html(二)html学习-干货之 html4+css2.0
一、元素类型
- 元素分类
- 置换和非置换元素
- 元素类型转换
二、css精灵
三、宽高自适应
- 宽度自适应
- 高度自适应
- 最小高度自适应
- 高度塌陷及解决办法
- 元素的高度自适应屏幕的高度
四、BEC概念应用
- 常见定位方案
- 触发BFC
- BFC特性及应用
- BFC概念
五、浏览器相关概述
- 主要浏览器及内核
- 浏览器常见兼容问题
六、css统筹及相关概念
- css继承
- 网页优化(SEO、搜索引擎优化)
- css重置
- 高级表单
- 高级表格
一、元素类型
1. 元素分类
元素类型有18种之多,但常用的类型只有4种。
(1)块元素(block):默认宽度和父框一样宽,强制换行,能设置宽高;
(2)行元素(inline):也叫“内联元素”。元素不能设置宽高,在一行显示,宽高由内容撑大;
(3)行内块元素(inline-block):在一行显示,并且能设置宽高,能设置宽高的行内元素;
(4)不显示元素(none 默认):鼠标滑过或点击显示,其余时间隐藏;
(5)列表元素(list-item):不常用。和块元素特性基本一样,只是能设置列表属性(比如list-style-type),只有 li 这个类型。
2. 置换和非置换元素
(1)置换元素:img、input、textarea、select;
特点:①不设置宽高,天生有宽高的元素;
②天生带有功能性的元素称为置换元素。
(2)其他的都是非置换元素。
3. 元素类型转换
通常布局下,我们块元素使用的多,行元素使用的少,但理想可使用的块元素相当的少,所以需要将很多行元素来转换成块元素使用。
(1)通过 display: 元素类型; 来转换。
元素类型可以是: block、inline、inline-block、none。
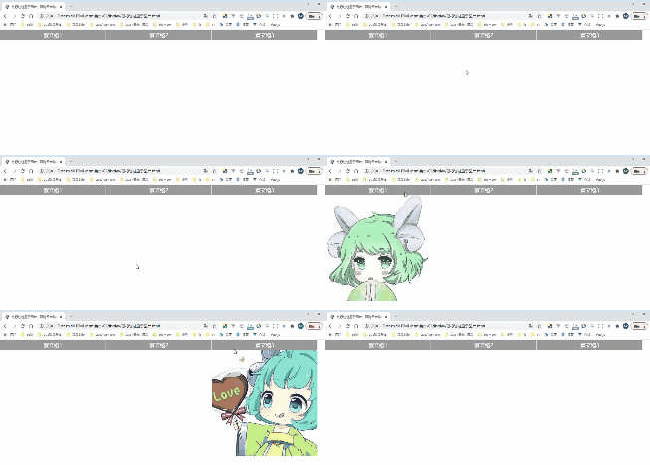
(2)案例
<style type="text/css">
  *{
      margin:0;padding:0}
  li{
      list-style-type: none;}
  ul{
      height: 440px;}
  li{
      float:left;width: 400px;height:40px;text-align: center;border: 1px solid #fff; font:20px/40px ""}
  li span{
      display: block;background: #999; color: #fff;}
  li img{
      display: none;width: 400px;height: 400px;}
  li:hover img{
      display: block;}
style>
<body>
  <ul>
    <li>
      <span>蔡文姬1span>
      <img src="../imgs/蔡蔡1.jpg" alt="">
    li>
    <li>
      <span>蔡文姬2span>
      <img src="../imgs/蔡蔡2.jpg" alt="">
    li>
    <li>
      <span>蔡文姬3span>
      <img src="../imgs/蔡蔡3.jpg" alt="">
    li>
  ul>
body>
二、css精灵
css 精灵又称 “图片整合”,
1. 优势:
(1) 减少对服务器的请求次数,从而提高页面加载速度;
(2)减少图片体积;
2. 劣势: 增加了开发人员的负担;
3. 使用:
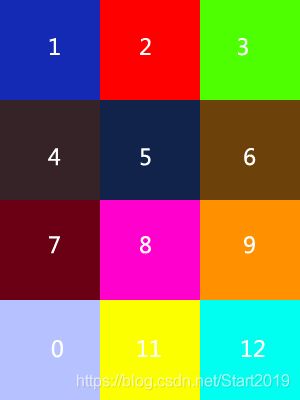
给元素定义一个 背景图,用background-position来实现应用,background-position经常为 负值。
  <style>
  *{
      margin:0; padding: 0;}
  ul{
      overflow: hidden;}
  ul li{

    float: left; list-style: none; width:100px; height: 100px; border:1px solid #000;
    margin-right: 10px;background: url(../imgs/position.png) no-repeat;
  }
  .li2{
      background-position: -200px 0;}
  .li3{
      background-position: -200px -200px;}

  .li4{
      background-position: 0 -200px;}
  .li5{
      background-position: -100px 0;}
  .li6{
      background-position: -100px 0;}
  .li7{
      background-position: 0 -100px;}

  .li8{
      background-position: -200px 0;}
  .li9{
      background-position: -200px -100px;}
  .li10{
      background-position: -100px -200px;}
  .li11{
      background-position: -100px -100px;}
style>
<body>
  <ul>
    <li class="li1">li>
    <li class="li2">li>
    <li class="li3">li>
    <li class="li4">li>
    <li class="li5">li>
    <li class="li6">li>
    <li class="li7">li>
    <li class="li8">li>
    <li class="li9">li>
    <li class="li10">li>
    <li class="li11">li>
  ul>
body>
三、宽高自适应
自适应: 元素的大小能够根据窗口或子元素自动调整。自适应能够使网页显示更灵活,可以适应在不同设备、不同窗口和不同分辨率下显示。
1. 宽度自适应
(1)块(子)元素在不设置宽度的情况下,width:auto;(默认);
子元素宽度 = 父元素的width;- 子元素设置了
padding、border、margin, 子元素的width = 父元素width - 子padding + 子border + 子margin;
(2)如果设置了宽度100%,width:100%;,那么 子元素width = 父元素width;
(3)口诀:
- ① 现在要书写的元素父子是否一样大,如果不是,就写。
- ② 子元素无法撑开父元素,就写宽度;
- ③ 多个子元素 = 父元素宽度时,父元素写宽度,子元素不写;
- ④ 唯一一个子元素和父元素一样大时,子元素设置宽度,父元素不写;
2. 高度自适应
(1)height:auto; 默认值,初始状态=0;
(2)子元素能撑开父元素的高度,如果父元素设置了固定高度,那么子元素就 无法撑开;
(3)如果元素本身有个最小高度,当内容区域超过最小高度时,父框就被撑大;
3. 最小高度自适应
(1)min-height: 最小高度;ie6不识别该属性,ie6中 height 其实就是 最小高度。
解决办法:{min-height:800px; _height:800px;}
(2)过滤器:
_属性 //只有ie6能识别。如:_height:value;
*属性 //只有ie6、7能识别。如:*height:value;
!important; //ie6不能识别。如:height:value !import;
4. 高度塌陷及解决办法
(1)伪元素选择符:ie8 以下不支持伪元素。
:after给最后一个子元素之后添加一个类似span标签的伪元素;:before给第一个子元素之前添加一个类似span标签的伪元素;:first-line给第一行文字设置样式;:first-letter给第一个字设置样式;
注意 :after 和 :before:
① 这两个伪元素必须添加 content:属性值; 否则伪元素无效 ;
② 这两个伪元素添加在 父级元素 身上;
(2)高度塌陷及解决办法:
① 给父元素足够高度;缺点:无法做到高度自适应;
② overflow:hidden; 自动检索子元素高度;缺点:溢出的部分(子元素超出父元素)会被隐藏;
③ clear:both; 清除左右浮动,让它前面所有浮动的兄弟元素都占文档流,并且保持横向结构。
通常在最后一个浮动元素之后添加一个块元素,这个块元素写样式 clear:both; 来清除浮动。
clear: left;清除左浮动,设置左浮动的块元素就占文档流了;clear: right;清除右浮动,设置左浮动的块元素就占文档流了;
<style>
  .box{
      width: 500px; border: 2px solid #000;}
  .left{
      float: left; width: 100px; height: 100px; background:#f99;}
  .right{
      float: right; width: 120px; height: 120px; background:#f80;}
  .clearx{
      clear: both;}
style>
<body>
  <div class="box">
    <div class="left">div>
    <div class="right">div>
    <div class="clearx">div>
  div>
body>
④ 万能清除法:配合第二种方式通过伪元素来实现
//zoom:1;一条解决ie疑难杂症(比如浮动)的神奇属性
// visibility: visible/hidden;可见/隐藏
//父元素:before{content: ""; display:table;} 解决第一个块元素 margin-top 向上传递问题。
父元素{
     zoom:1;}
父元素:after{
     display: block; content: ""; clear: both; visibility: hidden;}
父元素:before{
     content: ""; display:table;}
<style>
  .box{
      width: 500px; border: 2px solid #000;zoom:1;}
  .left{
      float: left; width: 100px; height: 100px; background:#f99;}
  .right{
      float: right; width: 120px; height: 120px; background:#f80;}
  .clearx:after{
      display: block; content: ""; clear: both; visibility: hidden;}
  .clearx:before{
      content: ""; display:table;}
style>
<body>
  <div class="box clearx">
    <div class="left">div>
    <div class="right">div>
  div>
body>
5. 元素的高度自适应屏幕的高度
如果想让元素高度和窗口高度一样那么就要设置:
html,body{height:100%;}
元素{height:100%;}
四、BFC概念应用
参考“林东洲”讲解
要想知道什么是“BFC”,我们先从自己熟悉的地方开始了解,再来解释什么叫做“BFC”。BFC 属于页面定位方案的“普通流”。
1. 常见定位方案
(1)普通流(normal flow)
在普通流中,元素按照其在 HTML 中的先后位置至上而下布局,在这个过程中,行内元素水平排列,直到当行被占满然后换行;块级元素则会被渲染为完整的一个新行。除非另外指定,否则所有元素默认都是普通流定位,也可以说,普通流中元素的位置由该元素在 HTML 文档中的位置决定。
(2)浮动 (float)
在浮动布局中,元素首先按照普通流的位置出现,然后根据浮动的方向尽可能的向左边或右边偏移,其效果与印刷排版中的文本环绕相似。
(3)绝对定位 (absolute positioning)
在绝对定位布局中,元素会整体脱离普通流,因此绝对定位元素不会对其兄弟元素造成影响,而元素具体的位置由绝对定位的坐标决定。
2. 触发 BFC
只要元素满足下面任一条件即可触发 BFC 特性:
(1)body 为根元素;
(2)浮动元素: float 除 none 以外的值;
(3)绝对定位元素:position(absolute、fixed);
(4)display 的属性值为 inline-block、table-cells、flex;
(5)overflow 除了 visible 以外的值 (hidden、auto、scroll)。
3. BFC 特性及应用
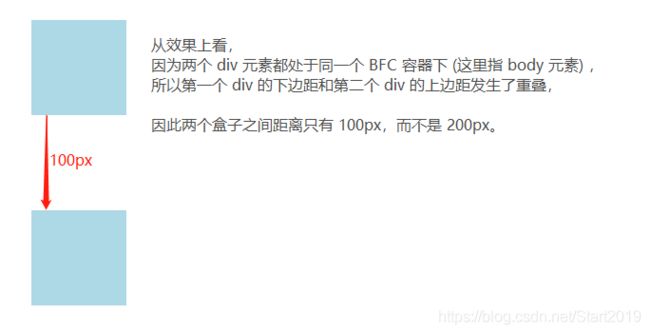
(1)同一个 BFC 下外边距会发生折叠:(具体可以查看 盒模型 margin 的坑)
<style>
div{

    width: 100px;
    height: 100px;
    background: lightblue;
    margin: 100px;
}
style>
<body>
    <div>div>
    <div>div>
body>
- 解决方法:如果想要避免外边距的重叠,可以将其放在不同的 BFC 容器中。
<style>
  .container {

    overflow: hidden;
  }
  p {

    width: 100px;
    height: 100px;
    background: lightblue;
    margin: 100px;
  }
style>
<body>

  <div class="container">
    <p>p>
  div>
  <div class="container">
    <p>p>
  div>
body>
(2)BFC 可以包含浮动的元素(清除浮动)
我们都知道,浮动的元素会脱离普通文档流,如果不给父元素高度,子元素会撑不开父元素,造成“高度塌陷”(可以查看 浮动 float 遇到的坑-高度塌陷)。来看下面一个例子:
<body>
  <div style="border: 1px solid #000;">
    <div style="width: 100px;height: 100px;background: #eee;float: left;">div>
  div>
body>
- 解决办法:如果使容器触发 BFC,那么容器将会包裹着浮动元素。
(3)BFC 可以阻止元素被浮动元素覆盖
相当于 浮动 float 遇到的坑-第5条 浮动元素不能与文本元素重合在一起,它会把文字挤出去;
<body>
  <div style="height: 100px;width: 100px;float: left;background: lightblue">
    我是一个左浮动的元素
  div>
  <div style="width: 200px; height: 200px;background: #eee">
    我是一个没有设置浮动, 也没有触发 BFC 元素, width: 200px; height:200px; background: #eee;
  div>
body>
- 解决办法:如果想避免元素被覆盖,可触第二个元素的 BFC 特性:在第二个元素中加入
overflow: hidden,或者margin-left:第一个元素的宽。
4. BFC 概念
了解上面的内容之后,我们对 BFC 就有一层理解了。
具有 BFC 特性的元素可以看作是隔离了的独立容器,容器里面的元素不会在布局上影响到外面的元素,并且 BFC 具有普通容器所没有的一些特性。
BFC(Block fomatting content)块级格式化上下文。是 w3c css2.1 规范中的一个概念。它是页面中的一块渲染区域,且有一套渲染规则,它决定了其子元素将如何定位,以及和其他元素的关系和相互作用。
五、浏览器相关概述
1. 主要浏览器及内核:
(1)IE浏览器: Trident;
(2)火狐Firefox浏览器: Gecko;
(3)原谷歌现苹果: Webkit;
(4)现在Opera和谷歌: Blink(由Google和Opera 开发的浏览器排版引擎);
(5)原Opera: Presto(迅速的,但是缺乏兼容性);
2. 浏览器常见的兼容问题
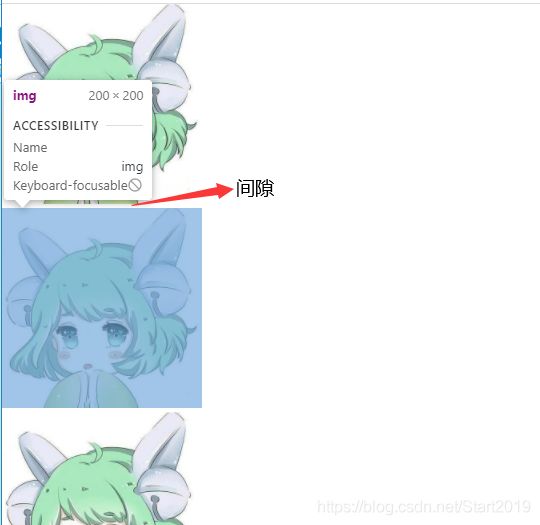
(1)图片间隙:
描述: 在 div 中插入图片时,图片会将 div 下方撑大 3px ;该 bug 出现在 ie6 及更低版本中。
- hack: 将
display:block;
(2)dt,li 中图片间隙
- hack:给
display:block;
<style>
  *{
      padding: 0; margin: 0;}
  ul li{
      list-style: none;}
  img{
      width: 200px;height: 200px;}
style>
<ul>
  <li><img src="../imgs/蔡蔡1.jpg" alt="" srcset="">li>
  <li><img src="../imgs/蔡蔡1.jpg" alt="" srcset="">li>
  <li><img src="../imgs/蔡蔡1.jpg" alt="" srcset="">li>
ul>
(3)双倍外边距:
描述: 当 ie6及更低版本浏览器 在解析浮动元素时,会错误地把浮向边边界加倍显示。
产生条件: 块元素 、浮动、 贴边、 左右边距;
- hack: 给浮动元素添加声明:
display:inline;
(4)默认高度:
描述: 在IE6及以下版本中,部分块元素拥有默认高度(低于18px高度);
- hack1: 给元素添加声明:
font-size:0; - hack2: 给元素添加声明:
overflow:hidden;
(5)表单元素和按钮不在一行显示:
产生原因: 按钮元素的 value 为空("");

<style>
  *{
      margin:0;padding:0;}
  input{
       height:40px; width: 180px;padding:5px;}
style>
<body>
  <input type="text" name="" id="" />
  <input type="button"  value="" />
body>
- hack:给表单元素添加声明:
float: left或者vertical-align: top/middle/bttom;
注意:使用vertical-align会让两个表单元素产生 5px 空格,但是float:left不会。
<style>
  *{
      margin:0;padding:0;}
  input{
       height:40px; width: 180px;padding:5px;float:left;}
style>
<body>
  <input type="text" name="" id="" />
  <input type="button"  value="" />
body>
(6)表单元素和按钮元素默认大小不一致:
产生原因: 按钮元素的 padding 和 border 大小会算在 width、height 里面;

<style>
  *{
      margin:0;padding:0;}
  input{
       height:40px; width: 180px;padding:5px;}
style>
<body>
  <input type="text" name="" id="" />
  <input type="submit"  value="按钮" />
body>
- hack:给按钮设置成标准盒模型模式,或者计算出按钮的宽高。
最好给表单元素加上vertical-align:top;,否则表单顶部会产生 1px 间隙。
<style>
  *{
      margin:0;padding:0;}
  input{
       height:40px; width: 180px;padding:5px;vertical-align:top;}
  .sub{
      height: 54px;}
style>
<body>
  <input type="text" name="" id="" />
  <input type="submit"  value="按钮" class="sub"/>
body>
(7)鼠标指针bug:
描述: cursor 属性的 hand 属性值只有IE浏览器识别,其它浏览器不识别该声明,cursor 属性的 pointer 属性值IE6.0以上版本及其它内核浏览器都识别该声明。
- hack: 如统一某元素鼠标指针形状为手型,应添加声明:
cursor:pointer;
(8)透明属性:
IE8以下浏览器写法: filter:alpha(opacity=value); 取值范围 0-100;
兼容其他浏览器写法:opacity:.value;(value的取值范围0-1,0.1,0.2,0.3-----0.9);
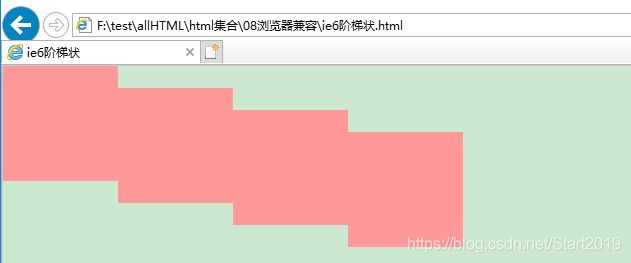
(9)a显示成阶梯状
描述: 当LI里的 转成块元素时,给A写浮动属性后,IE6里会错误的将列表项显示成阶梯状;
<style>
  *{
      margin:0; padding:0}
  ul li{
      list-style: none;}
style>
<body>
  <ul>
    <li>
      <a href="#">1a>
      <a href="#">2a>
      <a href="#">3a>
      <a href="#">4a>
    li>
  ul>
body>
六、css统筹及相关概念
更多可参考:https://www.cnblogs.com/wzndkj/p/7813054.html
1. css继承
和文本有关 的属性通常都有继承性:color,font,line-height,text-aligh 等。
2. 网页优化(SEO、搜索引擎优化)
(1)关键词:
关键词分割可以用 “,”、“|”、“”,多个关键词时最好统一用一种分隔符。
描述:
(3)超链接优化
- 采用纯文本连接少用,最好是别用 Flash 动画设置连接,因为搜索引擎无法识别 Flash 上的文字;
- 最好别使用图片热点连接;
(4)图片优化
使用 alt 属性,title 属性。
(5)页面优化
- 尽量不要使用h1、h2,若有需要,一个页面 h1 和 h2 表签分别控制出现 1个和2个。
- 搜索引擎不喜欢太大体积的页面,控制在 100Kb 内为佳;
3. css重置
(1)css规范
- 命名方法(语义化命名,结构化命名);
- ID:结构化:
#header、#footer; - class:
.border0、. red、.font12、.clear;
(2)css命名规则:
- 建议使用小写字母;
- 以英文字母开头,后面可以连接数字、字母、下划线、连接线,建议尽量使用英文字母,适当使用下划线和连接线;
- 词必达意,同时要简短。
4. 高级表单
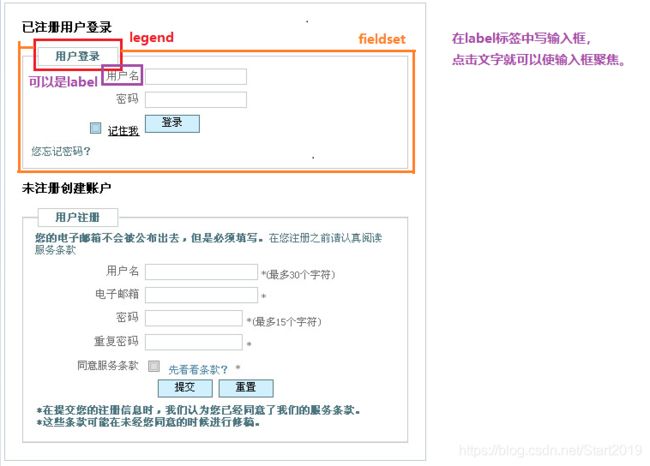
(1)表单字段集: ;fieldset 常与 legend 配合使用,对表单进行分组;
(2)字段集标题:;
(3)表单元素:
上传文件,默认样式不可修改,且在不同浏览器中显示的样式也不相同;图片域,把提交按钮变成图片的样子。不常用这个,常在submit 按钮中添加背景图;隐藏输入框及内容(常用于传值,但是又不想在页面上显示出来)
(4)提示信息标签:;
label 标签是 行元素,label 中的内容可以是 input 输入框(常用于:type="radio/checkbox"),此时不需要 for 属性。
使用示范:
<fieldset>表单字段集fieldset>


<legend>字段集标题legend>


<fieldset>
  <legend>表单字段集和字段集标题配合使用legend>
fieldset>
<fieldset>
  <legend>表单字段集和字段集标题配合使用legend>
  <input type="file">
  <input type="image" src="../imgs/蔡蔡1.jpg" style="width: 100px; height: 100px;">
  <input type="hidden">
fieldset>


<fieldset>
  <legend>label绑定file输入框legend>
  <label>内容label>


  <label for="upload" style="cursor: pointer;border:1px solid #f99;background: #9f9">点击上传label>
  <input type="file" id="upload" style="display: none;"/>


  <label><input type="radio" name="sex">男label>
  <label><input type="radio" name="sex">女label>
fieldset>
5. 高级表格
<style>
  table{
      width:260px;border:1px solid red;}
  td{
      border:1px solid green;}
style>

<table>
  <tr>
    <td>1td>
    <td>2td>
    <td>3td>
  tr>
  <tr>
    <td>1td>
    <td>2td>
    <td>3td>
  tr>
  <tr>
    <td>1td>
    <td>2td>
    <td>3td>
  tr>
table>
(1)单元格与单元格之间的间距 border-spacing:value;
默认有 2px 的边距,设置为 0 ,边框粗细会变成 2px ;写给table的css样式,效果类似 cellspacing。

<style>
  table{
      width:260px;border:1px solid red;border-spacing:0;}
  td{
      border:1px solid green;}
style>
(2)合并相邻单元格边框border-collapse: separate(默认边框分开)/collapse(边框合并)
td合并在一起后边框会是 2px,若想变成1px,可以用该属性合并边框。写给table的css样式。

<style>
  table{
      width:260px;border:1px solid red;border-collapse:collapse;}
  td{
      border:1px solid green;}
style>
(3)无内容单元格显示、隐藏: empty-cells:show(默认)/hide;
写给 table 的css样式,隐藏时还包括了这个 td 身上的 css 样式。

<style>
  table{
      width:260px;border:1px solid red;empty-cells: hide;}
  td{
      border:1px solid green;}
style>

<table>
  <tr>
    <td>1td>
    <td>2td>
    <td>td>
  tr>
  <tr>
    <td>1td>
    <td>2td>
    <td>3td>
  tr>
  <tr>
    <td>1td>
    <td>2td>
    <td>3td>
  tr>
table>
(4)表格布局: table-layout:auto(默认,给 td 设置的宽度无效)/fixed(固定宽度,不会随内容多少改变单元格宽度);
- 自动表格布局(auto): 列的宽度是由列单元格中没有折行的最宽的内容设定的;
缺点: 较慢(因为他需要在确定最终的布局访问表格中的所有内容)。
优点: 灵活; - 固定表格布局(fixed):
优点: 加快运行速度,允许浏览器更快的对表格进行布局;
缺点: 不太灵活。

<table>
  <caption>表格标题caption>
  <tr>
    <td>1td>
    <td>2td>
    <td>3td>
  tr>
  <tr>
    <td>1td>
    <td>2td>
    <td>3td>
  tr>
  <tr>
    <td>1td>
    <td>2td>
    <td>3td>
  tr>
table>
(6)表格布局元素:
- 表格列标题:
- 垂直对齐方式:
valign="top/bottom/middle/baseline(默认)";
th、td在垂直方向上的位置,直接写在 tr 标签中。

<style>
*{
      margin:0;padding:0;}
table{
      width:460px;border:1px solid red; }
td{
      border:1px solid green;}
.valign{
      height: 300px;font-size:18px;}
.valign th{
      font-size: 28px;border:1px solid green;}
style>
<table class="valign">
  <caption>valign的使用caption>
  <tr>
    <td>1td>
    <th>2th>
    <td>3td>
  tr>
  <tr valign="baseline">
    <td>1td>
    <th>2th>
    <td>3td>
  tr>
  <tr valign="top">
    <td>1td>
    <th>2th>
    <td>3td>
  tr>
  <tr valign="middle">
    <td>1td>
    <th>2th>
    <td>3td>
  tr>
  <tr valign="bottom">
    <td>1td>
    <th>2th>
    <td>3td>
  tr>
table>
<style>
  *{
      margin:0; padding:0;}
  table{
      width: 300px; height: 150px; border:1px solid #f00; margin:20px;float: left;}
style>

<table rules="none">
  <caption>rules="none"caption>
  <tr>
    <td>1td>
    <td>2td>
    <td>3td>
    <td>4td>
    <td>5td>
  tr>
  <tr>
    <td>1td>
    <td>2td>
    <td>3td>
    <td>4td>
    <td>5td>
  tr>
  <tr>tr>
table>

  table>


<table rules="groups">
  <caption>rules="groups"caption>
  <thead>
    <tr>
      <td>1td>
      <td>2td>
      <td>3td>
      <td>4td>
      <td>5td>
    tr>
  <tr>
    <td>1td>
    <td>2td>
    <td>3td>
    <td>4td>
    <td>5td>
  tr>
thead>
  <tr>
    <td>1td>
    <td>2td>
    <td>3td>
    <td>4td>
    <td>5td>
  tr>
  <tr>
    <td>1td>
    <td>2td>
    <td>3td>
    <td>4td>
    <td>5td>
  tr>
  <tr>
    <td>1td>
    <td>2td>
    <td>3td>
    <td>4td>
    <td>5td>
  tr>
table>
(7)表格行分组
<table rules="groups">
  <caption>colgroup的使用caption>
  <colgroup>colgroup>
  <colgroup span="3">colgroup>
  <thead>
    <tr>
      <td>1td>
      <td>2td>
      <td>3td>
      <td>4td>
      <td>5td>
    tr>
  <tr>
    <td>1td>
    <td>2td>
    <td>3td>
    <td>4td>
    <td>5td>
  tr>
thead>
  <tr>
    <td>1td>
    <td>2td>
    <td>3td>
    <td>4td>
    <td>5td>
  tr>
  <tr>
    <td>1td>
    <td>2td>
    <td>3td>
    <td>4td>
    <td>5td>
  tr>
  <tr>
    <td>1td>
    <td>2td>
    <td>3td>
    <td>4td>
    <td>5td>
  tr>
table>
相关HTML部分笔试、面试题
上一篇: html(一)html学习-干货之 html4+css2.0
下一篇:html(一)html学习-干货之 html5+css3
