移动端星级评分效果的实现
星级评分在网页当中是经常用到的,今天特地用原生的JS实现了在移动端中的星级评分效果。由于在移动端中是没有鼠标事件的,所以在移动端中的星级评分效果的实现方式要与pc端稍微有点不同,就是要把相应的事件转成移动端的事件。
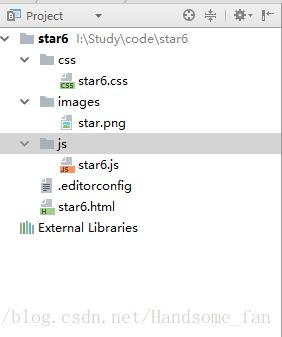
星级评分的目录结构如下:

图片资源也很简单:
![]()
星级评分的html结构很简单:
<html>
<head>
  <meta charset="UTF-8" />
  <meta name="viewport" content="width=device-width,initial-scale=1.0, maximum-scale=1.0, user-scalable=0"/>
  <meta name="apple-mobile-web-app-capable" content="yes"/>
  <meta name="apple-mobile-web-app-status-bar-style" content="black"/>
  <meta http-equiv="pragma" content="no-cache"/>
  <title>移动星级评分title>
  <meta name="format-detection" content="telephone=no,email=no"/>
  <meta name="applicable-device" content="mobile"/>
  <link rel="stylesheet" href="./css/star6.css" />
head>
<body>
<div class="wrap">
  <div class="star-out" data-score="4.0">
    <p class="star-score">p>
  div>
div>
<script src="./js/star6.js">script>
body>
html>html中data-score属性是为了保存评分数据,传给后台用的。
css代码如下:
/*标签样式初始化*/
a, abbr, acronym, address, applet, article, aside, audio, b, big, blockquote, body, canvas, caption, center, cite, code, dd, del, details, dfn, div, dl, dt, em, embed, fieldset, figcaption, figure, footer, form, h1, h2, h3, h4, h5, h6, header, hgroup, html, i, iframe, img, ins, kbd, label, legend, li, mark, menu, nav, object, ol, output, p, pre, q, ruby, s, samp, section, small, span, strike, strong, sub, summary, sup, table, tbody, td, tfoot, th, thead, time, tr, tt, u, ul, var, video{
  margin: 0;
  padding: 0;
  border: 0;
  font: inherit;
  vertical-align: baseline;
  word-wrap:break-word;
}
input{
  white-space:nowrap;
}
input:-webkit-autofill {
  -webkit-box-shadow: 0 0 0px 1000px #fff inset;
}
*{
  background-repeat: no-repeat;
  -webkit-tap-highlight-color:rgba(0,0,0,0);
}
ul,li,ol{
  list-style: none;
}
img{
  border: none;
  -webkit-tap-highlight-color:rgba(0,0,0,0);
}
html, body{
  height: 100%;
  font-family: "微软雅黑";
  color: #303445;
}
a{
  text-decoration: none;
  border: none;
  outline: none;
  color: #303445;
  tap-highlight-color: rgba(0,0,0,0);
  focus-ring-color: rgba(0, 0, 0, 0);
  -webkit-tap-highlight-color: rgba(0,0,0,0);
  -webkit-focus-ring-color: rgba(0, 0, 0, 0);
  -moz-tap-highlight-color: rgba(0,0,0,0);
  -moz-focus-ring-color: rgba(0, 0, 0, 0);
}
a:visited{
  color: inherit;
}
input,button{
  outline: none;
}
/*响应式布局*/
@media only screen and (min-width: 320px) {
  html{ font-size: 50px;}
}
@media only screen and (min-width: 360px) {
  html{ font-size: 56.25px;}
}
@media only screen and (min-width: 375px) {
  html{ font-size: 58.59px;}
}
@media only screen and (min-width: 400px) {
  html{ font-size: 62.5px;}
}
@media only screen and (min-width: 414px) {
  html{ font-size: 64.68px;}
}
@media only screen and (min-width: 640px) {
  html{ font-size: 100px;}
}
@media only screen and (min-width: 768px) {
  html{ font-size: 120px;}
}

.wrap {
  margin: 50px auto;
  display: flex;
  justify-content: center;
}

.wrap .star-out {
  height: 33px;
  width: 165px;
  background: url("../images/star.png");
  cursor: pointer;
  display: inline-block;
  font-size: 0;
}

.wrap .star-score {
  width: 132px;
  height: 33px;
  background: url("../images/star.png") 0 72px;
}
我们先用面向过程的方法实现其中的js逻辑:
window.onload = function () {


  function bind(obj, ev, fn) {

    if (obj.addEventListener) {
      obj.addEventListener(ev, fn, false);
    } else {
      obj.attachEvent('on' + ev, function() {

        fn.call(obj);
      });
    }
  }

  var oStarOut = document.querySelector('.star-out');
  var oStarScore = document.querySelector('.star-score');
  var totalWidth = 165; // 星级评分组件总宽度
  var fraction = 0.0; // 分数

  bind(oStarOut, 'touchend', function (e) {

    // 鼠标点与星级评分组件左端的距离
    var oDis =  e.changedTouches[0].pageX - e.srcElement.offsetLeft;
    var newScore = (oDis / totalWidth).toFixed(2);
    if (newScore > 0.00 && newScore <= 0.20) {
      newScore = 0.20;
      fraction = (5 * newScore).toFixed(1); // 1.0分
    }

    if (newScore > 0.20 && newScore <= 0.40) {
      newScore = 0.40;
      fraction = (5 * newScore).toFixed(1); // 2.0分
    }

    if (newScore > 0.40 && newScore <= 0.60) {
      newScore = 0.60;
      fraction = (5 * newScore).toFixed(1); // 3.0分
    }

    if (newScore > 0.60 && newScore <= 0.80) {
      newScore = 0.80;
      fraction = (5 * newScore).toFixed(1); // 4.0分
    }

    if (newScore > 0.80 && newScore <= 1) {
      newScore = 1;
      fraction = (5 * newScore).toFixed(1); // 5.0分
    }

    var starWidth = Math.floor(newScore * totalWidth);

    oStarScore.style.width = starWidth + 'px';
    oStarOut.setAttribute('data-score', fraction);

  });

};
然后,为了方便代码的复用,我们要将以上的代码封装成js模块:
window.onload = function () {

  var starModule = (function () {


    var oStarOut = document.querySelector('.star-out');
    var oStarScore = document.querySelector('.star-score');
    var totalWidth = 165; // 星级评分组件总宽度
    var fraction = 0.0; // 分数

    var bind = function (obj, ev, fn) {

      if (obj.addEventListener) {
        obj.addEventListener(ev, fn, false);
      } else {
        obj.attachEvent('on' + ev, function() {

          fn.call(obj);
        });
      }
    };

    var star = bind(oStarOut, 'touchend', function (e) {

      // 鼠标点与星级评分组件左端的距离
      var oDis =  e.changedTouches[0].pageX - e.srcElement.offsetLeft;
      var newScore = (oDis / totalWidth).toFixed(2);
      if (newScore > 0.00 && newScore <= 0.20) {
        newScore = 0.20;
        fraction = (5 * newScore).toFixed(1); // 1.0分
      }

      if (newScore > 0.20 && newScore <= 0.40) {
        newScore = 0.40;
        fraction = (5 * newScore).toFixed(1); // 2.0分
      }

      if (newScore > 0.40 && newScore <= 0.60) {
        newScore = 0.60;
        fraction = (5 * newScore).toFixed(1); // 3.0分
      }

      if (newScore > 0.60 && newScore <= 0.80) {
        newScore = 0.80;
        fraction = (5 * newScore).toFixed(1); // 4.0分
      }

      if (newScore > 0.80 && newScore <= 1) {
        newScore = 1;
        fraction = (5 * newScore).toFixed(1); // 5.0分
      }

      var starWidth = Math.floor(newScore * totalWidth);

      oStarScore.style.width = starWidth + 'px';
      oStarOut.setAttribute('data-score', fraction);

    });

    return {
      star: star
    };

  })();

  starModule.star;

};