(企业运维5)SaltStack使用(全)
saltstack
- 前言
- 一、saltstack部署
- 二、saltstack远程执行
-
- salt远程执行单条shell命令
- 编写远程执行模块(相当于shell脚本)
- 了解YAML语法
- 配置管理
- salt判断发布文件修改标准 MD5
- 三、grains和pillar
-
- 3.1 grains
-
- 3.1.1 grains的基本设置
- 3.1.2 编写grains模块
- 3.1.3 grains匹配运用
- 3.1.4 安装nginx
- 3.2 pillar
-
- 3.2.1 自定义pillar项
- 3.2.2 pillar数据匹配
- 3.2.3 saltstack推keepalived
- 四 Jinja模板
-
- 4.1 Jinja模板使用方式
- 4.2 引用变量
- 4.3 推zabbix-server
-
- 4.3.1 设置数据库
- 4.3.2 设置zabbix-server
- 五、JOB 管理
-
- 5.1 minimon客户端设置数据上传数据库
- 5.2 master服务端设置数据上传数据库
- 六、salt-ssh(备用)
- 七、salt-syndic
-
- 7.1 salt-syndic简介
- 7.2 salt-syndic图解
- 7.3 salt-syndic配置
- 八 、salt-api
-
- 8.1 salt-api简介
- 8.2 salt-api配置
- 8.3 salt-api使用
前言
saltstack介绍请看企业运维5-第1篇博客:(企业运维5)SaltStack介绍
本篇博客使用红帽7.6系统作为实验平台,深入浅出学习saltstack的使用,可以和ansible相关文章作对比,是运维人员的又一手好工具。
一、saltstack部署
-
salt和ansible的架构不同,salt是C-S架构,minion与master之间通过ZeroMQ消息队列通信,默认监听4505端口;所以服务器,客户机上都需要安装相应软件。

-
客户与服务机需配置yum仓库,有官网和阿里云的,国内阿里云速度会快些,你懂的!
-
服务机安装salt-master.noarch;客户机安装salt-minion.noarch
-
配置相应配置文件
-
启动服务测试
配置官方yum源可能会比较慢
yum install https://repo.saltstack.com/yum/redhat/salt-repo-latest.el7.noarch.rpm
配置阿里云yum源 推荐
阿里云官网salt镜像配置方法
cat /etc/yum.repos.dlt-3000.repo
[salt-3000]
name=SaltStack 3000 Release Channel for Python 2 RHEL/Centos $releasever
baseurl=https://mirrors.aliyun.com/saltstack/yum/redhat/7/$basearch/3000  #这里是阿里云
failovermethod=priority
enabled=1
gpgcheck=0
gpgkey=file:///etc/pki/rpm-gpgltstack-signing-key, file:///etc/pki/rpm-gpg/centos7-signing-key

master端配置:
yum install -y salt-master.noarch  #服务机安装master
systemctl enable --now  salt-master.service

minion端配置
yum install -y salt-minion.noarch  #客户机安装minion

vim /etc/salt/minion  #配置客户机
master: 1.2.3.1   #需要指定主机IP

systemctl enable --now salt-minion  #启动客户机服务

master端执行命令允许minion连接
salt-key -L  ## 列出minion端
salt-key -A  ## 允许minion连接

lsof -i :4505   #查看端口是否被监听

master端测试与minion端的连接:
salt '*' test.ping #
二、saltstack远程执行
salt远程执行单条shell命令
Salt命令由三个主要部分构成:
salt '' <function> [arguments]
target: 指定哪些minion, 默认的规则是使用glob匹配minion id.
# salt '*' test.ping
Targets也可以使用正则表达式:
# salt -E 'server[1-3]' test.ping
Targets也可以指定列表:
# salt -L 'server2,server3' test.ping

funcation是module提供的功能,Salt内置了大量有效的functions.
# salt '*' cmd.run 'uname -a'
arguments通过空格来界定参数:
# salt 'server2' sys.doc pkg			#查看模块文档
# salt 'server2' pkg.install httpd
# salt 'server2' pkg.remove httpd
salt内置的执行模块列表:
http://docs.saltstack.cn/ref/modules/all/index.html
编写远程执行模块(相当于shell脚本)
编辑master配置文件:
 vim /etc/salt/master
file_roots:
  base:
    - /srv/salt
重启master服务:
 systemctl restart salt-master

创建模块目录:
 mkdir /srv/salt/_modules
编写模块文件:
 vim /srv/salt/_modules/mydisk.py
def df():
    return __salt__['cmd.run']('df -h')
同步模块:
 salt server2 saltutil.sync_modules

运行模块:
 salt server2 mydisk.df
默认不用改
salt server2 saltutil.sync_modules

了解YAML语法
规则一: 缩进
Salt需要每个缩进级别由两个空格组成,不要使用tabs。
规则二: 冒号
字典的keys在YAML中的表现形式是一个以冒号结尾的字符串。
my_key: my_value
规则三: 短横杠
想要表示列表项,使用一个短横杠加一个空格。
 - list_value_one
 - list_value_two
配置管理
Salt 状态系统的核心是SLS,或者叫SaLt State 文件。
SLS表示系统将会是什么样的一种状态,而且是以一种很简单的格式来包含这些数据,常被叫做配置管理。
sls文件命名:
sls文件以”.sls”后缀结尾,但在调用是不用写此后缀。
使用子目录来做组织是个很好的选择。
init.sls 在一个子目录里面表示引导文件,也就表示子目录本身, 所以apache/init.sls 就是表示apache.
如果同时存在apache.sls 和 apache/init.sls,则 apache/init.sls 被忽略,apache.sls将被用来表示 apache.
创建一个sls文件:
 vim /srv/salt/apache.sls
httpd:                 	# ID声明
  pkg:                  	# 状态声明
    - installed           	# 函数声明

指定主机执行:
 salt server2 state.sls apache

准备Top文件:
 vim /srv/salt/top.sls
base:
  '*':
    - apache
批量执行:
 salt '*' state.highstate
实验一:远程安装apache
mkdir -p  /srv/salt/apache
cd /srv/salt/apache/

vim install.sls
pache:
  pkg.installed:
    - pkgs:
      - httpd
      - php
      - php-mysql

  file.managed:
    - source: salt://apache/files/index.html
    - name: /var/www/html/index.html

  service.running:
    - name: httpd
    - enable: true
    - watch:
      - file: apache

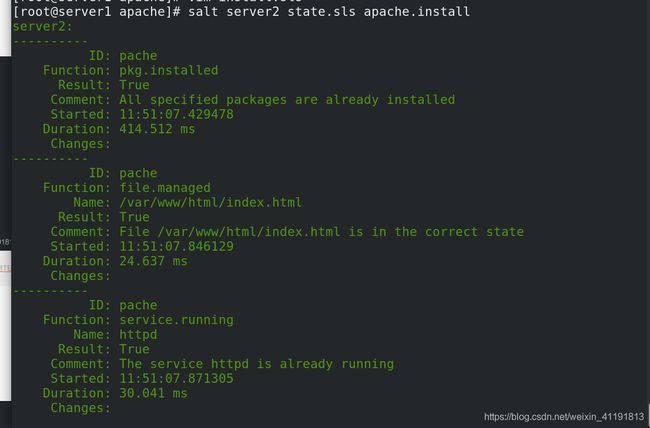
salt server2 state.sls apache.install
实验二:修改httpd端口
salt判断发布文件修改标准 MD5
md5sum apache/files/index.html
6da99bf010458b793d2a2d9755b3b518  apache/files/index.html
服务机和客户机md5码保持一致,如果修改就会被salt更改,未修改不做更改显示成功

三、grains和pillar
3.1 grains
Grains是SaltStack的一个组件,存放在SaltStack的minion端。
当salt-minion启动时会把收集到的数据静态存放在Grains当中,只有当minion重启时才会进行数据的更新。
由于grains是静态数据,因此不推荐经常去修改它。
应用场景:
信息查询,可用作CMDB。
在target中使用,匹配minion。
在state系统中使用,配置管理模块。
3.1.1 grains的基本设置
信息查询
salt server2 grains.ls
salt server2 grains.items
salt server2 grains.item ipv4
salt server2 grains.item fqdn
在server2客户机主配置文件上添加grains,需要重启服务
  vim /etc/salt/minion
  grains:
  roles:
    - apache
    - httpd

  systemctl restart salt-minion.service

在server2客户机/etc/salt下添加grains文件,不需要重启服务,同步即可

在/etc/salt/grains中定义:
  vim /etc/salt/grains:
  deployment:  datacenter1
同步数据:
  salt server2 saltutil.sync_grains
查询自定义项:
  salt server2 grains.item deployment
3.1.2 编写grains模块
在salt-master端创建_grains目录:
mkdir /srv/salt/_grains
vim /srv/salt/_grains/my_grain.py
def my_grain():
    grains = {
     }
    grains['roles'] = 'nginx'
    grains['hello'] = 'world'
    return grains

salt '*' saltutil.sync_grains	#同步grains到minion端
3.1.3 grains匹配运用
在target中匹配minion:
# salt -G roles:apache cmd.run hostname
在top文件中匹配:
# vim /srv/salt/top.sls
base:
  'roles:apache':
    - match: grain
    - apache.install
3.1.4 安装nginx
路径:/srv/salt/nginx
[root@server1 nginx]# tree
.
├── files
│ ├── nginx-1.18.0.tar.gz
│ ├── nginx.conf
│ └── nginx.service
├── init.slscd
└── install.sls
[root@server1 nginx]# cat init.sls
include:
  - nginx.install

/usr/local/nginx/conf/nginx.conf:
  file.managed:
    - source: salt://nginx/files/nginx.conf

nginx-service:
  user.present:
    - name: nginx
    - shell: /sbin/nologin
    - home: /usr/local/nginx
    - createhome: false
  file.managed:
    - source: salt://nginx/files/nginx.service
    - name: /usr/lib/systemd/system/nginx.service
  service.running:
    - name: nginx
    - enable: true
    - reload: true
    - watch:
      - file: /usr/local/nginx/conf/nginx.conf
[root@server1 nginx]# cat install.sls
nginx-install:
  pkg.installed:
    - pkgs:
      - gcc
      - pcre-devel
      - openssl-devel
  file.managed:
    - source: salt://nginx/files/nginx-1.18.0.tar.gz
    - name: /mnt/nginx-1.18.0.tar.gz
  cmd.run:
    - name: cd /mnt && tar zxf nginx-1.18.0.tar.gz && cd nginx-1.18.0 && ./configure --prefix=/usr/local/nginx --with-http_ssl_module &> /dev/null && make &> /dev/null && make install &> /dev/null
    - creates: /usr/local/nginx
[root@server1 files]# cat nginx.conf

#user  nobody;
worker_processes  1;

#error_log  logs/error.log;
#error_log  logs/error.log  notice;
#error_log  logs/error.log  info;

#pid        logs/nginx.pid;


events {

    worker_connections  1024;
}


http {

    include       mime.types;
    default_type  application/octet-stream;

    #log_format  main  '$remote_addr - $remote_user [$time_local] "$request" '
    #                  '$status $body_bytes_sent "$http_referer" '
    #                  '"$http_user_agent" "$http_x_forwarded_for"';

    #access_log  logs/access.log  main;

    sendfile        on;
    #tcp_nopush     on;

    #keepalive_timeout  0;
    keepalive_timeout  65;

    #gzip  on;

    server {

        listen       80;
        server_name  localhost;

        #charset koi8-r;

        #access_log  logs/host.access.log  main;

        location / {

            root   html;
            index  index.html index.htm;
        }

        #error_page  404              /404.html;

        # redirect server error pages to the static page /50x.html
        #
        error_page   500 502 503 504  /50x.html;
        location = /50x.html {

            root   html;
        }

        # proxy the PHP scripts to Apache listening on 127.0.0.1:80
        #
        #location ~ \.php$ {

        #    proxy_pass   http://127.0.0.1;
        #}

        # pass the PHP scripts to FastCGI server listening on 127.0.0.1:9000
        #
        #location ~ \.php$ {

        #    root           html;
        #    fastcgi_pass   127.0.0.1:9000;
        #    fastcgi_index  index.php;
        #    fastcgi_param  SCRIPT_FILENAME  /scripts$fastcgi_script_name;
        #    include        fastcgi_params;
        #}

        # deny access to .htaccess files, if Apache's document root
        # concurs with nginx's one
        #
        #location ~ /\.ht {

        #    deny  all;
        #}
    }


    # another virtual host using mix of IP-, name-, and port-based configuration
    #
    #server {

    #    listen       8000;
    #    listen       somename:8080;
    #    server_name  somename  alias  another.alias;

    #    location / {

    #        root   html;
    #        index  index.html index.htm;
    #    }
    #}


    # HTTPS server
    #
    #server {

    #    listen       443 ssl;
    #    server_name  localhost;

    #    ssl_certificate      cert.pem;
    #    ssl_certificate_key  cert.key;

    #    ssl_session_cache    shared:SSL:1m;
    #    ssl_session_timeout  5m;

    #    ssl_ciphers  HIGH:!aNULL:!MD5;
    #    ssl_prefer_server_ciphers  on;

    #    location / {

    #        root   html;
    #        index  index.html index.htm;
    #    }
    #}

}
[root@server1 files]# cat nginx.service
[Unit]
Description=The NGINX HTTP and reverse proxy server
After=syslog.target network.target remote-fs.target nss-lookup.target

[Service]
Type=forking
PIDFile=/usr/local/nginx/logs/nginx.pid
ExecStartPre=/usr/local/nginx/sbin/nginx -t
ExecStart=/usr/local/nginx/sbin/nginx
ExecReload=/usr/local/nginx/sbin/nginx -s reload
ExecStop=/bin/kill -s QUIT $MAINPID
PrivateTmp=true

[Install]
WantedBy=multi-user.target
3.2 pillar
参考官网手册pillar
pillar和grains一样也是一个数据系统,但是应用场景不同。
pillar是将信息动态的存放在master端,主要存放私密、敏感信息(如用户名密码等),而且可以指定某一个minion才可以看到对应的信息。
pillar更加适合在配置管理中运用。
3.2.1 自定义pillar项
vim /srv/pillar/top.sls
base:
  '*':
    - packages

vim /srv/pillar/apache.sls
{
     % if grains['fqdn'] == 'server3' %}
package: httpd
{
     % elif grains['fqdn'] == 'server2' %}
package: mairadb
{
     % endif %}

刷新pillar数据:
salt '*' saltutil.refresh_pillar
查询pillar数据:
salt '*' pillar.items
salt '*' grains.item  roles
3.2.2 pillar数据匹配
命令行中匹配:
# salt -I 'roles:apache' test.ping
state系统中使用:
# vim /srv/salt/apache.sls
apache:
  pkg.installed:
    - name: {
     {
      pillar['package'] }}
3.2.3 saltstack推keepalived
server2为master server3为backup
路径:/srv/salt/keepalived
[root@server1 keepalived]# tree
.
├── files
│ └── keepalived.conf
└── init.sls
[root@server1 keepalived]# cat init.sls
kp-install:
  pkg.installed:
    - name: keepalived
  file.managed:
    - name: /etc/keepalived/keepalived.conf
    - source: salt://keepalived/files/keepalived.conf
    - template: jinja
    - context:
      STATE: {
     {
      pillar['state'] }}
      VRID: {
     {
      pillar['vrid'] }}
      PRI: {
     {
      pillar['pri'] }}
  service.running:
    - name: keepalived
    - enable: true
    - reload: true
    - watch:
      - file: kp-install
[root@server1 keepalived]# cat files/keepalived.conf
! Configuration File for keepalived

global_defs {

   notification_email {

     [email protected]
     [email protected]
     [email protected]
   }
   notification_email_from [email protected]
   smtp_server 192.168.200.1
   smtp_connect_timeout 30
   router_id LVS_DEVEL
   vrrp_skip_check_adv_addr
#   vrrp_strict
   vrrp_garp_interval 0
   vrrp_gna_interval 0
}

vrrp_instance VI_1 {

    state MASTER
    interface eth0
    virtual_router_id {
     {
      VRID }}
    priority {
     {
      PRI }}
    advert_int 1
    authentication {

        auth_type PASS
        auth_pass 1111
    }
    virtual_ipaddress {

        1.2.3.100
    }
}

#
四 Jinja模板
Jinja是一种基于python的模板引擎,在SLS文件里可以直接使用jinja模板来做一些操作。
通过jinja模板可以为不同服务器定义各自的变量。
两种分隔符: {% … %} 和 { { … }},前者用于执行诸如 for 循环 或赋值的语句,后者把表达式的结果打印到模板上。
4.1 Jinja模板使用方式
Jinja最基本的用法是使用控制结构包装条件:
vim /srv/salt/test.sls
/mnt/testfile:
  file.append:
    {
     % if grains['fqdn'] == 'server2' %}
    - text: server2
    {
     % elif grains['fqdn'] == 'server3' %}
    - text: server3
    {
     % endif %}

Jinja在普通文件的使用:
vim /srv/salt/apache.sls
/etc/httpd/conf/httpd.conf:
  file.managed:
  - source: salt://httpd.conf
  - template: jinja
  - context:
    bind: 172.25.0.2

import方式,可在state文件之间共享:
定义变量文件:
# vim lib.sls
{
     % set port = 80 %}
导入模板文件:
# vim httpd.conf
{
     % from 'lib.sls' import port %}
...
Listen {
     {
      prot }}
4.2 引用变量
直接引用grains变量:
Listen {
     {
      grains['ipv4'][1] }}
直接引用pillar变量:
Listen {
     {
      pillar['ip'] }}
在state文件中引用:
- template: jinja
    - context:
      bind: {
     {
      pillar['ip'] }}
4.3 推zabbix-server
4.3.1 设置数据库
路径:/srv/salt/mysql
[root@server1 mysql]# tree
.
├── files
│ ├── create.sql
│ └── my.cnf
└── init.sls
[root@server1 mysql]# cat init.sls
mysql-install:
  pkg.installed:
    - pkgs:
      - mariadb-server
      - MySQL-python
  file.managed:
    - name: /etc/my.cnf
    - source: salt://mysql/files/my.cnf
  service.running:
    - name: mariadb
    - enable: true
    - watch:
      - file: mysql-install

mysql-config:
  mysql_database.present:
    - name: zabbix
  mysql_user.present:
    - name: zabbix
    - host: '%'
    - password: "westos"
  mysql_grants.present:
    - grant: all privileges
    - database: zabbix.*
    - user: zabbix
    - host: '%'
  file.managed:
    - name: /mnt/create.sql
    - source: salt://mysql/files/create.sql
  cmd.run:
    - name: mysql zabbix < /mnt/create.sql && touch /mnt/zabbix.lock
    - creates: /mnt/zabbix.lock
[root@server1 files]# cat my.cnf
[mysqld]
datadir=/var/lib/mysql
socket=/var/lib/mysql/mysql.sock
# Disabling symbolic-links is recommended to prevent assorted security risks
symbolic-links=0
# Settings user and group are ignored when systemd is used.
# If you need to run mysqld under a different user or group,
# customize your systemd unit file for mariadb according to the
# instructions in http://fedoraproject.org/wiki/Systemd

log-bin=mysql-bin
character-set-server=utf8


[mysqld_safe]
log-error=/var/log/mariadb/mariadb.log
pid-file=/var/run/mariadb/mariadb.pid


#
# include all files from the config directory
#
!includedir /etc/my.cnf.d
对于create.sql所在目录(安装zabbix服务的机中):/usr/share/doc/zabbix-server-mysql-4.0.5/create.sql.gz 导入到master机即可。
4.3.2 设置zabbix-server
路径:/srv/salt/zabbix-server
[root@server1 zabbix-server]# tree
.
├── files
│ ├── zabbix.conf
│ ├── zabbix.conf.php
│ └── zabbix_server.conf
└── init.sls
[root@server1 zabbix-server]# cat init.sls
zabbix-server:
  pkgrepo.managed:
    - name: zabbix
    - humanname: zabbix 4.0
    - baseurl: http://1.2.3.200/software/zabbix/4.0
    - gpgcheck: 0
  pkg.installed:
    - pkgs:
      - zabbix-server-mysql
      - zabbix-agent
      - zabbix-web-mysql
  file.managed:
    - name: /etc/zabbix/zabbix_server.conf
    - source: salt://zabbix-server/files/zabbix_server.conf
  service.running:
    - name: zabbix-server
    - enable: true
    - watch:
      - file: zabbix-server

zabbix-agent:
  service.running

zabbix-web:
  file.managed:
    - name: /etc/httpd/conf.d/zabbix.conf
    - source: salt://zabbix-server/files/zabbix.conf
  service.running:
    - name: httpd
    - enable: true
    - watch:
      - file: zabbix-web

/etc/zabbix/web/zabbix.conf.php:
  file.managed:
    - source: salt://zabbix-server/files/zabbix.conf.php
[root@server1 files]# cat zabbix.conf
#
# Zabbix monitoring system php web frontend
#

Alias /zabbix /usr/share/zabbix

<Directory "/usr/share/zabbix">
    Options FollowSymLinks
    AllowOverride None
    Require all granted

    <IfModule mod_php5.c>
        php_value max_execution_time 300
        php_value memory_limit 128M
        php_value post_max_size 16M
        php_value upload_max_filesize 2M
        php_value max_input_time 300
        php_value max_input_vars 10000
        php_value always_populate_raw_post_data -1
        php_value date.timezone Asia/Shanghai
    </IfModule>
</Directory>

<Directory "/usr/share/zabbix/conf">
    Require all denied
</Directory>

<Directory "/usr/share/zabbix/app">
    Require all denied
</Directory>

<Directory "/usr/share/zabbix/include">
    Require all denied
</Directory>

<Directory "/usr/share/zabbix/local">
    Require all denied
</Directory>
[root@server1 files]# cat zabbix.conf.php
<?php
// Zabbix GUI configuration file.
global $DB;

$DB['TYPE']     = 'MYSQL';
$DB['SERVER']   = '1.2.3.3';
$DB['PORT']     = '0';
$DB['DATABASE'] = 'zabbix';
$DB['USER']     = 'zabbix';
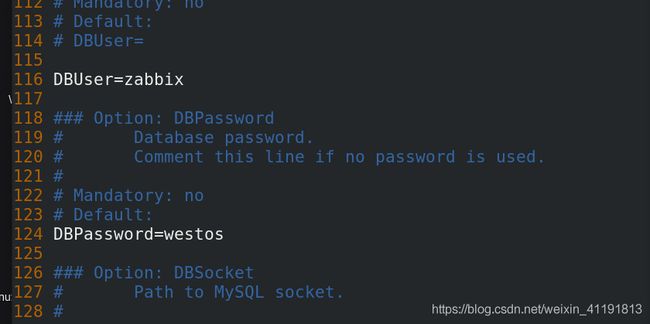
$DB['PASSWORD'] = 'westos';

// Schema name. Used for IBM DB2 and PostgreSQL.
$DB['SCHEMA'] = '';

$ZBX_SERVER      = 'localhost';
$ZBX_SERVER_PORT = '10051';
$ZBX_SERVER_NAME = 'Zabbix server';

$IMAGE_FORMAT_DEFAULT = IMAGE_FORMAT_PNG;
五、JOB 管理
master在下发指令任务时,会附带上产生的jid。
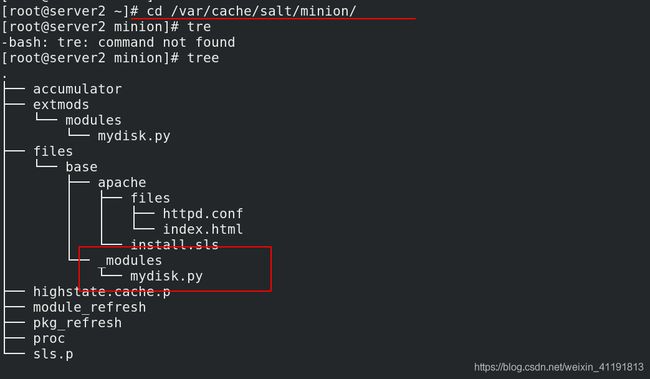
minion在接收到指令开始执行时,会在本地的/var/cache/salt/minion/proc目录下产生该jid命名的文件,用于在执行过程中master查看当前任务的执行情况。
指令执行完毕将结果传送给master后,删除该临时文件。
5.1 minimon客户端设置数据上传数据库
参考文档
[root@server1 ~]# cat salt.sql
CREATE DATABASE  `salt`
  DEFAULT CHARACTER SET utf8
  DEFAULT COLLATE utf8_general_ci;

USE `salt`;

--
-- Table structure for table `jids`
--

DROP TABLE IF EXISTS `jids`;
CREATE TABLE `jids` (
  `jid` varchar(255) NOT NULL,
  `load` mediumtext NOT NULL,
  UNIQUE KEY `jid` (`jid`)
) ENGINE=InnoDB DEFAULT CHARSET=utf8;

--
-- Table structure for table `salt_returns`
--

DROP TABLE IF EXISTS `salt_returns`;
CREATE TABLE `salt_returns` (
  `fun` varchar(50) NOT NULL,
  `jid` varchar(255) NOT NULL,
  `return` mediumtext NOT NULL,
  `id` varchar(255) NOT NULL,
  `success` varchar(10) NOT NULL,
  `full_ret` mediumtext NOT NULL,
  `alter_time` TIMESTAMP DEFAULT CURRENT_TIMESTAMP,
  KEY `id` (`id`),
  KEY `jid` (`jid`),
  KEY `fun` (`fun`)
) ENGINE=InnoDB DEFAULT CHARSET=utf8;

--
-- Table structure for table `salt_events`
--

DROP TABLE IF EXISTS `salt_events`;
CREATE TABLE `salt_events` (
`id` BIGINT NOT NULL AUTO_INCREMENT,
`tag` varchar(255) NOT NULL,
`data` mediumtext NOT NULL,
`alter_time` TIMESTAMP DEFAULT CURRENT_TIMESTAMP,
`master_id` varchar(255) NOT NULL,
PRIMARY KEY (`id`),
KEY `tag` (`tag`)
) ENGINE=InnoDB DEFAULT CHARSET=utf8;
minion:
vim /etc/salt/minion
mysql.host: '1.2.3.1'
mysql.user: 'salt'
mysql.pass: 'westos'
mysql.db: 'salt'
mysql.port: 3306

systemctl restart salt-minion

salt 'server3' test.ping --return mysql #测试语句
5.2 master服务端设置数据上传数据库
master:
master_job_cache: mysql
mysql.host: 'localhost'
mysql.user: 'salt'
mysql.pass: 'westos'
mysql.db: 'salt'
mysql.port: 3306

systemctl restart salt-master
六、salt-ssh(备用)
转并行为串行,效率不高,常作为备用方法,了解即可。
对server1
yum install -y salt-ssh.noarch  ## 安装插件salt-ssh
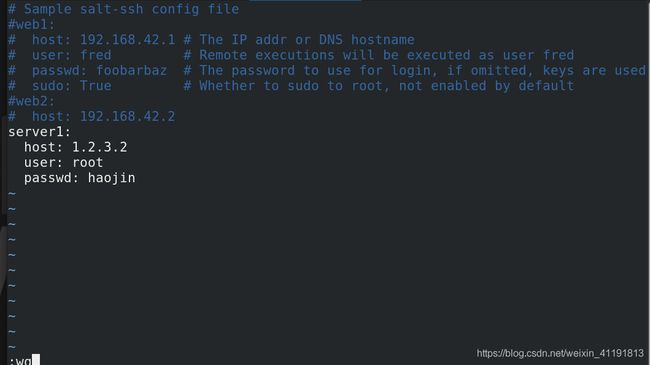
vim /etc/salt/roster            ## 修改salt-ssh的配置文件

server1:
  host: 1.2.3.2
  user: root
  passwd: haojin

对server2
systemctl stop salt-minion.service ##关闭minion,使用ssh模式

测试
salt-ssh '*' test.ping  ##速度有些慢,测试成功即可
七、salt-syndic
7.1 salt-syndic简介
如果大家知道zabbix proxy的话那就很容易理解了,syndic其实就是个代理,隔离master与minion。
Syndic必须要运行在master上,再连接到另一个topmaster上。
Topmaster 下发的状态需要通过syndic来传递给下级master,minion传递给master的数据也是由syndic传递给topmaster。
topmaster并不知道有多少个minion。
syndic与topmaster的file_roots和pillar_roots的目录要保持一致。
7.2 salt-syndic图解
7.3 salt-syndic配置
topmaster端:这里是server4
yum install -y salt-master
vim /etc/salt/master
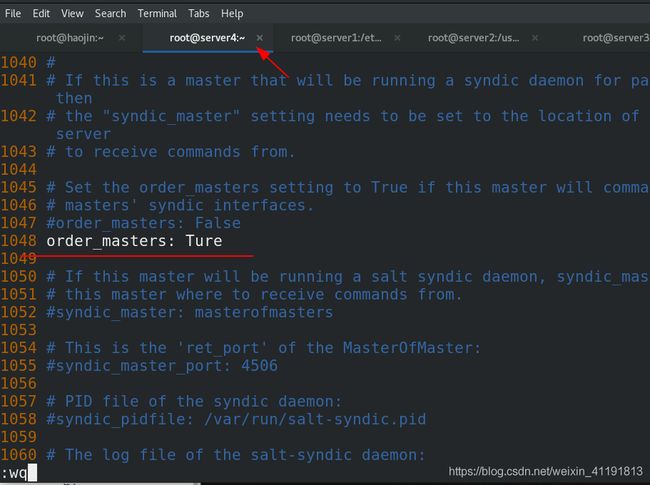
order_masters: True			#作为顶级master
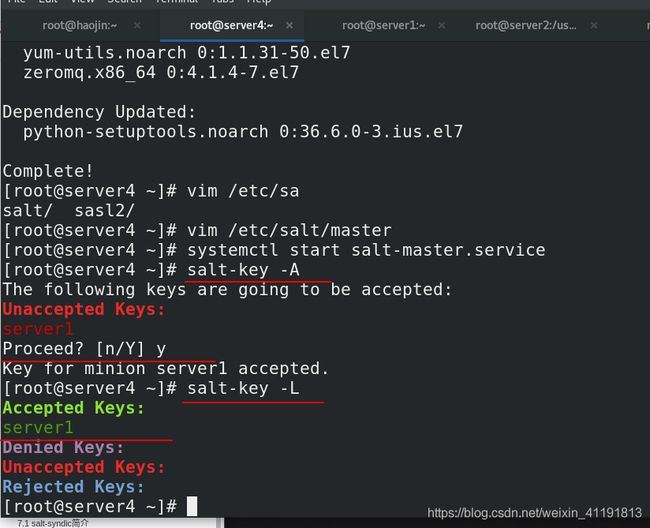
systemctl start salt-master

salt-key -L				#查看下级master的连接授权
salt-key -A


下级master端:这里为server1
yum install -y salt-syndic
vim /etc/salt/master
syndic_master: 1.2.3.4		#指向topmaster

 systemctl restart salt-master
 systemctl start salt-syndic
八 、salt-api
8.1 salt-api简介
参考链接:salt-API
SaltStack 官方提供有REST API格式的 salt-api 项目,将使Salt与第三方系统集成变得尤为简单。
官方提供了三种api模块:
rest_cherrypy
rest_tornado
rest_wsgi
官方链接:https://docs.saltstack.com/en/latest/ref/netapi/all/index.html#all-netapi-modules
8.2 salt-api配置
安装salt-api:
yum install -y salt-api  python-cherrypy

生成证书:
cd /etc/pki/tls/private
openssl genrsa 2048 > localhost.key
cd /etc/pki/tls/certs
make testcert		//根据提示填写相关信息即可

创建用户认证文件:
 useradd -s /sbin/nologin saltapi
 echo westos | passwd --stdin saltapi
 vim /etc/salt/master.d/eauth.conf
external_auth:
  pam:
    saltapi:
      - .*
      - '@wheel'
      - '@runner'

激活rest_cherrypy模块:
vim /etc/salt/master.d/api.conf
rest_cherrypy:
  host: 1.2.3.1
  port: 8000
  ssl_crt: /etc/pki/tls/certs/localhost.crt
  ssl_key: /etc/pki/tls/private/localhost.key

重启服务:
systemctl restart salt-master
systemctl start salt-api
8.3 salt-api使用
获取认证token:
curl -sSk https://1.2.3.1:8000/login \
    -H 'Accept: application/x-yaml' \
    -d username=saltapi \
    -d password=westos \
    -d eauth=pam

推送任务:
curl -sSk https://1.2.3.1:8000 \
    -H 'Accept: application/x-yaml' \
    -H 'X-Auth-Token: 77e2b1de04b0dbc0a4bf11900712b83e4fa2c241'\
    -d client=local \
    -d tgt='*' \
    -d fun=test.ping
token值是上面命令获取的toekn值。


