服务配置中心:Config
目录
- 第一章 Config介绍
-
- 1.1、什么是配置中心
- 1.2、为啥用配置中心
- 1.3、常见的配置中心
- 第二章 Config工作流程
- 第三章 Config入门案例
-
- 3.1、项目准备与启动
- 3.2、配置中心远程库
- 3.3、配置中心服务端
- 3.4、配置中心客户端
- 第四章 Config信息安全
-
- 4.1、介绍 JCE
- 4.2、安装 JCE
- 4.3、对称加密说明
- 4.4、加密敏感信息
- 4.5、解密敏感信息
- 4.6、修改明文数据
- 4.7、测试配置获取
- 第五章 Config局部刷新
-
- 5.1、问题描述
- 5.2、问题解决
- 第六章 Config全局刷新
-
- 6.1、问题描述
- 6.2、问题解决
-
- 6.2.1、修改服务端
- 6.2.2、修改客户端
- 第七章 Config安全认证
-
- 7.1、修改服务端
- 7.2、修改客户端
- 第八章 Config的高可用
-
- 8.1、高可用介绍
- 8.2、高可用实现
配套资料,免费下载
链接:https://pan.baidu.com/s/1la_3-HW-UvliDRJzfBcP_w
提取码:lxfx
复制这段内容后打开百度网盘手机App,操作更方便哦
第一章 Config介绍
1.1、什么是配置中心
使用微服务就意味着要将单体应用中的业务拆分成一个个的子服务,每个服务的粒度相对较小,因此,系统中将会出现大量的服务。由于每一个服务都需要必要的配置信息才能运行,所以也将会产生大量的配置文件,所以有一套对配置文件进行集中式、动态式的管理的设施就必不可少了。
常见对配置的管理有三种:
- 传统的配置方式:配置信息分散到系统各个角落方式,配置文件或者在代码中。
- 集中式配置中心:将应用系统中对配置信息的管理作为一个新的应用功能模块,进行集中统一管理,并且提供额外功能。
- 分布式配置中心:在分布式、微服务架构中,独立的配置中心服务。
1.2、为啥用配置中心
在微服务体系中,服务的数量以及配置信息日益增多,比如各种服务器参数配置、各种数据库访问参数配置、各种环境下配置信息的不同、配置信息修改之后实时生效等等,传统的配置文件方式或者将配置信息存放于数据库中的方式已无法满足开发人员对配置管理的要求,如:
- 安全性:配置跟随源代码保存在代码库中,容易造成配置泄漏。
- 时效性:修改配置,需要重启服务才能生效。
- 局限性:无法支持动态调整,例如日志开关、功能开关。
1.3、常见的配置中心
- Diamond:淘宝开源的持久配置中心,支持各种持久信息(比如各种规则,数据库配置等)的发布和订阅。
- Qconf:奇虎360内部分布式配置管理工具,用来替代传统的配置文件,使得配置信息和程序代码分离,同时配置变化能够实时同步到客户端,而且保证用户高效读取配置,这使的工程师从琐碎的配置修改、代码提交、配置上线流程中解放出来,极大地简化了配置管理工作。
- Disconf:百度的分布式配置管理平台,专注于各种分布式系统配置管理的通用组件和通用平台,提供统一的配置管理服务。
- Apollo:携程框架部门研发的分布式配置中心,能够集中化管理应用不同环境、不同集群的配置,配置修改后能够实时推送到应用端,并且具备规范的权限、流程治理等特性,适用于微服务配置管理场景。
- Spring Cloud Config:Spring Cloud微服务开发的配置中心,他是一个解决分布式系统的配置管理方案。它包含 Client 和 Server 两个部分,Server 提供配置文件的存储、以接口的形式将配置文件的内容提供出去,Client 通过接口获取数据、并依据此数据初始化自己的应用。(我们学习这一款产品)
Spring Cloud Config官方文档:https://docs.spring.io/spring-cloud-config/docs/2.2.6.RELEASE/reference/html/
第二章 Config工作流程
Spring Cloud Config Server 的工作流程,如下图所示:
- 首先需要一个远程 Git 仓库,平时测试可以使用 GitHub,在实际生产环境 中,需要自己搭建一个 Git 服务器,远程 Git 仓库的主要作用是用来保存我们的配置文件,我们在这里采用国内的码云 gitee,也可以使用国外的 GitHub,由于使用 Github 网络比较慢,可能连接失败,用哪个都是可以的。
- 除了远程 Git 仓库之外,我们还需要一个本地 Git 仓库,每当 Config Server 访问远程 Git 仓库时,都会克隆一份到本地,这样当远程仓库无法连接时,就直接使用本地存储的配置信息;
- 微服务 A、微服务 B 则是我们的具体应用,这些应用在启动的时候会从 Config Server 中获取相应的配置信息;
- 当微服务 A、微服务 B 尝试从 Config Server 中加载配置信息的时候,Config Server 会先通过 git clone 命令克隆一份配置文件保存到本地;
- 由于配置文件是存储在 Git 仓库中,所以配置文件天然具有版本管理功能;
第三章 Config入门案例
3.1、项目准备与启动
我们接下来的所有操作均是在Gateway最后完成的工程上进行操作,相关代码请到配套资料中寻找。
3.2、配置中心远程库
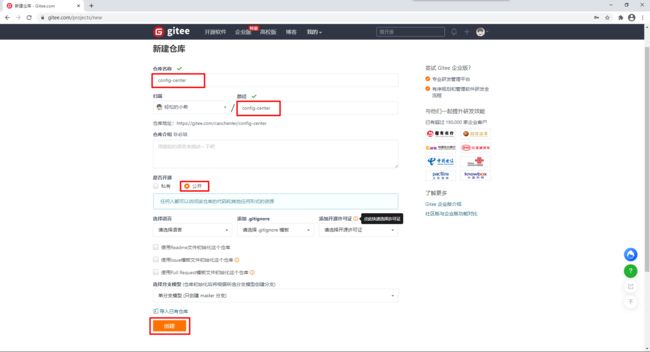
创建远程仓库:https://gitee.com/projects/new
上传配置文件:
application-dev.yaml(内容自己随便定义的,没有什么特殊含义,用来模拟一些配置信息)
computer:
  username: caochenlei
  password: dev123456
  env: dev
  version: 1
application-prod.yaml(内容自己随便定义的,没有什么特殊含义,用来模拟一些配置信息)
computer:
  username: caochenlei
  password: prod123456
  env: prod
  version: 1
application-test.yaml(内容自己随便定义的,没有什么特殊含义,用来模拟一些配置信息)
computer:
  username: caochenlei
  password: test123456
  env: test
  version: 1
3.3、配置中心服务端
(1)在父项目spring-cloud-study下创建一个子项目config-server4001
(2)打开依赖文件pom.xml,把以下依赖信息拷贝进去:
<dependencies>
    <dependency>
        <groupId>org.springframework.cloudgroupId>
        <artifactId>spring-cloud-config-serverartifactId>
    dependency>
dependencies>
(3)创建配置文件application.yaml,把以下配置信息拷贝进去:
server:
  port: 4001

spring:
  application:
    name: config-server
  cloud:
    config:
      server:
        git:
          uri: https://gitee.com/caochenlei/config-center.git  #代表你配置文件仓库的远程地址
          search-paths: config-center                          #代表你配置文件仓库的仓库路径
          username: XXXXXXXXXXXXXXX                            #代表你Github/Gitee的账户
          password: XXXXXXXXXXXXXXX                            #代表你Github/Gitee的密码
(4)编写主启动类com.caochenlei.ConfigServer4001Application,把以下代码拷贝进去,然后启动当前应用:
@SpringBootApplication
@EnableConfigServer
public class ConfigServer4001Application {

    public static void main(String[] args) {

        SpringApplication.run(ConfigServer4001Application.class, args);
    }
}
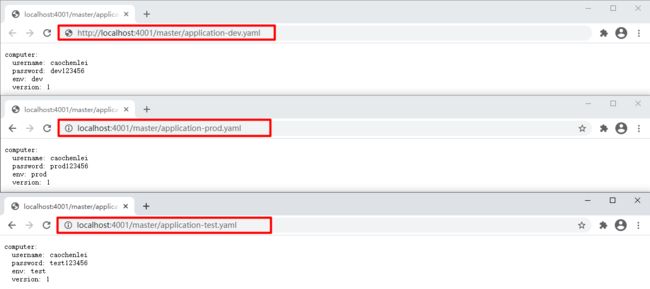
(5)打开浏览器,在浏览器地址输入以下地址依次进行访问仓库的配置文件:
访问地址1:http://localhost:4001/master/application-dev.yaml
访问地址2:http://localhost:4001/master/application-prod.yaml
访问地址3:http://localhost:4001/master/application-test.yaml
当访问成功后配置中心会通过 git clone 命令将远程配置文件在本地也保存一份,以确保在 git 仓库故障时我们的应用还可以继续正常使用。
(6)访问远程仓库的配置文件,官方提供了很多种方式,但是我们最推荐的就是上边这种,还有一些其他的访问规则,我在下边都给出了,但不具体演示了。
/{
     application}/{
     profile}[/{
     label}]

/{
     application}-{
     profile}.yaml
/{
     label}/{
     application}-{
     profile}.yaml

/{
     application}-{
     profile}.yml
/{
     label}/{
     application}-{
     profile}.yml

/{
     application}-{
     profile}.properties
/{
     label}/{
     application}-{
     profile}.properties
{application}:表示配置文件的名字,对应的配置文件即:application。
{profile}:表示环境,有 dev、prod、test、online及默认(不写就是默认)。
{label} 表示分支,默认我们放在 master 分支上。
(7)一个拓展的小知识,YAML文件的拓展名到底是用yml还是yaml?
回答:两种都可以,都有人在用,Spring Boot都能识别,无伤大雅,这里推荐使用yaml,为什么,不是我说的,是官网说的,我们只要打开YAML的官网。
地址:https://yaml.org/faq.html
3.4、配置中心客户端
(1)前面已经搭建好了配置中心的服务端,并且通过访问接口从config服务端读取配置信息, 不过实际开发中,更多的不是我们人为去获取配置信息,而是由微服务自己从config服务端上加载配置信息, 那么怎么来加载呢?按道理来说,我们需要给微服务的所有服务都配置上连接配置中心的配置,但是,目前我们正处于学习阶段,为了保持思路清晰,也为了减少修改工程的代码量,我在这里就不在修改以前原有的项目了,我现在要重新创建新的服务,来模拟配置中心的客户端,实际上,这一块的配置应该和微服务的服务们一块用的。
(2)在父项目spring-cloud-study下创建一个子项目config-client3001
(3)打开依赖文件pom.xml,把以下依赖信息拷贝进去:
<dependencies>
    <dependency>
        <groupId>org.springframework.cloudgroupId>
        <artifactId>spring-cloud-starter-configartifactId>
    dependency>
    <dependency>
        <groupId>org.springframework.bootgroupId>
        <artifactId>spring-boot-starter-webartifactId>
    dependency>
    <dependency>
        <groupId>org.springframework.bootgroupId>
        <artifactId>spring-boot-starter-actuatorartifactId>
    dependency>
dependencies>
(4)创建配置文件application.yaml,把以下配置信息拷贝进去:
server:
  port: 3001

spring:
  application:
    name: config-client3001
(5)创建配置文件bootstrap.yaml,把以下配置信息拷贝进去:
#有啥区别:application.yaml和bootstrap.yaml都是配置文件,都可以被Spring Boot所识别
#加载顺序:bootstrap.yaml > application.yaml > application-(dev/prod/test).yaml
#具体配置如下:
spring:
  cloud:
    config:
      profile: dev               #要使用哪种环境的配置文件
      label: master              #要使用哪个分支的配置文件
      uri: http://localhost:4001 #分布式配置中心的服务地址
(6)编写主启动类com.caochenlei.ConfigClient3001Application,把以下代码拷贝进去,然后启动当前应用:
@SpringBootApplication
public class ConfigClient3001Application {

    public static void main(String[] args) {

        SpringApplication.run(ConfigClient3001Application.class, args);
    }
}
(7)编写一个控制器类,在里边编写一个方法,来获取配置文件当中的属性信息,这样,当我们启动这个项目的时候,我们可以通过浏览器地址来访问,查看当前的配置是不是从配置中心加载出来的,具体类名:com.caochenlei.controller.ConfigController,具体代码如下:
@RestController
public class ConfigController {

    @Value("${computer.username}")
    private String username;
    @Value("${computer.password}")
    private String password;
    @Value("${computer.env}")
    private String env;
    @Value("${computer.version}")
    private String version;

    @RequestMapping("/info")
    public String info() {

        return username + " : " + password + " : " + env + " : " + version;
    }
}
(8)启动当前这个项目,在浏览器地址输入:http://localhost:3001/info
![]()
第四章 Config信息安全
4.1、介绍 JCE
前面是在 Git 仓库中明文存储配置信息值,很多场景下,对于某些敏感的配置内容(例如数据库账号、密码等),应该加密存储,Config Server为我们考虑到了这一点,对配置内容提供了加密与解密支持,Config Server的加解密功能依赖Java Cryptography Extension(JCE)。
4.2、安装 JCE
Java 8 JCE下载地址(默认需要登录Oracle账号,不想登录,可以使用配套资料中我已经下载好的资源包):
http://www.oracle.com/technetwork/java/javase/downloads/jce8-download-2133166.html
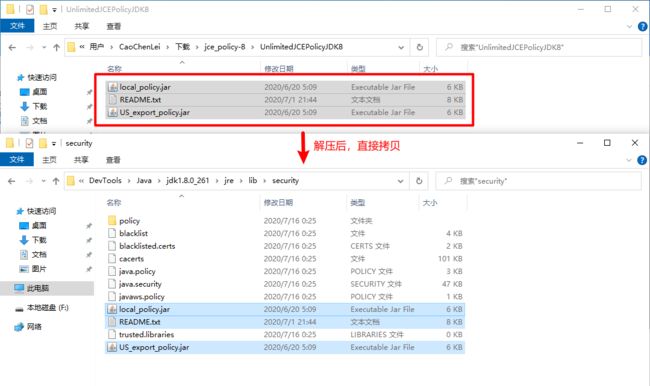
下载得到JCE的zip压缩包并解压,将其中的jar包覆盖到JDK安装目录/jre/lib/security目录下。
4.3、对称加密说明
Config Server提供了加密与解密的接口,并且使用的是对称加密算法,因此,你需要提供一个密钥来进行加解密使用,通常我们只需要手动加密,而不需要手动解密,因为,程序在执行的过程中,发现你使用了密文以后,会自动的根据你提供的密钥来进行解密,我们学习解密只是为了告诉你,原来解密后确实是咱们以前定义的明文数据,让你对加解密有更深的印象。
- 加密接口:http://localhost:4001/encrypt
- 解密接口:http://localhost:4001/decrypt
我们需要在config-server4001项目下创建一个bootstrap.yaml配置文件,配置文件的内容如下:
#设置对称密钥,用这个密钥进行加密和解密,密钥自己随便定义,越复杂越好
encrypt:
  key: 123456789ABC
接下来,我们需要重新启动项目来进行加密和解密测试,加密和解密接口都需要post请求,因此,请选择你熟练使用的工具来发送,推荐postman,curl。
4.4、加密敏感信息
加密数据请发送:curl -XPOST http://localhost:4001/encrypt -d "caochenlei"
4.5、解密敏感信息
解密数据请发送:curl -XPOST http://localhost:4001/decrypt -d “3ec5f0bcdeef2348a2f03059ed551bb57353ea3b8f21011bd94b19a3fd73e876”
4.6、修改明文数据
application-dev.yaml({cipher}就是用来告诉程序这是一个密文)
computer:
  username: '{cipher}3ec5f0bcdeef2348a2f03059ed551bb57353ea3b8f21011bd94b19a3fd73e876'
  password: '{cipher}cc08112f0bfc3979553c80afbc2aa65183ecd54351236b899bf431df79f82805'
  env: dev
  version: 1
application-prod.yaml({cipher}就是用来告诉程序这是一个密文)
computer:
  username: '{cipher}3ec5f0bcdeef2348a2f03059ed551bb57353ea3b8f21011bd94b19a3fd73e876'
  password: '{cipher}f10682be4b46b06b17c78fba441347d8dd603a83874949e71d0182c8fe02a037'
  env: prod
  version: 1
application-test.yaml({cipher}就是用来告诉程序这是一个密文)
computer:
  username: '{cipher}3ec5f0bcdeef2348a2f03059ed551bb57353ea3b8f21011bd94b19a3fd73e876'
  password: '{cipher}82136fe37c3f9b1989992e4b398a8fa1a82a494879c23b68f00a28734c1911e1'
  env: test
  version: 1
注意:你可以直接在线修改,也可以在本地修改好,使用 git 上传到远程仓库。
4.7、测试配置获取
重新启动config-client3001,然后访问:http://localhost:3001/info
我们发现可以成功读取,这说明Config Server能自动解密配置内容。
第五章 Config局部刷新
5.1、问题描述
我们发现我们刚才修改了远程仓库中的配置文件,但是,我们需要重新启动一次config-client3001客户端才能够读取最新的配置信息,实际上,当一个应用上线以后,我们尽量不能让他来回重启,很多场景下,需要在运行期间动态调整配置,如果配置发生了修改,微服务要如何实现配置的动态刷新呢?
5.2、问题解决
(1)在Controller上添加注解@RefreshScope,添加这个注解的类会在配置更新时得到特殊的处理。
com.caochenlei.controller.ConfigController
@RestController
@RefreshScope
public class ConfigController {

    @Value("${computer.username}")
    private String username;
    @Value("${computer.password}")
    private String password;
    @Value("${computer.env}")
    private String env;
    @Value("${computer.version}")
    private String version;

    @RequestMapping("/info")
    public String info() {

        return username + " : " + password + " : " + env + " : " + version;
    }
}
(2)开启web访问端点:management.endpoints.web.exposure.include=*
application.yaml
server:
  port: 3001

spring:
  application:
    name: config-client3001

management:
  endpoints:
    web:
      exposure:
        include: '*'
(3)重新启动当前这个项目,以让配置生效,重启以后访问地址:http://localhost:3001/info
(4)修改远程仓库application-dev.yaml的版本号为2
application-dev.yaml
computer:
  username: '{cipher}3ec5f0bcdeef2348a2f03059ed551bb57353ea3b8f21011bd94b19a3fd73e876'
  password: '{cipher}cc08112f0bfc3979553c80afbc2aa65183ecd54351236b899bf431df79f82805'
  env: dev
  version: 2
(5)通知当前的应用刷新配置,需要使用post方式来访问:http://localhost:3001/actuator/refresh
curl -XPOST http://localhost:3001/actuator/refresh
(6)访问地址:http://localhost:3001/info
这样我们就实现了,再不重新启动当前应用的情况下,如何优雅的让配置信息动态更新。
第六章 Config全局刷新
6.1、问题描述
上边介绍的这种方式的刷新,就是你对每个微服务分别进行刷新,也就是一个一个操作,如果你有80个微服务,那么就需要手动刷新这80个微服务,而我们很清楚,一个微服务项目,很有很多服务模块,一个一个刷新,也可以,可以让运维人员写一个批处理脚本,这样也能减轻工作总量,但是,我们除了写脚本以外,还有没有一种更加优雅的方式,当远程仓库的配置信息发生修改,可以让所有连接配置中心的服务(客户端)都能够即使的刷新,当然是有办法的。
前面使用/actuator/refresh端点手动刷新配置虽然可以实现刷新,但所有微服务节点的配置都需要手动去刷新,如果微服务非常多,其工作量非常庞大。因此,实现配置的自动刷新是志在必行,Spring Cloud Bus就可以用来实现配置的自动刷新。
Spring Cloud Bus使用轻量级的消息代理/总线(例如RabbitMQ、Kafka等)广播传播状态的更改(例如配置的更新)或者其他的管理指令,可以将Spring Cloud Bus想象成一个分布式的Spring Boot Actuator。
使用了Spring Cloud Bu以后,我们只需要向配置中心发送一次/actuator/bus-refresh,就能让所有连接到该配置中心的服务(客户端)都能动态刷新。
6.2、问题解决
注意:这一章节我们需要使用RabbitMQ,而RabbitMQ的学习与搭建与启动,请参考:https://caochenlei.blog.csdn.net/article/details/112549952
6.2.1、修改服务端
(1)打开config-server4001的pom.xml,新增加如下依赖:
<dependency>
    <groupId>org.springframework.cloudgroupId>
    <artifactId>spring-cloud-starter-bus-amqpartifactId>
dependency>
(2)打开config-server4001的application.yaml,修改为如下配置:
server:
  port: 4001

spring:
  application:
    name: config-server
  cloud:
    #配置中心的配置信息
    config:
      server:
        git:
          uri: https://gitee.com/caochenlei/config-center.git  #代表你配置文件仓库的远程地址
          search-paths: config-center                          #代表你配置文件仓库的仓库路径
          username: XXXXXXXXXXXXXXX                            #代表你Github/Gitee的账户
          password: XXXXXXXXXXXXXXX                            #代表你Github/Gitee的密码
    #开启spring cloud bus,默认是开启的,也可以省略该配置
    bus:
      enabled: true
  #rabbitmq的一些常见配置
  rabbitmq:
    host: localhost
    port: 5672
    username: guest
    password: guest

#打开所有的web访问端点
management:
  endpoints:
    web:
      exposure:
        include: '*'
  endpoint:
    bus-refresh:
      enabled: true
(3)重新启动当前配置中心config-server4001
6.2.2、修改客户端
(1)打开config-client3001的pom.xml,新增加如下依赖:
<dependency>
    <groupId>org.springframework.cloudgroupId>
    <artifactId>spring-cloud-starter-bus-amqpartifactId>
dependency>
(2)打开config-client3001的application.yaml,修改为如下配置:
server:
  port: 3001

spring:
  application:
    name: config-client3001
  cloud:
    #开启spring cloud bus,默认是开启的,也可以省略该配置
    bus:
      enabled: true
  #rabbitmq的一些常见配置
  rabbitmq:
    host: localhost
    port: 5672
    username: guest
    password: guest

#打开所有的web访问端点
management:
  endpoints:
    web:
      exposure:
        include: '*'
  endpoint:
    bus-refresh:
      enabled: true
(3)因为我们要模拟只请求一次,而让所有连接配置中心的客户端都能自动刷新,现在只有一个,显然效果不是很明显,所以,我们需要拷贝config-client3001为config-client3002,这里建议,先新建一个子项目,然后把依赖、配置、启动类、代码在拷贝进去,不要直接拷贝项目,可能会出现一些意想不到的问题,当config-client3001和config-client3002都准备好了以后,请一个一个启动起来。
注意:ConfigClient3002Application和application.yaml的端口号
(4)我们分别访问如下地址:
地址1:http://localhost:3001/info
地址2:http://localhost:3002/info
(5)修改远程仓库application-dev.yaml的版本号为3
application-dev.yaml
computer:
  username: '{cipher}3ec5f0bcdeef2348a2f03059ed551bb57353ea3b8f21011bd94b19a3fd73e876'
  password: '{cipher}cc08112f0bfc3979553c80afbc2aa65183ecd54351236b899bf431df79f82805'
  env: dev
  version: 3
(6)通知当前的配置中心刷新配置,需要使用post方式来访问:http://localhost:4001/actuator/bus-refresh
curl -XPOST http://localhost:4001/actuator/bus-refresh
(7)我们分别访问如下地址:
地址1:http://localhost:3001/info
地址2:http://localhost:3002/info
这样我们就实现了,再不重新启动当前应用的情况下,如何优雅的让配置信息动态更新。
第七章 Config安全认证
我们现在是可以随便访问config-server4001的,因此,我们的配置中心也需要安全认证保护。
7.1、修改服务端
(1)打开config-server4001的pom.xml,把用于安全认证的依赖加入:
<dependency>
    <groupId>org.springframework.bootgroupId>
    <artifactId>spring-boot-starter-securityartifactId>
dependency>
(2)打开config-server4001的application.yaml,给安全认证加上账户和密码:
spring:
  security:
    user:
      name: config
      password: 123456
(3)重新启动当前的config-server4001
7.2、修改客户端
(1)修改config-client3001和config-client3002的bootstrap.yaml,修改后如下:
#有啥区别:application.yaml和bootstrap.yaml都是配置文件,都可以被Spring Boot所识别
#加载顺序:bootstrap.yaml > application.yaml > application-(dev/prod/test).yaml
#具体配置如下:
spring:
  cloud:
    config:
      profile: dev               #要使用哪种环境的配置文件
      label: master              #要使用哪个分支的配置文件
      uri: http://localhost:4001 #分布式配置中心的服务地址
      username: config           #分布式配置中心的登录账号
      password: 123456           #分布式配置中心的登录密码
(2)重新启动config-client3001和config-client3002
(3)我们分别访问如下地址:
地址1:http://localhost:3001/info
地址2:http://localhost:3002/info
第八章 Config的高可用
8.1、高可用介绍
有了配置中心之后,其他的微服务都是从配置中心上获取配置信息,此时配置中心就至关重要了,在真实的项目环境中,Spring Cloud Config配置中心难免会出现各种问题,此时就需要考虑Spring Cloud Config的高可用机制了。
Spring Cloud Config的高可用机制解决方式非常简单,把Spring Cloud Config注册到Eureka就搞定了,此时用户访问的时候不是直接从配置中心获取配置信息,而是先通过Eureka中获取配置中心的地址,然后再从配置中心获取具体服务的配置信息。
要想实现Config配置中心的高可用,我们还要实现配置中心的集群环境,目前我们只有一台配置中心服务端,因此,我们拷贝config-server4001一份为config-server4002,这里建议不要直接拷贝,要先在父工程下创建一个子项目,然后再把依赖、配置、主启动类、代码拷贝进来,注意修改配置文件和主启动类的端口号。
接下来,我们需要依次启动:
- eureka-server7001
- eureka-server7002
8.2、高可用实现
服务端添加对注册中心支持:
(1)在config-server4001和config-server4002的pom.xml中,添加如下依赖:
<dependency>
    <groupId>org.springframework.cloudgroupId>
    <artifactId>spring-cloud-starter-netflix-eureka-clientartifactId>
dependency>
(2)在config-server4001和config-server4002的application.yaml中,添加如下配置:
eureka:
  instance:
    #是否使用 ip 地址注册
    prefer-ip-address: true
    #该实例注册到服务中心的唯一ID
    instance-id: ${
     spring.cloud.client.ip-address}:${
     server.port}
    #告诉注册中心,每间隔10s,向服务端发送一次心跳,证明自己依然"存活"
    lease-renewal-interval-in-seconds: 10
    #告诉注册中心,如果我20s之内没有给你发心跳,就代表我故障了,将我踢出掉
    lease-expiration-duration-in-seconds: 20
  client:
    #设置服务注册中心地址
    service-url:
      defaultZone: http://root:123456@eureka-server7001.com:7001/eureka/,http://root:123456@eureka-server7002.com:7002/eureka/
(3)重新启动config-server4001和config-server4002,然后在浏览器输入:http://localhost:7001,账号:root,密码:123456
客户端添加对注册中心支持:
(1)在config-client3001和config-client3002的pom.xml中,添加如下依赖:
<dependency>
    <groupId>org.springframework.cloudgroupId>
    <artifactId>spring-cloud-starter-netflix-eureka-clientartifactId>
dependency>
(2)在config-client3001和config-client3002的bootstrap.yaml中,修改成如下配置:
#有啥区别:application.yaml和bootstrap.yaml都是配置文件,都可以被Spring Boot所识别
#加载顺序:bootstrap.yaml > application.yaml > application-(dev/prod/test).yaml
#具体配置如下:
spring:
  cloud:
    config:
      discovery:
        enabled: true               #开启注册中心发现服务
        service-id: CONFIG-SERVER   #使用注册中心注册名称为CONFIG-SERVER的分布式配置中心集群
      profile: dev               #要使用哪种环境的配置文件
      label: master              #要使用哪个分支的配置文件
      username: config           #分布式配置中心的登录账号
      password: 123456           #分布式配置中心的登录密码

eureka:
  instance:
    #是否使用 ip 地址注册
    prefer-ip-address: true
    #该实例注册到服务中心的唯一ID
    instance-id: ${
     spring.cloud.client.ip-address}:${
     server.port}
  client:
    #是否将自己注册到注册中心,默认为 true
    register-with-eureka: true
    #表示 Eureka Client 间隔多久去服务器拉取注册信息,默认为 30 秒
    registry-fetch-interval-seconds: 10
    #设置服务注册中心地址
    service-url:
      defaultZone: http://root:123456@eureka-server7001.com:7001/eureka/,http://root:123456@eureka-server7002.com:7002/eureka/
(3)重新启动config-client3001和config-client3002,然后在浏览器分别输入如下地址测试:
地址1:http://localhost:3001/info
地址2:http://localhost:3002/info
(4)将config-server4001停止,模拟宕机情况。
(5)我们分别访问如下地址:
地址1:http://localhost:3001/info
地址2:http://localhost:3002/info


