使用Python+Flask+Bootstrap实现一个简单的用户权限管理(RBAC)(Part2)
准备工作
相关工具
本人用到的相关开发工具或者平台或者源代码如下,请自行获取
Window 10
嗯,我是用的这个操作系统写的代码和文章,没用MacOS或者Linux
Pycharm
我认为最棒的python开发工具,其中Community版本是免费的,官方网站 https://www.jetbrains.com/
VMWARE Workstation
主要是因为我的webserver要跑在centos上服务器上,而我的开发机是windows,所以不得不装一个虚拟化软件先,然后在虚拟机上安装centos。
Vmware workstation是一个免费的虚拟机软件,请自行到vmware 的网站下载,当然,如果你有linux物理机或者vsphere,或者你愿意在windows跑webserver,这个就不是关键了。
CentOS 8.1
我很赶时髦的下载了截止到目前(2020/2/22)最新发布centos8.1,并安装在了我的vmware workstation上,请注意vmware workstation可能自动识别这个ISO文件是一个很古老版本的Linux(5.0 or old)导致安装失败,请在安装的时候选择other linux kernel 4.x。
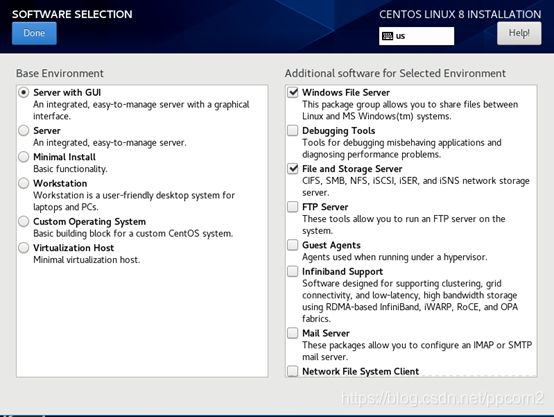
我在安装的时候选择如下配置,不过其实我也没有发现怎么能直接把文件共享给我的windows,所以我最后决定安装samba来实现共享。

同时,请记得在安装的时候就打开网卡,这样子以后都可以直接使用网络连接上去了。
Putty
当今最方便最轻量级的ssh工具,下载地址 https://www.chiark.greenend.org.uk/~sgtatham/putty/
Samba
因为我在windows下开发,用centos做服务器,为了避免文件传来传去的麻烦,所以我直接在centos下启用了samba服务,这样子可以直接编辑centos上面的文件。
- 安装samba服务,需要先用putty ssh root到centos的ip地址,然后执行yum
[root@localhost ~]#yum install samba
...
- 添加一个testshare的用户并建立一个share的目录,将来的文件会放在这个用户目录下
[root@localhost ~]#useradd testshare
[root@localhost ~]#passwd testshare
[root@localhost ~]#mkdir /home/testshare/share
[root@localhost ~]#chmod -R 777 /home/testshare/share/
- 备份并编辑samba的配置文件
[root@localhost ~]# cd /etc/samba/
[root@localhost ~]# cp smb.conf smb.conf.bak
[root@localhost samba]# vi smb.conf
# See smb.conf.example for a more detailed config file or
# read the smb.conf manpage.
# Run 'testparm' to verify the config is correct after
# you modified it.

[global]
workgroup = WORKGROUP
netbios name = Linux
server string = Linux Samba Server TestServer
security = user
map to guest = bad user
#guest account = nobody
valid users= testshare
lanman auth = no
ntlm auth = yes
client lanman auth = no

[share]
path = /home/testshare/share
writable = yes
browseable = yes
guest ok = no
valid users=testshare
- 添加一个叫做testshare的samba用户,假设密码为123456
[root@localhost samba]# smbpasswd -a testshare
New SMB password:
Retype new SMB password:
- 将防火墙和selinux都关掉
[root@localhost samba]# systemctl stop firewalld
[root@localhost samba]# systemctl disable firewalld
Removed /etc/systemd/system/multi-user.target.wants/firewalld.service.
Removed /etc/systemd/system/dbus-org.fedoraproject.FirewallD1.service.
[root@localhost samba]# setenforce 0
[root@localhost samba]# sestatus
SELinux status:                 enabled
SELinuxfs mount:                /sys/fs/selinux
SELinux root directory:         /etc/selinux
Loaded policy name:             targeted
Current mode:                   permissive
Mode from config file:          enforcing
Policy MLS status:              enabled
Policy deny_unknown status:     allowed
Max kernel policy version:      28
如果需要永久关闭selinux,则需要修改配置文件SELINUX=disabled
vim /etc/sysconfig/selinux
...
SELINUX=disabled
...
- 重启samba服务
[root@localhost samba]# systemctl restart smb
[root@localhost samba]# systemctl status smb
● smb.service - Samba SMB Daemon
   Loaded: loaded (/usr/lib/systemd/system/smb.service; disabled; vendor preset: disabled)
   Active: active (running) since Fri 2020-02-21 20:51:28 EST; 8s ago
     Docs: man:smbd(8)
           man:samba(7)
           man:smb.conf(5)
 Main PID: 36793 (smbd)
   Status: "smbd: ready to serve connections..."
    Tasks: 4 (limit: 23820)
   Memory: 10.0M
   CGroup: /system.slice/smb.service
           ├─36793 /usr/sbin/smbd --foreground --no-process-group
           ├─36795 /usr/sbin/smbd --foreground --no-process-group
           ├─36796 /usr/sbin/smbd --foreground --no-process-group
           └─36797 /usr/sbin/smbd --foreground --no-process-group

Feb 21 20:51:28 localhost.localdomain systemd[1]: Starting Samba SMB Daemon...
Feb 21 20:51:28 localhost.localdomain smbd[36793]: [2020/02/21 20:51:28.815246,  0] ../../lib/util/become_daemon.c:136(daemon_ready)
Feb 21 20:51:28 localhost.localdomain systemd[1]: Started Samba SMB Daemon.
Feb 21 20:51:28 localhost.localdomain smbd[36793]:   daemon_ready: daemon 'smbd' finished starting up and ready to serve connections
- 测试samba服务
为了测试samba是否准备完毕,在你的windows 电脑上访问\{centos ip},如果输入用户名testshare,密码123456以后能看到share目录的话,那么就是设置共享成功,如果还没有成功,则需要百度或者谷歌来解决。
Flask
Flask是我使用的webserver,官方网站是 https://flask.palletsprojects.com
请按照如下步骤直接安装flask,centos8.1已经自带了python3,如果你用的其他centos版本上不带python3的话,请自行使用yum安装python3,就能执行同样的命令了。
[root@localhost share]# python3 -m venv venv
[root@localhost share]# ls
venv
[root@localhost share]# source ./venv/bin/activate
(venv) [root@localhost share]#
(venv) [root@localhost share]# pip install flask
Collecting flask
  Downloading…
……
You are using pip version 9.0.3, however version 20.0.2 is available.
You should consider upgrading via the 'pip install --upgrade pip' command.
请根据自己的需要决定是不是升级pip
需要特别注意中间的激活venv的命令,我们以后大部分操作都是在这个环境下执行的。当你看到shell的前缀是venv的时候,表明venv已经激活
[root@localhost share]# source ./venv/bin/activate
(venv) [root@localhost share]#
Bootstrap
Bootstrap是当前最强大的html前端库,非常好用,我提供的源码中已经包含我我们需要的两个文件,想要了解该前端库更多信息,请访问 https://getbootstrap.com/
JQuery
和bootstrap结合起来,实现这些前端的特效,我的源代码中已经包含所需的文件,如果想要了解更多,请访问 https://jquery.com/
flask_sqlalchemy
因为我们使用了centos中自带的sqlite3作为数据库,为了连接这个数据库,需要安装一个第三方插件,名字叫flask_sqlalchemy,在venv中可以直接使用pip安装
(venv) [root@localhost share]# pip install flask_sqlalchemys
测试Flask
在venv环境中,在share目录下做一个简单的测试,步骤如下
(venv) [root@localhost share]# mkdir myproject
(venv) [root@localhost share]# ls
myproject  venv
(venv) [root@localhost share]# cd myproject/
(venv) [root@localhost myproject]# ls
(venv) [root@localhost myproject]#
(venv) [root@localhost myproject]# vi hello.py
from flask import Flask
app = Flask(__name__)

@app.route('/')
def hello_world():
    return 'Hello, World!'
(venv) [root@localhost myproject]# export FLASK_APP=hello.py
(venv) [root@localhost myproject]# flask run --host=0.0.0.0
 * Serving Flask app "hello.py"
 * Environment: production
   WARNING: This is a development server. Do not use it in a production deployment.
   Use a production WSGI server instead.
 * Debug mode: off
 * Running on http://0.0.0.0:5000/ (Press CTRL+C to quit)
然后我们在windows的电脑上打开浏览器,访问 http://{centos ip}:5000,如果能看到“Hello World!”,就表示我们的flask安装已经成功
测试我的demo代码
将前面测试flask的myproject目录下的内容删除,并将https://github.com/junfhu/rbacdemo 中的源代码下载下来并放入myproject目录下,目录结构和我前面贴出的一样,然后执行该目录下的run.py来启动webserver
(venv) [root@localhost myproject]# pwd
/home/testshare/share/myproject
(venv) [root@localhost myproject]# (venv) [root@localhost myproject]# ./run.py
 * Serving Flask app "tool_portal" (lazy loading)
 * Environment: production
   WARNING: This is a development server. Do not use it in a production deployment.
   Use a production WSGI server instead.
 * Debug mode: on
 * Running on http://0.0.0.0:5000/ (Press CTRL+C to quit)
 * Restarting with stat
 * Debugger is active!
 * Debugger PIN: 407-886-526
然后就可以用浏览器打开http://{centos ip}:5000来访问网站了,其中内置的用户名是admin,内置的密码是Password123!