FFmpeg开发(一):mac项目环境搭建
FFmpeg简介
FFmpeg 有六个常用的功能模块:
- libavformat:多媒体文件或协议的封装和解封装库,如 Mp4、Flv 等文件封装格式,RTMP、RTSP 等网络协议封装格式;
- libavcodec:音视频编解码库;
- libavfilter:音视频、字幕滤镜库;
- libswscale:图像格式转换库;
- libswresample:音频重采样库;
- libavutil:工具库;
Android C开发
NDK开发流程
配置
Android NDK环境创建
Android项目,并与NDK进行关联在
Android项目中声明所需要调用的Native方法使用
Android需要交互的本地代码 实现在Android中声明的Native方法通过
ndk - bulid命令编译产生.so库文件编译
Android Studio工程,从而实现Android调用本地代码
| Java类型 | JNI别名 | 本地类型 |
|---|---|---|
| boolean | jboolean | unsigned char |
| byte | jbyte | signed char |
| char | jchar | unsigned short |
| short | jshort | short |
| int | jint | int |
| long | jlong | long long |
| float | jfloat | float |
| double | jdouble | double |
JNI与NDK关系
- JNI是实现的目的,NDK是在Android中实现JNI的手段
FFmpg环境搭建
编译环境
- macOS 11.0(m1 2020)
- android-ndk-r21e
- FFmpeg 4.3.1
编译准备
- 拉取FFmpeg源码
git clone https://git.ffmpeg.org/ffmpeg.git ffmpeg
- 进入源码目录并配置项目
./configure --disable-x86asm
在源码目录下创建编译脚本build_android_arm64-v8a_clang.sh
#!/bin/bash

export NDK=/Users/comochirs/Documents/andriod_project/NDK/android-ndk-r21e
TOOLCHAIN=$NDK/toolchains/llvm/prebuilt/darwin-x86_64

function build_android
{


./configure \
--prefix=$PREFIX \
--enable-neon  \
--enable-hwaccels  \
--enable-gpl   \
--disable-postproc \
--disable-debug \
--enable-small \
--enable-jni \
--enable-mediacodec \
--enable-decoder=h264_mediacodec \
--enable-static \
--enable-shared \
--disable-doc \
--enable-ffmpeg \
--disable-ffplay \
--disable-ffprobe \
--disable-avdevice \
--disable-doc \
--disable-symver \
--cross-prefix=$CROSS_PREFIX \
--target-os=android \
--arch=$ARCH \
--cpu=$CPU \
--cc=$CC \
--cxx=$CXX \
--enable-cross-compile \
--sysroot=$SYSROOT \
--extra-cflags="-Os -fpic $OPTIMIZE_CFLAGS" \
--extra-ldflags="$ADDI_LDFLAGS"\

make -j16
make install

echo "============================ build android arm64-v8a success =========================="

}

#arm64-v8a
ARCH=arm64
CPU=armv8-a
API=21
CC=$TOOLCHAIN/bin/aarch64-linux-android$API-clang
CXX=$TOOLCHAIN/bin/aarch64-linux-android$API-clang++
SYSROOT=$NDK/toolchains/llvm/prebuilt/darwin-x86_64/sysroot
CROSS_PREFIX=$TOOLCHAIN/bin/aarch64-linux-android-
PREFIX=$(pwd)/android/$CPU
OPTIMIZE_CFLAGS="-march=$CPU"

build_android
中间会出现无法确认开发者身份的情况,按照系统提示更改即可,编译成功后会在 android 目录下生成对应六个模块的静态库和动态库,若是编译出错,需要查看ffbuild/config.log。
FFmpeg 集成
配置AS的C开发环境

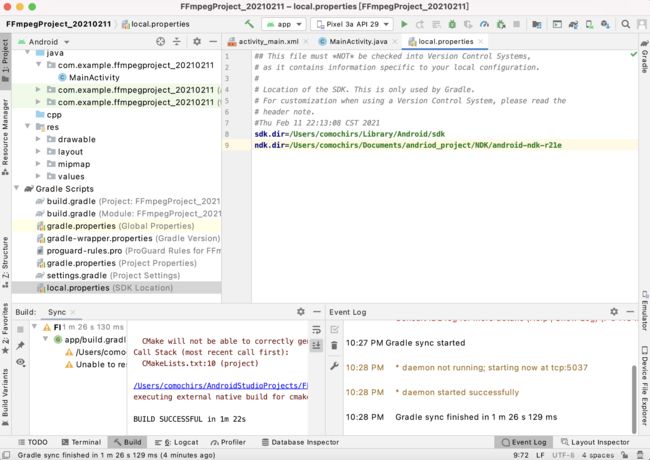
创建工程后提示安装NDK,直接使用之前下载好的文件,opt + cmd + c复制NDK路径,粘贴至local.properties文件下如图:
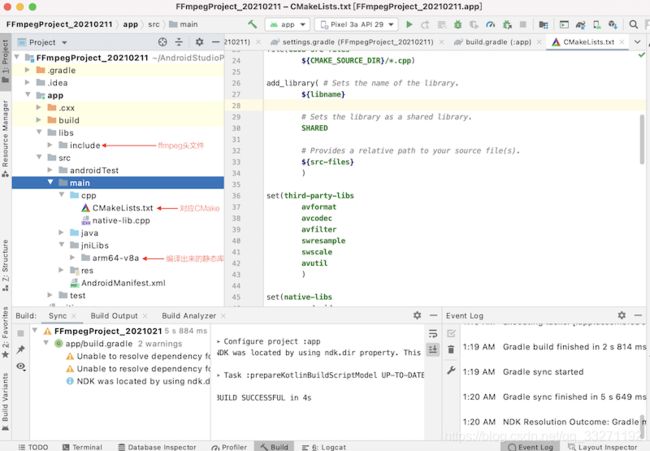
切换至project选项,将 FFmpeg 各个模块的静态库和头文件放置到指定目录下
编译成功!
环境测试
调用API测试环境配置是否成功
cmake_minimum_required(VERSION 3.10.2)

# Add FFmpeg

set(CMAKE_CXX_FLAGS "${CMAKE_CXX_FLAGS} -std=gnu++11")

set(jnilibs ${CMAKE_SOURCE_DIR}/../jniLibs)
set(libname test-ffmpeg)

include_directories(
        include
#        ${CMAKE_SOURCE_DIR}/util
)

link_directories(
        ${jnilibs}/${ANDROID_ABI})

file(GLOB src-files
        ${CMAKE_SOURCE_DIR}/*.cpp)

add_library( # Sets the name of the library.
        ${libname}

        # Sets the library as a shared library.
        SHARED

        # Provides a relative path to your source file(s).
        ${src-files}
        )

set(third-party-libs
        avformat
        avcodec
        avfilter
        swresample
        swscale
        avutil
        )

set(native-libs
        android
        EGL
        GLESv3
        OpenSLES
        log
        m
        z
        )

target_link_libraries(
                     # Specifies the target library.
                     # FFmpeg
                       ${libname}
                       # Links the target library to the log library
                       # included in the NDK.

                       #FFmpeg
                       ${third-party-libs}
                       ${native-libs}

                       ${log-lib} )
调用如下java库,
package com.example.ffmpegproject_20210211;

public class FFMediaPlayer {

    static {

        System.loadLibrary("test-ffmpeg");
    }

    public static String GetFFmpegVersion() {

        return native_GetFFmpegVersion();
    }

    private static native String native_GetFFmpegVersion();
}
值得注意的是可以使用AS直接生产对应JNI函数定义,添加宏后代码如下
#include 构建后没有问题!成功输出配置信息。