Nacos服务注册和配置中心
Nacos服务注册和配置中心
###第1章 Nacos简介
1.1 什么是Nacos?
官方术语:一个更易于构建云原生应用的动态服务发现、配置管理和服务管理平台
个人理解:Nacos就是注册中心+配置中心的组合(Nacos=Eureka+Config+Bus)
1.2 Nacos能干什么?
替代Eureka做服务注册中心
替代Config做服务配置中心
1.3下载地址以及官方文档
下载地址:
https://github.com/alibaba/Nacos
官方文档:
https://nacos.io/zh-cn/docs/quick-start.html
https://spring.io/projects/spring-cloud-alibaba/
第2章 Nacos安装并运行
- Windows版本Nacos的安装直接下载后解压即可
- 进入bin目录,然后在当前目录运行cmd,输入startup.cmd,看Nacos的图标证明Nacos运行成功
- 运行成功后在浏览器输入http://localhost:8848/nacos ,访问成功后证明Nacos安装并运行成功(默认Nacos的账号密码是:nacos)
第3章 Nacos的使用
3.1Nacos作为服务注册中心(提供者)
步骤:
-
导入依赖
<dependencies> <dependency> <groupId>org.springframework.cloudgroupId> <artifactId>spring-cloud-starter-alibaba-nacos-discoveryartifactId> <version>0.2.2.RELEASEversion> dependency> <dependency> <groupId>com.alibaba.nacosgroupId> <artifactId>nacos-clientartifactId> <version>1.1.0version> dependency> <dependency> <groupId>org.springframework.bootgroupId> <artifactId>spring-boot-starter-webartifactId> dependency> <dependency> <groupId>org.springframework.bootgroupId> <artifactId>spring-boot-starter-testartifactId> dependency> <dependency> <groupId>org.springframework.bootgroupId> <artifactId>spring-boot-actuatorartifactId> dependency> dependencies> -
编写application.yml
server: port: 9001 #端口9001 spring: cloud: nacos: discovery: server-addr: localhost:8848 #nacos的服务端地址 application: name: nacos-payment-provider #微服务的提供者 -
编写SpringBoot启动类
@SpringBootApplication public class NacosServerProvider { public static void main(String[] args) { SpringApplication.run(NacosServerProvider.class,args); } } -
编写业务代码
3.2Nacos作为客户端(消费者)
步骤:
-
导入依赖
<dependencies> <dependency> <groupId>org.springframework.cloudgroupId> <artifactId>spring-cloud-starter-alibaba-nacos-discoveryartifactId> <version>0.2.2.RELEASEversion> dependency> <dependency> <groupId>com.alibaba.nacosgroupId> <artifactId>nacos-clientartifactId> <version>1.1.0version> dependency> <dependency> <groupId>org.springframework.bootgroupId> <artifactId>spring-boot-starter-webartifactId> dependency> <dependency> <groupId>org.springframework.bootgroupId> <artifactId>spring-boot-starter-testartifactId> dependency> <dependency> <groupId>org.springframework.bootgroupId> <artifactId>spring-boot-actuatorartifactId> dependency> dependencies> -
编写application.yml
server: port: 9002 #端口9002 spring: cloud: nacos: discovery: server-addr: localhost:8848 #nacos的服务端地址 application: name: nacos-payment-consumer #微服务的消费者 -
编写SpringBoot启动类
@EnableDiscoveryClient
@SpringBootApplication
public class NacosServerConsumer {

    public static void main(String[] args) {

        SpringApplication.run(NacosServerConsumer.class,args);
    }
}
3.3 Nacos负载均衡
条件:
需要两个以上服务的提供者,端口号不同
消费端
-
导入依赖
<dependencies> <dependency> <groupId>org.springframework.cloudgroupId> <artifactId>spring-cloud-alibaba-nacos-discoveryartifactId> <version>0.2.2.RELEASEversion> dependency> <dependency> <groupId>com.alibaba.nacosgroupId> <artifactId>nacos-clientartifactId> <version>1.1.0version> dependency> <dependency> <groupId>org.springframework.bootgroupId> <artifactId>spring-boot-starter-webartifactId> <version>2.2.2.RELEASEversion> dependency> <dependency> <groupId>org.springframework.bootgroupId> <artifactId>spring-boot-starter-testartifactId> <version>2.2.2.RELEASEversion> dependency> <dependency> <groupId>org.springframework.bootgroupId> <artifactId>spring-boot-starter-actuatorartifactId> <version>2.2.2.RELEASEversion> dependency> dependencies> -
编写启动类
package com.zhiwang.nacos; import org.springframework.boot.SpringApplication; import org.springframework.boot.autoconfigure.SpringBootApplication; import org.springframework.cloud.client.discovery.EnableDiscoveryClient; @EnableDiscoveryClient @SpringBootApplication public class NacosServerConsumer { public static void main(String[] args) { SpringApplication.run(NacosServerConsumer.class,args); } } -
编写config
package com.zhiwang.nacos.config; import org.springframework.cloud.client.loadbalancer.LoadBalanced; import org.springframework.context.annotation.Bean; import org.springframework.context.annotation.Configuration; import org.springframework.web.client.RestTemplate; @Configuration public class RestTemplateConfig { @Bean @LoadBalanced //表示进行轮询 public RestTemplate restTemplate(){ return new RestTemplate(); } } -
编写controller
package com.zhiwang.nacos.controller; import org.springframework.beans.factory.annotation.Value; import org.springframework.cloud.client.discovery.DiscoveryClient; import org.springframework.web.bind.annotation.GetMapping; import org.springframework.web.bind.annotation.PathVariable; import org.springframework.web.bind.annotation.RequestMapping; import org.springframework.web.bind.annotation.RestController; import org.springframework.web.client.RestTemplate; import javax.annotation.Resource; @RestController @RequestMapping("/order") public class OrderController { @Resource private RestTemplate restTemplate; @Resource private DiscoveryClient discoveryClient; @Value("${service-url.nacos-user-service}") private String serverURL; @GetMapping("/goods/{id}") public String findGoodsById(@PathVariable("id") int id){ return restTemplate.getForObject(serverURL+"/goods/findOne/"+id,String.class); } } -
application.yml
server:
  port: 9002 #端口9002
spring:
  cloud:
    nacos:
      discovery:
        server-addr: localhost:8848 #nacos的服务端地址
  application:
    name: nacos-payment-consumer #微服务的消费者
service-url:
   nacos-user-service: http://nacos-payment-provider
服务端
需要创建两个及以上的服务端,除了端口号不同,其它都相同
-
导入依赖
<dependencies> <dependency> <groupId>org.springframework.cloudgroupId> <artifactId>spring-cloud-starter-alibaba-nacos-discoveryartifactId> <version>0.2.2.RELEASEversion> dependency> <dependency> <groupId>com.alibaba.nacosgroupId> <artifactId>nacos-clientartifactId> <version>1.1.0version> dependency> <dependency> <groupId>org.springframework.bootgroupId> <artifactId>spring-boot-starter-webartifactId> dependency> <dependency> <groupId>org.springframework.bootgroupId> <artifactId>spring-boot-starter-testartifactId> dependency> <dependency> <groupId>org.springframework.bootgroupId> <artifactId>spring-boot-actuatorartifactId> dependency> dependencies> -
编写启动类
package com.zhiwang.nacos; import org.springframework.boot.SpringApplication; import org.springframework.boot.autoconfigure.SpringBootApplication; @SpringBootApplication public class NacosServerProvider2 { public static void main(String[] args) { SpringApplication.run(NacosServerProvider2.class,args); } } -
application.yml
server: port: 9000 #端口9000 spring: cloud: nacos: discovery: server-addr: localhost:8848 #nacos的服务端地址 application: name: nacos-payment-provider #微服务的提供者 -
编写ontroller直接返回数据
package com.zhiwang.nacos.controller;


import org.springframework.beans.factory.annotation.Value;
import org.springframework.web.bind.annotation.GetMapping;
import org.springframework.web.bind.annotation.PathVariable;
import org.springframework.web.bind.annotation.RequestMapping;
import org.springframework.web.bind.annotation.RestController;

@RestController
@RequestMapping("/goods")
public class GoodsController {


    @Value("${server.port}")
    private String serverPort;

    @GetMapping("/findOne/{id}")
    public String findOne(@PathVariable("id") int id){


        return "nacos registry,serverPort:"+serverPort+"id:"+id;
    }
}
第4章 Nacos服务配置中心
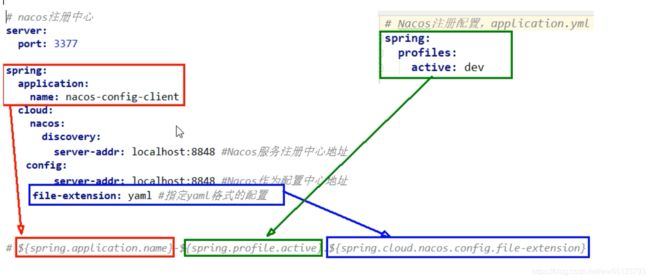
Nacos同springcloud-config一样,在项目初始化时,要保证先从配置中心进行配置拉取,拉取配置之后,才能保证项目的正常启动。
springboot中配置文件的加载是存在优先级顺序的,bootstrap优先级高于application
bootstarp.yml
server:
  port: 3377 #端口3377
spring:
  application:
    name: nacos-config-client #微服务的消费者
  cloud:
    nacos:
      discovery:
        server-addr: localhost:8848 #nacos的服务端地址
      config:
        server-addr: localhost:8848 #nacos作为配置中心
        file-extension: yaml #指定yaml格式的配置
        group: DEV_GROUP #指定组

#   ${prefix}-${spring.profiles.active}.${file-extension}
# nacos-config-client-dev-yaml
#    prefix 默认为 spring.application.name 的值,也可以通过配置项 spring.cloud.nacos.config.prefix来配置。
#   spring.profiles.active 即为当前环境对应的 profile,详情可以参考 Spring Boot文档。
#  注意:当 spring.profiles.active 为空时,对应的连接符 - 也将不存在,dataId 的拼接格式变成 ${prefix}.${file-extension}
#  file-exetension 为配置内容的数据格式,可以通过配置项 spring.cloud.nacos.config.file-extension 来配置。目前只支持 properties 和 yaml 类型。
application.yml
spring:
  profiles:
    active: info #表示开发环境
