centos7编译安装基于fastcgi模式的LAMP架构

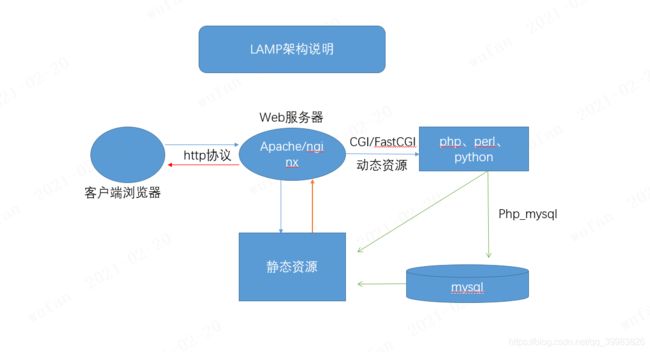
工作过程:
1、当客户请求的是静态资源时,web服务器会直接把静态资源返回客户端;
2、当客户端请求的是动态资源时,httpd的php模块会进行相应的动态资源运算,
如果此时过程还需要数据库的数据作为运算参数时,php会连接mysql取得数据然后
进行运算,运算的结果转为静态资源由web服务器返回到客户端;
PHP官网:http://www.php.net
php各种版本官方支持时间:
https://www.php.net/supported-versions.php
php 的配置文件:/etc/php.ini, /etc/php.d/*.ini 配置文件在php解释器启动时被读取
对配置文件的修改生效方法
Modules:重启httpd服务
FastCGI:重启php-fpm服务
注释符:
以#开头,纯粹的注释信息
以 ; 开头,用于注释可启用的directive
php.ini 配置参考文档:
php.ini的核心配置选项文档: http://php.net/manual/zh/ini.core.php
php.ini配置选项列表:http://php.net/manual/zh/ini.list.php
php常见设置:
max_execution_time= 30 最长执行时间30s
memory_limit=128M 生产不够,可调大
display_errors=off 调试使用,不要打开,否则可能暴露重要信息
display_startup_errors=off 建议关闭
post_max_size=8M 最大上传数据大小,生产可能调大,比下面项大
upload_max_filesize =2M 最大上传文件,生产可能要调大
max_file_uploads = 20 同时上传最多文件数 date.timezone =Asia/Shanghai 指定时区 short_open_tag=on 开启短标签
二进制部署mysql数据库:
1、安装基础依赖包
yum install vim gcc gcc-c++ wget autoconf net-tools lrzsz iotop lsof iotop bash-completion curl policycoreutils openssh-server opensshclients postfix libaio -y
2、解压MySQL源码包,并创建软连接
[root@wufanecs src]# pwd
/usr/local/src
[root@wufanecs src]# tar xf 1mysql-5.6.46-linux-glibc2.12-x86_64.tar
[root@wufanecs src]# ls
mysql-5.6.46-linux-glibc2.12-x86_64.tar  mysql-5.6.46-linux-glibc2.12-x86_64
[root@wufanecs src]# ln -sv /usr/local/src/mysql-5.6.46-linux-glibc2.12-x86_64  /usr/local/mysql

‘/usr/local/mysql’ -> ‘mysql-5.6.46-linux-glibc2.12-x86_64’
3、创建mysql用户设置权限
[root@wufanecs src]# useradd mysql -s /sbin/nologin
[root@wufanecs src]# mkdir -pv /data/mysql /var/lib/mysql
mkdir: created directory ‘/data’
mkdir: created directory ‘/data/mysql’
mkdir: created directory ‘/var/lib/mysql’
[root@wufanecs src]# chown -R mysql.mysql /data /var/lib/mysql/
[root@wufanecs mysql]# ./scripts//mysql_install_db --user=mysql --datadir=/data/mysql --basedir=/usr/local/mysql/
4、准备启动脚本
[root@wufanecs mysql]# cp /usr/local/mysql/support-files/mysql.server /etc/init.d/mysqld
[root@wufanecs mysql]# chmod a+x /etc/init.d/mysqld
5、修改配置文件
[root@wufanecs mysql]# vim /etc/my.cnf
[mysqld]
datadir=/data/mysql
socket=/data/mysql/mysql.sock
user=mysql
symbolic-links=0
innodb_file_per_table=1
[client]
port=3306
socket=/var/lib/mysql/mysql.sock
[mysqld_safe]
log-error=/var/log/mysqld.log
pid-file=/tmp/mysql.sock
6、启动mysql创建数据库并授权
[root@wufanecs mysql]# /etc/init.d/mysqld start
Starting MySQL.                                            [  OK  ]

[root@wufanecs ~]# ln -sv /data/mysql/mysql.sock /var/lib/mysql/mysql.sock
‘/var/lib/mysql/mysql.sock’ -> ‘/data/mysql/mysql.sock’
[root@wufanecs ~]#  /usr/local/mysql/bin/mysql
mysql> CREATE DATABASE wordpress;
Query OK, 1 row affected (0.00 sec)

mysql> GRANT ALL PRIVILEGES ON wordpress.* TO 'wordpress'@'%' IDENTIFIED BY '123456';
Query OK, 0 rows affected (0.00 sec)

mysql> FLUSH PRIVILEGES;
Query OK, 0 rows affected (0.00 sec)

mysql> show databases;
+--------------------+
| Database           |
+--------------------+
| information_schema |
| mysql              |
| performance_schema |
| test               |
| wordpress          |
+--------------------+
5 rows in set (0.00 sec)
部署PHP:编译安装php7.4.3
1、安装基础依赖包
yum -y install wget vim pcre pcre-devel openssl openssl-devel libicu-devel gcc gcc-c++ autoconf libjpeg libjpeg-devel libpng libpng-devel freetype freetype-devel libxml2 libxml2-devel zlib zlib-devel glibc glibcdevel glib2 glib2-devel ncurses ncurses-devel curl curl-devel krb5-devel libidn libidn-devel openldap openldap-devel nss_ldap jemalloc-devel cmake boost-devel bison automake libevent libevent-devel gd gd-devel libtool* libmcrypt libmcrypt-devel mcrypt mhash libxslt libxslt-devel readline readline-devel gmp gmp-devel libcurl libcurl-devel openjpeg-devel sqlite-devel
2、解压并编译安装
[root@wufanecs ~]# cd /usr/local/src/
[root@wufanecs src]# ls
mysql-5.6.46-linux-glibc2.12-x86_64  mysql-5.6.46-linux-glibc2.12-x86_64.tar.gz  php-7.4.3.tar.gz
[root@wufanecs src]# tar xf php-7.4.3.tar.gz
[root@wufanecs src]# cd php-7.4.3/

[root@wufanecs php-7.4.3]# ./configure --prefix=/apps/php --enable-fpm --with-fpmuser=www --with-fpm-group=www --with-pear --with-curl --with-png-dir --with-freetype --with-iconv --with-mhash --with-zlib --with-xmlrpc --with-xsl --with-openssl --with-mysqli --with-pdo-mysql --disable-debug --enable-zip --enable-sockets --enable-soap --enable-inline-optimization --enable-xml --enable-ftp --enable-exif --enable-wddx --enable-bcmath --enable-calendar --enable-shmop --enable-dba --enable-sysvsem --enable-sysvshm --enable-sysvmsg
[root@wufanecs php-7.4.3]# make -j 2
[root@wufanecs php-7.4.3]# echo $?
0
[root@wufanecs php-7.4.3]# make install
3、准备php配置文件:
[root@wufanecs php-7.4.3]# cd /apps/php/etc/php-fpm.d/
[root@wufanecs php-fpm.d]# cp www.conf.default www.conf
[root@wufanecs php-fpm.d]# cp /usr/local/src/php-7.4.3/p
pear/                php.ini-development  php.ini-production
[root@wufanecs php-fpm.d]# cp /usr/local/src/php-7.4.3/php.ini-production /apps/php/etc/php.ini
4、修改配置文件
[root@wufanecs php-fpm.d]# useradd  www -s /sbin/nologin  -u 1001

[root@wufanecs php-fpm.d]# vim www.conf
[root@wufanecs php-fpm.d]# grep -v ";" www.conf | grep -v "^$"
[www]
user = www
group = www
listen = 127.0.0.1:9000
pm = dynamic
pm.max_children = 50
pm.start_servers = 30
pm.min_spare_servers = 30
pm.max_spare_servers = 35
[root@wufanecs php-fpm.d]# mkdir /apps/php/log/
[root@wufanecs php-fpm.d]# cd /apps/php/etc/
[root@wufanecs etc]# cp php-fpm.conf.default php-fpm.conf
5、启动并验证php-fpm:
#检测语法并启动php-fpm
[root@wufanecs etc]# /apps/php/sbin/php-fpm -t
[20-Feb-2021 14:21:56] NOTICE: configuration file /apps/php/etc/php-fpm.conf test is successful
#验证php-fpm
[root@wufanecs etc]# /apps/php/sbin/php-fpm  -c /apps/php/etc/php.ini
[root@wufanecs etc]# ps -ef |grep php-fpm
root      9398     1  0 14:24 ?        00:00:00 php-fpm: master process (/apps/php/etc/php-fpm.conf)
www       9399  9398  0 14:24 ?        00:00:00 php-fpm: pool www
www       9400  9398  0 14:24 ?        00:00:00 php-fpm: pool www
www       9401  9398  0 14:24 ?        00:00:00 php-fpm: pool www

[root@wufanecs etc]# netstat -tanlp |grep php-fpm
tcp        0      0 127.0.0.1:9000          0.0.0.0:*               LISTEN      9398/php-fpm: maste
部署nginx:
1、安装nginx需要的依赖包
yum install -y vim lrzsz tree screen psmisc lsof tcpdump wget ntpdate gcc gcc-c++ glibc glibc-devel pcre pcre-devel openssl openssl-develsystemd-devel net-tools iotop bc zip unzip zlib-devel bash-completion nfs-utils automake libxml2 libxml2-devel libxslt libxslt-devel perl perl-ExtUtils-Embed
2、下载nginx源码包并解压
[root@wufanecs etc]# cd /usr/local/src/
[root@wufanecs src]# wget https://nginx.org/download/nginx-1.16.1.tar.gz
[root@wufanecs src]# tar xf nginx-1.16.1.tar.gz
[root@wufanecs src]# cd nginx-1.16.1/
3、编译nginx
[root@wufanecs nginx-1.16.1]# ./configure --prefix=/apps/nginx --user=nginx --group=nginx --with-http_ssl_module --with-http_v2_module --with-http_realip_module --with-http_stub_status_module --with-http_gzip_static_module --with-pcre --with-stream --with-stream_ssl_module --with-stream_realip_module

[root@wufanecs nginx-1.16.1]# make
[root@wufanecs nginx-1.16.1]# make install
4、创建nginx普通用户
[root@wufanecs nginx-1.16.1]# useradd nginx -s /sbin/nologin -u 2000
[root@wufanecs nginx-1.16.1]# chown nginx.nginx -R /apps/nginx/
5、验证版本及编译参数
[root@wufanecs nginx-1.16.1]# /apps/nginx/sbin/nginx -V
nginx version: nginx/1.16.1
built by gcc 4.8.5 20150623 (Red Hat 4.8.5-44) (GCC)
built with OpenSSL 1.0.2k-fips  26 Jan 2017
TLS SNI support enabled
configure arguments: --prefix=/apps/nginx --user=nginx --group=nginx --with-http_ssl_module --with-http_v2_module --with-http_realip_module --with-http_stub_status_module --with-http_gzip_static_module --with-pcre --with-stream --with-stream_ssl_module --with-stream_realip_module
6、准备php测试页:
[root@wufanecs nginx-1.16.1]# mkdir /data/nginx/wordpress -p
[root@wufanecs nginx-1.16.1]# vim /data/nginx/wordpress/index.php
[root@wufanecs nginx-1.16.1]# cat /data/nginx/wordpress/index.php
<?php
  phpinfo();
?>
7、配置nginx:
[root@wufanecs nginx-1.16.1]# grep -v "#" /apps/nginx/conf/nginx.conf | grep -v "^$"
worker_processes  1;
events {

    worker_connections  1024;
}
http {

    include       mime.types;
    default_type  application/octet-stream;
    sendfile        on;
    keepalive_timeout  65;
    server {

        listen       80;
        server_name  localhost;
        location / {

            root   /data/nginx/wordpress;
            index  index.php index.html index.htm;
        }
        error_page  404              /404.html;
        error_page   500 502 503 504  /50x.html;
        location = /50x.html {

            root   html;
        }
        location ~ \.php$ {

            root           /data/nginx/wordpress;
            fastcgi_pass   127.0.0.1:9000;
            fastcgi_index  index.php;
            fastcgi_param  SCRIPT_FILENAME   $document_root$fastcgi_script_name;
            include        fastcgi_params;
        }
    }
}


[root@wufanecs nginx-1.16.1]# /apps/nginx/sbin/nginx -t
nginx: the configuration file /apps/nginx/conf/nginx.conf syntax is ok
nginx: configuration file /apps/nginx/conf/nginx.conf test is successful
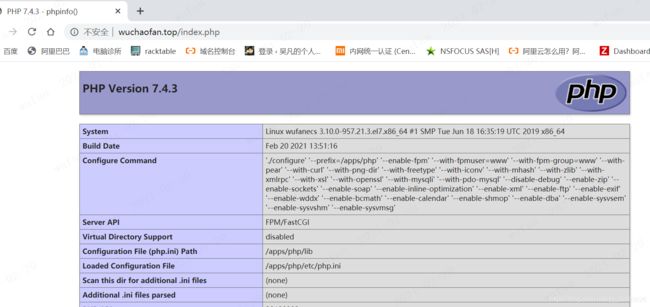
重启nginx并访问php状态页:
[root@wufanecs nginx-1.16.1]# /apps/nginx/sbin/nginx -s reload
vim /apps/nginx/conf/nginx.conf
server_tokens off;  #http 配置项
隐藏PHP版本:
location ~ \.php$ {

            root           html;
            fastcgi_pass   127.0.0.1:9000;
            fastcgi_index  index.php;
            fastcgi_hide_header X-Powered-By;
            #fastcgi_param  SCRIPT_FILENAME  /scripts$fastcgi_script_name;
            fastcgi_param  SCRIPT_FILENAME $document_root$fastcgi_script_name;
            include        fastcgi_params;
        }
