MNIST手写数字识别(TensorFlow2.0,包含数字的数据集)
MNIST手写数字识别(TensorFlow2.0,包含数字的数据集)
- 0 简介
- 1 训练部分
-
- 1.1 图像的预处理
- 1.2 进行训练
- 1.3 参数可视化
- 2 检验训练结果
- 3 代码资源
0 简介
手写数字识别是深度学习入门的一个典型案例,用于新手的学习,以此了解训练的过程。手写数字识别是一个分类的过程。数据集一共包括60000张手写数字图像,本示例包含完整的处理过程。
有一说一,按照官网这种突然地数据载入,我初学的时候简直头痛。

1 训练部分
训练部分在train.py文件中。
老规矩,首先导入用到的package。主要用到了tensorflow2.0、简单的图像处理、numpy、os处理、图像可视化的package。
'''
@Auther : gaoxin
@Date : 2019.08.15
@Version : 1.0
'''

import tensorflow as tf
from PIL import Image
import numpy as np
import os
from matplotlib import pyplot as plt

#定义numpy显示数组全部内容
np.set_printoptions(threshold = np.inf)
1.1 图像的预处理
首先加载图像路径。
train_path = './mnist_image_label/mnist_train_jpg_60000/'
train_txt = './mnist_image_label/mnist_train_jpg_60000.txt'
x_train_savepath = './mnist_image_label/mnist_x_train.npy'
y_train_savepath = './mnist_image_label/mnist_y_train.npy'

test_path = './mnist_image_label/mnist_test_jpg_10000/'
test_txt = './mnist_image_label/mnist_test_jpg_10000.txt'
x_test_savepath = './mnist_image_label/mnist_x_test.npy'
y_test_savepath = './mnist_image_label/mnist_y_test.npy'
接着定义一个预处理函数,用于产生适合训练的数据集。
def generateds(path, txt):
    f = open(txt, 'r')
    contents = f.readlines()
    f.close()
    x, y_ = [], []
    for content in contents:
        value = content.split()
        img_path = path + value[0]
        img = Image.open(img_path)
        img = np.array(img.convert('L'))
        img = img / 255.
        x.append(img)
        y_.append(value[1])
        print('loading : ' + content)
    x = np.array(x)
    y_ = np.array(y_)
    y_ = y_.astype(np.int64)
    return x, y_
然后,产生数据集。
if os.path.exists(x_train_savepath) and os.path.exists(y_train_savepath) and os.path.exists(
        x_test_savepath) and os.path.exists(y_test_savepath):
    print('-------------Load Datasets-----------------')
    x_train_save = np.load(x_train_savepath)
    y_train = np.load(y_train_savepath)
    x_test_save = np.load(x_test_savepath)
    y_test = np.load(y_test_savepath)
    x_train = np.reshape(x_train_save, (len(x_train_save), 28, 28))
    x_test = np.reshape(x_test_save, (len(x_test_save), 28, 28))
else:
    print('-------------Generate Datasets-----------------')
    x_train, y_train = generateds(train_path, train_txt)
    x_test, y_test = generateds(test_path, test_txt)

    print('-------------Save Datasets-----------------')
    x_train_save = np.reshape(x_train, (len(x_train), -1))
    x_test_save = np.reshape(x_test, (len(x_test), -1))
    np.save(x_train_savepath, x_train_save)
    np.save(y_train_savepath, y_train)
    np.save(x_test_savepath, x_test_save)
    np.save(y_test_savepath, y_test)
1.2 进行训练
这里的教程只使用了全连接层,大家也可以换成其他的模型,比如一些经典的卷积神经LeeNet、AlexNet、InceptionNet、VGGNet、ResNet等(注意手写数字识别太简单了,根本不必要用复杂的模型进行训练)
model = tf.keras.models.Sequential([
    tf.keras.layers.Flatten(),
    tf.keras.layers.Dense(128, activation='relu'),
    tf.keras.layers.Dense(10, activation='softmax')
])
模型进行配置,然后训练。
model.compile(optimizer='adam',
              loss=tf.keras.losses.SparseCategoricalCrossentropy(from_logits=False),
              metrics=['sparse_categorical_accuracy'])


checkpoint_save_path = "./checkpoint/mnist.ckpt"
if os.path.exists(checkpoint_save_path + '.index'):
    print('-------------load the model-----------------')
    model.load_weights(checkpoint_save_path)

cp_callback = tf.keras.callbacks.ModelCheckpoint(filepath=checkpoint_save_path,
                                                 save_weights_only=True,
                                                 save_best_only=True)

history = model.fit(x_train, y_train, batch_size=32, epochs=5, validation_data=(x_test, y_test), validation_freq=1, callbacks=[cp_callback])
model.summary()
1.3 参数可视化
这里将模型的weights、bias都写入了一个txt文件,如果需要的话可以查看参数情况。
file = open('./weights.txt', 'w')
for v in model.trainable_variables:
    file.write(str(v.name) + '\n')
    file.write(str(v.shape) + '\n')
    file.write(str(v.numpy()) + '\n')
file.close()
最后是plot画出正确率与loss的曲线图。
# 显示训练集和验证集的acc和loss曲线
acc = history.history['sparse_categorical_accuracy']
val_acc = history.history['val_sparse_categorical_accuracy']
loss = history.history['loss']
val_loss = history.history['val_loss']

plt.subplot(1, 2, 1)
plt.plot(acc, label='Training Accuracy')
plt.plot(val_acc, label='Validation Accuracy')
plt.title('Training and Validation Accuracy')
plt.legend()

plt.subplot(1, 2, 2)
plt.plot(loss, label='Training Loss')
plt.plot(val_loss, label='Validation Loss')
plt.title('Training and Validation Loss')
plt.legend()
plt.show()
2 检验训练结果
检验部分在app.py程序中。
程序如下。主要是加载模型参数,然后做数字分类的识别。
from PIL import Image
import numpy as np
import tensorflow as tf

model_save_path = './checkpoint/mnist.ckpt'

model = tf.keras.models.Sequential([
    tf.keras.layers.Flatten(),
    tf.keras.layers.Dense(128, activation='relu'),
    tf.keras.layers.Dense(10, activation='softmax')])

model.load_weights(model_save_path)

preNum = int(input("input the number of test pictures:"))

for i in range(preNum):
    image_path = input("the path of test picture:")
    img = Image.open(image_path)
    img = img.resize((28, 28), Image.ANTIALIAS)
    img_arr = np.array(img.convert('L'))

    for i in range(28):
        for j in range(28):
            if img_arr[i][j] < 200:
                img_arr[i][j] = 255
            else:
                img_arr[i][j] = 0

    img_arr = img_arr / 255.0
    x_predict = img_arr[tf.newaxis, ...]
    result = model.predict(x_predict)

    pred = tf.argmax(result, axis=1)

    print('\n')
    tf.print(pred)
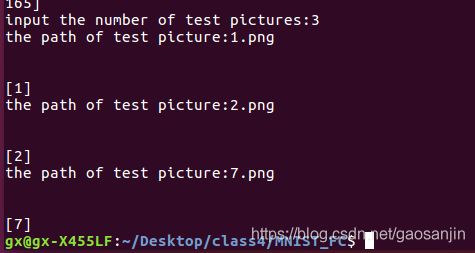
运行程序,输入检验的次数,我输入:3,检验3次;然后依次输入检验的图像的路径:1.png、2.png、7.png,检验结果正确,结果如下。

3 代码资源
因为这个程序带有数据集,所以我放上了网盘资源:
链接:https://pan.baidu.com/s/1z-UHb2yNBrNv38ISlhbzwg
提取码:gxin
最后使用的时候记得解压数据集。
附上另一分类识别的数据集,可以当做一个小练习。
链接:https://pan.baidu.com/s/1SR3uu86xWGyEMyneRaVg5Q
提取码:gxin
