天池热身赛-布匹瑕疵目标检测
1、检测代码
代码源自datawhale官方提供baseline: https://github.com/datawhalechina/team-learning-cv/tree/master/DefectDetection
数据处理代码都写好了,太感动了 _
baseline使用的是yolov5,我的显卡只有一个1080Ti,所以先选择yolov5s进行训练,设置训练50个epoch, 图片大小设置为512x512。
这部分内容主要参考了https://blog.csdn.net/qq_26751117/article/details/113853150
- 数据处理:主要是将比赛方提供的数据格式转化为yolo需要的格式,先使用convertTrainLabel.py转化,然后在运行process_data_yolo.py,就得到了数据,存放位置为process_data文件夹;注意需要修改process_data_yolo中val字段,全部改为train字段,运行两次,分别得到验证和训练的数据文件。
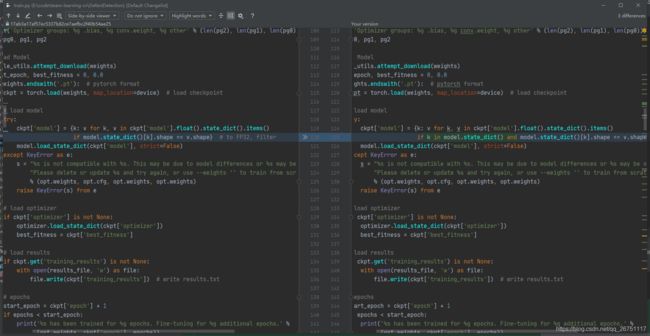
- 预训练权重:尝试了一下不加载预训练权重,效果不是很好,可能是因为本来数据就比较少,还是需要进行迁移学习的。所以想办法下载了yolov5s.pt文件,进行了加载。由于模型比较小,可以设置较大的batch size, 这里是16。这里借上边那个文章的图,需要简单修改一下加载权重的部分。
- 运行,简单修改了一下一些报错的点,然后就可以运行了yolov5s模型了。
2、docker提交
我的dockerfile文件:
# Base Images
FROM registry.cn-shanghai.aliyuncs.com/tcc-public/pytorch:1.4-cuda10.1-py3

ADD . /workspace

WORKDIR /workspace

RUN pip install -r requirements.txt

CMD ["sh", "run.sh"]
开始构建:
(torch16) pdluser@pdluser-System-Product-Name:~/project/tianchi_demo$ sudo docker build -t registry.cn-shenzhen.aliyuncs.com/nine_percent/tianchi_submit:1.0 .
[sudo] pdluser 的密码:
Sending build context to Docker daemon  6.778GB
Step 1/5 : FROM registry.cn-shanghai.aliyuncs.com/tcc-public/pytorch:1.4-cuda10.1-py3
 ---> 76c152fbfd03
Step 2/5 : ADD . /workspace
 ---> 10ca596f6d20
Step 3/5 : WORKDIR /workspace
 ---> Running in 37a88d04d2a9
Removing intermediate container 37a88d04d2a9
 ---> 7f7982fbfaba
Step 4/5 : RUN pip install -r requirements.txt -i https://mirrors.aliyun.com/pypi/simple --ignore-installed PyYAML
 ---> Running in 877004f83473
Looking in indexes: https://mirrors.aliyun.com/pypi/simple
  Downloading https://mirrors.aliyun.com/pypi/packages/ec/d6/a82d191ec058314b2b7cbee5635150f754ba1c6ffc05387bc9a57efe48b8/cryptacular-1.5.5.tar.gz
  Installing build dependencies: started
  Installing build dependencies: finished with status 'done'
  Getting requirements to build wheel: started
  Getting requirements to build wheel: finished with status 'done'
    Preparing wheel metadata: started
    Preparing wheel metadata: finished with status 'done'
Collecting zope.sqlalchemy
  Downloading https://mirrors.aliyun.com/pypi/packages/fa/83/459decec1dd2c14d60f9a360fff989c128abe545a1554a1da64b054a55d4/zope.sqlalchemy-1.3-py2.py3-none-any.whl
Collecting velruse>=1.0.3
  Downloading https://mirrors.aliyun.com/pypi/packages/8f/0b/d47ea894587f3155f8c4520aa74d57c856189d0bbe27e831881d655a3386/PasteDeploy-2.1.1-py2.py3-none-any.whl
Building wheels for collected packages: cryptacular
  Building wheel for cryptacular (PEP 517): started
  Building wheel for cryptacular (PEP 517): finished with status 'done'
  Created wheel for cryptacular: filename=cryptacular-1.5.5-cp37-abi3-manylinux2010_x86_64.whl size=52452 sha256=93037b68313c3d86df4c8cab9d0cc0866d1579cb7399410c7903b56eb2ff0067
  Stored in directory: /root/.cache/pip/wheels/dd/c7/11/721f100da8477396b1f8fcfa2d23c801d5bac07d0e2d82dc0d
Successfully built cryptacular
Building wheels for collected packages: apex, velruse, pbkdf2, anykeystore
  Building wheel for apex (setup.py): started
  Building wheel for apex (setup.py): finished with status 'done'
  Created wheel for apex: filename=apex-0.9.10.dev0-cp37-none-any.whl size=46468 sha256=c68745de219dd6169195cfec426e528cd5f5f932bd3cb7ddbc22817a9827cfea
  Stored in directory: /root/.cache/pip/wheels/b8/f0/7a/2fc4cf8a70bfc0981f7009a2146685d06ee220398c0b780acf
  Building wheel for velruse (setup.py): started
  Building wheel for velruse (setup.py): finished with status 'done'
  Created wheel for velruse: filename=velruse-1.1.1-cp37-none-any.whl size=50923 sha256=c300b70b745467b6b075bec09d6b2a11ab3524f6de31605431a62308613648e3
  Stored in directory:
Successfully built apex velruse pbkdf2 anykeystore
Installing collected packages: PyYAML, Cython, numpy, opencv-python, typing-extensions, torch, pyparsing, kiwisolver, six, cycler, pillow
Removing intermediate container 877004f83473
 ---> 5c40d92c4bc1
Step 5/5 : CMD ["sh", "run.sh"]
 ---> Running in 41c2daf77fbc
Removing intermediate container 41c2daf77fbc
 ---> 603e3fe4452c
Successfully built 603e3fe4452c
Successfully tagged registry.cn-shenzhen.aliyuncs.com/nine_percent/tianchi_submit:1.0
在构建完镜像以后,进入镜像:
先查看一下对应的ID:
pdluser@pdluser-System-Product-Name:~$ sudo docker images
[sudo] pdluser 的密码:
REPOSITORY                                                      TAG                 IMAGE ID            CREATED             SIZE
registry.cn-shenzhen.aliyuncs.com/nine_percent/tianchi_submit   1.0                 b773b4e52e7a        4 minutes ago       11.2GB
                                                                        f99df53cc33c        23 hours ago        7.92GB
registry.cn-shanghai.aliyuncs.com/tcc-public/pytorch            1.4-cuda10.1-py3    76c152fbfd03        13 months ago       7.56GB
registry.cn-shanghai.aliyuncs.com/tcc-public/python             3                   a4cc999cf2aa        21 months ago       929MB
进入第一个镜像,b7:
(torch16) pdluser@pdluser-System-Product-Name:~/project/tianchi_demo$ sudo docker run -it b7 /bin/bash
root@2a128d20af63:/workspace#
在这里运行run.sh,测试成功就可以提交了。
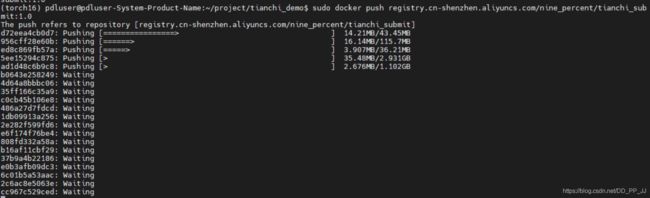
下一步将镜像推送到Registry:
$ sudo docker login --username=用户名 registry.cn-shenzhen.aliyuncs.com
$ sudo docker tag [ImageId] registry.cn-shenzhen.aliyuncs.com/nine_percent/tianchi_submit:[镜像版本号]
$ sudo docker push registry.cn-shenzhen.aliyuncs.com/nine_percent/tianchi_submit:[镜像版本号]
3、遇到的问题
在进行build的时候,发现以下问题,ERROR: Double requirement given: PyYAML>=5.3 (from -r requirements.txt (line 10)) (already in PyYAML, name=‘PyYAML’)
通过把yaml的等级要求去掉,就不会报错了。

用到opencv的时候也出现了报错:
Python 3.7.4 (default, Aug 13 2019, 20:35:49)
[GCC 7.3.0] :: Anaconda, Inc. on linux
Type "help", "copyright", "credits" or "license" for more information.
>>> import cv2
Traceback (most recent call last):
  File "", line 1, in
  File "/opt/conda/lib/python3.7/site-packages/cv2/__init__.py", line 5, in
    from .cv2 import *
ImportError: libGL.so.1: cannot open shared object file: No such file or directory
解决方案是在dockerfile中添加以下内容:
RUN apt update
RUN apt install libgl1-mesa-glx
RUN apt-get install -y libglib2.0-0
但是会遇到以下问题:
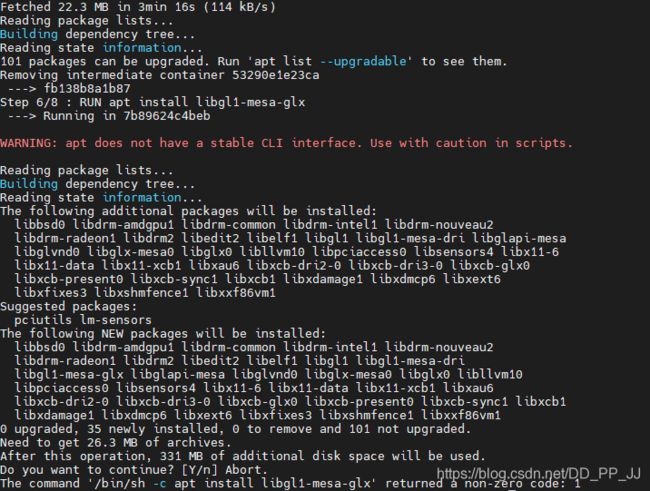
这样改动dockfile,避免交互:
RUN DEBIAN_FRONTEND=noninteractive apt update -y
RUN DEBIAN_FRONTEND=noninteractive apt install libgl1-mesa-glx -y
RUN DEBIAN_FRONTEND=noninteractive apt-get install -y libglib2.0-0
第一次提交出错:
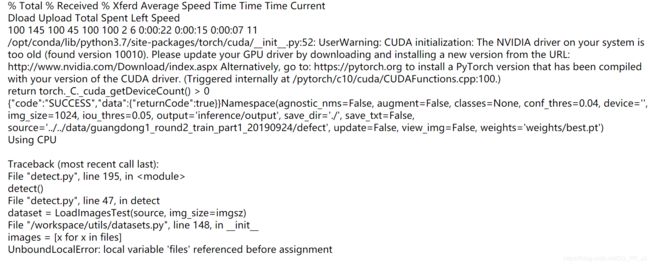
啊,连续两次错误了。
之后调节了一下文件存放位置,和对应的命令,终于提交成功了,可喜可贺可喜可贺。
吐槽:这个docker虽然很不错,但是入门还是有一定门槛的,我总结了一下使用过程中经常用到的知识点:https://blog.csdn.net/DD_PP_JJ/article/details/113902874 可以参考一下。 整个过程docker卡壳时间比较久,查看了一下群友推荐的资料,感觉还是对docker了解比较局限,每次build的时候都需要从远端下载镜像,非常麻烦,每次build要花很久很久,遇到了许多dockerfile的相关的问题,每次处理都需要重新下载,感觉很麻烦。提交比赛结果也是非常漫长,push要花很久时间,好麻烦。另外,不知道为何我再运行docker -v的时候发现映射不到容器中,这个问题还没有解决。