MHA高可用配置以及故障切换和实验中的报错和解决方法
目录
- 一、概述
-
- 1、MHA简介
- 2、MHA的组成
- 3、MHA特点
- 二、搭建MySQL MHA实验
-
- 1、实验环境
- 2、实验目的
- 3、实验步骤
一、概述
1、MHA简介
- 一套优秀的MySQL高可用环境下故障切换和主从复制的软件
- MHA的出现就是解决MySQL单点的问题
- MySQL故障过程中,MHA能做到0~30秒内自动完成故障切换
- MHA能在最大程度上保证数据的一致性,以达到真正意义上的高可用
2、MHA的组成
- MHA Manager(管理节点)
MHA Manager 可以单独部署在一台独立的机器上,管理多个 master-slave 集群;也可以部署在一台 slave 节点上。
MHA Manager 会定时探测集群中的 master 节点。当 master 出现故障时,它可以自动将最新数据的 slave 提升为新的 master, 然后将所有其他的 slave 重新指向新的 master。整个故障转移过程对应用程序完全透明。 - MHA Node(数据节点)
MHA Node运行在每台MySQL服务器上
3、MHA特点
- 自动故障切换过程中,MHA视图从宕机的主服务器上保存二进制日志,最大程度的保证数据不丢失
- 使用半同步复制,可以大大降低数据丢失的风险,如果只有一个slave已经收到了最新的二进制日志,MHA可以将最新的二进制日志应用于其他所有的slave服务器上,因此可以保证所有节点的数据一致性
- 目前MHA支持一主多从架构,最少三台服务,即一主两从
二、搭建MySQL MHA实验
1、实验环境
2、实验目的
- 通过MHA监控MySQL服务器,在服务器故障时自动进行切换,不影响业务
- 当主服务器宕机时,备选主服务器自动成为主服务器
3、实验步骤
1)关闭所有服务器的防火墙
systemctl stop firewalld
setenforce 0
2)Master、Slave1、Slave2 节点上安装 mysql5.7
3)改 Master、Slave1、Slave2 节点的主机名
hostnamectl set-hostname Mysql1
su
hostnamectl set-hostname Mysql2
su
hostnamectl set-hostname Mysql3
su
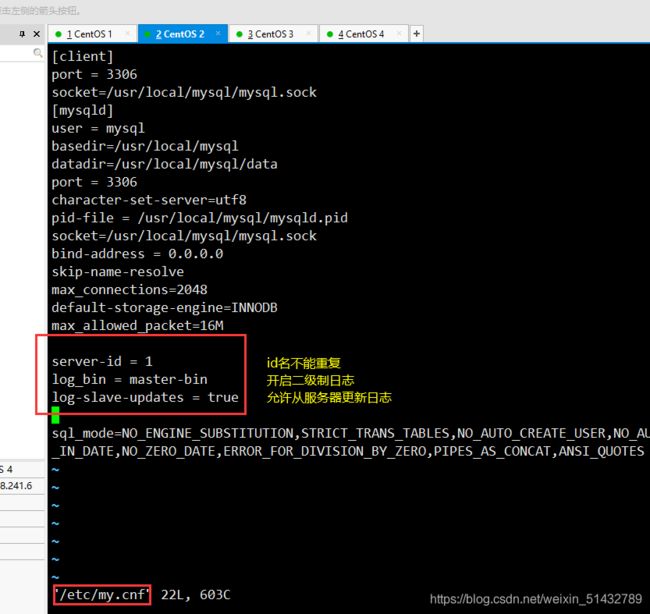
4)修改 Master、Slave1、Slave2 节点的 Mysql主配置文件/etc/my.cnf
##Master 节点##
vim /etc/my.cnf
[mysqld]
server-id = 1
log_bin = master-bin
log-slave-updates = true

systemctl restart mysqld

##Slave1、Slave2 节点##
vim /etc/my.cnf
server-id = 2 						#三台服务器的 server-id 不能一样
log_bin = master-bin
relay-log = relay-log-bin
relay-log-index = slave-relay-bin.index

systemctl restart mysqld
5)在 Master、Slave1、Slave2 节点上都创建两个软链接
ln -s /usr/local/mysql/bin/mysql /usr/sbin/
ln -s /usr/local/mysql/bin/mysqlbinlog /usr/sbin/
6)配置 mysql 一主两从
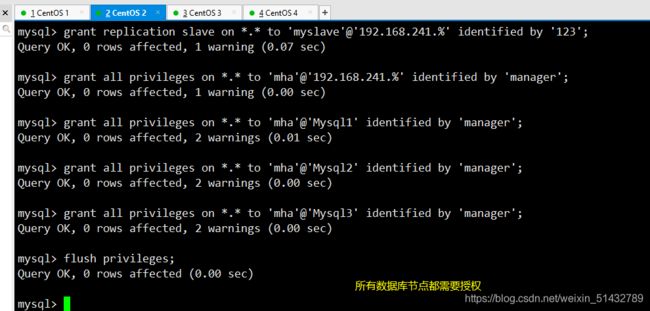
(1)所有数据库节点进行 mysql 授权
mysql -uroot -p
grant replication slave on *.* to 'myslave'@'192.168.241.%' identified by '123';		#从数据库同步使用
grant all privileges on *.* to 'mha'@'192.168.241.%' identified by 'manager';		#manager 使用

grant all privileges on *.* to 'mha'@'Mysql1' identified by 'manager';				#防止从库通过主机名连接不上主库
grant all privileges on *.* to 'mha'@'Mysql2' identified by 'manager';
grant all privileges on *.* to 'mha'@'Mysql3' identified by 'manager';
flush privileges;
(2)在 Master 节点查看二进制文件和同步点
show master status;
+-------------------+----------+--------------+------------------+-------------------+
| File              | Position | Binlog_Do_DB | Binlog_Ignore_DB | Executed_Gtid_Set |
+-------------------+----------+--------------+------------------+-------------------+
| master-bin.000001 |     2566 |              |                  |                   |
+-------------------+----------+--------------+------------------+-------------------+
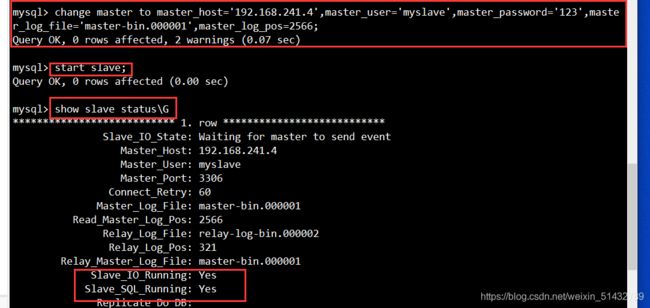
change master to master_host='192.168.241.4',master_user='myslave',master_password='123',master_log_file='master-bin.000001',master_log_pos=2566;

start slave;
(4)在 Slave1、Slave2 节点查看数据同步结果
show slave status\G
//确保 IO 和 SQL 线程都是 Yes,代表同步正常。
Slave_IO_Running: Yes
Slave_SQL_Running: Yes
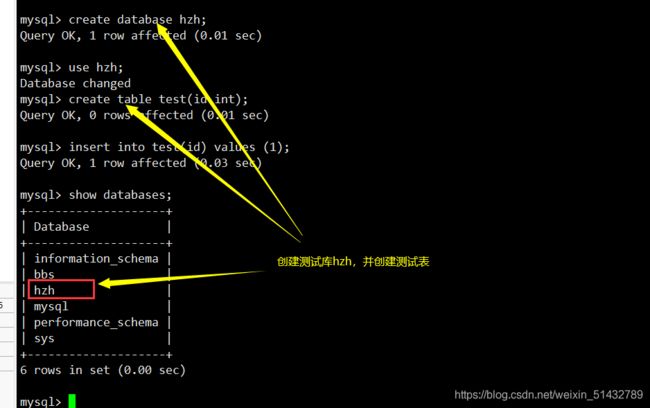
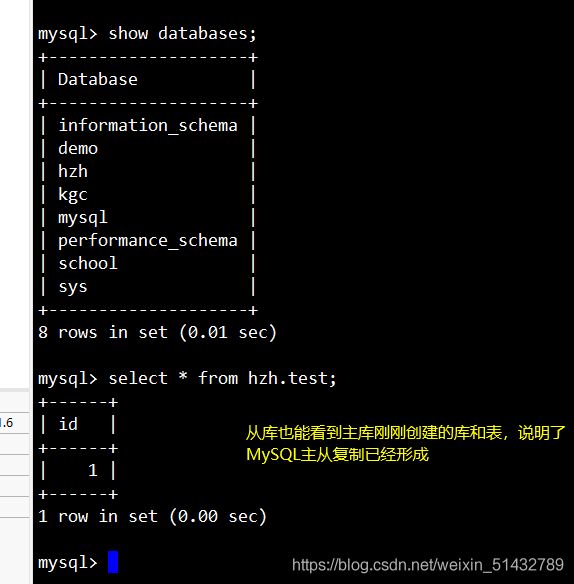
set global read_only=1;
create database hzh;
use hzh;
create table test(id int);
insert into test(id) values (1);
7)安装 MHA 软件
(1)所有服务器上都安装 MHA 依赖的环境,首先安装 epel 源
epel源需要使用在线源安装,如果使用本地源的话是没法安装的,需要将本地源给释放出来
cd /etc/yum.repos.d
/etc/yum.repos.d
mv * ../
yum install epel-release --nogpgcheck -y

yum install -y perl-DBD-MySQL \
perl-Config-Tiny \
perl-Log-Dispatch \
perl-Parallel-ForkManager \
perl-ExtUtils-CBuilder \
perl-ExtUtils-MakeMaker \
perl-CPAN

(2)安装 MHA 软件包,先在所有服务器上必须先安装 node 组件
对于每个操作系统版本不一样,这里 CentOS7.4 必须选择 0.57 版本。
在所有服务器上必须先安装 node 组件,最后在 MHA-manager 节点上安装 manager 组件,因为 manager 依赖 node 组件。
将安装包拖入/opt目录中进行解压安装
cd /opt
tar zxvf mha4mysql-node-0.57.tar.gz
cd mha4mysql-node-0.57
perl Makefile.PL
make && make install
(3)在 MHA manager 节点上安装 manager 组件
cd /opt
tar zxvf mha4mysql-manager-0.57.tar.gz
cd mha4mysql-manager-0.57
perl Makefile.PL
make && make install

######################################################
#manager 组件安装后在/usr/local/bin 下面会生成几个工具,主要包括以下几个:
masterha_check_ssh 检查 MHA 的 SSH 配置状况
masterha_check_repl 检查 MySQL 复制状况
masterha_manger 启动 manager的脚本
masterha_check_status 检测当前 MHA 运行状态
masterha_master_monitor 检测 master 是否宕机
masterha_master_switch 控制故障转移(自动或者手动)
masterha_conf_host 添加或删除配置的 server 信息
masterha_stop  关闭manager

#node 组件安装后也会在/usr/local/bin 下面会生成几个脚本(这些工具通常由 MHAManager 的脚本触发,无需人为操作)主要如下:
save_binary_logs 保存和复制 master 的二进制日志
apply_diff_relay_logs 识别差异的中继日志事件并将其差异的事件应用于其他的 slave
filter_mysqlbinlog 去除不必要的 ROLLBACK 事件(MHA 已不再使用这个工具)
purge_relay_logs 清除中继日志(不会阻塞 SQL 线程)
8)在所有服务器上配置无密码认证
(1)在 manager 节点上配置到所有数据库节点的无密码认证
ssh-keygen -t rsa 				#一路按回车键
ssh-copy-id 192.168.241.4
ssh-copy-id 192.168.241.5
ssh-copy-id 192.168.241.6

(2)在 mysql1 上配置到数据库节点 mysql2 和 mysql3 的无密码认证
ssh-keygen -t rsa
ssh-copy-id 192.168.241.5
ssh-copy-id 192.168.241.6

(3)在 mysql2 上配置到数据库节点 mysql1 和 mysql3 的无密码认证
ssh-keygen -t rsa
ssh-copy-id 192.168.241.4
ssh-copy-id 192.168.241.6

(4)在 mysql3 上配置到数据库节点 mysql1 和 mysql2 的无密码认证
ssh-keygen -t rsa
ssh-copy-id 192.168.241.4
ssh-copy-id 192.168.241.5
9)在 manager 节点上配置 MHA
(1)在 manager 节点上复制相关脚本到/usr/local/bin 目录
cp -rp /opt/mha4mysql-manager-0.57/samples/scripts /usr/local/bin
//拷贝后会有四个执行文件
ll /usr/local/bin/scripts/

####################################################
master_ip_failover  		#自动切换时 VIP 管理的脚本
master_ip_online_change 	#在线切换时 vip 的管理
power_manager 				#故障发生后关闭主机的脚本
send_report 				#因故障切换后发送报警的脚本
(2)复制上述的自动切换时 VIP 管理的脚本到 /usr/local/bin 目录,这里使用master_ip_failover脚本来管理 VIP 和故障切换
cp /usr/local/bin/scripts/master_ip_failover /usr/local/bin
(3)修改内容如下:(删除原有内容,直接复制并修改vip相关参数)
vim /usr/local/bin/master_ip_failover
#!/usr/bin/env perl
use strict;
use warnings FATAL => 'all';

use Getopt::Long;

my (
$command, $ssh_user, $orig_master_host, $orig_master_ip,
$orig_master_port, $new_master_host, $new_master_ip, $new_master_port
);
#############################添加内容部分#########################################
my $vip = '192.168.241.200';									#指定vip的地址
my $brdc = '192.168.241.255';								#指定vip的广播地址
my $ifdev = 'ens33';										#指定vip绑定的网卡
my $key = '1';												#指定vip绑定的虚拟网卡序列号
my $ssh_start_vip = "/sbin/ifconfig ens33:$key $vip";		#代表此变量值为ifconfig ens33:1 192.168.241.200
my $ssh_stop_vip = "/sbin/ifconfig ens33:$key down";		#代表此变量值为ifconfig ens33:1 192.168.241.200 down
my $exit_code = 0;											#指定退出状态码为0
#my $ssh_start_vip = "/usr/sbin/ip addr add $vip/24 brd $brdc dev $ifdev label $ifdev:$key;/usr/sbin/arping -q -A -c 1 -I $ifdev $vip;iptables -F;";
#my $ssh_stop_vip = "/usr/sbin/ip addr del $vip/24 dev $ifdev label $ifdev:$key";
##################################################################################
GetOptions(
'command=s' => \$command,
'ssh_user=s' => \$ssh_user,
'orig_master_host=s' => \$orig_master_host,
'orig_master_ip=s' => \$orig_master_ip,
'orig_master_port=i' => \$orig_master_port,
'new_master_host=s' => \$new_master_host,
'new_master_ip=s' => \$new_master_ip,
'new_master_port=i' => \$new_master_port,
);

exit &main();

sub main {


print "\n\nIN SCRIPT TEST====$ssh_stop_vip==$ssh_start_vip===\n\n";

if ( $command eq "stop" || $command eq "stopssh" ) {


my $exit_code = 1;
eval {

print "Disabling the VIP on old master: $orig_master_host \n";
&stop_vip();
$exit_code = 0;
};
if ($@) {

warn "Got Error: $@\n";
exit $exit_code;
}
exit $exit_code;
}
elsif ( $command eq "start" ) {


my $exit_code = 10;
eval {

print "Enabling the VIP - $vip on the new master - $new_master_host \n";
&start_vip();
$exit_code = 0;
};
if ($@) {

warn $@;
exit $exit_code;
}
exit $exit_code;
}
elsif ( $command eq "status" ) {

print "Checking the Status of the script.. OK \n";
exit 0;
}
else {

&usage();
exit 1;
}
}
sub start_vip() {

`ssh $ssh_user\@$new_master_host \" $ssh_start_vip \"`;
}
## A simple system call that disable the VIP on the old_master
sub stop_vip() {

`ssh $ssh_user\@$orig_master_host \" $ssh_stop_vip \"`;
}

sub usage {

print
"Usage: master_ip_failover --command=start|stop|stopssh|status --orig_master_host=host --orig_master_ip=ip --orig_master_port=port --new_master_host=host --new_master_ip=ip --new_master_port=port\n";
}
这里需要注意的是,复制后全是“#”号开头,需要使用vi编辑器里的快速编辑功能,快速删掉开头为“#”
:2,87 s/^#//g
(4)创建 MHA 软件目录并拷贝配置文件,这里使用app1.cnf配置文件来管理 mysql 节点服务器
mkdir /etc/masterha
cp /opt/mha4mysql-manager-0.57/samples/conf/app1.cnf /etc/masterha

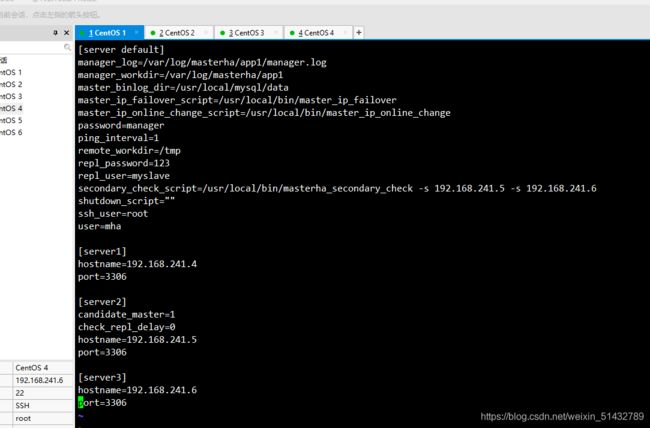
vim /etc/masterha/app1.cnf						#删除原有内容,直接复制并修改节点服务器的IP地址
[server default]
manager_log=/var/log/masterha/app1/manager.log
manager_workdir=/var/log/masterha/app1
master_binlog_dir=/usr/local/mysql/data
master_ip_failover_script=/usr/local/bin/master_ip_failover
master_ip_online_change_script=/usr/local/bin/master_ip_online_change
password=manager
ping_interval=1
remote_workdir=/tmp
repl_password=123
repl_user=myslave
secondary_check_script=/usr/local/bin/masterha_secondary_check -s 192.168.241.5 -s 192.168.241.6
shutdown_script=""
ssh_user=root
user=mha

[server1]
hostname=192.168.241.4
port=3306

[server2]
candidate_master=1
check_repl_delay=0
hostname=192.168.241.5
port=3306

[server3]
hostname=192.168.241.6
port=3306
解释下:
[server default]
manager_log=/var/log/masterha/app1/manager.log      #manager日志
manager_workdir=/var/log/masterha/app1.log        #manager工作目录
master_binlog_dir=/usr/local/mysql/data/         #master保存binlog的位置,这里的路径要与master里配置的binlog的路径一致,以便MHA能找到
master_ip_failover_script=/usr/local/bin/master_ip_failover  #设置自动failover时候的切换脚本,也就是上面的那个脚本
master_ip_online_change_script=/usr/local/bin/master_ip_online_change  #设置手动切换时候的切换脚本
password=manager			#设置mysql中root用户的密码,这个密码是前文中创建监控用户的那个密码
ping_interval=1				#设置监控主库,发送ping包的时间间隔,默认是3秒,尝试三次没有回应的时候自动进行failover
remote_workdir=/tmp			#设置远端mysql在发生切换时binlog的保存位置
repl_password=123			#设置复制用户的密码
repl_user=myslave			#设置复制用户的用户
report_script=/usr/local/send_report     #设置发生切换后发送的报警的脚本
secondary_check_script=/usr/local/bin/masterha_secondary_check -s 192.168.241.5 -s 192.168.241.6	#指定检查的从服务器IP地址
shutdown_script=""			#设置故障发生后关闭故障主机脚本(该脚本的主要作用是关闭主机防止发生脑裂,这里没有使用)
ssh_user=root				#设置ssh的登录用户名
user=mha					#设置监控用户root

[server1]
hostname=192.168.241.4
port=3306

[server2]
hostname=192.168.241.5
port=3306
candidate_master=1
#设置为候选master,设置该参数以后,发生主从切换以后将会将此从库提升为主库,即使这个主库不是集群中最新的slave

check_repl_delay=0
#默认情况下如果一个slave落后master 超过100M的relay logs的话,MHA将不会选择该slave作为一个新的master, 因为对于这个slave的恢复需要花费很长时间;通过设置check_repl_delay=0,MHA触发切换在选择一个新的master的时候将会忽略复制延时,这个参数对于设置了candidate_master=1的主机非常有用,因为这个候选主在切换的过程中一定是新的master

[server3]
hostname=192.168.241.6
port=3306
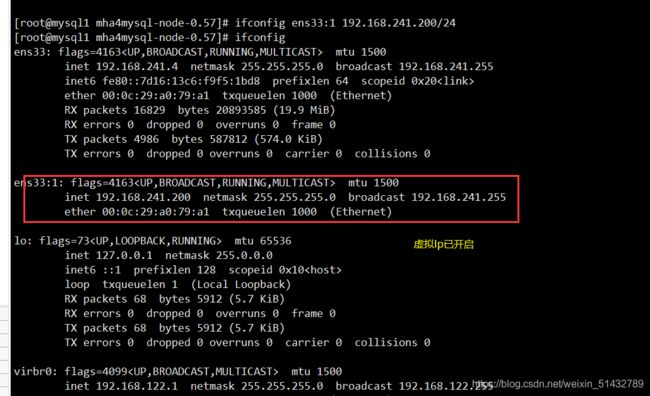
10)第一次配置需要在 Master 节点上手动开启虚拟IP
ifconfig ens33:1 192.168.241.200/24
11)在 manager 节点上测试 ssh 无密码认证,如果正常最后会输出 successfully,如下所示。
[root@hzh /etc]# masterha_check_ssh -conf=/etc/masterha/app1.cnf
Sun Feb 21 20:18:57 2021 - [warning] Global configuration file /etc/masterha_default.cnf not found. Skipping.
Sun Feb 21 20:18:57 2021 - [info] Reading application default configuration from /etc/masterha/app1.cnf..
Sun Feb 21 20:18:57 2021 - [info] Reading server configuration from /etc/masterha/app1.cnf..
Sun Feb 21 20:18:57 2021 - [info] Starting SSH connection tests..
Sun Feb 21 20:18:58 2021 - [debug]
Sun Feb 21 20:18:57 2021 - [debug]  Connecting via SSH from [email protected](192.168.241.4:22) to [email protected](192.168.241.5:22)..
Sun Feb 21 20:18:57 2021 - [debug]   ok.
Sun Feb 21 20:18:57 2021 - [debug]  Connecting via SSH from [email protected](192.168.241.4:22) to [email protected](192.168.241.6:22)..
Sun Feb 21 20:18:58 2021 - [debug]   ok.
Sun Feb 21 20:18:59 2021 - [debug]
Sun Feb 21 20:18:58 2021 - [debug]  Connecting via SSH from [email protected](192.168.241.6:22) to [email protected](192.168.241.4:22)..
Sun Feb 21 20:18:58 2021 - [debug]   ok.
Sun Feb 21 20:18:58 2021 - [debug]  Connecting via SSH from [email protected](192.168.241.6:22) to [email protected](192.168.241.5:22)..
Sun Feb 21 20:18:59 2021 - [debug]   ok.
Sun Feb 21 20:18:59 2021 - [debug]
Sun Feb 21 20:18:57 2021 - [debug]  Connecting via SSH from [email protected](192.168.241.5:22) to [email protected](192.168.241.4:22)..
Sun Feb 21 20:18:58 2021 - [debug]   ok.
Sun Feb 21 20:18:58 2021 - [debug]  Connecting via SSH from [email protected](192.168.241.5:22) to [email protected](192.168.241.6:22)..
Sun Feb 21 20:18:58 2021 - [debug]   ok.
Sun Feb 21 20:18:59 2021 - [info] All SSH connection tests passed successfully.
12)在 manager 节点上测试 mysql 主从连接情况,最后出现 MySQL Replication Health is OK 字样说明正常。如下所示。
masterha_check_repl -conf=/etc/masterha/app1.cnf

Sun Feb 21 20:39:14 2021 - [info] Slaves settings check done.
Sun Feb 21 20:39:14 2021 - [info]
192.168.241.4(192.168.241.4:3306) (current master)
 +--192.168.241.5(192.168.241.5:3306)
 +--192.168.241.6(192.168.241.6:3306)

Sun Feb 21 20:39:14 2021 - [info] Checking replication health on 192.168.241.5..
Sun Feb 21 20:39:14 2021 - [info]  ok.
Sun Feb 21 20:39:14 2021 - [info] Checking replication health on 192.168.241.6..
Sun Feb 21 20:39:14 2021 - [info]  ok.
Sun Feb 21 20:39:14 2021 - [info] Checking master_ip_failover_script status:
Sun Feb 21 20:39:14 2021 - [info]   /usr/local/bin/master_ip_failover --command=status --ssh_user=root --orig_master_host=192.168.241.4 --orig_master_ip=192.168.241.4 --orig_master_port=3306


IN SCRIPT TEST====/sbin/ifconfig ens33:1 down==/sbin/ifconfig ens33:1 192.168.241.200===

Checking the Status of the script.. OK
Sun Feb 21 20:39:14 2021 - [info]  OK.
Sun Feb 21 20:39:14 2021 - [warning] shutdown_script is not defined.
Sun Feb 21 20:39:14 2021 - [info] Got exit code 0 (Not master dead).

MySQL Replication Health is OK.
13)在 manager 节点上启动 MHA
nohup masterha_manager --conf=/etc/masterha/app1.cnf --remove_dead_master_conf --ignore_last_failover < /dev/null > /var/log/masterha/app1/manager.log 2>&1 &

#########################################################################
--remove_dead_master_conf:该参数代表当发生主从切换后,老的主库的 ip 将会从配置文件中移除。
--manger_log:日志存放位置。
--ignore_last_failover:在缺省情况下,如果 MHA 检测到连续发生宕机,且两次宕机间隔不足 8 小时的话,则不会进行 Failover, 之所以这样限制是为了避免 ping-pong 效应。该参数代表忽略上次 MHA 触发切换产生的文件,默认情况下,MHA 发生切换后会在日志记目录,也就是上面设置的日志app1.failover.complete文件,下次再次切换的时候如果发现该目录下存在该文件将不允许触发切换,除非在第一次切换后收到删除该文件,为了方便,这里设置为--ignore_last_failover。
![]()
14)查看 MHA 状态,可以看到当前的 master 是 Mysql1 节点。
masterha_check_status --conf=/etc/masterha/app1.cnf
15)查看 MHA 日志,也以看到当前的 master 是 192.168.241.4,如下所示。
cat /var/log/masterha/app1/manager.log | grep "current master"
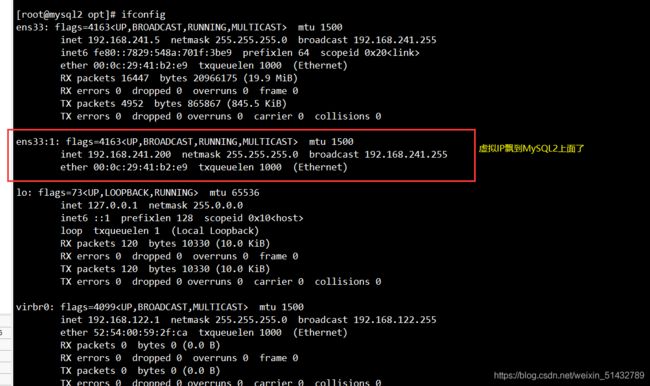
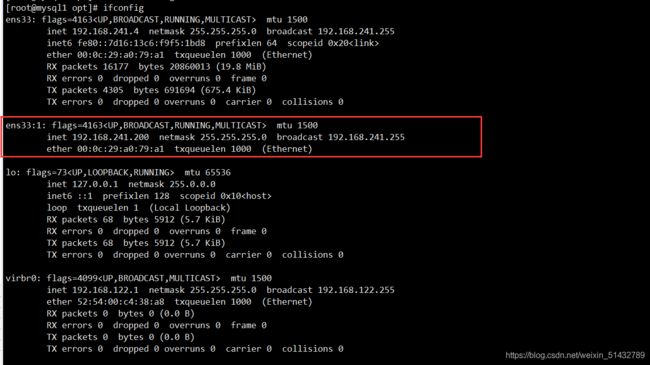
16)查看 Mysql1 的 VIP 地址 192.168.241.200 是否存在,这个 VIP 地址不会因为 manager 节点停止 MHA 服务而消失。
ifconfig
模拟下MySQL主服务器故障
1)在 manager 节点上监控观察日志记录
tail -f /var/log/masterha/app1/manager.log
2)在 Master 节点 Mysql1 上停止mysql服务
systemctl stop mysqld
或
pkill -9 mysql

##############################
#正常自动切换一次后,MHA 进程会退出。HMA 会自动修改 app1.cnf 文件内容,将宕机的 mysql1 节点删除。查看 mysql2 是否接管 VIP
ifconfig
故障切换备选主库的算法:
1.一般判断从库的是从(position/GTID)判断优劣,数据有差异,最接近于master的slave,成为备选主。
2.数据一致的情况下,按照配置文件顺序,选择备选主库。
3.设定有权重(candidate_master=1),按照权重强制指定备选主。
(1)默认情况下如果一个slave落后master 100M的relay logs的话,即使有权重,也会失效。
(2)如果check_repl_delay=0的话,即使落后很多日志,也强制选择其为备选主。
故障恢复
1) 修复mysql
systemctl restart mysqld
2)修复主从
1、在现主库服务器 Mysql2 查看二进制文件和同步点
show master status;
2、在原主库服务器 mysql1 执行同步操作
change master to master_host='192.168.241.5',master_user='myslave',master_password='123',master_log_file='master-bin.000007',master_log_pos=1747;
start slave;
show slave status\G
###################
假如发现IO变成NO了
Slave_IO_Running: NO
Slave_SQL_Running: Yes
这是我的情况:
*************************** 1. row ***************************
               Slave_IO_State:
                  Master_Host: 192.168.241.5
                  Master_User: myslave
                  Master_Port: 3306
                Connect_Retry: 60
              Master_Log_File: master-bin.000008
          Read_Master_Log_Pos: 154
               Relay_Log_File: mysql1-relay-bin.000002
                Relay_Log_Pos: 4
        Relay_Master_Log_File: master-bin.000008
             Slave_IO_Running: No
            Slave_SQL_Running: Yes
              Replicate_Do_DB:
          Replicate_Ignore_DB:
           Replicate_Do_Table:
       Replicate_Ignore_Table:
      Replicate_Wild_Do_Table:
  Replicate_Wild_Ignore_Table:
                   Last_Errno: 0
                   Last_Error:
                 Skip_Counter: 0
          Exec_Master_Log_Pos: 154
              Relay_Log_Space: 154
              Until_Condition: None
               Until_Log_File:
                Until_Log_Pos: 0
           Master_SSL_Allowed: No
           Master_SSL_CA_File:
           Master_SSL_CA_Path:
              Master_SSL_Cert:
            Master_SSL_Cipher:
               Master_SSL_Key:
        Seconds_Behind_Master: NULL
Master_SSL_Verify_Server_Cert: No
                Last_IO_Errno: 1236
                Last_IO_Error: Got fatal error 1236 from master when reading data from binary log: 'Could not find first log file name in binary log index file'
               Last_SQL_Errno: 0
               Last_SQL_Error:
  Replicate_Ignore_Server_Ids:
             Master_Server_Id: 2
                  Master_UUID: 8721c727-5d32-11eb-a430-000c2941b2e9
             Master_Info_File: /usr/local/mysql/data/master.info
                    SQL_Delay: 0
          SQL_Remaining_Delay: NULL
      Slave_SQL_Running_State: Slave has read all relay log; waiting for more updates
           Master_Retry_Count: 86400
                  Master_Bind:
      Last_IO_Error_Timestamp: 210219 15:00:48
     Last_SQL_Error_Timestamp:
               Master_SSL_Crl:
           Master_SSL_Crlpath:
           Retrieved_Gtid_Set:
            Executed_Gtid_Set:
                Auto_Position: 0
         Replicate_Rewrite_DB:
                 Channel_Name:
           Master_TLS_Version:
1 row in set (0.00 sec)

此时你需要在新的主MySQL主服务器上刷新下日志
flush logs;
show  master  status;
然后再去MySQL1上进行授权
change master to master_log_file='mysql-bin.000009',master_log_pos=154;
start slave;
show slave status\G
*************************** 1. row ***************************
               Slave_IO_State: Waiting for master to send event
                  Master_Host: 192.168.241.5
                  Master_User: myslave
                  Master_Port: 3306
                Connect_Retry: 60
              Master_Log_File: mysql-bin.000009
          Read_Master_Log_Pos: 154
               Relay_Log_File: mysql1-relay-bin.000003
                Relay_Log_Pos: 320
        Relay_Master_Log_File: mysql-bin.000009
             Slave_IO_Running: Yes
            Slave_SQL_Running: Yes
              Replicate_Do_DB:
          Replicate_Ignore_DB:
           Replicate_Do_Table:
       Replicate_Ignore_Table:
      Replicate_Wild_Do_Table:
  Replicate_Wild_Ignore_Table:
                   Last_Errno: 0
                   Last_Error:
                 Skip_Counter: 0
          Exec_Master_Log_Pos: 154
              Relay_Log_Space: 528
              Until_Condition: None
               Until_Log_File:
                Until_Log_Pos: 0
           Master_SSL_Allowed: No
           Master_SSL_CA_File:
           Master_SSL_CA_Path:
              Master_SSL_Cert:
            Master_SSL_Cipher:
               Master_SSL_Key:
        Seconds_Behind_Master: 0
Master_SSL_Verify_Server_Cert: No
                Last_IO_Errno: 0
                Last_IO_Error:
               Last_SQL_Errno: 0
               Last_SQL_Error:
  Replicate_Ignore_Server_Ids:
             Master_Server_Id: 2
                  Master_UUID: 8721c727-5d32-11eb-a430-000c2941b2e9
             Master_Info_File: /usr/local/mysql/data/master.info
                    SQL_Delay: 0
          SQL_Remaining_Delay: NULL
      Slave_SQL_Running_State: Slave has read all relay log; waiting for more updates
           Master_Retry_Count: 86400
                  Master_Bind:
      Last_IO_Error_Timestamp:
     Last_SQL_Error_Timestamp:
               Master_SSL_Crl:
           Master_SSL_Crlpath:
           Retrieved_Gtid_Set:
            Executed_Gtid_Set:
                Auto_Position: 0
         Replicate_Rewrite_DB:
                 Channel_Name:
           Master_TLS_Version:
1 row in set (0.00 sec)
这样问题就解决了
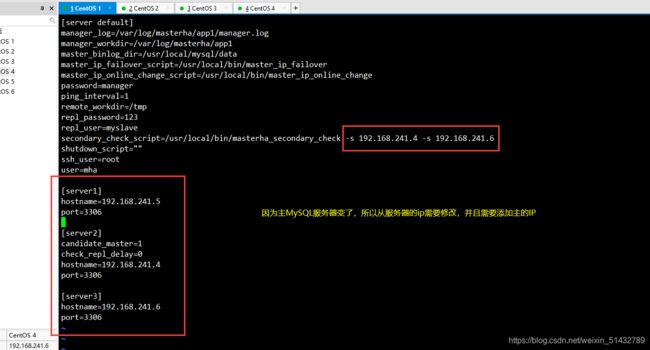
3)在 manager 节点上修改配置文件app1.cnf(再把这个记录添加进去,因为它检测掉失效时候会自动消失)
vim /etc/masterha/app1.cnf
......
secondary_check_script=/usr/local/bin/masterha_secondary_check -s 192.168.241.4 -s 192.168.241.6
......
[server1]
hostname=192.168.241.5
port=3306

[server2]
candidate_master=1
check_repl_delay=0
hostname=192.168.241.4
port=3306

[server3]
hostname=192.168.241.6
port=3306
nohup masterha_manager --conf=/etc/masterha/app1.cnf --remove_dead_master_conf --ignore_last_failover < /dev/null > /var/log/masterha/app1/manager.log 2>&1 &


