hystrix 单独使用_springcloudstarternetflixhystrix使用详解
前面文中我们学习了hystrix的原生使用(hystrix入门-原生API使用)和注解使用(hystrix进阶-注解hystrix-javanica使用),本文来看下hystrix在spring-boot中的使用。
首先还是先看个最简单的demo
第一步:添加依赖
org.springframework.cloudgroupId> spring-cloud-starter-netflix-hystrixartifactId>dependency> 第二步:开启配置
在配置类上添加@EnableCircuitBreaker注解
@SpringBootApplication@EnableCircuitBreaker//添加这个注解public class HystrixBootApplication {
        public static void main(String[] args) {
          SpringApplication.run(HystrixBootApplication.class, args);  }}
第三步:在需要开启熔断降级的方法上添加@HystrixCommand
@RestControllerpublic class DemoController {
          @HystrixCommand(fallbackMethod = "helloFallback")    @GetMapping("/hello")    public String hello(String msg){
              throw new RuntimeException("hello throw RuntimeException");    }    public String helloFallback(String msg, Throwable t) {
              return "helloFallback:" + msg + "," + t.getMessage();    }}
浏览器访问:http://localhost:8080/hello?msg=world,输出结果:helloFallback:world,hello throw RuntimeException
异常传播
@HystrixCommand(fallbackMethod = "helloFallback")@GetMapping("/hello")public String hello(){
          throw new HystrixBadRequestException("参数校验异常");}
只要抛出HystrixBadRequestException即可,就不会进入到fallback中。但是这样不太友好,业务代码跟hystrix耦合到了一起,两种解决办法:
第一种办法:可以让我们自定义的业务异常继承HystrixBadRequestException:
public static class BizException extends HystrixBadRequestException{
          public BizException(String message) {
              super(message);    }    public BizException(String message, Throwable cause) {
              super(message, cause);    }}
第二种办法:可以在@HystrixCommand上配置ignoreExceptions:
@HystrixCommand(fallbackMethod = "helloFallback",   ignoreExceptions = ParamException.class)@GetMapping("/world")public String world(){
          throw new ParamException("参数不能为空");}
熔断
@RestController@RequestMapping("/circuit")public class CircuitBreakerController {
          private static Logger log = LoggerFactory.getLogger(CircuitBreakerController.class);    private static AtomicInteger cnt = new AtomicInteger(0);    @GetMapping("/open")    @HystrixCommand(      fallbackMethod = "openFallback",      commandProperties={
                @HystrixProperty(name="metrics.rollingStats.timeInMilliseconds", value="5000"),          @HystrixProperty(name="circuitBreaker.requestVolumeThreshold", value="4"),          @HystrixProperty(name="circuitBreaker.errorThresholdPercentage", value="50"),          @HystrixProperty(name="circuitBreaker.sleepWindowInMilliseconds", value="3000")      }    )    public String open(){
              //如果5秒内,请求达到了4个,错误率达到50%以上,就开启跳闸,        //就会直接走fallback,业务代码将不再会调用        //如果3秒以后再调用,会再执行一次业务方法        log.info("c={}", cnt.get());        int c = cnt.incrementAndGet();        if(c>2){
                  throw new RuntimeException();        }else{
                  return "c="+c;        }    }    public String openFallback(){
              return "fallback:"+cnt.get();    }}
以上几个参数的含义是:5秒种以内,请求次数达到4个以上,失败率达到50%以上,则开启跳闸。跳闸3秒以后如果有请求过来不会继续跳闸,而是去实际做请求,如果请求失败,继续保持跳闸的状态,如果请求成功,则取消跳闸。
我们连续请求5次,可以看到日志中只会打出四条记录:
2020-08-08 11:45:48.319 INFO 9564 --- [kerController-1] c.g.x.h.h.c.CircuitBreakerController : c=02020-08-08 11:45:48.958 INFO 9564 --- [kerController-2] c.g.x.h.h.c.CircuitBreakerController : c=12020-08-08 11:45:49.599 INFO 9564 --- [kerController-3] c.g.x.h.h.c.CircuitBreakerController : c=22020-08-08 11:45:50.351 INFO 9564 --- [kerController-4] c.g.x.h.h.c.CircuitBreakerController : c=3第5个请求并没有打印日志,因为已经开启了熔断,不再请求业务方法,直接走的fallback。
当然如果不想在代码中做配置,也可以在配置文件做配置:
hystrix: command: # 这里的default代表默认的所有的command # 可以换成某一个特定的command的key,默认就是方法的名字 default: execution: isolation: #strategy: SEMAPHORE thread: timeoutInMilliseconds: 1000 metrics: rollingStats: timeInMilliseconds: 5000 circuitBreaker: requestVolumeThreshold: 4 errorThresholdPercentage: 50 sleepWindowInMilliseconds: 3000 # 设置某个具体的command的参数 commandKeyTest: execution: isolation: thread: timeoutInMilliseconds: 10000注意如果想单独设置某一个command的参数,需要这样设置:
hystrix.command.commandKeyTest.executionisolation.thread.timeoutInMilliseconds,command长这样:
@HystrixCommand(fallbackMethod = "helloFallback")@GetMapping("/command_key_test")public String commandKeyTest(String msg){
        try{
            Thread.sleep(5000);  }catch(Exception e){
            e.printStackTrace();  }  return "timeout";}
默认超时是1秒,这里单独设置了超时时间是10秒,因此可以正常输出timeout。因为这里的command的key默认是取的方法的名字,因此同名的方法如果需要不同的设置,需要在command里面设置不同的commandkey。
隔离策略
hystrix的隔离策略分两种,线程池隔离和信号量隔离,默认是使用线程隔离,也就是说command是运行在单独的线程池中的,当然也可以给不同的command设置不同的线程池。但是,此时有个问题,如果command是在单独的线程池中执行,那么command中将无法获取主线程中给ThreadLocal变量设置的值,比如:
@RestController@RequestMapping("/isolate")public class IsolationController {
        @Autowired  private IsolateService isolateService;  @GetMapping("/hello")  public String hello(String msg){
          //这里是向ThreadLocal存值,    UserHolder.setUser("Joshua");    //这里显然可以取到    log.info("IsolationController user:" + UserHolder.getUser());    return isolateService.hello();  }}@Servicepublic class IsolateService {
          private static Logger log = LoggerFactory.getLogger(IsolateService.class);    //HystrixCommand都是运行在单独的线程池中    @HystrixCommand    public String hello(){
              log.info("IsolateService user:" + IsolationController.UserHolder.getUser());        return "IsolateService user:" + IsolationController.UserHolder.getUser();    }}//访问:http://localhost:8080/isolate/hello//日志输出:2020-08-08 14:19:04.244  INFO 1924 --- [nio-8080-exec-1] c.g.x.h.h.c.IsolationController          : IsolationController user:Joshua2020-08-08 14:19:04.546  INFO 1924 --- [solateService-1] c.g.x.h.h.service.IsolateService         : IsolateService user:null
很明显这里会返回IsolateService user:null,因为service是运行在一个名字叫solateService-1的线程中,而非tomcat的线程。如何解决这个问题呢?
第一种解决办法:信号量隔离
@HystrixCommand(  commandProperties = {
          //只需要设置execution.isolation.strategy = SEMAPHORE即可    @HystrixProperty(name="execution.isolation.strategy", value="SEMAPHORE")  })public String hello(){
        log.info("IsolateService user:" + IsolationController.UserHolder.getUser());  return "IsolateService user:" + IsolationController.UserHolder.getUser();}
只需要设置execution.isolation.strategy的值是SEMAPHORE就可以让command使用主线程来执行,此时还可以设置并发数execution.isolation.semaphore.maxConcurrentRequests,超过了并发数同样会触发fallback。
第二种办法:自定义HystrixConcurrencyStrategy
如果使用SEMAPHORE,那么command就会使用主线程来执行,这样就起不到隔离的作用了,hystrix本身还是推荐使用单独的线程池的,但是hystrix又不允许同时注册多个并发策略,如果既想使用单独的线程池还想把ThreadLocal中的值传递过去,该怎么办呢?可以通过自定义HystrixConcurrencyStrategy并注册到hystrix的插件里面来实现,继续上面的例子,我们看下如何来做:
@Configurationpublic class IsolateConfig {
          @Bean    public HystrixConcurrencyStrategy hystrixConcurrencyStrategy(){
              return new ThreadLocalHystrixConcurrencyStrategy();    }    public static class ThreadLocalHystrixConcurrencyStrategy extends HystrixConcurrencyStrategy{
              public ThreadLocalHystrixConcurrencyStrategy(){
                  //注册成hystrix的插件            HystrixPlugins.getInstance().registerConcurrencyStrategy(this);        }        public CallablewrapCallable(Callable callable) {
                  //先包装一下要执行的任务,在这里把ThreadLocal的值取出来            return new ThreadLocalCallable(callable);        }    }    public static class ThreadLocalCallable implements Callable{
              private Callable target;        private String user;        public  ThreadLocalCallable(Callable target){
                  this.target = target;            //取ThreadLocal的值并保存起来            this.user = IsolationController.UserHolder.getUser();        }        @Override        public V call() throws Exception {
                  try{
                      //真正执行的时候再设置进去                IsolationController.UserHolder.setUser(this.user);                //真正执行的时候再设置进去                return target.call();            }finally {
                      //执行完毕再清理掉                IsolationController.UserHolder.clean();            }        }    }}输出结果:2020-08-08 16:55:06.283  INFO 12620 --- [nio-8080-exec-1] c.g.x.h.h.c.IsolationController          : IsolationController user:Joshua2020-08-08 16:55:06.728  INFO 12620 --- [solateService-1] c.g.x.h.h.service.IsolateService         : IsolateService user:Joshua
只需要添加这个配置即可,hystrix在创建command任务的时候会先把任务包装一下,这个时候还是在主线程的,因此可以把ThreadLocal的值先取出来保存一下,等真正执行任务的时候再把值设置进去,相当于完成了从主线程到另一个线程的传递,输出结果也可能看出来,实际是在不同的线程执行的。
此类问题还有:当需要做链路追踪的时候,同样的道理,先在主线程获取context map,MDC.getCopyOfContextMap(),然后再在子线程中执行MDC.setContextMap()即可。
看下spring-cloud-starter-netflix-hystrix的源码
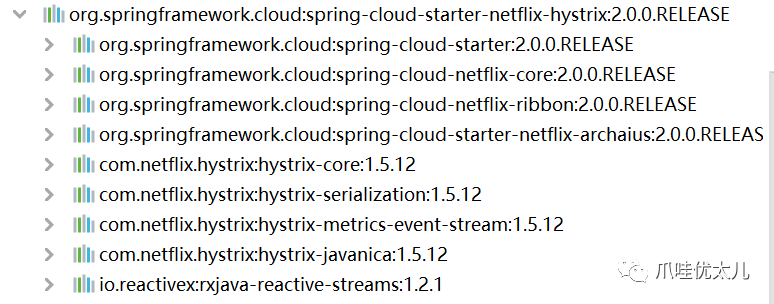
本身没有包含任何源码,看下依赖:
可以看出来它依赖了hystrix-javanina.jar。打开com.netflix.hystrix:hystrix-core:jar,里面有一个spring.factories:
org.springframework.boot.autoconfigure.EnableAutoConfiguration=\org.springframework.cloud.netflix.hystrix.HystrixAutoConfiguration,\org.springframework.cloud.netflix.hystrix.security.HystrixSecurityAutoConfigurationorg.springframework.cloud.client.circuitbreaker.EnableCircuitBreaker=\org.springframework.cloud.netflix.hystrix.HystrixCircuitBreakerConfiguration里面配置了2个自动配置类,还配置了个EnableCircuitBreaker的。我们先看下那两个自动配置类,HystrixAutoConfiguration主要是配置监控相关的,HystrixSecurityAutoConfiguration是跟spring security相关的配置,我们暂时先略过,剩下的那个是干啥的呢?
记得我们在启动类上加了一个注解@EnableCircuitBreaker,看下它的源码:
@Import(EnableCircuitBreakerImportSelector.class)public @interface EnableCircuitBreaker {
      }
看到了我们熟悉的@Import,打开EnableCircuitBreakerImportSelector:
public class EnableCircuitBreakerImportSelector extends    SpringFactoryImportSelector {
        @Override  protected boolean isEnabled() {
          return getEnvironment().getProperty(        "spring.cloud.circuit.breaker.enabled", Boolean.class, Boolean.TRUE);  }}
继承了SpringFactoryImportSelector,这个类其实就是去加载spring.factories里面配置的key是注解类型的那个value,也就是刚才我们看到的:
org.springframework.cloud.client.circuitbreaker.EnableCircuitBreaker=\org.springframework.cloud.netflix.hystrix.HystrixCircuitBreakerConfiguration因此,springboot会去加载HystrixCircuitBreakerConfiguration:
@Configurationpublic class HystrixCircuitBreakerConfiguration {
        @Bean  public HystrixCommandAspect hystrixCommandAspect() {
          return new HystrixCommandAspect();  }  ...}
这里就配置了javanina里面的HystrixCommandAspect,剩下的就是javanica的事情了。
参考代码下载:https://github.com/xjs1919/enumdemo下面的hystrix-demo/hystrix-boot。
