SpringBoot 整合 ElasticSearch 实现京东搜索(手把手带你完成一个 “前后端分离项目”)
前言
项目上传到Gitee上了,需要项目源码的自行点击链接获取:
后端项目地址:https://gitee.com/WuZe-wz/jdelasticsearch.git
前端项目地址:https://gitee.com/WuZe-wz/jdelasticsearchvue.git
说明:本项目主要关注功能的实现,对于代码的规范性以及页面的展示还待优化…
(1)创建后端项目(版本 2.2.5.RELEASE)
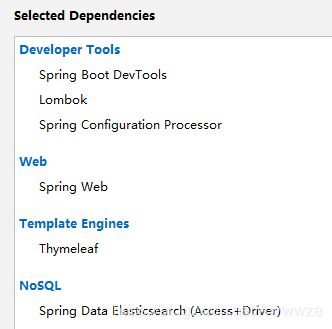
1)勾选需要的依赖
注:Thymeleaf 模板后来没有用到
2)更改Springboot版本2.2.5.RELEASE、ES版本7.6.1
3)引入其他依赖(fastjson)
        <dependency>
            <groupId>org.jsoupgroupId>
            <artifactId>jsoupartifactId>
            <version>1.10.2version>
        dependency>


        <dependency>
            <groupId>com.alibabagroupId>
            <artifactId>fastjsonartifactId>
            <version>1.2.62version>
        dependency>
4)application配置文件
<1>配置端口
<2>关闭thymeleaf缓存(穿越:thymeleaf 后面没有用到)
(2)爬虫
1)分析
去京东商城,搜索 ”java“,可以分析其中核心的请求地址就是
https://search.jd.com/Search?keyword=java
再提取,核心就是 keyword 属性!
总结:
爬取数据:其实就是 ”获取请求返回的页面信息,筛选出我们想要的数据“!
Java 中对应的包:
jsoup
2)整合jsoup包
<1>导入 jsoup 依赖
        <dependency>
            <groupId>org.jsoupgroupId>
            <artifactId>jsoupartifactId>
            <version>1.10.2version>
        dependency>
注:jsoup 只能爬取网页信息,像音乐这些没办法爬取。
<2>编写工具类解析网页
package com.wuze.jdelasticsearch.config;

import com.wuze.jdelasticsearch.pojo.JDBook;
import org.jsoup.Jsoup;
import org.jsoup.nodes.Document;
import org.jsoup.nodes.Element;
import org.jsoup.select.Elements;

import java.net.URL;
import java.util.ArrayList;
import java.util.List;

/**
 * @author wuze
 * @desc ...
 * @date 2021-02-21 17:49:56
 */

//爬取京东首页数据工具类
public class HtmlParseUtil {


    /*public static void main(String[] args) throws Exception {
        List bookList = new HtmlParseUtil().parseJD("vue");
        for (JDBook jdBook : bookList) {
            System.out.println(jdBook);
        }

    }*/

    public List<JDBook> parseJD(String keyword) throws Exception {

        //获取请求(url)
        String url = "https://search.jd.com/Search?keyword="+keyword;
        //解析网页,jsoup 返回的 document 就是 浏览器的 Document对象(接下来对document的操作就跟前端 js 操作一样)
        Document document = Jsoup.parse(new URL(url),30000);//30s超时
        //获取搜索结果的 List 集合
        Element jGoodsList = document.getElementById("J_goodsList");
        //获取集合里面的单个元素
        Elements liGoodsList = jGoodsList.getElementsByTag("li");

        //创建List 集合
        List<JDBook> jdBookList = new ArrayList<>();

        //遍历所有 li 标签,获取单个商品信息
        for (Element perGoods : liGoodsList) {

            //1、添加 .text() 方法,才能转换成 String 输出
            //2、图片img 是懒加载方式,所以只提取 img 的src属性是爬取不到数据的,需要指定data-lazy-img 属性
            String img = perGoods.getElementsByTag("img").attr("data-lazy-img");//获取商品图片(先获取标签,再获取标签内属性)
            String price = perGoods.getElementsByClass("p-price").text();//书的价格
            String name = perGoods.getElementsByClass("p-name").text();//书的名称
            String bookShop = perGoods.getElementsByClass("p-shopnum").text();//书店名
            JDBook jdBook = new JDBook();
            jdBook.setImg(img);
            jdBook.setPrice(price);
            jdBook.setName(name);
            jdBook.setBookShop(bookShop);
            jdBookList.add(jdBook);

        }

        return jdBookList;


    }
}
(3)整合swagger2
1)添加swagger依赖(2.8.0)(其他版本我的环境下有弹窗问题)
        <dependency>
              <groupId>io.springfoxgroupId>
              <artifactId>springfox-swagger2artifactId>
              <version>2.8.0version>
        dependency>

        <dependency>
              <groupId>io.springfoxgroupId>
              <artifactId>springfox-swagger-uiartifactId>
              <version>2.8.0version>
        dependency>
2)SwaggerConfig 配置类
package com.wuze.jdelasticsearch.config;

import com.google.common.base.Predicates;
import org.springframework.context.annotation.Bean;
import org.springframework.context.annotation.Configuration;
import springfox.documentation.builders.ApiInfoBuilder;
import springfox.documentation.builders.PathSelectors;
import springfox.documentation.service.ApiInfo;
import springfox.documentation.service.Contact;
import springfox.documentation.spi.DocumentationType;
import springfox.documentation.spring.web.plugins.Docket;
import springfox.documentation.swagger2.annotations.EnableSwagger2;

    /**
     * @author wuze
     * @desc ...
     * @date 2021-02-21 18:51:24
     */
@Configuration //指定为配置类(注入spring)
@EnableSwagger2 //表示swagger整合
public class SwaggerConfig {

    @Bean
    public Docket webApiConfig(){

        return new Docket(DocumentationType.SWAGGER_2)
                .groupName("webApi")
                .apiInfo(webApiInfo())
                .select()
                .paths(Predicates.not(PathSelectors.regex("/admin/.*")))
                .paths(Predicates.not(PathSelectors.regex("/error.*")))
                .build();
    }

    private ApiInfo webApiInfo(){

        return new ApiInfoBuilder()
                .title("网站-JD首页书籍信息API文档")
                .description("本文档描述了JD首页书籍信息接口定义")
                .version("1.0")
                .contact(new Contact("wz", "http://wuzest.com",
                        "[email protected]"))
                .build();
    }

}
(4)引入 ES API 工具类
package com.wuze.jdelasticsearch.config;


import com.alibaba.fastjson.JSON;
import com.wuze.jdelasticsearch.pojo.JDBook;
import org.apache.http.HttpHost;
import org.elasticsearch.action.admin.indices.delete.DeleteIndexRequest;
import org.elasticsearch.action.bulk.BulkRequest;
import org.elasticsearch.action.bulk.BulkResponse;
import org.elasticsearch.action.delete.DeleteRequest;
import org.elasticsearch.action.delete.DeleteResponse;
import org.elasticsearch.action.get.GetRequest;
import org.elasticsearch.action.get.GetResponse;
import org.elasticsearch.action.index.IndexRequest;
import org.elasticsearch.action.index.IndexResponse;
import org.elasticsearch.action.search.SearchRequest;
import org.elasticsearch.action.search.SearchResponse;
import org.elasticsearch.action.update.UpdateRequest;
import org.elasticsearch.action.update.UpdateResponse;
import org.elasticsearch.client.RequestOptions;
import org.elasticsearch.client.RestClient;
import org.elasticsearch.client.RestHighLevelClient;
import org.elasticsearch.client.indices.CreateIndexRequest;
import org.elasticsearch.client.indices.CreateIndexResponse;
import org.elasticsearch.client.indices.GetIndexRequest;
import org.elasticsearch.common.unit.TimeValue;
import org.elasticsearch.common.xcontent.XContentType;
import org.elasticsearch.index.query.MatchAllQueryBuilder;
import org.elasticsearch.index.query.MatchQueryBuilder;
import org.elasticsearch.index.query.QueryBuilders;
import org.elasticsearch.search.SearchHit;
import org.elasticsearch.search.builder.SearchSourceBuilder;
import org.springframework.context.annotation.Bean;
import org.springframework.context.annotation.Configuration;

import java.util.ArrayList;
import java.util.List;
import java.util.Map;
import java.util.concurrent.TimeUnit;

/**
 * @author wuze
 * @desc ...
 * @date 2021-02-21 15:06:07
 */
@Configuration
public class ElasticSearchUtils {


    /**
     * 注入 RestHighLevelClient
     * @return
     */
  @Bean
    public RestHighLevelClient restHighLevelClient(){

        RestHighLevelClient client = new RestHighLevelClient(
                RestClient.builder(
                        new HttpHost("localhost", 9200, "http")));
        return client;
    }


    /*
    * 注意:RestHighLevelClient 需要传入方法,调用时再从 bean容器 里面@Autowired拿出
    * 所以这里不需要拿出,调用时再拿出(直接传入形参操作即可!)
    */
    //@Autowired
    //private static RestHighLevelClient restHighLevelClient;


    /
    //  索引操作
    /

    //1 创建索引
    public static void creareIndex(String indexName, RestHighLevelClient restHighLevelClient){

        try {

            //1 创建索引请求
            CreateIndexRequest indexRequest = new CreateIndexRequest(indexName);
            //2 客户端执行请求,请求后获得响应
            CreateIndexResponse indexResponse = restHighLevelClient.indices().create(indexRequest, RequestOptions.DEFAULT);
            System.out.println(indexResponse);
        }catch (Exception e){

            e.printStackTrace();
        }

    }


    //2 获取索引(“索引”相当于“数据库”,只能判断其是否存在)
    public static void isExistsIndex(String indexName, RestHighLevelClient restHighLevelClient){

        try {

            //注意:GetIndexRequest导入的包是org.elasticsearch.client.indices.GetIndexRequest;
            GetIndexRequest indexRequest = new GetIndexRequest(indexName);
            boolean isExists = restHighLevelClient.indices().exists(indexRequest, RequestOptions.DEFAULT);
            System.out.println(isExists);
        }catch (Exception e){

            e.printStackTrace();
        }


    }

    //3 删除索引
    public static void deleteIndex(String indexName, RestHighLevelClient restHighLevelClient){

        try {

            DeleteIndexRequest deleteRequest = new DeleteIndexRequest(indexName);
            restHighLevelClient.indices().delete(deleteRequest, RequestOptions.DEFAULT);
        }catch (Exception e){

            e.printStackTrace();
        }

    }


    /
    //  文档操作
    /


    //1、添加文档(添加 ”行“ )
    public static void addDocument(JDBook jdBook, String indexName, RestHighLevelClient restHighLevelClient){

        try {

            //1、创建对象
            //User user = new User("wz1", 22);
            //2、创建请求(指定 “索引”(数据库))
            IndexRequest indexRequest = new IndexRequest(indexName);
            //3、配置请求基本规则
            indexRequest.id("1");//行号为 1
            indexRequest.timeout(TimeValue.timeValueSeconds(1));//过期时间1s
            //4、将我们的数据放入请求(先将对象转换成json格式)
            indexRequest.source(JSON.toJSONString(jdBook), XContentType.JSON);
            //5、客户端发送请求,获取响应结果
            IndexResponse response = restHighLevelClient.index(indexRequest, RequestOptions.DEFAULT);

            System.out.println(response.toString());//输出响应结果,json--> string
            System.out.println(response.status());//输出 响应状态(Create/Update/...)

        }catch (Exception e){

            e.printStackTrace();
        }

    }


    //2 获取文档信息(先查询文档是否存在)
    public static void getDocument(String indexName, String docId, RestHighLevelClient restHighLevelClient){

        try {

            //1、创建请求(指定 “索引”(数据库) 和 id(行号))
            GetRequest request = new GetRequest(indexName,docId);
            //2、判断文档是否存在
            boolean isExists = restHighLevelClient.exists(request, RequestOptions.DEFAULT);
            //如果存在
            if(isExists){

                //发送请求,获取文档,得到响应
                GetResponse response =restHighLevelClient.get(request, RequestOptions.DEFAULT);
                System.out.println(response.getSourceAsString());//转换成字符串输出
                System.out.println(response);//原输出,跟命令行方式输出一致
            }

        }catch (Exception e){

            e.printStackTrace();
        }


    }

    //3 更新文档信息
    public static void updateDocument(JDBook jdBook, String indexName, String docId, RestHighLevelClient restHighLevelClient){

        try {

            //1、创建更新请求
            UpdateRequest updateRequest = new UpdateRequest(indexName,docId);
            //2、设置基本规则
            updateRequest.timeout(TimeValue.timeValueSeconds(1));

            //3、将我们的新数据放入请求(先将对象转换成json格式)
            //XContentType.JSON 指定类型为 json
            //User user = new User("wz222", 18);
            updateRequest.doc(JSON.toJSONString(jdBook), XContentType.JSON);

            //4、客户端发送 update 请求,得到响应
            UpdateResponse response = restHighLevelClient.update(updateRequest, RequestOptions.DEFAULT);

            System.out.println(response);

        }catch (Exception e){

            e.printStackTrace();
        }


    }


    //4 删除文档
    public static void deleteDocument(String indexName, String docId, RestHighLevelClient restHighLevelClient){

        try {

            //1、创建删除的请求
            DeleteRequest deleteRequest = new DeleteRequest(indexName,docId);
            //2、客户端发起删除请求,得到响应
            DeleteResponse deleteResponse = restHighLevelClient.delete(deleteRequest, RequestOptions.DEFAULT);

            System.out.println(deleteResponse.status());//输出响应状态

        }catch (Exception e){

            e.printStackTrace();
        }


    }


    //5 批量插入数据(List)
    public static void bulkDocumentList(List<JDBook> bookList, String indexName, RestHighLevelClient restHighLevelClient){

        try {

            //1、创建批量插入的请求
            BulkRequest bulkRequest = new BulkRequest();

            //2、传入批量数据(这里用List演示)
//            List userList = new ArrayList<>();
//            userList.add(new User("阿泽1",11));
//            userList.add(new User("阿泽2",12));
//            userList.add(new User("阿泽3",13));

            //基本规则配置
            bulkRequest.timeout("10s");//设置超时时间

            //遍历,插入数据
            for (int i = 0; i < bookList.size(); i++) {

                // 指定索引
                // 设置id(否则生成随机id)(注意:最好不要这样指定id,否则每次把数据添加到这个索引,都是覆盖掉前面的值,而不是继续新增!!!)
                // 插入数据(json)
                bulkRequest.add(new IndexRequest(indexName)
                        //.id(""+(i+1))
                        .source(JSON.toJSONString(bookList.get(i)), XContentType.JSON)
                );
            }
            //发送请求,得到响应
            BulkResponse bulkResponse = restHighLevelClient.bulk(bulkRequest, RequestOptions.DEFAULT);
            System.out.println(bulkResponse.hasFailures());//是否失败,false为不失败,即 成功!

        }catch (Exception e){

            e.printStackTrace();
        }


    }


    //6 查询整个索引内的所有文档
    public static ArrayList<Map<String,Object>> searchAllDocument(String indexName, RestHighLevelClient restHighLevelClient){

        try {


            //1、创建查询请求(指定索引(数据库))(SearchRequest)
            SearchRequest searchRequest = new SearchRequest(indexName);

            //2、构建搜索条件(SearchSourceBuilder)
            SearchSourceBuilder sourceBuilder = new SearchSourceBuilder();

            //3、创建查询条件(使用 工具类QueryBuilders )
            //查询所有文档
            MatchAllQueryBuilder matchAllQueryBuilder = QueryBuilders.matchAllQuery();

            //4、配置 “搜索条件” 基本规则 并执行 “查询条件”
            sourceBuilder.timeout(new TimeValue(60, TimeUnit.SECONDS));
            sourceBuilder.query(matchAllQueryBuilder);

            //5、构建请求(绑定 “搜索条件”)
            searchRequest.source(sourceBuilder);

            //6、执行请求
            SearchResponse searchResponse = restHighLevelClient.search(searchRequest, RequestOptions.DEFAULT);

            //将结果封装成List,并返回List
            ArrayList<Map<String,Object>> resopnseList = new ArrayList<>();

            //7、获取搜索结果
            //System.out.println(JSON.toJSONString(searchResponse.getHits()));
            //System.out.println("==========================================");
            for (SearchHit hit : searchResponse.getHits().getHits()) {

                resopnseList.add(hit.getSourceAsMap());
                //System.out.println(hit.getSourceAsMap());
            }
            return resopnseList;

        }catch (Exception e){

            e.printStackTrace();
            return null;
        }


    }


//根据 indexName 和 keyword 查询数据(条件查询)
    public static ArrayList<Map<String, Object>> searchDocumentByKeyWord(String indexName, String keyWord, RestHighLevelClient restHighLevelClient){

        try {


            //1、创建查询请求(指定索引(数据库))(SearchRequest)
            SearchRequest searchRequest = new SearchRequest(indexName);

            //2、构建搜索条件(SearchSourceBuilder)
            SearchSourceBuilder sourceBuilder = new SearchSourceBuilder();

            //3、创建查询条件(使用 工具类QueryBuilders )
            //查询所有文档
            //matchQuery:会将搜索词分词,再与目标查询字段进行匹配,若分词中的任意一个词与目标字段匹配上,则可查询到。
            //termQuery:不会对搜索词进行分词处理,而是作为一个整体与目标字段进行匹配,若完全匹配,则可查询到。
            //name 字段 绑定到 keyWord 属性!(从head工具可以查看,书名的字段叫“name”)
            MatchQueryBuilder matchQuery = QueryBuilders.matchQuery("name", keyWord);

            //4、配置 “搜索条件” 基本规则 并执行 “查询条件”
            sourceBuilder.timeout(new TimeValue(60, TimeUnit.SECONDS));
            sourceBuilder.query(matchQuery);

            //5、构建请求(绑定 “搜索条件”)
            searchRequest.source(sourceBuilder);

            //6、执行请求
            SearchResponse searchResponse = restHighLevelClient.search(searchRequest, RequestOptions.DEFAULT);

            //将结果封装成List,并返回List
            ArrayList<Map<String, Object>> resopnseList = new ArrayList<>();

            //7、获取搜索结果
            //System.out.println(JSON.toJSONString(searchResponse.getHits()));
            //System.out.println("==========================================");
            for (SearchHit hit : searchResponse.getHits().getHits()) {

                resopnseList.add(hit.getSourceAsMap());
                //System.out.println(hit.getSourceAsMap());
            }
            return resopnseList;


        }catch(Exception e){

            e.printStackTrace();
            return null;
        }

    }


}
关键注意的地方:
1、索引中文档(字段)问题
这里使用 termQuery 更好!
2、id问题(添加/覆盖的区别)
(5)后端Controller(记得跨域配置)
package com.wuze.jdelasticsearch.controller;

import com.wuze.jdelasticsearch.config.ElasticSearchUtils;
import com.wuze.jdelasticsearch.config.HtmlParseUtil;
import com.wuze.jdelasticsearch.pojo.JDBook;
import org.elasticsearch.client.RestHighLevelClient;
import org.springframework.beans.factory.annotation.Autowired;
import org.springframework.web.bind.annotation.*;

import java.util.ArrayList;
import java.util.List;
import java.util.Map;

/**
 * @author wuze
 * @desc ...
 * @date 2021-02-21 18:29:20
 */
@RestController
@RequestMapping("/jdes")
@CrossOrigin	//跨域
public class JDEsController {


    @Autowired
    private RestHighLevelClient restHighLevelClient;

    @PostMapping("addbooklist/{keyword}")
    public void addBookList(@PathVariable String keyword) throws Exception {

        List<JDBook> jdBookList = new HtmlParseUtil().parseJD(keyword);
        ElasticSearchUtils.bulkDocumentList(jdBookList,"jd-es-test3",restHighLevelClient);
    }


    @GetMapping("getall")
    public ArrayList<Map<String, Object>> getAllBooks(){

        ArrayList<Map<String, Object>> booksList = ElasticSearchUtils.searchAllDocument("wz_springboot_es_index2", restHighLevelClient);
        /*for (Map book : booksList) {
            System.out.println(book);
        }*/
        return booksList;
    }


    //将指定keyword数据从指定索引中通过elasticsearch 查询出来
    // (爬虫+es)
    @GetMapping("getbykeyword/{keyWord}")
    public ArrayList<Map<String, Object>> getByKeyWord(@PathVariable String keyWord) throws Exception {

        String indexName = "jd-es-test3";

        ArrayList<Map<String, Object>> booksList = ElasticSearchUtils.searchDocumentByKeyWord(indexName,keyWord,restHighLevelClient);
        /*for (Map book : booksList) {
            System.out.println(book);
        }*/
        return booksList;
    }

}
(6)swagger测试 / 浏览器提交get请求测试(OK)
(7)创建前端 vue 项目
1)在新文件夹 npm init webpack 项目名 初始化vue环境并创建项目
2)进入项目目录,cnpm i 安装 所需依赖
3)安装 axios 插件 npm install axios
安装完插件会生成 node_modules 文件夹,就ok
4)项目启动测试(npm run dev)
如果出现vue项目启动界面,则项目创建成功。
5)项目结构分析
<1>本项目关键
本项目需要改动的地方只有
main.js文件、App.vue文件、index.html文件
- main.js:配置axios
- App.vue:写页面,调用后端接口方法(核心)
- index.html:写主页(首页)信息
<6>其他文件结构说明
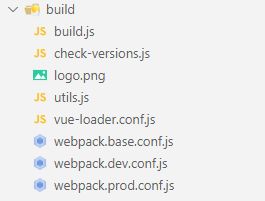
1、build(构建脚本目录)(一般不需要修改)
1)
build.js==> 生产环境构建脚本;2)
check-versions.js==> 检查 npm,node.js 版本;3)
utils.js==> 构建相关工具方法;4)
vue-loader.conf.js==> 配置了 css 加载器以及编译 css 之后自动添加前缀;5)
webpack.base.conf.js==> webpack 基本配置;6)
webpack.dev.conf.js==> webpack 开发环境配置;7)
webpack.prod.conf.js==> webpack 生产环境配置;
2、config:(项目环境配置)
1)
dev.env.js==> 开发环境变量;2)
index.js==> 项目配置文件;3)
prod.env.js==> 生产环境变量;
3、
node_modules:npm 加载的项目依赖模块
4、src:这里是我们要开发的目录(关键),基本上要做的事情都在这个目录里。里面包含了几个目录及文件:
1)
assets:资源目录,放置一些图片或者公共 js、公共 css。这里的资源会被 webpack 构建;2)
components:组件目录,我们写的组件就放在这个目录里面;3)
router:前端路由,我们需要配置的路由路径写在 index.js 里面;4)
App.vue:根组件;5)
main.js:入口 js 文件;
5、
static:静态资源目录,如图片、字体等。不会被 webpack 构建
6、
index.html:首页入口文件,可以添加一些 meta 信息等
7、
package.json:npm 包配置文件,定义了项目的 npm 脚本,依赖包等信息
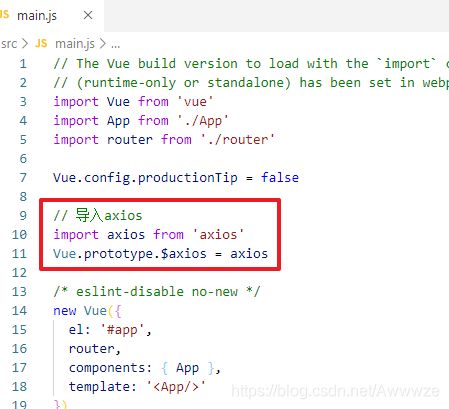
6)main.js 引入 axios插件依赖!
// 导入axios
import axios from 'axios'
Vue.prototype.$axios = axios
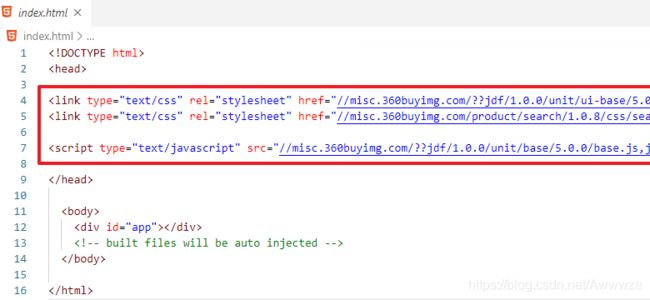
7)index.html 添加主页css文件(css链接写在 head头部)(在京东首页拷贝代码)
<link type="text/css" rel="stylesheet" href="//misc.360buyimg.com/??jdf/1.0.0/unit/ui-base/5.0.0/ui-base.css,jdf/1.0.0/unit/shortcut/5.0.0/shortcut.css,jdf/1.0.0/unit/global-header/5.0.0/global-header.css,jdf/1.0.0/unit/myjd/5.0.0/myjd.css,jdf/1.0.0/unit/nav/5.0.0/nav.css,jdf/1.0.0/unit/shoppingcart/5.0.0/shoppingcart.css,jdf/1.0.0/unit/global-footer/5.0.0/global-footer.css,jdf/1.0.0/unit/service/5.0.0/service.css,jdf/1.0.0/unit/global-header-photo/5.0.0/global-header-photo.css,jdf/1.0.0/ui/area/1.0.0/area.css" />
<link type="text/css" rel="stylesheet" href="//misc.360buyimg.com/product/search/1.0.8/css/search.css" />

<script type="text/javascript" src="//misc.360buyimg.com/??jdf/1.0.0/unit/base/5.0.0/base.js,jdf/lib/jquery-1.6.4.js,product/module/es5-shim.js">script>
8)App.vue(主页面+绑定后端接口)
注(说明):
因为前端页面只涉及首页,单页面,所以直接在
App.vue页面写,就没有在components/views/...去单独创建页面(并配置路由跳转)
主要代码组成:
- 搜索框页面(京东首页源码提取)
- 图书展示页面(京东首页源码提取)
- 使用axios绑定后端接口
完整代码:
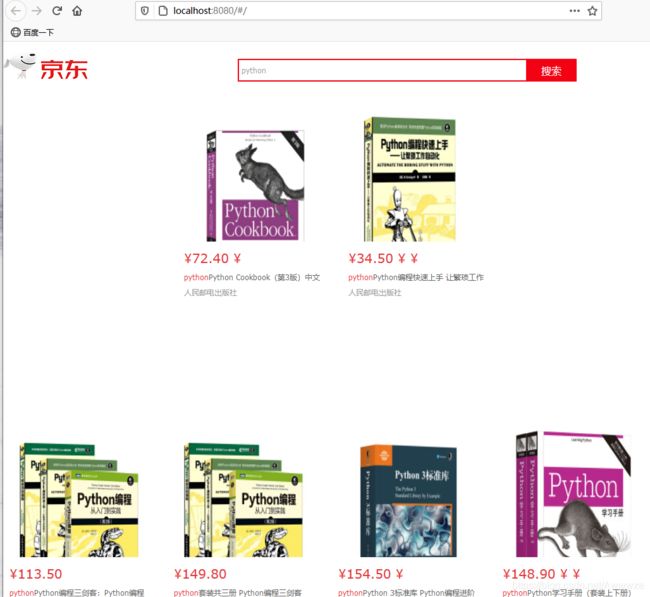
9)效果演示(注:搜索不区分大小写)
刚进入:
搜索的前提是索引(数据库)中有这个 keyword 对应的数据(书籍)
现在 索引 jd-es-test3 里面有 python、java、css、html…
比起京东首页,显然界面不是特别美观,但目前想实现的功能效果已经达到了,页面的美化等后续完善…
本文如果对你有帮助,一键三连噢,感谢支持~
