存放位置 springboot_实战演练【SpringBoot入门搭建】
点击蓝色“IT乾坤”关注我哟
加个“星标”,一起成长
项目搭建使用技术
开发环境:idea
框架:Springboot
工具:Maven
前端:Html,Thymeleaf
后台:Mybatis
数据库:Mysql
项目搭建
【01】点击idea的File->new->Project,点击next
 springboot-build
【02】选择Spring Initializr,点击next
 springboot-build
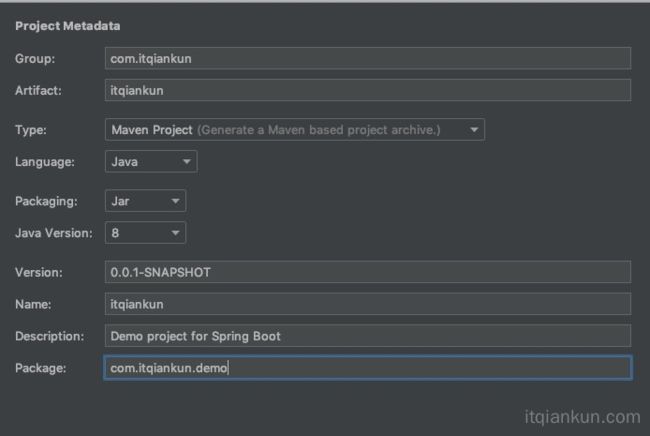
【03】配置springboot项目的坐标,项目的package,点击next
 springboot-build
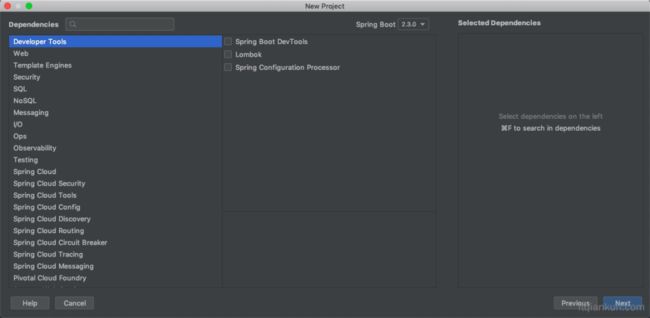
【04】配置项目所需要jar包依赖,这个地方选择会自动带入pom.xml中(可以创建项目之后自行进行配置,这里我什么也不选择,等到在项目里面配置,这样更清楚些),点击next
 springboot-build
【05】项目名字(名字是在上面第三步已经配置好的)和项目路径配置,点击finish
 springboot-build
【06】配置项目的maven路径,点击preferences->maven->配置maven的settings.xml文件
 springboot-build
 springboot-build
【07】选中右下角的自动导入依赖jar包,然后就等待依赖jar包下载完成吧
 springboot-build
【08】查看此时的pom.xml文件,我们可以看到下面的groupId,artifactId,version,name,description正是我们在上面的第三步配置的
    4.0.0modelVersion>

        org.springframework.bootgroupId>
        spring-boot-starter-parentartifactId>
        2.3.0.RELEASEversion>
        relativePath>
    parent>
    com.itqiankungroupId>
    itqiankunartifactId>
    0.0.1-SNAPSHOTversion>
    itqiankunname>
    Demo project for Spring Bootdescription>


        1.8java.version>
    properties>


            org.springframework.bootgroupId>
            spring-boot-starterartifactId>
        dependency>


            org.springframework.bootgroupId>
            spring-boot-starter-testartifactId>
            testscope>


                    org.junit.vintagegroupId>
                    junit-vintage-engineartifactId>
                exclusion>
            exclusions>
        dependency>
    dependencies>


                org.springframework.bootgroupId>
                spring-boot-maven-pluginartifactId>
            plugin>
        plugins>
    build>

project>
这里我们把它简单化,就保留最基本的,下面的java.version表示我们的项目是使用jdk1.8的,parent元素是定义父类jar包的,这个也不能少,至于为什么先不要问,以后讲springboot技术的时候会讲到
    4.0.0modelVersion>

        org.springframework.bootgroupId>
        spring-boot-starter-parentartifactId>
        2.3.0.RELEASEversion>
        relativePath>
    parent>
    com.itqiankungroupId>
    itqiankunartifactId>
    0.0.1-SNAPSHOTversion>
    itqiankunname>
    Demo project for Spring Bootdescription>

        1.8java.version>
    properties>
project>
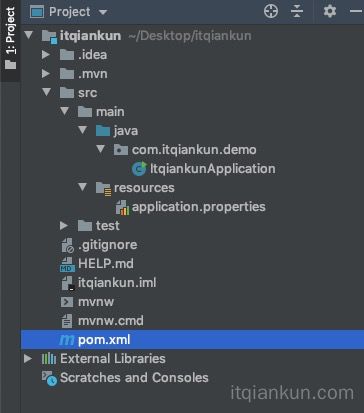
【09】查看项目结构(注意:ItqiankunApplication一定要在路径的最外层(这是因为springboot默认启动会扫描和ItqiankunApplication同一个等级的包)),resources为资源文件路径:存放propertie文件,我们会在resources文件里面设置static、templates目录,(static、templates目录存放前端页面文件:static存放 js、css文件,templates存放html等文件。)
 springboot-build
编写controller层来启动springboot
在pom.xml里面添加web层jar包和springboot核心jar包和测试包
            org.springframework.bootgroupId>
            spring-boot-starterartifactId>
        dependency>


            org.springframework.bootgroupId>
            spring-boot-starter-webartifactId>
        dependency>


            org.springframework.bootgroupId>
            spring-boot-starter-testartifactId>
            testscope>


                    org.junit.vintagegroupId>
                    junit-vintage-engineartifactId>
                exclusion>
            exclusions>
        dependency>
    dependencies>
然后编写controller层代码,
package com.itqiankun.demo.controller;

import org.springframework.stereotype.Controller;
import org.springframework.web.bind.annotation.GetMapping;

@Controller
public class HelloController {

    @GetMapping("/hello")
    @ResponseBody
    public String hello(){

        return "hello world";
    }
}
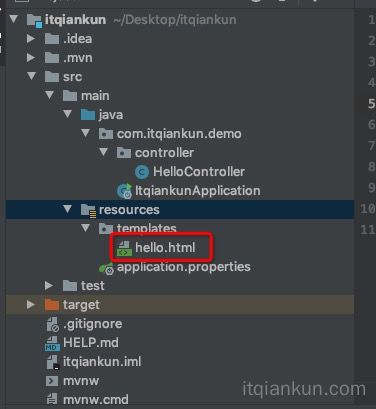
此时可以看到controller层和ItqiankunApplication是同一个目录级别的,这一点不要忽略了
 springboot-build
然后启动springboot,直接运行ItqiankunApplication里面的main方法,如果看到tomcat started就表示启动成功了,然后可以看到访问接口是8080
 springboot-build
然后直接访问,可以看到成功了,这就说明springboot的基本搭建就成功了
 springboot-build
配置Thymeleaf 来显示数据
1.首先引入jar包
    org.springframework.bootgroupId>
    spring-boot-starter-thymeleafartifactId>
dependency>
2.配置application.properties文件里面的Thymeleaf,告诉springboot我们的thymeleaf位置在那里
spring.thymeleaf.prefix: classpath:/templates/
2.在resources创建templates目录,在templates目录里面创建hello.html文件
 springboot-build
html>
Indextitle><br>head><br><body><br>姓名:<input type="text" th:value="${name}"><br/><br>年龄:<input type="text" th:value="${age}"><br/><br>body><br>html><br></code></pre>
<p>然后修改controller层代码</p>
<pre class="has"><code>package com.itqiankun.demo.controller;<br><br>import org.springframework.stereotype.Controller;<br>import org.springframework.ui.Model;<br>import org.springframework.web.bind.annotation.GetMapping;<br><br>@Controller<br>public class HelloController {
<br> @GetMapping("/hello")<br> public String index(Model model) {
<br> model.addAttribute("name", "itqiankun");<br> model.addAttribute("age", 2);<br> return "hello";<br> }<br>}<br></code></pre>
<p>重新启动结果如下所示</p>
<a href="http://img.e-com-net.com/image/info8/681036fa911043ed8b194d040eae7494.jpg" target="_blank"><img src="http://img.e-com-net.com/image/info8/681036fa911043ed8b194d040eae7494.jpg" alt="存放位置 springboot_实战演练【SpringBoot入门搭建】_第14张图片" width="460" height="203" style="border:1px solid black;"></a> springboot-build
<h2><span style="font-weight:bold;">配置Mybatis和Thymeleaf 来显示数据</span></h2>
<p>1.首先引入jar包<br>mysql和mybatis和lombok</p>
<pre class="has"><code><br> <dependency><br> <groupId>mysqlgroupId><br> <artifactId>mysql-connector-javaartifactId><br> <scope>runtimescope><br> dependency><br><br> <br> <dependency><br> <groupId>org.mybatis.spring.bootgroupId><br> <artifactId>mybatis-spring-boot-starterartifactId><br> <version>1.3.2version><br> dependency><br><br> <br> <dependency><br> <groupId>org.projectlombokgroupId><br> <artifactId>lombokartifactId><br> <optional>trueoptional><br> dependency><br></code></pre>
<p>2.配置application.properties文件里面</p>
<ul>
<li><p>2.1 mysql配置</p></li>
</ul>
<pre class="has"><code>#mysql<br>spring.datasource.url=jdbc:mysql://x.x.x.x:3306/myblog?useUnicode=true&characterEncoding=utf-8&useSSL=false<br>spring.datasource.password=xxx<br>spring.datasource.driverClassName=com.mysql.jdbc.Driver<br>spring.datasource.username=root<br></code></pre>
<ul>
<li><p>2.2 mybatis配置,配置mapper.xml的位置所在,一般我们放在resources里面的mpper文件夹里面</p></li>
</ul>
<pre class="has"><code>#mybatis<br>mybatis.type-aliases-package=com.itqiankun.demo.model<br>mybatis.mapper-locations=classpath:mapper/*Mapper.xml</code></pre>
<a href="http://img.e-com-net.com/image/info8/189fe5cefa6c42fead45779fc62a836f.jpg" target="_blank"><img src="http://img.e-com-net.com/image/info8/189fe5cefa6c42fead45779fc62a836f.jpg" alt="存放位置 springboot_实战演练【SpringBoot入门搭建】_第15张图片" width="340" height="564" style="border:1px solid black;"></a> springboot-build
<p>3.在resources创建mapper目录,在mapper目录里面创建PersonMapper.xml文件</p>
<a href="http://img.e-com-net.com/image/info8/189fe5cefa6c42fead45779fc62a836f.jpg" target="_blank"><img src="http://img.e-com-net.com/image/info8/189fe5cefa6c42fead45779fc62a836f.jpg" alt="存放位置 springboot_实战演练【SpringBoot入门搭建】_第16张图片" width="340" height="564" style="border:1px solid black;"></a> springboot-build
<pre class="has"><code><?xml version="1.0" encoding="UTF-8"?><br>mapper PUBLIC "-//mybatis.org//DTD Mapper 3.0//EN" "http://mybatis.org/dtd/mybatis-3-mapper.dtd"><br><mapper namespace="com.itqiankun.demo.mapper.PersonMapper"><br> <resultMap id="BaseResultMap" type="com.itqiankun.demo.model.Person"><br> <id column="id" jdbcType="INTEGER" property="id" >id><br> <result column="name" jdbcType="VARCHAR" property="name" >result><br> <result column="age" jdbcType="INTEGER" property="age" >result><br> resultMap><br><br> <sql id="Base_Column_List"><br> id, name, age<br> sql><br><br> <select id="select" parameterType="java.lang.Integer" resultType="com.itqiankun.demo.model.Person"><br><br> select<br> <include refid="Base_Column_List" >include><br> from person<br> where id = #{id}<br> select><br>mapper><br></code></pre>
<p>4.编写mapper接口和Person类</p>
<a href="http://img.e-com-net.com/image/info8/b40ad9264e6643a6addc393d511f2be9.jpg" target="_blank"><img src="http://img.e-com-net.com/image/info8/b40ad9264e6643a6addc393d511f2be9.jpg" alt="存放位置 springboot_实战演练【SpringBoot入门搭建】_第17张图片" width="379" height="604" style="border:1px solid black;"></a> springboot-build
<ul>
<li><p>4.1Person类</p></li>
</ul>
<pre class="has"><code>package com.itqiankun.demo.model;<br><br>import lombok.Data;<br><br>@Data<br>public class Person {
<br> private Integer id;<br> private String name;<br> private Integer age;<br>}<br></code></pre>
<ul>
<li><p>4.2 PersonMapper接口</p></li>
</ul>
<pre class="has"><code>package com.itqiankun.demo.mapper;<br><br>import com.itqiankun.demo.model.Person;<br>import org.apache.ibatis.annotations.Mapper;<br>import org.springframework.stereotype.Repository;<br><br>@Mapper<br>@Repository<br>public interface PersonMapper {
<br> Person select(Person person);<br>}<br></code></pre>
<p>5.修改controller层代码</p>
<pre class="has"><code>package com.itqiankun.demo.controller;<br><br>import javax.annotation.Resource;<br><br>import com.itqiankun.demo.mapper.PersonMapper;<br>import com.itqiankun.demo.model.Person;<br>import org.springframework.stereotype.Controller;<br>import org.springframework.ui.Model;<br>import org.springframework.web.bind.annotation.GetMapping;<br><br>@Controller<br>public class HelloController {
<br> @Resource<br> private PersonMapper personMapper;<br> @GetMapping("/hello")<br> public String index(Model model) {
<br> Person person = new Person();<br> person.setId(1);<br> model.addAttribute("person",personMapper.select(person));<br> return "hello";<br> }<br>}<br></code></pre>
<p>6.修改html代码</p>
<pre class="has"><code>html><br><html lang="en" xmlns:th="http://www.thymeleaf.org" xmlns:http="http://www.w3.org/1999/xhtml"><br><head><br> <meta charset="UTF-8"><br> <title>Indextitle><br>head><br><body><br>姓名:<input type="text" th:value="${person.name}"><br/><br>年龄:<input type="text" th:value="${person.age}"><br/><br>body><br>html><br></code></pre>
<p>7.数据库数据</p>
<pre class="has"><code>CREATE TABLE `person` (<br> `id` int(11) unsigned NOT NULL AUTO_INCREMENT,<br> `name` varchar(256) DEFAULT NULL,<br> `age` int(11) DEFAULT NULL,<br> PRIMARY KEY (`id`)<br>) ENGINE=InnoDB DEFAULT CHARSET=utf8mb4;<br>INSERT INTO `person` (`id`, `name`, `age`)<br>VALUES<br> (1, 'itqiankun', 200);<br></code></pre>
<p>此时在重启springboot,结果如下所示:</p>
<a href="http://img.e-com-net.com/image/info8/56e69f619ae643e7926fbd78f8794bc4.jpg" target="_blank"><img src="http://img.e-com-net.com/image/info8/56e69f619ae643e7926fbd78f8794bc4.jpg" alt="存放位置 springboot_实战演练【SpringBoot入门搭建】_第18张图片" width="418" height="219" style="border:1px solid black;"></a> springboot-build
<p>到这里从前端到数据库的spring入门教程就全部讲解完成来,希望对眼前对你有所帮助,看的高兴的同学就点个喜欢吧,感谢。</p>
<p><img src="http://img.e-com-net.com/image/info8/d3b607b661bc4afdb012a4e38377905b.jpg" alt="0efe4c3204d53fb3cd84616b6a6ffa06.png" width="640" height="22"><strong><strong><a href="http://img.e-com-net.com/image/info8/8647be66ac33436aa432d2d241e334aa.gif" target="_blank"><img src="http://img.e-com-net.com/image/info8/8647be66ac33436aa432d2d241e334aa.gif" alt="117a2b9d6cd89e40d19aaffcacb14a18.gif" width="55" height="55"></a></strong></strong></p>
<p><a href="http://img.e-com-net.com/image/info8/e1967a64b9484961a3c6a95d1bcee299.jpg" target="_blank"><img src="http://img.e-com-net.com/image/info8/e1967a64b9484961a3c6a95d1bcee299.jpg" alt="存放位置 springboot_实战演练【SpringBoot入门搭建】_第19张图片" width="650" height="361" style="border:1px solid black;"></a></p>
<p><strong>点个再看少个bug</strong><strong> </strong><strong> </strong><a href="http://img.e-com-net.com/image/info8/869a4ffdd8f54f3c99cea2a9a07f0e3b.gif" target="_blank"><img src="http://img.e-com-net.com/image/info8/869a4ffdd8f54f3c99cea2a9a07f0e3b.gif" alt="存放位置 springboot_实战演练【SpringBoot入门搭建】_第20张图片" width="300" height="300" style="border:1px solid black;"></a></p>
</div>
</div>
</div>
</div>
</div>
</div>
</div>
<!--PC和WAP自适应版-->
<div id="SOHUCS" sid="1364043869699727360"></div>
<script type="text/javascript" src="/views/front/js/chanyan.js"></script>
<!-- 文章页-底部 动态广告位 -->
<div class="youdao-fixed-ad" id="detail_ad_bottom"></div>
</div>
<div class="col-md-3">
<div class="row" id="ad">
<!-- 文章页-右侧1 动态广告位 -->
<div id="right-1" class="col-lg-12 col-md-12 col-sm-4 col-xs-4 ad">
<div class="youdao-fixed-ad" id="detail_ad_1"> </div>
</div>
<!-- 文章页-右侧2 动态广告位 -->
<div id="right-2" class="col-lg-12 col-md-12 col-sm-4 col-xs-4 ad">
<div class="youdao-fixed-ad" id="detail_ad_2"></div>
</div>
<!-- 文章页-右侧3 动态广告位 -->
<div id="right-3" class="col-lg-12 col-md-12 col-sm-4 col-xs-4 ad">
<div class="youdao-fixed-ad" id="detail_ad_3"></div>
</div>
</div>
</div>
</div>
</div>
</div>
<div class="container">
<h4 class="pt20 mb15 mt0 border-top">你可能感兴趣的:(存放位置,springboot)</h4>
<div id="paradigm-article-related">
<div class="recommend-post mb30">
<ul class="widget-links">
<li><a href="/article/1900799507981987840.htm"
title="图解AUTOSAR_CP_ComM" target="_blank">图解AUTOSAR_CP_ComM</a>
<span class="text-muted">KaiGer666</span>
<a class="tag" taget="_blank" href="/search/%E5%9B%BE%E8%A7%A3AUTOSAR_CP/1.htm">图解AUTOSAR_CP</a><a class="tag" taget="_blank" href="/search/%E5%B5%8C%E5%85%A5%E5%BC%8F%E7%A1%AC%E4%BB%B6/1.htm">嵌入式硬件</a><a class="tag" taget="_blank" href="/search/%E5%8D%95%E7%89%87%E6%9C%BA/1.htm">单片机</a><a class="tag" taget="_blank" href="/search/%E6%B1%BD%E8%BD%A6/1.htm">汽车</a>
<div>AUTOSARComM模块详解AUTOSAR通信管理模块详细解析目录1.概述1.1.ComM模块的作用1.2.ComM模块的位置2.架构设计2.1.模块上下文视图2.2.内部组件结构3.状态机3.1.通道状态机3.2.PNC状态机4.配置模型4.1.配置结构4.2.用户-PNC-通道映射5.服务接口5.1.API概述5.2.主要功能6.通信序列<</div>
</li>
<li><a href="/article/1900793580474134528.htm"
title="Java Spring Boot 常用技术及核心注解" target="_blank">Java Spring Boot 常用技术及核心注解</a>
<span class="text-muted">微笑的曙光(StevenLi)</span>
<a class="tag" taget="_blank" href="/search/JAVA/1.htm">JAVA</a><a class="tag" taget="_blank" href="/search/java/1.htm">java</a><a class="tag" taget="_blank" href="/search/spring/1.htm">spring</a><a class="tag" taget="_blank" href="/search/boot/1.htm">boot</a><a class="tag" taget="_blank" href="/search/%E5%BC%80%E5%8F%91%E8%AF%AD%E8%A8%80/1.htm">开发语言</a>
<div>一、常用技术自动配置(Auto-Configuration)SpringBoot根据类路径中的依赖自动配置应用程序。例如,引入spring-boot-starter-web会自动配置内嵌Tomcat和SpringMVC。@EnableAutoConfiguration//启用自动配置起步依赖(StarterDependencies)通过预定义的依赖集合(如spring-boot-starter-d</div>
</li>
<li><a href="/article/1900790679647350784.htm"
title="springboot 整合 elk (Elasticsearch+Logstash+Kibana)" target="_blank">springboot 整合 elk (Elasticsearch+Logstash+Kibana)</a>
<span class="text-muted">高大王竟然被注册</span>
<a class="tag" taget="_blank" href="/search/spring/1.htm">spring</a><a class="tag" taget="_blank" href="/search/%E8%BF%90%E7%BB%B4/1.htm">运维</a>
<div>Elasticsearch是个开源分布式搜索引擎,它的特点有:分布式,零配置,自动发现,索引自动分片,索引副本机制,restful风格接口,多数据源,自动搜索负载等。Logstash是一个完全开源的工具,他可以对你的日志进行收集、过滤,并将其存储供以后使用(如,搜索)。Kibana也是一个开源和免费的工具,它Kibana可以为Logstash和ElasticSearch提供的日志分析友好的Web界</div>
</li>
<li><a href="/article/1900786391944589312.htm"
title="小白十分钟速通 Spring Boot 基础" target="_blank">小白十分钟速通 Spring Boot 基础</a>
<span class="text-muted">Gao_雪</span>
<a class="tag" taget="_blank" href="/search/Spring/1.htm">Spring</a><a class="tag" taget="_blank" href="/search/spring/1.htm">spring</a><a class="tag" taget="_blank" href="/search/boot/1.htm">boot</a><a class="tag" taget="_blank" href="/search/%E5%90%8E%E7%AB%AF/1.htm">后端</a><a class="tag" taget="_blank" href="/search/java/1.htm">java</a><a class="tag" taget="_blank" href="/search/spring/1.htm">spring</a><a class="tag" taget="_blank" href="/search/vscode/1.htm">vscode</a>
<div>SpringBoot介绍随着Spring体系的不断庞大,加上现代互联网应用体积庞大,构建一个应用还是非常困难的,Spring团队重新打造了一个新的面向微服务的框架SpringBoot。严格来说SpringBoot不能是一个框架,它更是一个方案,Spring工程的快速上手方案,它极大的降低了JavaWeb工程的创建和运行和部署的难度。在过去这些都是Java工程师的老大难,所以说SpringBoot的</div>
</li>
<li><a href="/article/1900777063321759744.htm"
title="零基础小白如何系统学习Spring Boot" target="_blank">零基础小白如何系统学习Spring Boot</a>
<span class="text-muted">Victoria Zhu</span>
<a class="tag" taget="_blank" href="/search/%E5%AD%A6%E4%B9%A0/1.htm">学习</a><a class="tag" taget="_blank" href="/search/spring/1.htm">spring</a><a class="tag" taget="_blank" href="/search/boot/1.htm">boot</a><a class="tag" taget="_blank" href="/search/%E5%90%8E%E7%AB%AF/1.htm">后端</a>
<div>零基础小白如何系统学习SpringBoot一、学习前的准备1.必备基础知识✅Java基础:掌握Java8+的核心语法(类/对象/集合/异常处理)✅Maven/Gradle:理解依赖管理工具的基本使用(pom.xml配置)✅HTTP协议:了解RESTfulAPI设计理念(GET/POST/PUT/DELETE)环境要求公式环境要求公式环境要求公式推荐配置:JDK≥11,IDE=IntelliJIDE</div>
</li>
<li><a href="/article/1900773407943880704.htm"
title="鸿蒙HarmonyOS NEXT开发:自定义事件拦截(ArkTS组件事件)" target="_blank">鸿蒙HarmonyOS NEXT开发:自定义事件拦截(ArkTS组件事件)</a>
<span class="text-muted">「已注销」</span>
<a class="tag" taget="_blank" href="/search/%E9%B8%BF%E8%92%99/1.htm">鸿蒙</a><a class="tag" taget="_blank" href="/search/ArkTS/1.htm">ArkTS</a><a class="tag" taget="_blank" href="/search/harmonyos/1.htm">harmonyos</a><a class="tag" taget="_blank" href="/search/%E5%8D%8E%E4%B8%BA/1.htm">华为</a><a class="tag" taget="_blank" href="/search/%E9%B8%BF%E8%92%99/1.htm">鸿蒙</a><a class="tag" taget="_blank" href="/search/android/1.htm">android</a><a class="tag" taget="_blank" href="/search/%E9%A9%B1%E5%8A%A8%E5%BC%80%E5%8F%91/1.htm">驱动开发</a>
<div>为组件提供自定义的事件拦截能力,开发者可根据事件在控件上按下时发生的位置,输入源等事件信息决定控件上的HitTestMode属性。说明:从APIVersion12开始支持。后续版本如有新增内容,则采用上角标单独标记该内容的起始版本。onTouchInterceptonTouchIntercept(callback:Callback)系统能力:SystemCapability.ArkUI.ArkUI</div>
</li>
<li><a href="/article/1900770000747163648.htm"
title="classfinal加密失败,踩坑了,不妨进来看看" target="_blank">classfinal加密失败,踩坑了,不妨进来看看</a>
<span class="text-muted">行云的逆袭</span>
<a class="tag" taget="_blank" href="/search/classfinal/1.htm">classfinal</a><a class="tag" taget="_blank" href="/search/springboot/1.htm">springboot</a><a class="tag" taget="_blank" href="/search/jar%E5%8C%85%E5%8A%A0%E5%AF%86/1.htm">jar包加密</a><a class="tag" taget="_blank" href="/search/%E8%B8%A9%E5%9D%91/1.htm">踩坑</a><a class="tag" taget="_blank" href="/search/%E5%8A%A0%E5%AF%86%E5%A4%B1%E8%B4%A5/1.htm">加密失败</a>
<div>最近在使用classfinal加密springboot,执行成功了,但是反编译后还是能看到源码,很郁闷!加密之后,反编译还是能看到源码,头疼我采用的加密方式是插件方式,放上配置net.roseboyclassfinal-maven-plugin${classfinal.version}#org.springxingyunapplication.yml,application-dev.yml,app</div>
</li>
<li><a href="/article/1900757512521576448.htm"
title="BT、BT Mesh、WiFi、Zigbee技术对比分析" target="_blank">BT、BT Mesh、WiFi、Zigbee技术对比分析</a>
<span class="text-muted">莫道桑榆晚-为霞尚满天</span>
<a class="tag" taget="_blank" href="/search/%E7%A1%AC%E4%BB%B6%E5%B7%A5%E7%A8%8B/1.htm">硬件工程</a><a class="tag" taget="_blank" href="/search/%E7%BD%91%E7%BB%9C%E5%8D%8F%E8%AE%AE/1.htm">网络协议</a><a class="tag" taget="_blank" href="/search/%E4%BF%A1%E6%81%AF%E4%B8%8E%E9%80%9A%E4%BF%A1/1.htm">信息与通信</a>
<div>一、蓝牙(Bluetooth,BT)1.技术原理核心概念:蓝牙是一种短距离(10-100米)无线通信技术,采用跳频扩频(FHSS)技术,通过快速切换频段(每秒1600次)避免干扰。跳频扩频(FHSS)原理:在2.4GHz频段的79个1MHz信道中,按伪随机序列快速切换频率。比喻:像两人在嘈杂派对上不断更换餐桌位置私聊,躲避他人监听。协议版本:经典蓝牙(BR/EDR):高功耗,支持音频传输(如耳机)</div>
</li>
<li><a href="/article/1900748056928776192.htm"
title="基于NXP+FPGA轨道交通3U机箱结构牵引控制单元" target="_blank">基于NXP+FPGA轨道交通3U机箱结构牵引控制单元</a>
<span class="text-muted">深圳信迈主板定制专家</span>
<a class="tag" taget="_blank" href="/search/%E8%BD%A8%E9%81%93%E4%BA%A4%E9%80%9A/1.htm">轨道交通</a><a class="tag" taget="_blank" href="/search/NXP%2BFPGA/1.htm">NXP+FPGA</a><a class="tag" taget="_blank" href="/search/X86%2BFPGA/1.htm">X86+FPGA</a><a class="tag" taget="_blank" href="/search/fpga%E5%BC%80%E5%8F%91/1.htm">fpga开发</a><a class="tag" taget="_blank" href="/search/%E8%BE%B9%E7%BC%98%E8%AE%A1%E7%AE%97/1.htm">边缘计算</a><a class="tag" taget="_blank" href="/search/%E4%BA%BA%E5%B7%A5%E6%99%BA%E8%83%BD/1.htm">人工智能</a><a class="tag" taget="_blank" href="/search/%E5%A4%A7%E6%95%B0%E6%8D%AE/1.htm">大数据</a><a class="tag" taget="_blank" href="/search/%E5%B5%8C%E5%85%A5%E5%BC%8F%E7%A1%AC%E4%BB%B6/1.htm">嵌入式硬件</a>
<div>基于NXP+FPGA轨道交通异步电机牵引控制单元(TCU-IM)异步电机牵引控制单元(TCU-IM)用于牵引逆变器-异步电机构成的牵引电传动系统,可采用车控或架控方式。执行高性能异步电机复矢量控制策略,具有响应迅速、有效可靠的防空转·滑行控制功能以及平稳、无冲击的带速重投技术。无速度传感器控制通过转速观察算法,推算出准确的转速和转子位置,在实际应用中,达到省去速度传感器的目的,降低成本并减少故障点</div>
</li>
<li><a href="/article/1900746293270081536.htm"
title="STL中list的使用" target="_blank">STL中list的使用</a>
<span class="text-muted">海马HiMark</span>
<a class="tag" taget="_blank" href="/search/C%2B%2B/1.htm">C++</a><a class="tag" taget="_blank" href="/search/STL/1.htm">STL</a><a class="tag" taget="_blank" href="/search/list/1.htm">list</a>
<div>list的底层结构list底层是一个带头节点的双向循环链表,任意位置插入和删除时间复杂度0(1)list迭代器由于list底层是带头节点的双向循环链表,因此list的迭代器需要list的实现者自己提供迭代器怎么实现呢?迭代器的本质是指针,将指针封装出新的类型,指针有的操作,迭代器也视情况支持这些操作,比如:指针++,–,*,->等操作。迭代器在类中将这些操作重载出来即可,然后将list迭代器看作l</div>
</li>
<li><a href="/article/1900745915275210752.htm"
title="【Springboot知识】开发属于自己的中间件健康监测HealthIndicate" target="_blank">【Springboot知识】开发属于自己的中间件健康监测HealthIndicate</a>
<span class="text-muted">问道飞鱼</span>
<a class="tag" taget="_blank" href="/search/%E5%BE%AE%E6%9C%8D%E5%8A%A1%E7%9B%B8%E5%85%B3%E6%8A%80%E6%9C%AF/1.htm">微服务相关技术</a><a class="tag" taget="_blank" href="/search/spring/1.htm">spring</a><a class="tag" taget="_blank" href="/search/boot/1.htm">boot</a><a class="tag" taget="_blank" href="/search/%E4%B8%AD%E9%97%B4%E4%BB%B6/1.htm">中间件</a><a class="tag" taget="_blank" href="/search/%E5%90%8E%E7%AB%AF/1.htm">后端</a><a class="tag" taget="_blank" href="/search/HealthIndicate/1.htm">HealthIndicate</a>
<div>文章目录**一、技术栈****二、项目结构****三、依赖配置(pom.xml)****四、配置文件(application.yml)****五、自定义健康检查实现****1.Redis健康检查****2.Elasticsearch健康检查****3.Kafka健康检查****4.MySQL健康检查****六、自定义健康检查接口(可选)****七、测试与验证****八、高级功能扩展****九、部署</div>
</li>
<li><a href="/article/1900741626427404288.htm"
title="springboot新手入门搭建项目" target="_blank">springboot新手入门搭建项目</a>
<span class="text-muted">stayhungerstayflush</span>
<a class="tag" taget="_blank" href="/search/spring/1.htm">spring</a><a class="tag" taget="_blank" href="/search/boot/1.htm">boot</a><a class="tag" taget="_blank" href="/search/%E5%90%8E%E7%AB%AF/1.htm">后端</a><a class="tag" taget="_blank" href="/search/java/1.htm">java</a>
<div>SpringBoot新手入门指南:从原理到实践一、SpringBoot简介SpringBoot是基于Spring框架的快速开发脚手架,通过约定优于配置的设计理念,简化了Spring应用的初始化搭建和开发过程。主要优势包括:内嵌Web服务器(Tomcat/Jetty)自动配置Spring和第三方库提供生产级监控端点无需XML配置二、核心概念解析1.自动配置(Auto-Configuration)@S</div>
</li>
<li><a href="/article/1900737439828340736.htm"
title="HarmonyOS NEXT 获取当前位置信息" target="_blank">HarmonyOS NEXT 获取当前位置信息</a>
<span class="text-muted"></span>
<a class="tag" taget="_blank" href="/search/%E6%9E%B6%E6%9E%84%E6%95%99%E8%82%B2/1.htm">架构教育</a>
<div>在鸿蒙原生开发中,位置信息属于半开放隐私信息,开发中要想获取当前设备信息,需要向用户弹框申请权限及需要再module.json5添加权限列表"requestPermissions":[{"name":"ohos.permission.LOCATION","reason":"$string:permissionsReason","usedScene":{"abilities":["EntryAbil</div>
</li>
<li><a href="/article/1900733148975656960.htm"
title="基于k3s部署Nginx、MySQL、SpringBoot和Redis的详细教程" target="_blank">基于k3s部署Nginx、MySQL、SpringBoot和Redis的详细教程</a>
<span class="text-muted"></span>
<div>1.安装k3s集群1.1单节点快速部署#使用root或sudo权限执行curl-sfLhttps://get.k3s.io|sh-#验证安装sudokubectlgetnodes#输出应为Ready状态sudosystemctlstatusk3s1.2配置kubectl权限(可选)mkdir-p~/.kubesudocp/etc/rancher/k3s/k3s.yaml~/.kube/config</div>
</li>
<li><a href="/article/1900729150633734144.htm"
title="HashMap 中的 key 值类型" target="_blank">HashMap 中的 key 值类型</a>
<span class="text-muted">百里自来卷</span>
<a class="tag" taget="_blank" href="/search/java/1.htm">java</a>
<div>在Java中,HashMap的key一般建议使用String而不是自定义对象,主要有以下几个原因:1.String是不可变对象(Immutable)String在Java中是不可变的,一旦创建就不会改变其哈希值(hashCode)。HashMap依赖key的hashCode()计算存储位置,如果key是可变对象,修改key后,它的hashCode()可能会改变,导致HashMap无法正确查找该ke</div>
</li>
<li><a href="/article/1900728897717202944.htm"
title="android 新闻客户端和springboot后台开发-网络接口封装(三)" target="_blank">android 新闻客户端和springboot后台开发-网络接口封装(三)</a>
<span class="text-muted">mmsx</span>
<a class="tag" taget="_blank" href="/search/android/1.htm">android</a><a class="tag" taget="_blank" href="/search/%E4%BD%9C%E4%B8%9A%E6%BA%90%E7%A0%81%E5%88%86%E4%BA%AB/1.htm">作业源码分享</a><a class="tag" taget="_blank" href="/search/android/1.htm">android</a><a class="tag" taget="_blank" href="/search/spring/1.htm">spring</a><a class="tag" taget="_blank" href="/search/boot/1.htm">boot</a>
<div>一、前言android新闻客户端和springboot后台开发(一)-CSDN博客android新闻客户端和springboot后台开发(二)-CSDN博客这篇接前面,写android客户端接口这样方面的实现。okhttp简易封装,方便使用。二、例如注册接口示例UsermUser=newUser(account,password,UserTypeEnum.User.getDesc());Okhtt</div>
</li>
<li><a href="/article/1900725237272604672.htm"
title="C语言:整数、浮点数在内存中的存储" target="_blank">C语言:整数、浮点数在内存中的存储</a>
<span class="text-muted">代码AC不AC</span>
<a class="tag" taget="_blank" href="/search/%E5%AD%A6%E4%B9%A0%E5%88%86%E4%BA%AB/1.htm">学习分享</a><a class="tag" taget="_blank" href="/search/c%E8%AF%AD%E8%A8%80/1.htm">c语言</a>
<div>hello,我又来了!~内存存储1、整数在内存中的存储2、浮点数在内存中的存储3、2中的例题解释1、整数在内存中的存储我们知道:整数的表达式有三种,即:原码、反码和补码。正整数的原码、反码和补码都相同。负整数的三种表达式各不相同。原码:将数值按照负数的形式翻译成二进制得到原码。反码:原码的符号位(首位)不变,其他位依次按位取反就得到反码。补码:反码+1。对整型来说,数据存放的是二进制的补码。原因:</div>
</li>
<li><a href="/article/1900715254455791616.htm"
title="一个完整的python webSockets游戏服务器,每100ms接收并广播玩家位置" target="_blank">一个完整的python webSockets游戏服务器,每100ms接收并广播玩家位置</a>
<span class="text-muted">小宝哥Code</span>
<a class="tag" taget="_blank" href="/search/Python%E5%9F%BA%E7%A1%80%E5%8F%8AAI%E5%BC%80%E5%8F%91/1.htm">Python基础及AI开发</a><a class="tag" taget="_blank" href="/search/python/1.htm">python</a><a class="tag" taget="_blank" href="/search/%E6%B8%B8%E6%88%8F/1.htm">游戏</a><a class="tag" taget="_blank" href="/search/%E6%9C%8D%E5%8A%A1%E5%99%A8/1.htm">服务器</a>
<div>PythonWebSockets游戏服务器下面是一个完整的PythonWebSockets游戏服务器实现,它每100ms接收并广播玩家位置信息。这个服务器使用websockets和asyncio库来处理WebSocket连接和异步操作。完整代码#!/usr/bin/envpython3"""实时游戏位置广播服务器每100ms接收玩家位置并广播给所有连接的客户端"""importasyncioimp</div>
</li>
<li><a href="/article/1900709328013291520.htm"
title="otsu算法_OTSU(大津法最大类间方差法)" target="_blank">otsu算法_OTSU(大津法最大类间方差法)</a>
<span class="text-muted">weixin_39996742</span>
<a class="tag" taget="_blank" href="/search/otsu%E7%AE%97%E6%B3%95/1.htm">otsu算法</a>
<div>OTSU基本介绍OTSU是一种确定图像二值化分割阈值的算法,由日本学者大津于1979年提出,被誉为是图像分割中全局阈值选择的最佳方法。OTSU按照图像的灰度特性,将图像分成前景和背景两部分。因为方差可以看成是灰度分布均匀的一种度量,故前景和背景之间的类间方差越大,说明构成图像两部分的差别越大,当部分前景错分为背景或者部分背景被错分为前景时,都会导致两部分的差别变小。使用类间方差最大的分割一位置错分</div>
</li>
<li><a href="/article/1900700495614373888.htm"
title="【MyBatis-Plus 注解配置】开发中常用注解整理与介绍" target="_blank">【MyBatis-Plus 注解配置】开发中常用注解整理与介绍</a>
<span class="text-muted">Yan.love</span>
<a class="tag" taget="_blank" href="/search/mybatis/1.htm">mybatis</a><a class="tag" taget="_blank" href="/search/%E5%90%8E%E7%AB%AF/1.htm">后端</a><a class="tag" taget="_blank" href="/search/java/1.htm">java</a>
<div>不知道朋友们会不会在SpringBoot中集成MyBatis-Plus的时候,总是这个注解那个注解,都不知道哪些是MyBatis-Plus的了,搞得晕乎乎的,所以我整理了一份MyBatis-Plus开发中常用的注解,相信看完你就知道哪些注解是MyBatis-Plus提供的了,以后在开发中就能够更加清晰了1.@TableName作用:指定实体类对应的数据库表名。用法:@TableName("user</div>
</li>
<li><a href="/article/1900698099861483520.htm"
title="解数独 (leetcode 37" target="_blank">解数独 (leetcode 37</a>
<span class="text-muted">JohnFF</span>
<a class="tag" taget="_blank" href="/search/leetcode/1.htm">leetcode</a><a class="tag" taget="_blank" href="/search/%E7%AE%97%E6%B3%95/1.htm">算法</a><a class="tag" taget="_blank" href="/search/%E8%81%8C%E5%9C%BA%E5%92%8C%E5%8F%91%E5%B1%95/1.htm">职场和发展</a>
<div>leetcode系列文章目录一、核心操作二、外层配合操作三、核心模式代码总结使用二维递归,不管在哪一层都对矩阵进行全部遍历一、核心操作建立判断是否有效函数,对ij位置是否能放入k进行判断,由于此时还没有放置k,则可以直接对行列进行遍历,但是对于每一个小九宫格的遍历需要使用先除再乘的方式就可以将其重置为小九宫格的起始位置,再对其进行行列遍历即可建立二维回溯函数,从每一行开始遍历,再遍历每一行的每一列</div>
</li>
<li><a href="/article/1900691544726368256.htm"
title="高性能缓存利器:Caffeine 在 Spring Boot 中的应用" target="_blank">高性能缓存利器:Caffeine 在 Spring Boot 中的应用</a>
<span class="text-muted">阿里小阿希</span>
<a class="tag" taget="_blank" href="/search/JAVA/1.htm">JAVA</a><a class="tag" taget="_blank" href="/search/%E7%BC%93%E5%AD%98/1.htm">缓存</a><a class="tag" taget="_blank" href="/search/spring/1.htm">spring</a><a class="tag" taget="_blank" href="/search/boot/1.htm">boot</a><a class="tag" taget="_blank" href="/search/spring/1.htm">spring</a>
<div>在现代应用程序中,缓存是提高数据检索速度、减少对数据库或其他数据源访问次数的重要手段。SpringCache提供了多种缓存实现方式,而在我们的SpringBoot项目中,我们选择了Caffeine作为默认的缓存库。Caffeine简介Caffeine是一个基于Java8的高性能、近乎最佳的缓存库。它提供了多种优化技术,如写入时复制(Copy-on-Write)和分段锁(SegmentedLocki</div>
</li>
<li><a href="/article/1900687512569966592.htm"
title="4.2.3 键值对集合2" target="_blank">4.2.3 键值对集合2</a>
<span class="text-muted">.Net学习</span>
<a class="tag" taget="_blank" href="/search/C%23/1.htm">C#</a><a class="tag" taget="_blank" href="/search/%E6%95%99%E7%A8%8B/1.htm">教程</a><a class="tag" taget="_blank" href="/search/c%23/1.htm">c#</a><a class="tag" taget="_blank" href="/search/%E5%BC%80%E5%8F%91%E8%AF%AD%E8%A8%80/1.htm">开发语言</a>
<div>版权声明:本文为博主原创文章,转载请在显著位置标明本文出处以及作者网名,未经作者允许不得用于商业目的4.2.3.3KeyValuePair结构KeyValuePair结构定义可设置或检索的键/值对。通常在KeyValuePair的构造函数中传入键和值作为参数,例如下面的语句定义了键为int、值为string的KeyValuePair,并赋予了初始值:KeyValuePairnewKeyValueP</div>
</li>
<li><a href="/article/1900687259938648064.htm"
title="SpringBoot整合MinIO实现文件的上传下载以及获取预览URL" target="_blank">SpringBoot整合MinIO实现文件的上传下载以及获取预览URL</a>
<span class="text-muted">.晚安.</span>
<a class="tag" taget="_blank" href="/search/spring/1.htm">spring</a><a class="tag" taget="_blank" href="/search/boot/1.htm">boot</a><a class="tag" taget="_blank" href="/search/%E5%90%8E%E7%AB%AF/1.htm">后端</a><a class="tag" taget="_blank" href="/search/java/1.htm">java</a><a class="tag" taget="_blank" href="/search/web/1.htm">web</a>
<div>SpringBoot整合MinIO实现文件的上传下载以及获取预览URLJDK17SpringBoot3参考https://min.io/docs/minio/linux/developers/java/API.html?ref=docs-redirect#uploadObject源码https://gitee.com/Uncommen/easy-min-io引入依赖在pom.xml中添加主要的依赖</div>
</li>
<li><a href="/article/1900681961916133376.htm"
title="银河麒麟V10ServerSP3中Redis7源码编译与安装详细教程" target="_blank">银河麒麟V10ServerSP3中Redis7源码编译与安装详细教程</a>
<span class="text-muted">小猿搬码</span>
<a class="tag" taget="_blank" href="/search/Redis/1.htm">Redis</a><a class="tag" taget="_blank" href="/search/Redis7/1.htm">Redis7</a><a class="tag" taget="_blank" href="/search/KylinV10/1.htm">KylinV10</a><a class="tag" taget="_blank" href="/search/%E9%93%B6%E6%B2%B3%E9%BA%92%E9%BA%9F/1.htm">银河麒麟</a><a class="tag" taget="_blank" href="/search/%E5%9B%BD%E4%BA%A7%E6%93%8D%E4%BD%9C%E7%B3%BB%E7%BB%9F/1.htm">国产操作系统</a>
<div>银河麒麟V10ServerSP3中Redis7源码编译与安装详细教程文章目录银河麒麟V10ServerSP3中Redis7源码编译与安装详细教程1.下载2.安装过程1.解压2.编译源码3.测试编译结果(可选)4.安装Redis5.安装位置6.复制配置文件7.修改redis.conf文件8.启动Redis服务9.客户端测试10.设置开机自启动3.开启远程访问1.编辑redis.conf2.开启防火墙</div>
</li>
<li><a href="/article/1900675770083241984.htm"
title="项目使用mybatis-plus分页插件和pageHelper分页插件引起失效问题!" target="_blank">项目使用mybatis-plus分页插件和pageHelper分页插件引起失效问题!</a>
<span class="text-muted">JavinLu</span>
<a class="tag" taget="_blank" href="/search/mybatis/1.htm">mybatis</a><a class="tag" taget="_blank" href="/search/java/1.htm">java</a><a class="tag" taget="_blank" href="/search/springboot/1.htm">springboot</a><a class="tag" taget="_blank" href="/search/%E4%B8%AA%E4%BA%BA%E5%BC%80%E5%8F%91/1.htm">个人开发</a><a class="tag" taget="_blank" href="/search/%E6%B7%B1%E5%BA%A6%E5%AD%A6%E4%B9%A0/1.htm">深度学习</a>
<div>一、背景项目中以前的源码是使用pageHelper分页插件来实现。涉及到的sql代码还是要手写部分。而目前在Springboot项目中,使用的主流的方式就是一个基于mybatis-plus的.page()的分页,当然这种分页方式是适用于一些简单的查询和简单场景下。对于多表联查等场景,可能还是需要通过手写sql来实现复杂查询。这时候就可以使用pageHelper的分页插件。二、问题描述在同时使用my</div>
</li>
<li><a href="/article/1900667317780541440.htm"
title="Spring Boot入门(15):一键生成,轻松搭建你的Spring Boot+MyBatis-Plus项目!" target="_blank">Spring Boot入门(15):一键生成,轻松搭建你的Spring Boot+MyBatis-Plus项目!</a>
<span class="text-muted">喵手</span>
<a class="tag" taget="_blank" href="/search/Springboot/1.htm">Springboot</a><a class="tag" taget="_blank" href="/search/spring/1.htm">spring</a><a class="tag" taget="_blank" href="/search/boot/1.htm">boot</a><a class="tag" taget="_blank" href="/search/mybatis/1.htm">mybatis</a><a class="tag" taget="_blank" href="/search/%E5%90%8E%E7%AB%AF/1.htm">后端</a>
<div>1.前言SpringBoot是一种全新的基于Spring框架的用于快速开发新一代应用程序的框架。它能够使开发者通过简单的配置快速搭建项目,并能够提供常见的功能模块,如数据库访问、事务管理、Web开发和安全管理等。而MyBatis-Plus是一个功能强大的MyBatis增强工具,它基于MyBatis本身进行了扩展,可以大幅度减少开发工作量,提高开发效率。本文将介绍如何使用MyBatis-Plus的A</div>
</li>
<li><a href="/article/1900666310178697216.htm"
title="RV1126笔记三十七:PaddleOCR检测模型训练" target="_blank">RV1126笔记三十七:PaddleOCR检测模型训练</a>
<span class="text-muted">殷忆枫</span>
<a class="tag" taget="_blank" href="/search/RV1126%E9%A1%B9%E7%9B%AE%E5%AE%9E%E6%88%98/1.htm">RV1126项目实战</a><a class="tag" taget="_blank" href="/search/%E7%AC%94%E8%AE%B0/1.htm">笔记</a>
<div>若该文为原创文章,转载请注明原文出处。PaddleOCR检测模型训练及验证测试1、准备数据集在PaddleOCR目录下新建文件夹:train_data,这个文件夹用于存放数据集的。使用的是网上大佬提供的车牌识别数据集,下载后,解压到train_data目录下。可以自己网上找,了可以找我要数据集,或自己标注数据集。2、配置文件在PaddleOCR主目录下:configs/det/ch_ppocr_v</div>
</li>
<li><a href="/article/1900665301519888384.htm"
title="Spring Boot启动流程及源码实现深度解析" target="_blank">Spring Boot启动流程及源码实现深度解析</a>
<span class="text-muted">黑猫Teng</span>
<a class="tag" taget="_blank" href="/search/spring/1.htm">spring</a><a class="tag" taget="_blank" href="/search/boot/1.htm">boot</a><a class="tag" taget="_blank" href="/search/%E5%90%8E%E7%AB%AF/1.htm">后端</a><a class="tag" taget="_blank" href="/search/java/1.htm">java</a>
<div>SpringBoot启动流程及源码实现深度解析一、启动流程概述SpringBoot的启动流程围绕SpringApplication类展开,核心流程可分为以下几个阶段:初始化阶段:推断应用类型,加载ApplicationContextInitializer和ApplicationListener环境准备:加载配置文件和命令行参数上下文创建:实例化ApplicationContext上下文刷新:执行r</div>
</li>
<li><a href="/article/1900657604988825600.htm"
title="计算机毕业设计springboot基于BS的驾校在线学习考试系统43i2x9【附源码+数据库+部署+LW】" target="_blank">计算机毕业设计springboot基于BS的驾校在线学习考试系统43i2x9【附源码+数据库+部署+LW】</a>
<span class="text-muted">゛花昔 计算机毕设源码程序</span>
<a class="tag" taget="_blank" href="/search/%E8%AF%BE%E7%A8%8B%E8%AE%BE%E8%AE%A1/1.htm">课程设计</a><a class="tag" taget="_blank" href="/search/spring/1.htm">spring</a><a class="tag" taget="_blank" href="/search/boot/1.htm">boot</a><a class="tag" taget="_blank" href="/search/%E5%AD%A6%E4%B9%A0/1.htm">学习</a>
<div>本项目包含程序+源码+数据库+LW+调试部署环境,文末可获取一份本项目的java源码和数据库参考。系统的选题背景和意义选题背景:随着社会的发展和交通工具的普及,驾驶证成为了越来越多人的需求。然而,传统的驾校学习考试方式存在一些问题,如时间和空间限制、学习资源不足等。为了解决这些问题,基于BS(Browser/Server)架构的驾校在线学习考试系统应运而生。该系统利用互联网浏览器作为客户端,通过服</div>
</li>
<li><a href="/article/35.htm"
title="JVM StackMapTable 属性的作用及理解" target="_blank">JVM StackMapTable 属性的作用及理解</a>
<span class="text-muted">lijingyao8206</span>
<a class="tag" taget="_blank" href="/search/jvm/1.htm">jvm</a><a class="tag" taget="_blank" href="/search/%E5%AD%97%E8%8A%82%E7%A0%81/1.htm">字节码</a><a class="tag" taget="_blank" href="/search/Class%E6%96%87%E4%BB%B6/1.htm">Class文件</a><a class="tag" taget="_blank" href="/search/StackMapTable/1.htm">StackMapTable</a>
<div>
在Java 6版本之后JVM引入了栈图(Stack Map Table)概念。为了提高验证过程的效率,在字节码规范中添加了Stack Map Table属性,以下简称栈图,其方法的code属性中存储了局部变量和操作数的类型验证以及字节码的偏移量。也就是一个method需要且仅对应一个Stack Map Table。在Java 7版</div>
</li>
<li><a href="/article/162.htm"
title="回调函数调用方法" target="_blank">回调函数调用方法</a>
<span class="text-muted">百合不是茶</span>
<a class="tag" taget="_blank" href="/search/java/1.htm">java</a>
<div>最近在看大神写的代码时,.发现其中使用了很多的回调 ,以前只是在学习的时候经常用到 ,现在写个笔记 记录一下
代码很简单:
MainDemo :调用方法 得到方法的返回结果
</div>
</li>
<li><a href="/article/289.htm"
title="[时间机器]制造时间机器需要一些材料" target="_blank">[时间机器]制造时间机器需要一些材料</a>
<span class="text-muted">comsci</span>
<a class="tag" taget="_blank" href="/search/%E5%88%B6%E9%80%A0/1.htm">制造</a>
<div> 根据我的计算和推测,要完全实现制造一台时间机器,需要某些我们这个世界不存在的物质
和材料...
甚至可以这样说,这种材料和物质,我们在反应堆中也无法获得......
</div>
</li>
<li><a href="/article/416.htm"
title="开口埋怨不如闭口做事" target="_blank">开口埋怨不如闭口做事</a>
<span class="text-muted">邓集海</span>
<a class="tag" taget="_blank" href="/search/%E9%82%93%E9%9B%86%E6%B5%B7+%E5%81%9A%E4%BA%BA+%E5%81%9A%E4%BA%8B+%E5%B7%A5%E4%BD%9C/1.htm">邓集海 做人 做事 工作</a>
<div>“开口埋怨,不如闭口做事。”不是名人名言,而是一个普通父亲对儿子的训导。但是,因为这句训导,这位普通父亲却造就了一个名人儿子。这位普通父亲造就的名人儿子,叫张明正。 张明正出身贫寒,读书时成绩差,常挨老师批评。高中毕业,张明正连普通大学的分数线都没上。高考成绩出来后,平时开口怨这怨那的张明正,不从自身找原因,而是不停地埋怨自己家庭条件不好、埋怨父母没有给他创造良好的学习环境。 </div>
</li>
<li><a href="/article/543.htm"
title="jQuery插件开发全解析,类级别与对象级别开发" target="_blank">jQuery插件开发全解析,类级别与对象级别开发</a>
<span class="text-muted">IT独行者</span>
<a class="tag" taget="_blank" href="/search/jquery/1.htm">jquery</a><a class="tag" taget="_blank" href="/search/%E5%BC%80%E5%8F%91/1.htm">开发</a><a class="tag" taget="_blank" href="/search/%E6%8F%92%E4%BB%B6%E3%80%80/1.htm">插件 </a><a class="tag" taget="_blank" href="/search/%E5%87%BD%E6%95%B0/1.htm">函数</a>
<div>jQuery插件的开发包括两种: 一种是类级别的插件开发,即给
jQuery添加新的全局函数,相当于给
jQuery类本身添加方法。
jQuery的全局函数就是属于
jQuery命名空间的函数,另一种是对象级别的插件开发,即给
jQuery对象添加方法。下面就两种函数的开发做详细的说明。
1
、类级别的插件开发 类级别的插件开发最直接的理解就是给jQuer</div>
</li>
<li><a href="/article/670.htm"
title="Rome解析Rss" target="_blank">Rome解析Rss</a>
<span class="text-muted">413277409</span>
<a class="tag" taget="_blank" href="/search/Rome%E8%A7%A3%E6%9E%90Rss/1.htm">Rome解析Rss</a>
<div>import java.net.URL;
import java.util.List;
import org.junit.Test;
import com.sun.syndication.feed.synd.SyndCategory;
import com.sun.syndication.feed.synd.S</div>
</li>
<li><a href="/article/797.htm"
title="RSA加密解密" target="_blank">RSA加密解密</a>
<span class="text-muted">无量</span>
<a class="tag" taget="_blank" href="/search/%E5%8A%A0%E5%AF%86/1.htm">加密</a><a class="tag" taget="_blank" href="/search/%E8%A7%A3%E5%AF%86/1.htm">解密</a><a class="tag" taget="_blank" href="/search/rsa/1.htm">rsa</a>
<div>RSA加密解密代码
代码有待整理
package com.tongbanjie.commons.util;
import java.security.Key;
import java.security.KeyFactory;
import java.security.KeyPair;
import java.security.KeyPairGenerat</div>
</li>
<li><a href="/article/924.htm"
title="linux 软件安装遇到的问题" target="_blank">linux 软件安装遇到的问题</a>
<span class="text-muted">aichenglong</span>
<a class="tag" taget="_blank" href="/search/linux/1.htm">linux</a><a class="tag" taget="_blank" href="/search/%E9%81%87%E5%88%B0%E7%9A%84%E9%97%AE%E9%A2%98/1.htm">遇到的问题</a><a class="tag" taget="_blank" href="/search/ftp/1.htm">ftp</a>
<div>1 ftp配置中遇到的问题
500 OOPS: cannot change directory
出现该问题的原因:是SELinux安装机制的问题.只要disable SELinux就可以了
修改方法:1 修改/etc/selinux/config 中SELINUX=disabled
2 source /etc</div>
</li>
<li><a href="/article/1051.htm"
title="面试心得" target="_blank">面试心得</a>
<span class="text-muted">alafqq</span>
<a class="tag" taget="_blank" href="/search/%E9%9D%A2%E8%AF%95/1.htm">面试</a>
<div>最近面试了好几家公司。记录下;
支付宝,面试我的人胖胖的,看着人挺好的;博彦外包的职位,面试失败;
阿里金融,面试官人也挺和善,只不过我让他吐血了。。。
由于印象比较深,记录下;
1,自我介绍
2,说下八种基本类型;(算上string。楼主才答了3种,哈哈,string其实不是基本类型,是引用类型)
3,什么是包装类,包装类的优点;
4,平时看过什么书?NND,什么书都没看过。。照样</div>
</li>
<li><a href="/article/1178.htm"
title="java的多态性探讨" target="_blank">java的多态性探讨</a>
<span class="text-muted">百合不是茶</span>
<a class="tag" taget="_blank" href="/search/java/1.htm">java</a>
<div>java的多态性是指main方法在调用属性的时候类可以对这一属性做出反应的情况
//package 1;
class A{
public void test(){
System.out.println("A");
}
}
class D extends A{
public void test(){
S</div>
</li>
<li><a href="/article/1305.htm"
title="网络编程基础篇之JavaScript-学习笔记" target="_blank">网络编程基础篇之JavaScript-学习笔记</a>
<span class="text-muted">bijian1013</span>
<a class="tag" taget="_blank" href="/search/JavaScript/1.htm">JavaScript</a>
<div>1.documentWrite
<html>
<head>
<script language="JavaScript">
document.write("这是电脑网络学校");
document.close();
</script>
</h</div>
</li>
<li><a href="/article/1432.htm"
title="探索JUnit4扩展:深入Rule" target="_blank">探索JUnit4扩展:深入Rule</a>
<span class="text-muted">bijian1013</span>
<a class="tag" taget="_blank" href="/search/JUnit/1.htm">JUnit</a><a class="tag" taget="_blank" href="/search/Rule/1.htm">Rule</a><a class="tag" taget="_blank" href="/search/%E5%8D%95%E5%85%83%E6%B5%8B%E8%AF%95/1.htm">单元测试</a>
<div> 本文将进一步探究Rule的应用,展示如何使用Rule来替代@BeforeClass,@AfterClass,@Before和@After的功能。
在上一篇中提到,可以使用Rule替代现有的大部分Runner扩展,而且也不提倡对Runner中的withBefores(),withAfte</div>
</li>
<li><a href="/article/1559.htm"
title="[CSS]CSS浮动十五条规则" target="_blank">[CSS]CSS浮动十五条规则</a>
<span class="text-muted">bit1129</span>
<a class="tag" taget="_blank" href="/search/css/1.htm">css</a>
<div>这些浮动规则,主要是参考CSS权威指南关于浮动规则的总结,然后添加一些简单的例子以验证和理解这些规则。
1. 所有的页面元素都可以浮动 2. 一个元素浮动后,会成为块级元素,比如<span>,a, strong等都会变成块级元素 3.一个元素左浮动,会向最近的块级父元素的左上角移动,直到浮动元素的左外边界碰到块级父元素的左内边界;如果这个块级父元素已经有浮动元素停靠了</div>
</li>
<li><a href="/article/1686.htm"
title="【Kafka六】Kafka Producer和Consumer多Broker、多Partition场景" target="_blank">【Kafka六】Kafka Producer和Consumer多Broker、多Partition场景</a>
<span class="text-muted">bit1129</span>
<a class="tag" taget="_blank" href="/search/partition/1.htm">partition</a>
<div>0.Kafka服务器配置
3个broker
1个topic,6个partition,副本因子是2
2个consumer,每个consumer三个线程并发读取
1. Producer
package kafka.examples.multibrokers.producers;
import java.util.Properties;
import java.util.</div>
</li>
<li><a href="/article/1813.htm"
title="zabbix_agentd.conf配置文件详解" target="_blank">zabbix_agentd.conf配置文件详解</a>
<span class="text-muted">ronin47</span>
<a class="tag" taget="_blank" href="/search/zabbix+%E9%85%8D%E7%BD%AE%E6%96%87%E4%BB%B6/1.htm">zabbix 配置文件</a>
<div>Aliaskey的别名,例如 Alias=ttlsa.userid:vfs.file.regexp[/etc/passwd,^ttlsa:.:([0-9]+),,,,\1], 或者ttlsa的用户ID。你可以使用key:vfs.file.regexp[/etc/passwd,^ttlsa:.: ([0-9]+),,,,\1],也可以使用ttlsa.userid。备注: 别名不能重复,但是可以有多个</div>
</li>
<li><a href="/article/1940.htm"
title="java--19.用矩阵求Fibonacci数列的第N项" target="_blank">java--19.用矩阵求Fibonacci数列的第N项</a>
<span class="text-muted">bylijinnan</span>
<a class="tag" taget="_blank" href="/search/fibonacci/1.htm">fibonacci</a>
<div>参考了网上的思路,写了个Java版的:
public class Fibonacci {
final static int[] A={1,1,1,0};
public static void main(String[] args) {
int n=7;
for(int i=0;i<=n;i++){
int f=fibonac</div>
</li>
<li><a href="/article/2067.htm"
title="Netty源码学习-LengthFieldBasedFrameDecoder" target="_blank">Netty源码学习-LengthFieldBasedFrameDecoder</a>
<span class="text-muted">bylijinnan</span>
<a class="tag" taget="_blank" href="/search/java/1.htm">java</a><a class="tag" taget="_blank" href="/search/netty/1.htm">netty</a>
<div>先看看LengthFieldBasedFrameDecoder的官方API
http://docs.jboss.org/netty/3.1/api/org/jboss/netty/handler/codec/frame/LengthFieldBasedFrameDecoder.html
API举例说明了LengthFieldBasedFrameDecoder的解析机制,如下:
实</div>
</li>
<li><a href="/article/2194.htm"
title="AES加密解密" target="_blank">AES加密解密</a>
<span class="text-muted">chicony</span>
<a class="tag" taget="_blank" href="/search/%E5%8A%A0%E5%AF%86%E8%A7%A3%E5%AF%86/1.htm">加密解密</a>
<div>AES加解密算法,使用Base64做转码以及辅助加密:
package com.wintv.common;
import javax.crypto.Cipher;
import javax.crypto.spec.IvParameterSpec;
import javax.crypto.spec.SecretKeySpec;
import sun.misc.BASE64Decod</div>
</li>
<li><a href="/article/2321.htm"
title="文件编码格式转换" target="_blank">文件编码格式转换</a>
<span class="text-muted">ctrain</span>
<a class="tag" taget="_blank" href="/search/%E7%BC%96%E7%A0%81%E6%A0%BC%E5%BC%8F/1.htm">编码格式</a>
<div>
package com.test;
import java.io.File;
import java.io.FileInputStream;
import java.io.FileOutputStream;
import java.io.IOException;
import java.io.InputStream;
import java.io.OutputStream;
</div>
</li>
<li><a href="/article/2448.htm"
title="mysql 在linux客户端插入数据中文乱码" target="_blank">mysql 在linux客户端插入数据中文乱码</a>
<span class="text-muted">daizj</span>
<a class="tag" taget="_blank" href="/search/mysql/1.htm">mysql</a><a class="tag" taget="_blank" href="/search/%E4%B8%AD%E6%96%87%E4%B9%B1%E7%A0%81/1.htm">中文乱码</a>
<div>1、查看系统客户端,数据库,连接层的编码
查看方法: http://daizj.iteye.com/blog/2174993
进入mysql,通过如下命令查看数据库编码方式: mysql> show variables like 'character_set_%'; +--------------------------+------</div>
</li>
<li><a href="/article/2575.htm"
title="好代码是廉价的代码" target="_blank">好代码是廉价的代码</a>
<span class="text-muted">dcj3sjt126com</span>
<a class="tag" taget="_blank" href="/search/%E7%A8%8B%E5%BA%8F%E5%91%98/1.htm">程序员</a><a class="tag" taget="_blank" href="/search/%E8%AF%BB%E4%B9%A6/1.htm">读书</a>
<div>
长久以来我一直主张:好代码是廉价的代码。
当我跟做开发的同事说出这话时,他们的第一反应是一种惊愕,然后是将近一个星期的嘲笑,把它当作一个笑话来讲。 当他们走近看我的表情、知道我是认真的时,才收敛一点。
当最初的惊愕消退后,他们会用一些这样的话来反驳: “好代码不廉价,好代码是采用经过数十年计算机科学研究和积累得出的最佳实践设计模式和方法论建立起来的精心制作的程序代码。”
我只</div>
</li>
<li><a href="/article/2702.htm"
title="Android网络请求库——android-async-http" target="_blank">Android网络请求库——android-async-http</a>
<span class="text-muted">dcj3sjt126com</span>
<a class="tag" taget="_blank" href="/search/android/1.htm">android</a>
<div>在iOS开发中有大名鼎鼎的ASIHttpRequest库,用来处理网络请求操作,今天要介绍的是一个在Android上同样强大的网络请求库android-async-http,目前非常火的应用Instagram和Pinterest的Android版就是用的这个网络请求库。这个网络请求库是基于Apache HttpClient库之上的一个异步网络请求处理库,网络处理均基于Android的非UI线程,通</div>
</li>
<li><a href="/article/2829.htm"
title="ORACLE 复习笔记之SQL语句的优化" target="_blank">ORACLE 复习笔记之SQL语句的优化</a>
<span class="text-muted">eksliang</span>
<a class="tag" taget="_blank" href="/search/SQL%E4%BC%98%E5%8C%96/1.htm">SQL优化</a><a class="tag" taget="_blank" href="/search/Oracle+sql%E8%AF%AD%E5%8F%A5%E4%BC%98%E5%8C%96/1.htm">Oracle sql语句优化</a><a class="tag" taget="_blank" href="/search/SQL%E8%AF%AD%E5%8F%A5%E7%9A%84%E4%BC%98%E5%8C%96/1.htm">SQL语句的优化</a>
<div>转载请出自出处:http://eksliang.iteye.com/blog/2097999
SQL语句的优化总结如下
sql语句的优化可以按照如下六个步骤进行:
合理使用索引
避免或者简化排序
消除对大表的扫描
避免复杂的通配符匹配
调整子查询的性能
EXISTS和IN运算符
下面我就按照上面这六个步骤分别进行总结: </div>
</li>
<li><a href="/article/2956.htm"
title="浅析:Android 嵌套滑动机制(NestedScrolling)" target="_blank">浅析:Android 嵌套滑动机制(NestedScrolling)</a>
<span class="text-muted">gg163</span>
<a class="tag" taget="_blank" href="/search/android/1.htm">android</a><a class="tag" taget="_blank" href="/search/%E7%A7%BB%E5%8A%A8%E5%BC%80%E5%8F%91/1.htm">移动开发</a><a class="tag" taget="_blank" href="/search/%E6%BB%91%E5%8A%A8%E6%9C%BA%E5%88%B6/1.htm">滑动机制</a><a class="tag" taget="_blank" href="/search/%E5%B5%8C%E5%A5%97/1.htm">嵌套</a>
<div>谷歌在发布安卓 Lollipop版本之后,为了更好的用户体验,Google为Android的滑动机制提供了NestedScrolling特性
NestedScrolling的特性可以体现在哪里呢?<!--[if !supportLineBreakNewLine]--><!--[endif]-->
比如你使用了Toolbar,下面一个ScrollView,向上滚</div>
</li>
<li><a href="/article/3083.htm"
title="使用hovertree菜单作为后台导航" target="_blank">使用hovertree菜单作为后台导航</a>
<span class="text-muted">hvt</span>
<a class="tag" taget="_blank" href="/search/JavaScript/1.htm">JavaScript</a><a class="tag" taget="_blank" href="/search/jquery/1.htm">jquery</a><a class="tag" taget="_blank" href="/search/.net/1.htm">.net</a><a class="tag" taget="_blank" href="/search/hovertree/1.htm">hovertree</a><a class="tag" taget="_blank" href="/search/asp.net/1.htm">asp.net</a>
<div>
hovertree是一个jquery菜单插件,官方网址:http://keleyi.com/jq/hovertree/ ,可以登录该网址体验效果。
0.1.3版本:http://keleyi.com/jq/hovertree/demo/demo.0.1.3.htm
hovertree插件包含文件:
http://keleyi.com/jq/hovertree/css</div>
</li>
<li><a href="/article/3210.htm"
title="SVG 教程 (二)矩形" target="_blank">SVG 教程 (二)矩形</a>
<span class="text-muted">天梯梦</span>
<a class="tag" taget="_blank" href="/search/svg/1.htm">svg</a>
<div>SVG <rect> SVG Shapes
SVG有一些预定义的形状元素,可被开发者使用和操作:
矩形 <rect>
圆形 <circle>
椭圆 <ellipse>
线 <line>
折线 <polyline>
多边形 <polygon>
路径 <path>
</div>
</li>
<li><a href="/article/3337.htm"
title="一个简单的队列" target="_blank">一个简单的队列</a>
<span class="text-muted">luyulong</span>
<a class="tag" taget="_blank" href="/search/java/1.htm">java</a><a class="tag" taget="_blank" href="/search/%E6%95%B0%E6%8D%AE%E7%BB%93%E6%9E%84/1.htm">数据结构</a><a class="tag" taget="_blank" href="/search/%E9%98%9F%E5%88%97/1.htm">队列</a>
<div>
public class MyQueue {
private long[] arr;
private int front;
private int end;
// 有效数据的大小
private int elements;
public MyQueue() {
arr = new long[10];
elements = 0;
front </div>
</li>
<li><a href="/article/3464.htm"
title="基础数据结构和算法九:Binary Search Tree" target="_blank">基础数据结构和算法九:Binary Search Tree</a>
<span class="text-muted">sunwinner</span>
<a class="tag" taget="_blank" href="/search/Algorithm/1.htm">Algorithm</a>
<div>
A binary search tree (BST) is a binary tree where each node has a Comparable key (and an associated value) and satisfies the restriction that the key in any node is larger than the keys in all</div>
</li>
<li><a href="/article/3591.htm"
title="项目出现的一些问题和体会" target="_blank">项目出现的一些问题和体会</a>
<span class="text-muted">Steven-Walker</span>
<a class="tag" taget="_blank" href="/search/DAO/1.htm">DAO</a><a class="tag" taget="_blank" href="/search/Web/1.htm">Web</a><a class="tag" taget="_blank" href="/search/servlet/1.htm">servlet</a>
<div> 第一篇博客不知道要写点什么,就先来点近阶段的感悟吧。
这几天学了servlet和数据库等知识,就参照老方的视频写了一个简单的增删改查的,完成了最简单的一些功能,使用了三层架构。
dao层完成的是对数据库具体的功能实现,service层调用了dao层的实现方法,具体对servlet提供支持。
&</div>
</li>
<li><a href="/article/3718.htm"
title="高手问答:Java老A带你全面提升Java单兵作战能力!" target="_blank">高手问答:Java老A带你全面提升Java单兵作战能力!</a>
<span class="text-muted">ITeye管理员</span>
<a class="tag" taget="_blank" href="/search/java/1.htm">java</a>
<div>本期特邀《Java特种兵》作者:谢宇,CSDN论坛ID: xieyuooo 针对JAVA问题给予大家解答,欢迎网友积极提问,与专家一起讨论!
作者简介:
淘宝网资深Java工程师,CSDN超人气博主,人称“胖哥”。
CSDN博客地址:
http://blog.csdn.net/xieyuooo
作者在进入大学前是一个不折不扣的计算机白痴,曾经被人笑话过不懂鼠标是什么,</div>
</li>
</ul>
</div>
</div>
</div>
<div>
<div class="container">
<div class="indexes">
<strong>按字母分类:</strong>
<a href="/tags/A/1.htm" target="_blank">A</a><a href="/tags/B/1.htm" target="_blank">B</a><a href="/tags/C/1.htm" target="_blank">C</a><a
href="/tags/D/1.htm" target="_blank">D</a><a href="/tags/E/1.htm" target="_blank">E</a><a href="/tags/F/1.htm" target="_blank">F</a><a
href="/tags/G/1.htm" target="_blank">G</a><a href="/tags/H/1.htm" target="_blank">H</a><a href="/tags/I/1.htm" target="_blank">I</a><a
href="/tags/J/1.htm" target="_blank">J</a><a href="/tags/K/1.htm" target="_blank">K</a><a href="/tags/L/1.htm" target="_blank">L</a><a
href="/tags/M/1.htm" target="_blank">M</a><a href="/tags/N/1.htm" target="_blank">N</a><a href="/tags/O/1.htm" target="_blank">O</a><a
href="/tags/P/1.htm" target="_blank">P</a><a href="/tags/Q/1.htm" target="_blank">Q</a><a href="/tags/R/1.htm" target="_blank">R</a><a
href="/tags/S/1.htm" target="_blank">S</a><a href="/tags/T/1.htm" target="_blank">T</a><a href="/tags/U/1.htm" target="_blank">U</a><a
href="/tags/V/1.htm" target="_blank">V</a><a href="/tags/W/1.htm" target="_blank">W</a><a href="/tags/X/1.htm" target="_blank">X</a><a
href="/tags/Y/1.htm" target="_blank">Y</a><a href="/tags/Z/1.htm" target="_blank">Z</a><a href="/tags/0/1.htm" target="_blank">其他</a>
</div>
</div>
</div>
<footer id="footer" class="mb30 mt30">
<div class="container">
<div class="footBglm">
<a target="_blank" href="/">首页</a> -
<a target="_blank" href="/custom/about.htm">关于我们</a> -
<a target="_blank" href="/search/Java/1.htm">站内搜索</a> -
<a target="_blank" href="/sitemap.txt">Sitemap</a> -
<a target="_blank" href="/custom/delete.htm">侵权投诉</a>
</div>
<div class="copyright">版权所有 IT知识库 CopyRight © 2000-2050 E-COM-NET.COM , All Rights Reserved.
<!-- <a href="https://beian.miit.gov.cn/" rel="nofollow" target="_blank">京ICP备09083238号</a><br>-->
</div>
</div>
</footer>
<!-- 代码高亮 -->
<script type="text/javascript" src="/static/syntaxhighlighter/scripts/shCore.js"></script>
<script type="text/javascript" src="/static/syntaxhighlighter/scripts/shLegacy.js"></script>
<script type="text/javascript" src="/static/syntaxhighlighter/scripts/shAutoloader.js"></script>
<link type="text/css" rel="stylesheet" href="/static/syntaxhighlighter/styles/shCoreDefault.css"/>
<script type="text/javascript" src="/static/syntaxhighlighter/src/my_start_1.js"></script>
</body>
</html>