最新最全vuepress零基础搭建(github搭建+新增插件)
最新最全vuepress零基础搭建
标注:最终版以及修改最终都在www.javanode.cn是最终版本,在学习中需要修改的内容以及笔记全在这个网站,谢谢!有任何不妥的地方望纠正
看完了,发现对你有用的话不关注就算了 还不点赞,你还是人吗?
简易版运行
1. 下载简易版
地址:https://gitee.com/gy297879328/vue_press_code
2. 编译启动项目
## 在解压目录也就是package.json文件的当前目录下执行命令
## 编译运行的命令
npm install
## 启动当前项目
npm run dev
##打开 http://localhost:8080/ 即可看到一个 Vue 文档风格的网站
搭建流程
1. 安装node.js
Node.js 版本 >= 8.6
1、安装Node.js,打开官网(http://nodejs.cn/),点击下载相应系统的文件。(Windows / MacOs)
-
安装文件下载完成后,运行并点击下一步直至安装结束(期间安装的位置可自行选择)
-
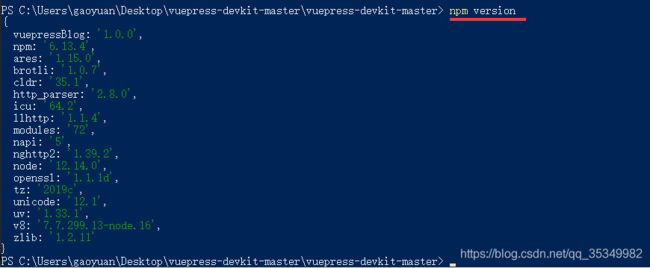
在终端(Windows cmd.exe,Macos 终端)执行指令
npm -version
-
配置NPM淘宝镜像,终端内执行
npm config set registry https://registry.npm.taobao.org
#之后再执行(检查配置的是否正确)
npm config get registry
2. 安装yarn
## 1.运行命令
npm i yarn -g

##-i:install
##-g:全局安装(global),使用 -g 或 --global

## 2. 输入yarn -version 可以看到版本号,说明安装成功了。我们就可以在项目中像使用npm一样使用yarn
3. 起步操作
## 参考 https://www.vuepress.cn/guide/getting-started.html
## 1.新建的目录 进入prodoc
makedir mydoc
makedir prodoc
cd prodoc
## 2.全局安装 VuePress
yarn add -D vuepress
## 3.初始化生成package.json
yarn init -y
## 4.创建你的第一篇文档(在prodoc目录里新建)
mkdir docs && echo '# Hello VuePress' > docs/README.md
## 5.添加主题 (在docs/README.md中添加)
## https://www.vuepress.cn/theme/default-theme-config.html 参考
---
home: true
heroImage: /hero.png
heroText: Hero 标题
tagline: Hero 副标题
actionText: 快速上手 →
actionLink: /zh/guide/
features:
- title: 简洁至上
  details: 以 Markdown 为中心的项目结构,以最少的配置帮助你专注于写作。
- title: Vue驱动
  details: 享受 Vue + webpack 的开发体验,在 Markdown 中使用 Vue 组件,同时可以使用 Vue 来开发自定义主题。
- title: 高性能
  details: VuePress 为每个页面预渲染生成静态的 HTML,同时在页面被加载的时候,将作为 SPA 运行。
footer: MIT Licensed | Copyright © 2018-present Evan You
---
## 6.启动
yarn docs:dev # npm run docs:dev
## VuePress 会在 http://localhost:8080 (opens new window) 启动一个热重载的开发服务器。
4. 导航目录设置
4.1 设置logo
## 1.新建about目录并新建README.md文档 (docs中)
## 2.重启服务后访问链接 localhost:8080/about 即可看到
注意: docs根目录的md文件 会编译成.html文件(无关紧要,可无视)
## https://www.vuepress.cn/theme/default-theme-config.html#%E5%AF%BC%E8%88%AA%E6%A0%8F 参考链接
## 3. 新建目录 .vuepress  在.vuepress下新建js config.js (docs中)
## 4. 在config中新增内容
module.exports = {

  themeConfig: {

    logo: '/assets/img/logo.png',
  }
}
## 5. 新建public文件 因为是公共资源目录 (默认规则详细查看 https://www.vuepress.cn/guide/directory-structure.html)
## 在 .vuepress 下新建 public 目录
## 在public下 新建/assets/img目录 存放Logo
4.2 导航栏链接
## https://www.vuepress.cn/theme/default-theme-config.html#%E5%AF%BC%E8%88%AA%E6%A0%8F 参考路径
## 在config.js中配置
themeConfig: {

    nav: [
      {
      text: 'Home', link: '/' },
      {
      text: 'Guide', link: '/guide/' },
      {
      text: 'External', link: 'https://google.com' },
    ]
  }
5. 侧边栏
##  https://www.vuepress.cn/theme/default-theme-config.html#%E4%BE%A7%E8%BE%B9%E6%A0%8F 自动生成参考路径
##  https://www.vuepress.cn/theme/default-theme-config.html#%E4%BE%A7%E8%BE%B9%E6%A0%8F%E5%88%86%E7%BB%84 侧边栏分组参考路径
5.1 自动生成
// .vuepress/config.js
module.exports = {

  themeConfig: {

    sidebar: 'auto'
  }
}
5.2 侧边栏分组
//测试例子
module.exports = {

  themeConfig: {

   sidebar: [
            '',
            'about',
            {

                title: '测边框分层',   // 必要的
                path: '/morethread/',      // 可选的, 标题的跳转链接,应为绝对路径且必须存在
                collapsable: false, // 可选的, 默认值是 true,
                sidebarDepth: 1,    // 可选的, 默认值是 1
                children: [
                    '/morethread/bf',
                    '/morethread/test1',
                ]
            }
        ]
  }
}
//按照路径分组
//https://www.vuepress.cn/theme/default-theme-config.html#%E5%A4%9A%E4%B8%AA%E4%BE%A7%E8%BE%B9%E6%A0%8F
module.exports = {

  themeConfig: {

	sidebar: {

            '/morethread/': [
                '',     /* /foo/ */
                'bf',  /* /foo/one.html */
                'test1'   /* /foo/two.html */
            ],

            '/about/': [
                '',      /* /bar/ */
                'test1' /* /bar/three.html */

            ],


        }
        }
}
//自动生成插件
https://github.com/shanyuhai123/vuepress-plugin-auto-sidebar
//链接
https://docs.shanyuhai.top/
6. SEO
// https://www.vuepress.cn/config/#%E5%9F%BA%E6%9C%AC%E9%85%8D%E7%BD%AE 参考文档
// https://favicon.io/emoji-favicons/ 选一个ico图标
// .vuepress/config.js
module.exports = {

    title:"小光头的java日记",
    description:"小光头的java日记,java笔记,java面试",
    head: [
        ['meta', {
      name: 'Keywords', content: '小光头的java日记,java笔记,java面试' }],
        ['meta', {
      name: 'description', content: '小光头的java日记用心分享' }],
        ['link', {
      rel: 'icon', href: '/assets/img/favicon.ico' }]
    ]
}
7. 最后更新时间
// https://www.vuepress.cn/theme/default-theme-config.html#%E6%9C%80%E5%90%8E%E6%9B%B4%E6%96%B0%E6%97%B6%E9%97%B4 参考
//第一种
// .vuepress/config.js
module.exports = {

  themeConfig: {

    lastUpdated: 'Last Updated', // string | boolean
  }
}
// 第二种 使用日期插件
//执行命令 本地安装moment
yarn add moment

// .vuepress/config.js
   plugins: [
        [
            '@vuepress/last-updated',
            {

                transformer: (timestamp) => {

                    moment.locale("zh-cn");
                    return moment(timestamp).fromNow("LLLL")
                }
            }
        ]
    ],
8. 部署gitee
// https://www.vuepress.cn/guide/deploy.html#github-pages 文档

// docs/.vuepress/config.js

//  docs/
1.修改 package.json
{

  "name": "prodoc",
  "version": "1.0.0",
  "main": "index.js",
  "repository": "https://github.com/gy297879328/prodoc.git",
  "author": "gy <[email protected]>",
  "license": "MIT",
  "scripts": {

    "docs:dev": "vuepress dev docs",
    "docs:build": "vuepress build docs",
    "deploy": "bash deploy.sh"
  },
  "devDependencies": {

    "@vuepress/back-to-top": "^1.5.0",
    "vuepress": "^1.7.1"
  }
}
// docs/.vuepress/config.js//
2. 修改config.js 添加base属性 上传到github的库名
module.exports = {

    title:"小光头的java日记",
    description:"小光头的java日记,java笔记,java面试",
    base:"/vuepresstest/",
}
// docs
3. 新建 deploy.sh 文件
#!/usr/bin/env sh

# 确保脚本抛出遇到的错误
set -e

# 生成静态文件
npm run docs:build

# 进入生成的文件夹
cd docs/.vuepress/dist

# 如果是发布到自定义域名
# echo 'www.example.com' > CNAME

git init
git add -A
git commit -m 'deploy'

# 如果发布到 https://.github.io
# git push -f [email protected]:/.github.io.git master

# 如果发布到 https://.github.io/
git push -f [email protected]:gy297879328/vuepresstest.git master:gh-pages

cd -
// docs
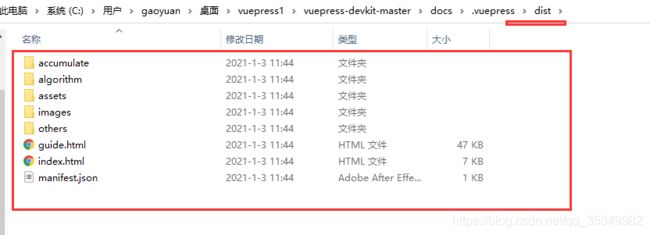
4. 执行编译命令会生成html文件在(docs/.vuepress/dist) 目录下上传到服务器即可
npm run docs:build
9. vssue评论
9.1 安装到个体
// https://vssue.js.org/zh/guide/getting-started.html 官网

//1.获取vssue的授权码(提前登陆自己的github账号)
https://github.com/settings/developers
## 2.本地安装
yarn add @vssue/vuepress-plugin-vssue
yarn add @vssue/api-github-v4
// 3.修改 docs/.vuepress/config.js//
  plugins: {

        '@vuepress/back-to-top':true,
        '@vssue/vuepress-plugin-vssue': {

            // 设置 `platform` 而不是 `api`
            platform: 'github-v4',
            // 其他的 Vssue 配置
            owner: 'gy297879328',//github用户名
            repo: 'vuepresstest',//需要评论的仓库
            clientId: '734e36fe47755fb32027',
            clientSecret: 'aa9953c892dc6235c8d95d622d2e2dc741247695',
            autoCreateIssue:true //自动初始化仓库
        },
    },
//4. 修改全局配置
//https://vssue.js.org/zh/options/#autocreateissue
9.2 全局配置
// https://blog.csdn.net/weixin_43742708/article/details/109545561 参考博客
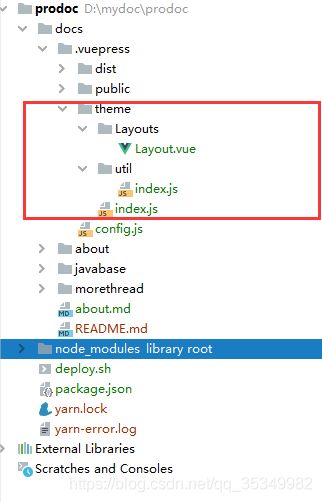
1. 首先我们先在 .vuepress 文件目录下 新建 theme,再在该目录下新建layouts目录:
2. 然后下载git clone https://gitee.com/mirrors/VuePress.git  或者
  (本地的node_modules\@vuepress\theme-default模块的也可以)
3. 进入该文件的 packages\@vuepress\theme-default\layouts\   把 Layout.vue拷贝到 我们刚才新建的 Layouts目录下。
4. 进入该文件的 packages\@vuepress\theme-default\目录下把 util文件夹,也拷贝到 我们的 theme文件夹下。
5. 接下来在我们的theme 目录下新建index.js,并添加如下配置:
module.exports = {

  extend: '@vuepress/theme-default'
}
// 6.修改 Layout.vue 文件
10. 百度统计插件
1. 获取代码
## https://blog.csdn.net/qq_39367226/article/details/107449882
## 添加百度统计登陆后获取代码 https://tm.baidu.com/
<script>
var _hmt = _hmt || [];
(function() {

  var hm = document.createElement("script");
  hm.src = "https://hm.baidu.com/hm.js?0cbb5bf425c624587e0804d2122aea84";
  var s = document.getElementsByTagName("script")[0];
  s.parentNode.insertBefore(hm, s);
})();
</script>
2. 修改config.js
     // 配置给 head属性
	// 添加百度统计
        [
        "script",
            {
     },
            `
        var _hmt = _hmt || [];
        (function() {
        var hm = document.createElement("script");
        hm.src = "https://hm.baidu.com/hm.js?0cbb5bf425c624587e0804d2122aea84";
        var s = document.getElementsByTagName("script")[0];
        s.parentNode.insertBefore(hm, s);
        })();
        `
        ]
3.修改enhanceApp
// .vuepress/enhanceApp.js 没有就新建
export default ({
      router }) => {

    /**
     * 路由切换事件处理
     */
    router.beforeEach((to, from, next) => {

        console.log("切换路由", to.fullPath, from.fullPath);

        //触发百度的pv统计
        if (typeof _hmt != "undefined") {

            if (to.path) {

                _hmt.push(["_trackPageview", to.fullPath]);
                console.log("上报百度统计", to.fullPath);
            }
        }

        // continue
        next();
    });
};
11. 自动生成侧边栏
## https://github.com/shanyuhai123/vuepress-plugin-auto-sidebar
## 1.下载依赖
yarn add vuepress-plugin-auto-sidebar
## 2.添加插件
// .vuepress/config.js

"vuepress-plugin-auto-sidebar": {
     }
12. 美化插件(自选)
1. 鼠标点击特效插件
   //鼠标点击特效 先安装在配置,
   // 1. 下载: npm install vuepress-plugin-cursor-effects

   // 2. .vuepress/config.js   plugins 中

      "cursor-effects":
      {

        size: 3,                    // size of the particle, default: 2
        shape: ['circle'],  // shape of the particle, default: 'star'
        zIndex: 999999999           // z-index property of the canvas, default: 999999999
      }
2. 复制插件
## https://www.npmjs.com/package/vuepress-plugin-copyright
yarn add vuepress-plugin-copyright
## .vuepress/config.js   plugins 中
    ['copyright',
    	{

            minLength: 10,
            noCopy: true,
    	},
    ]
3. 动态标题
// 1. 下载:  yarn add vuepress-plugin-dynamic-title
// 2. .vuepress/config.js   plugins 中
    "dynamic-title": {

        showIcon: "/assets/img/logo.png",
        showText: "(/≧▽≦/)你来啦!",
        hideIcon: "/assets/img/favicon.ico",
        hideText: "(●—●)喔哟,崩溃啦!",
        recoverTime: 2000
    }
4. 验证码的方式(待研究)
https://segmentfault.com/a/1190000038222412
5. 新增点击的 富强爱国显示
5.1 新建js
// .vuepress\public\js\MouseClickEffect.js
var a_idx = 0;

function getRandom(max, min) {

    return Math.floor(Math.random() * (max - min + 1) + min);
}
jQuery(document).ready(function ($) {

    $("body").click(function (e) {

        var a = new Array("富强", "民主", "文明", "和谐", "自由", "平等", "公正", "法治", "爱国", "敬业", "诚信", "友善");
        var $i = $("").text(a[a_idx]);
        a_idx = (a_idx + 1) % a.length;
        var x = e.pageX,
            y = e.pageY;
        $i.css({

            "z-index": 999999999999999999999999999999999999999999999999999999999999999999999,
            "top": y - 20,
            "left": x,
            "position": "absolute",
            "font-weight": "bold",
            "color": `rgb(${
       getRandom(255,0)},${
       getRandom(255,0)},${
       getRandom(255,0)})`,
            "user-select": 'none',
            "cursor": 'default'
        });
        $("body").append($i);
        $i.animate({

                "top": y - 180,
                "opacity": 0
            },
            1500,
            function () {

                $i.remove();
            });
    });
});
5.2 配置config
  // 配置给 head属性

    // 引入jquery
    ["script", {

        "language": "javascript",
        "type": "text/javascript",
        "src": "https://cdn.bootcdn.net/ajax/libs/jquery/3.5.1/jquery.min.js"
    }],
    // 引入鼠标点击脚本
    ["script", {

        "language": "javascript",
        "type": "text/javascript",
        "src": "/js/MouseClickEffect.js"
    }],
13.部署发布
编译文件
在根目录下执行 npm run build 命令会将md文档编译成html静态页(默认生成在docs/.vuepress/dist下)
13. 服务器部署
13.1.1 上传文件
将静态页放到 /home/vue_press 目录下
13.1.2 安装nginx
- 下载nginx
nginx下载地址:https://nginx.org/download/
## 1.解压
tar -zxvf nginx nginx-1.18.0
## 2.安装gcc命令
yum -y install gcc pcre-devel zlib-devel openssl openssl-devel
## 3.编译
./configure
# make
make
make install
## 4.启动日志会默认生成到 /usr/local/nginx/sbin/nginx 下
- 修改nginx.conf的配置文件(/usr/local/src/vue_press/nginx-1.18.0/conf)
 server {
        listen       80;
        server_name  localhost;

        #charset koi8-r;

        #access_log  logs/host.access.log  main;
		# root 配置读取的路径
        location / {
            root   /home/vue_press/;
            index  index.html index.htm;
        }
        }
13.2 gitee上部署
- 在gitee上部署,需要修改 docs.vuepress.config.js中的base属性,里面需要填写成新建库的名字
base: '/', // 部署到github相关的配置
## 修改成
base: '/vue_press_code/', // 部署到github相关的配置
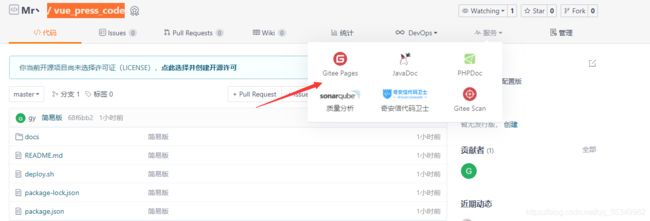
- 将生成的静态页上传到仓库中
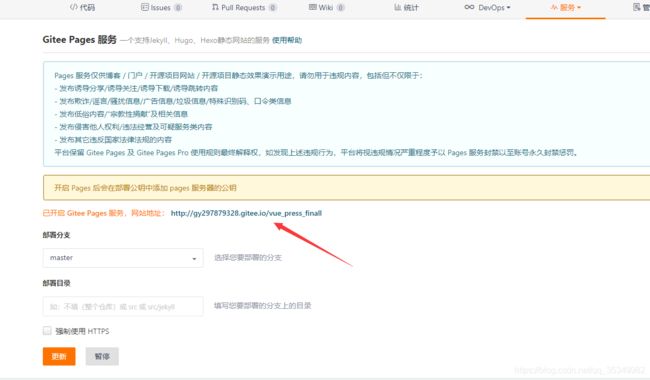
- 点击服务中的Gitee Pages选项
- 上线获取地址
13.3 github上部署
-
在github上部署,需要修改 docs.vuepress.config.js中的base属性,里面需要填写成新建库的名字
-
静态页上传到github上
- 点击settings下拉找到github pages页面
- 分支必须选择 main
- save以后 就会出现地址
安装的yarn源(了解即可)
## 全局环境
yarn add -D vuepress
yarn add moment
## 评论插件
yarn add @vssue/vuepress-plugin-vssue
yarn add @vssue/api-github-v4

## 自动生成测边框插件
npm i vuepress-plugin-auto-sidebar -D

##鼠标点击特效 先安装在配置,
npm install vuepress-plugin-cursor-effects


