Tensorflow笔记
Tensorflow笔记
第一章 神经网络的计算
1.1 人工智能三个学派
人工智能
让机器具备人的思维和意识。
人工智能的三学派
- 行为主义:基于控制论,构建感知-动作控制系统。(控制论、如:平衡、行走、避障等自适应控制系统)
- 符号主义:基于算数逻辑表达式,求解问题时先把问题描述为表达式,再求解表达式。(可用公式描述、实现理性思维、如专家系统)
- 连接主义:仿生学、模仿神经元连接关系。(防脑神经元连接、实现感性思维、如神经网络)
理解:基于连结主意的神经网络设计过程。
用计算机仿出神经网络连接关系,让计算机具备感性思维。
(1)准备数据:采集大量“特征/标签”数据
(2)搭建网络:搭建神经网络结构。
(3)优化参数:训练网络获取最佳参数(反传)
(4)应用网络:将网络保存为模型,输入新数据,输出分类或预测的结果(前传)
1.2神经网络设计过程
给鸢尾花分类
信息:0-狗尾鸢尾花 1-杂色鸢尾花 2-弗吉尼亚鸢尾花 问题:这个图片是哪个鸢尾花?
人们通过经验总结出了规律:通过测量花的花萼长、花萼宽、花瓣长、花瓣宽可以得出鸢尾花的类别。
(如:花萼长>花萼宽 且 花瓣长/花瓣宽>2 则为1杂色鸢尾花)
用if语句 case语句———专家系统:把专家的经验告知计算机,计算机执行逻辑判别(理性计算)给出分类。
神经网络
采集大量(花萼长、花萼宽、花瓣长、花瓣宽——输入特征,对应的类别——标签(需人工标定))数据对构成数据集。
把数据集喂入搭建好的神经网络结构——网络优化参数得到模型——模型读入新输入特征——输出识别结果
用神经网络实现鸢尾花分类

注:此网络为全连接网络
输入特征为:5.8 4.0 1.2 0.2 以及对应的标签0-狗尾鸢尾花。
为什么0类鸢尾花的得分不是最高?
损失函数
损失函数:预测值(y)与标准答案(y-)的差距。
损失函数可以定量判断w、b的优劣、当损失函数输出最小时,参数w、b会出现最优值
损失函数的定义方法-均方误差

目的: 想找一组参数w和b,使损失函数最小
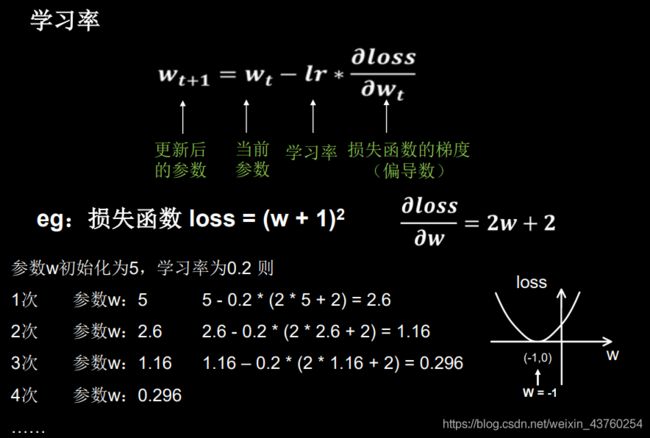
梯度: 函数对个参数求偏导后的向量。函数梯度下降的方向是函数减小的方向。
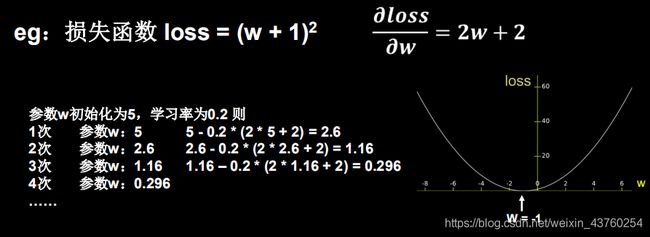
梯度下降法: 沿损失函数梯度下降的方向,寻找损失函数的最小值,得到最优参数的方法。

学习率(Ir): 当学习率设置过小时,收敛过程将变得十分缓慢。而当学习率设置的过大时,梯度可能会在最小值附近来回震荡,甚至可能无法收敛。
反向传播: 从后向前,逐层求损失函数对每层神经元参数的偏导数,迭代更新所有参数。

1.3张量的生成
张量(Tensor): 多维数组(列表)。
阶: 张量的维度。
| 维度 | 阶 | 名字 | 例子 |
|---|---|---|---|
| 0-D | 0 | 标量 scalar | s=1 2 3 |
| 1-D | 1 | 向量 vector | v=[1,2,3] |
| 2-D | 2 | 矩阵 matrix | m=[[1,2,3],[4,5,6],[7,8,9] |
| n-D | n | 张量 tensor | t=[[[… |
张量可以表示0阶到n阶的数组(列表)
数据类型
tf.int,tf.float tf.int 32 ,tf.float 32,tf.float 64
tf.bool:tf.constant([True,False])
tf.string:tf.constant(“Hello ,world!”)
创建一个Tensor
创建一个张量:tf.constant(张量内容,dtype=数据类型(可选))
例:
import tensorfiow as tf
a=tf.constant([1,5],dtype=tf.int64)
print(a)
print(a.dtype)
print(a,shape)
- 创建全为0的张量tf.zeros(维度)
- 创建全为1的张量tf.ones(维度)
- 创建全为n的张量tf.fill(维度,指定值)
注:一维度-直接写个数、二维度-用[行,列]、多维-用[n,m,j,k…]
例:
a=tf.zeros([2,3])
b=tf.ones(4)
c=tf.fill([2,2],9)
printf(a)
printf(b)
printf(c)
数据类型转化
将numpy的数据类型转换为Tensor数据类型:tf.convert-to-tensor(数据名,dtype=数据类型(可选))
例:
import tensorflow as tf
import numpy as np
a=np.arange(0,5)
b=tf.convert-to-tensor(a,dtype=tf.int64)
print(a)
print(b)
生成正态分布随机数,默认均值为0,标准差为1:tf.random.normal(维度,mean=均值,stddev=标准差)
生成截断式正态分布随机数:tf.random.truncated-normal(维度,mean=均值,stddev=标准差)
在tf.truncated-normal中如果随机生成数据的取值在(μ-2σ,μ+2σ)之外则重新进行生成,保证了生成值在均值附近。
μ:均值, σ:标准差

例:
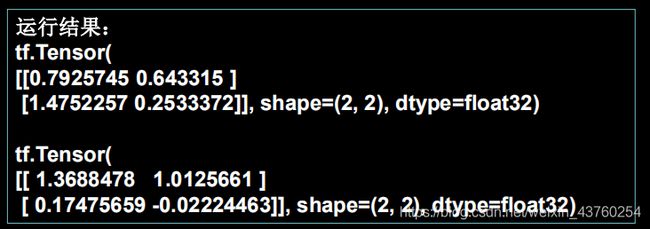
d=tf.random.normal([2,2],mean=0.5,stddev=1)
print(d)
e=tf.random.truncated-normal([2,2],mean=0.5,stddev=1)
print(e)
生成均匀分布随机数[minval,maxval):tf.random.uniform(维度,minval=最小值,maxval=最大值)
例:
f=tr.random.uniform([2,2],minval=0,maxval=1)
printf(f)

1.4TF2常用函数
强制tensor转换为该数据类型:tf.cast(张量名,dtype=数据类型)
计算张量维度上元素的最小值:tf.reduce-min(张量名)
计算张量维度上元素的最大值:tf.reduce-max(张量名)
例:
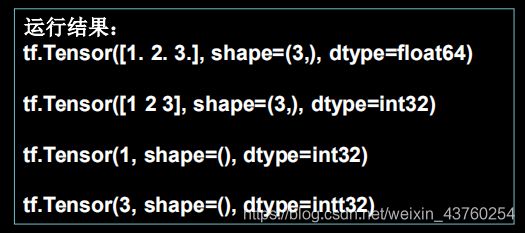
x1=tf.constant([1.,2.,3.],dtype=tf.float64)
printf(x1)
x2=tf.cast(x1,tf.int32)
print(x2)
print(tf.reduce-min(x2),tf.reduce-max(x2))
对axis的理解
计算张量沿着指定维度的平均值:tf.reduce-mean(张量名,axis=操作轴)
计算张量沿着指定维度的和:tf.reduce-sum(张量名,axis=操作轴)
例:
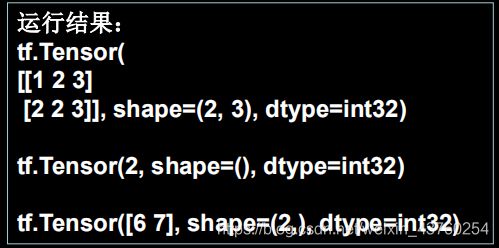
x=tf.constant([[1,2,3],[2,2,3]])
printf(x)
printf(tf.reduce-mean(x))
printf(tf.reduce-sum(x,axis=1))
tf.Variable
tf.Variable()将变量标记为“可训练”,被标记的变量会在反向传播中记录梯度信息。神经网络训练中,常用该函数标记待训练参数。
tf.Variable(初始值)
例:
w=tf.Variable(tf.random.normal([2,2],mean=0,stddev=1))
对应元素的四则运算–只有维度相同的张量才可以做四则运算
- 实现两个张量的对应元素相加tf.add(张量1,张量2)
- 实现两个元素的对应元素相减tf.subtract(张量1,张量2)
- 实现两个张量的对应元素相乘tf.multiply(张量1,张量2)
- 实现两个张量的对应元素相除tf.divide(张量1,张量2)
例:
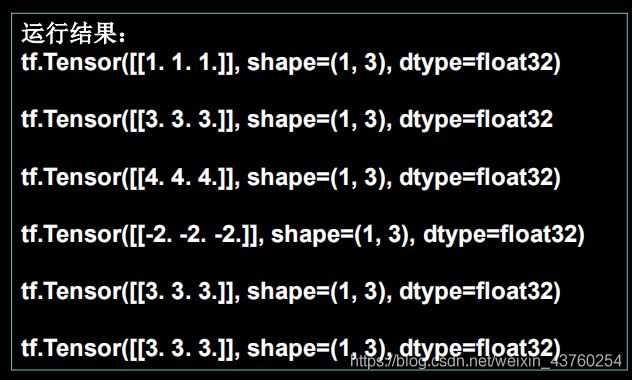
a=tf.ones([1,3])
b=tf.fill([1,3],3)
printf(a)
printf(b)
printf(tf.add(a,b))
printf(tf.subtract(a,b))
printf(tf.multiply(a,b))
printf(tf.divide(b,a)
- 计算某个张量的平方tf.square(张量名)
- 计算某个张量的n次方tf.pow(张量名,n次方数)
- 计算某个张量的开方tf.sqrt(张量名)
例:
a=tf.fill([1,2],3.)
print(a)
print(tf.pow(a,3))
print(tf.square(a))
print(tf.sqrt(a))

矩阵乘tf.matmul
实现两个矩阵的相乘tf.matmul(矩阵1,矩阵2)
例:
a=tf.ones([3,2])
b=tf.fill([2,3],3.)
printf(tf.matmul(a,b)
)

tf.data.Dataset.from-tensor-slices
切分传入张量的第一维度,生成输入特征/标签对,构建数据集data=tf.data.Dataset.from-tensor-slices((输入特征,标签))
注:Numpy和Tensor格式都可用该语句读入数据
例:
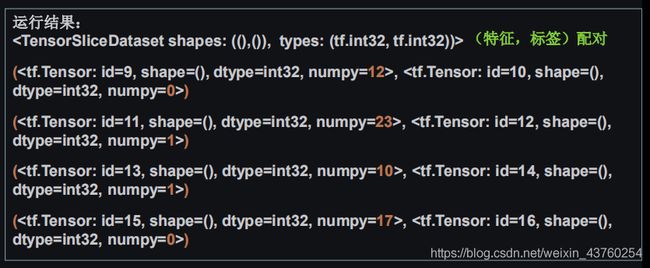
features=tf.constant([12,23,10,17])
labels=tf.constant([0,1,1,0])
dataset=tf.data.Dataset.from-tensor-slices((features,labels))
print(dataset)
for element in dataset:
 print(element)
enumerate
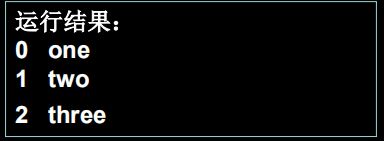
enumerate是python的内建函数,它可遍历每个元素(如列表\元组或字符串)组合为:索引元素,常在for循环使用。
enumerate(列表名)
例:
seq=['one','two','three']
for i,element in enumerate(seq):
print(i,element)
tf.one_hot
独热编码(one-hot encoding):在分类问题中,常用独热码做标签,标记类别:1表示是,0表示非。
(0狗尾草鸢尾 1杂色鸢尾 2弗吉尼亚鸢尾)
标签: 1
独热码:0 1 0
tf.one_hot()函数将待转换数据,转换为one-hot形式的数据输出。
tf.one_hot(待转换数据,depth=几分类)
例:
chasses=3
labels =tf.constant([1,0,2])#输入的元素值最小为0,最大为2
output=tf.one_hot(labels,depth=classes)
print(output)
y=tf.constant([1.01,2.01,-0.66])
y_pro=tf.nn.softmax(y)
print("After softmax,y_pro is:",y_pro)
assign_sub
赋值操作,更新参数的值并返回。
调用assign_sub前,先用tf。Variable定义变量w为可训练(可自更新)
w.assign_sub(w要自减的内容)
w=tf.Variable(4)
w.assign_sub(1)
print(w)
tf.argmax
返回张量沿指定维度最大值的索引tf.argmax(张量名,axis=操作轴)
例:
import numpy as np
test=np.array([[1,2,3],[2,3,4],[5,4,3],[8,7,2]])
print(test)
print(tf.argmax(test,axis=0))#返回每一列(经度)最大值的索引
print(tf.argmax(test,axis=1))#返回每一行(维度)最大值的索引
1.5神经网络实现鸢尾花分类
鸢尾花数据集
- 数据集介绍:共有数据150组,每组包括花萼长、花萼宽、花瓣长、花瓣宽4个输入特征。同时给出了,这一组特征对应的鸢尾花类别。类别包括Setosa Iris(狗尾草鸢尾),Versicolour Iris(杂色鸢尾),Virginica Iris(弗吉尼亚鸢尾)三类,分别用数字0,1,2表示。
- 从sklearn包datasels读入数据集,语法为:
from sklearn.datasetd import load_iris
x_data =datasets.load_iris().data #返回iris数据集所有输入特征
y_data=datasets.load_iris().target #返回iris数据集所有标签
-
主要实现步骤:
1.准备数据:数据集读入、数据集乱序、生成训练集和测试集(x_train/y_train)配成(输入特征,标签)对,每次读入一小撮。
2.搭建网络:定义神经网路中的所有可训练参数
3.参数优化:嵌套循环迭代,with结构更新参数,显示当前loss
4.测试效果:计算当前参数前向传播的准确率,显示当前loss
5.acc/loss可视化 -
具体代码实现
1.数据集读入
从sklearn 包datasets读入数据集:
from sklearn.datasets import datasets
x_data=datasets.load_iris().data
y_data=datasets.load_iris().target
2.数据集乱序
np.random.seed(116) # 使用相同的seed,使输入特征/标签一一对应
np.random.shuffle(x_data)
np.random.seed(116)
np.random.shuffle(y_data)
tf.random.set_seed(116)
3.数据集分出永不相见的训练集和测试集
x_train = x_data[:-30]
y_train = y_data[:-30]
x_test = x_data[-30:]
y_test = y_data[-30:]
4.配成[输入特征,标签]对,每次喂入一小撮(bath)
train_db = tf.data.Dataset.from_tensor_slices((x_train, y_train)).batch(32)
test_db = tf.data.Dataset.from_tensor_slices((x_test, y_test)).batch(32)
5.定义神经网络中所有可训练参数
w1 = tf.Variable(tf.random.truncated_normal([ 4, 3 ], stddev=0.1, seed=1))
b1 = tf.Variable(tf.random.truncated_normal([ 3 ], stddev=0.1, seed=1)
6.嵌套循环迭代,with结果更新参数,显示当前loss
for epoch in range(epoch): #数据集级别迭代
for step, (x_train, y_train) in enumerate(train_db): #batch级别迭代
with tf.GradientTape() as tape: # 记录梯度信息
前向传播过程计算y
计算总loss
grads = tape.gradient(loss, [ w1, b1 ])
w1.assign_sub(lr * grads[0]) #参数自更新
b1.assign_sub(lr * grads[1])
print("Epoch {}, loss: {}".format(epoch, loss_all/4))
7.计算当前参数前向传播后的准确率,显示当前acc
for x_test, y_test in test_db:
y = tf.matmul(h, w) + b # y为预测结果
y = tf.nn.softmax(y) # y符合概率分布
pred = tf.argmax(y, axis=1) # 返回y中最大值的索引,即预测的分类
pred = tf.cast(pred, dtype=y_test.dtype) #调整数据类型与标签一致
correct = tf.cast(tf.equal(pred, y_test), dtype=tf.int32)
correct = tf.reduce_sum (correct) # 将每个batch的correct数加起来
total_correct += int (correct) # 将所有batch中的correct数加起来
total_number += x_test.shape [0]
acc = total_correct / total_number
print("test_acc:", acc)#acc是一个指标示个人情况参考
8.acc/loss可视化
plt.title('Acc Curve') # 图片标题
plt.xlabel('Epoch') # x轴名称
plt.ylabel('Acc') # y轴名称
plt.plot(test_acc, label="$Accuracy$") # 逐点画出test_acc值并连线
plt.legend()
plt.sh
第二章 神经网络优化
2.1预备知识
tf.where():条件语句真返回A,条件语句假返回B。
tf.where(条件语句,真返回A,假返回B)
a = tf.constant([1,2,3,1,1])//定义一个一维张量
b = tf.constant([0,1,3,4,5])
c = tf.where(tf.greater(a,b),a,b)//返回a对应位置的元素,否则返回b 对应位置的元素。
print("c.",c)
np.random.RandomState.rand():返回一个[0,1]之间的随机数
np.random.RandomState.rand(维度)//维度为空,返回标量
import numpy as np
rdm = np.random.RandomState(seed=1)//seed=常数每次生成随机数相同
a = rdm.rand()//返回一个(0,1]随机标量
b = rdm.rand(2,3)//返回维度为2行3列的随机数矩阵
printf("a:",a)//返回维度为2行3列随机数矩阵
print("b:",b)
np.vstack():将两个数组按垂直方向叠加。
np.vstack(数组1,数组2)
import numpy as np
a = np.array([1,2,3])
b = np.array([4,5,6])
c = np.vstack((a,b))
print("c:\n",c)
np.mgrid[]
np.mgrid[起始值:结束值:步长,起始值:结束值:步长,…]//[起始值:结束值)
x.ravel()
将x变成一维数组,把m前变量“拉直”
np.c[];使返回的间隔数值点配对
np.c_[数组1,数组2,…]
import numpy as np
x,y = np.mgrid[1:3:1,2:4:0.5]
grid = np.c_[x.ravel(),y.ravel()]
print("x:",x)
print("y:",y)
print('grid:\n',grid)
2.2复杂学习率
NN复杂度:多用NN层数和NN参数的个数表示。
1.空间复杂度:
层数 = 隐藏层的层数 +1个输出层。例:左图为2层NN
总参数 = 总w +总b。 例:3×4+4 + 4×2+2 = 26
2.时间复杂度:
乘加运算次数。例:3×4 + 4×2 = 28
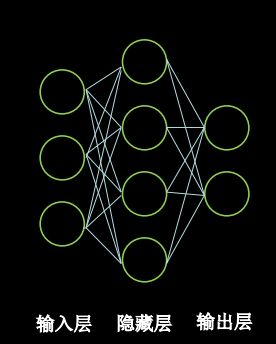
指数衰减学习率
可以先用较大的学习率,快速得到最优解,然后逐步缩小学习率,使模型在训练后期稳定。
指数衰减学习率 = 初始学习率 * 学习率衰减率(当前轮数/多少轮衰减一次)
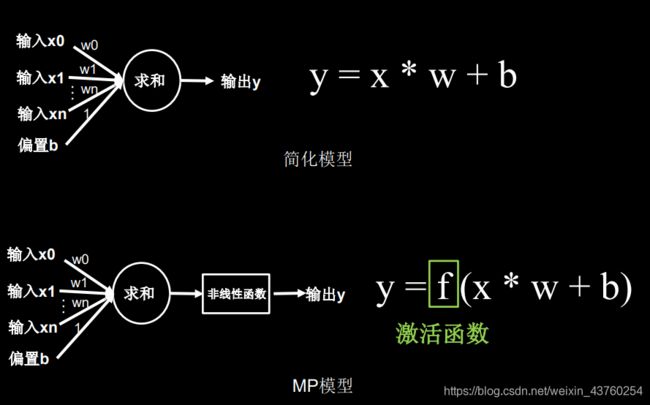
2.3激活函数
- 非线性:激活函数非线性时。多层神经网络可逼近所有函数。
- 可微性:优化器大多用梯度下降更新参数
- 单调性:当激活函数是单调的,能保证单层网络的损失好事的凸函数。
- 近似恒等性:f(x)≈x当参数初始化为随机小值时,神经网络更稳定。
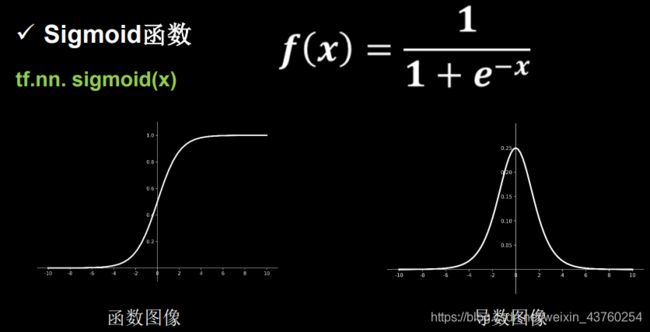
激活函数输出值的范围
特点:易造成梯度损失、输出非0的均值、收敛慢、幂运算复杂、训练时间长。
Tanh函数
tf.math.tanh(x)
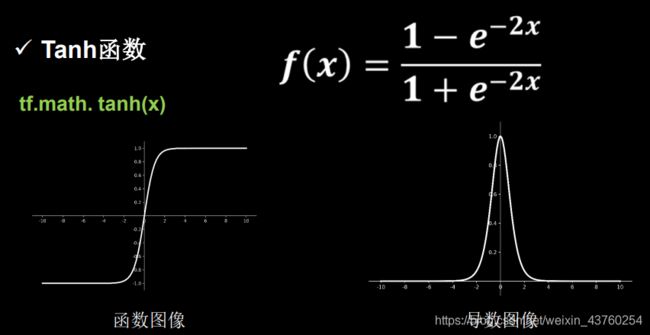
特点:输出是0均值、易造成梯度消失、幂运算复杂、训练时间长。
Relu函数
tf.nn.relu(x)
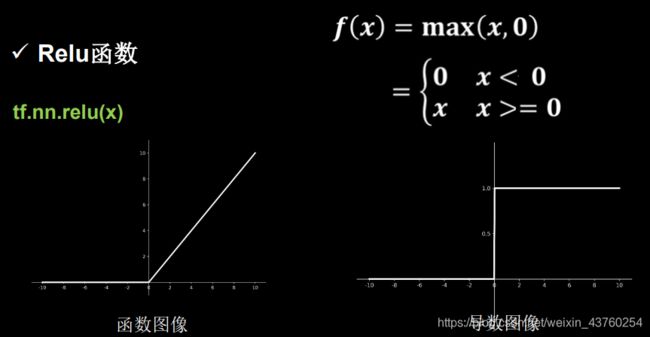
特点:
优点:解决了梯度消失的问题(正区间)、只需判断输入是否大于0,计算速度快,收敛速度远快于上两个激活函数。
缺点:输出非0均值,收敛慢。Deed ReIU问题,某些神经元可能永远不会被激活,导致相应的参数永远不能被更新。
Deed Relu改进办法:减小学习率,避免训练过程中过多负数特征输入relu函数。
Leaky Relu函数
tf.nn.leaky_relu(x)
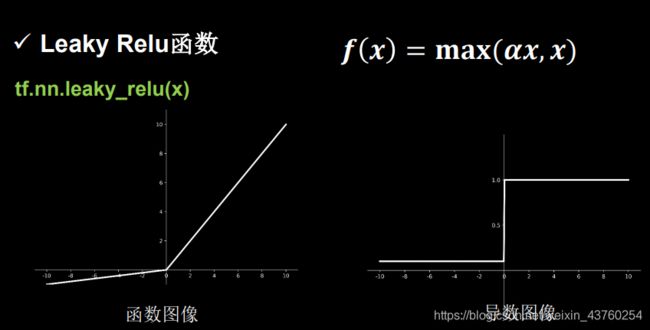
f(x)=max(ax,x)
理论上来说,Leaky Relu有Relude所有优点,外加不会有Deal Relu问题,但是在实际操作中,并没有完全证明Leaky Relu 总是好于Relu。
对于初学者的建议:
1.首选relu激活函数
2.学习率设置较小值
3.输入特征标准恩华,即让输入特征满足以0为均值,1为标准差的正态分布。
4.初始参数中心化,即让随机生成的参数满足以0为均值, 2 当 前 层 输 入 特 征 个 数 \sqrt{ \frac{2}{当前层输入特征个数}} 当前层输入特征个数2为标准差的正态分布。
2.4损失函数
损失函数(loss):预测值(y)与已知答案(y_)的差距。
NN优化目标:
-------->mse(Mean Squared Error)均方误差
loss最小 --------->自定义
-------->ce(Cross Entropy)交叉熵
均方误差mse:
loss_mse = tf.reduce_mean(tf.square(y_-y))

例:
预测酸奶日销量y,x1、x2是影响日销量的因素。
建模前,应预先采集的数据有:每日x1、x2和销量y_(即已知答案,最佳情况:产量=销量)
拟造数据集X,Y_: y_ = x1 + x2 噪声:-0.05 ~ +0.05 拟合可以预测销量的函数。
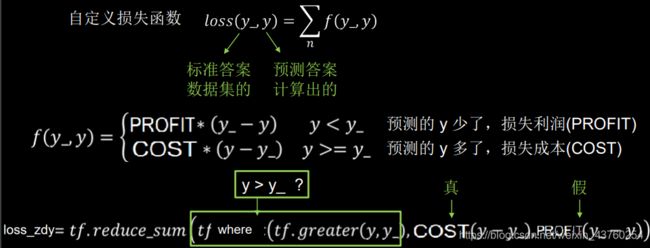
自定义损失函数
如预测商品销量,预测多了,成本损失;预测少了,损失利润。若利润≠成本,则mse产生的loss无法利益最大化。
如:预测酸奶销量,酸奶成本(COST)1元,酸奶利润(PROFIT)99元。预测少了损失利润99元,大于预测队列损失成本1元。预测少了损失大,希望生成的预测函数往多了预测。
交叉熵
交叉熵损失函数CE(Cross Entropy):表征两个概率分布之间的距离。
tf.losses.categorical_crossentropy(y_,y)

例:
二分类 已知答案y_=(1, 0) 预测y1=(0.6, 0.4) y2=(0.8, 0.2)
哪个更接近标准答案?
H1((1,0),(0.6,0.4)) = -(1ln0.6 + 0ln0.4) ≈ -(-0.511 + 0) = 0.511
H2((1,0),(0.8,0.2)) = -(1ln0.8 + 0ln0.2) ≈ -(-0.223 + 0) = 0.223
因为H1 > H2,所以y2预测更准
loss_cet1= tf.losses.categorical_crossentropy([1,0],[0.6,0.4])
loss_ce2=tf.losses.categorical_crossentropy([1,0],[0.8,0.2])
print("loss_ce1",loss_ce1)
print("loss_ce2",loss_ce2)
softmax与交叉熵结合
输出先过softmax函数,再计算 y与y_的交叉熵损失函数。一次解决概率分布和交叉熵计算。
tf.nn.softmax_cross_entropy_with_logits(y_,y)
y_ = np.array([[1, 0, 0], [0, 1, 0], [0, 0, 1], [1, 0, 0], [0, 1, 0]])
y = np.array([[12, 3, 2], [3, 10, 1], [1, 2, 5], [4, 6.5, 1.2], [3, 6, 1]])
y_pro = tf.nn.softmax(y)
loss_ce1 = tf.losses.categorical_crossentropy(y_, y_pro)
loss_ce2 = tf.nn.softmax_cross_entropy_with_logits(y_, y)
print('分步计算的结果:\n', loss_ce1)
print('结合计算的结果:\n', loss_ce2)
2.5缓解过拟合

欠拟合的解决方法:
增加输入特征项、增加网络参数、减少正则化参数
过拟合的解决方法:
数据清洗、增大训练集、采用正则化、增大正则化参数
正则化缓解过拟合
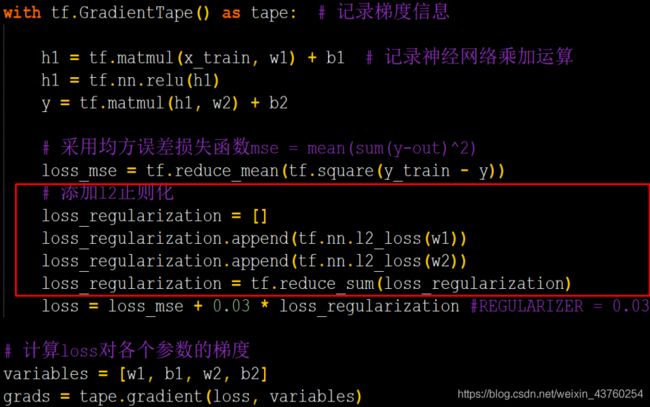
正则化在损失函数中引入模型复杂度指标,利用给w加权值,弱化了训练数据的噪声(一般不正则化b).

正则化的选择:
L1正则化大概率会使很多参数变为零,因此该方法可以通过稀疏参数、即减少参数的数量,降低复杂度。
L2正则化会使参数很接近零但不为零,因此该方法可通过减少参数值的大小降低复杂度。
2.6优化器
神经网络参数优化器
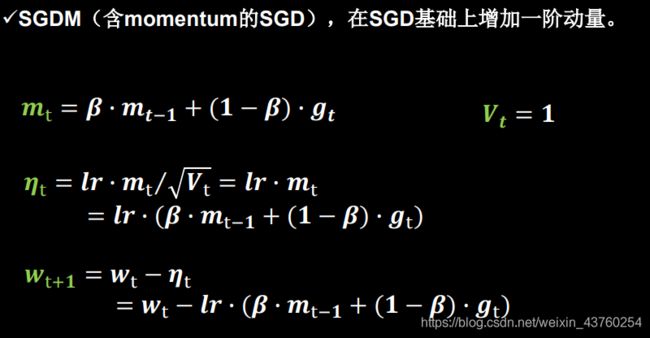
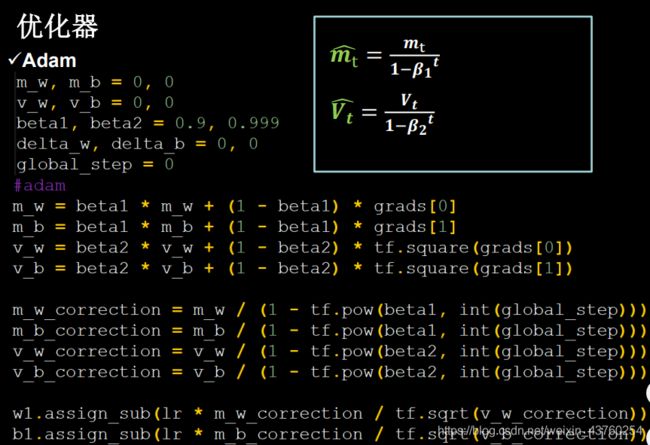
待优化参数w,损失函数loss,学习率lr,每次迭代一个batch,t表示当前batch迭代的总次数。

一阶动量:与梯度相关的函数。
二阶动量:与梯度平方相关的函数。
SGDM(含momentum的SGD)在SGD基础上增加一阶动能。

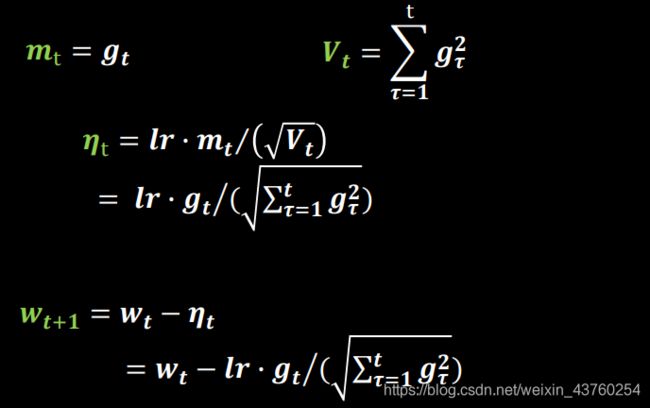
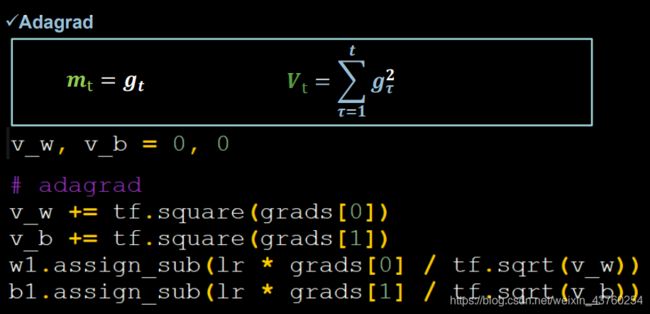
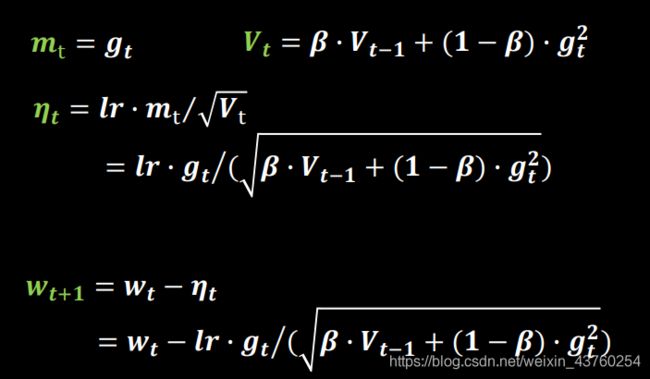
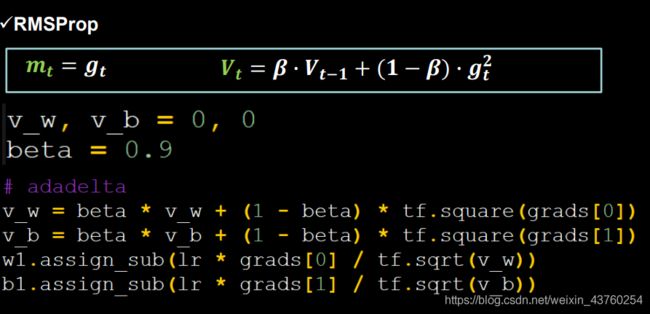
Adam, 同时结合SGDM一阶动量和RMSProp二阶动量

第三章 神经网络八股
3.1搭建神经网络八股sequential
用tensorflow API:tf.keras搭建网络八股
第一步:import
import相关模块
第二步:train test
告知要喂入网络的训练集和测试集,要指定训练集的输入特征,指定测试集的标签。
第三步:model = tf.keras.models.Sequential
在Sequential()中搭建神经网络,逐层描述没层网络,相当于走了一遍前向传播。
第四步:model.compile
在compile中配置训练方法告知训练时使用哪种优化器,选择哪个损失函数,选择哪种评测指标。
第五步:model.fit
在fit中执行训练过程,告知训练集和测试集的输入特征和标签,告知每一个batch是多少,告知要迭代多少次数据集
第六步:model.summmary
用summary打印出网络的结构和参数统计。
Sequential用法
model=tf.keras.models.Sequential([网络结构])#描述各层网络
网络结构:
- 拉直层:tf.keras.layers.Flatten()
拉直层只是形状转换把输入特征拉直变成一维数组 - 全连接层:tf.keras.layers.Dense(神经元个数,activation=“激活函数”,kernel_regularizer=哪种正则化)
activation(以字符串给出)可选:relu、softmax、sigmoid、tanh
kernel_regularizer可选:tf.keras.regularizer.l1()、tf.keras.regularizer.l2() - 卷积层:tf.keras.layers.Conv2D(filters = 卷积核个数,kernel_size=卷积核尺寸 strides=卷积步长,padding="valid"or)
- LSTM层:tf.keras.layers.LSTM()
Compile用法
model.compile(optimizer=优化器,loss=损失函数,metrics=["准确率"])
- Optimizer可选:
'sgd’or tf.keras.optimizers.SGD(lr=学习率,momentum=动量参数)
‘adagrad’ or tf.keras.optimizers.Adagrad(lr=学习率)
‘adadelta’ or tf.keras.optimizers.Adadelta(lr=学习率)
‘adam’ or tf.keras.optimizers.Adam(lr=学习率,beta_1=0.9,bata_2=0.999) - loss可选:
‘mse’ or tf.keras.losses.MeanSquaredError()
‘sqarse_categorical_crossentropy’ or tf.keras.losses.SqarseCategoricalCrossentropy(from_logits=False)
如果神经网络概率分布输出前经过概率分布from_logits=False,反之则为True。 - Metrics可选:网络评测指标
‘accuracy’:y_和y都是数值,如y_=[1] y=[1]
‘categorical_accuracy’:y_和y都是独热吗(概率分布),y_=[0,1,0] y =[0.256,0.695,0.045]
‘sparse_categorical_accuracy’:y_是数值,y是独热码(概率分布),如y_=[1] y =[0.256,0.695,0.045]
Fit用法
model.fit(训练集的输入特征,训练集的标签,batch_size=“每次喂入神经网络的样本数”,epochs=“要迭代多少次数据集”,
validation_data=(测试集的输入特征,测试集的标签),validation_split=从训练集划分多少比例给测试集,—两者二选一
validation_freq=多少次epoch测试一次)
Summary用法
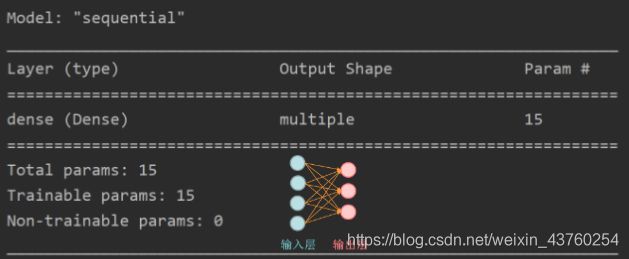
鸢尾花分类用六步法复现源代码
import tensorflow as tf
from sklearn import datasete
import numpy as np
#import相关模块

x_train = datasets.load_irin().data
y_train = datasets.load_iris()target
#交代训练集的输入特征x_train和y_train

np.random.seed(116)
np.random.shuffle(x_train)
np.random.seed(116)
np.random.shuffle(y_train)
tf.random.set_seed(116)
#将数据集数据打乱

model = tf.keras.models.Sequential([
    tf.keras.layers.Dense(3,activation="softmax",kernel_regularizer=tf.keras.regularizers.l2())
])
#搭建神经网络:有三个 神经元的全连接网络,激活函数使用softmax函数,运用l2正则化。

model.compile(optimizer=tf.keras.optimizers.SGD(lr=0.1),
    loss=tf.keras.losses.SparseCategoricalCrossentropy(from_logits=False),
    metrics=['sparse_categorical_accuracy'])

#配置训练方法,评测指标

model.fit(x_train,y_train,batch_size=32,epochs=500,validation_split=0.2,validation_freq=20)
#训练过程

model.summary()
#打印网络结构和参数统计
3.2搭建网络八股class
用Sequential可以搭建出上层输出就是下层输入的顺序网络结构,但是无法写出一些带有跳连的非顺序网络结构,对于这种非顺序网络结构可以选择class搭建神经网络结构。
class用法
class MyModel(Model) model=MyModel
class MyModel(Model):
def_init_(self):
super(MyModel,self)._ init _(self):
定义网络结构模块
def call(self,x):
调用网络结构块,实现前向传播
return y
model = MyModel()
_ init _():定义所需网络结构块
call(): 写出前向传播
#对于鸢尾花的例子
class MyModel(Model):
    def_init_(self):
        super(MyModel,self)._  init _(self):
        self.d1 = Dense(3)
   def call(self,x):
       y = self.d1(x)
        return y
model = MyModel()
import tensorflow as tf
from tensorflow.keras.layers import Dense
from tensorflow.keras import Model
from sklearn import datasets
import numpy as np
#import导入

x_train = datasets.load_iris().data
y_train = datasets.load_iris().target
#训练集导入

np.random.seed(116)
np.random.shuffle(x_train)
np.random.seed(116)
np.random.shuffle(y_train)
tf.random.set_seed(116)
#将数据集打乱

class IrisModel(Model):
    def __init__(self):
        super(IrisModel, self).__init__()
        self.d1 = Dense(3, activation='softmax', kernel_regularizer=tf.keras.regularizers.l2())

    def call(self, x):
        y = self.d1(x)
        return y

model = IrisModel()
# 用class方法搭建神经网络,实例化model

model.compile(optimizer=tf.keras.optimizers.SGD(lr=0.1),
#配置训练方法,评价指标
              loss=tf.keras.losses.SparseCategoricalCrossentropy(from_logits=False),
              metrics=['sparse_categorical_accuracy'])

model.fit(x_train, y_train, batch_size=32, epochs=500, validation_split=0.2, validation_freq=20)
#训练过程
model.summary()
#打印神经网络
3.3MNIST数据集
MNIST数据集:
提供6万张28 * 28像素点的0~9手写数字图片和标签,用于训练。
提供1万张28*28像素的0~9手写数字图片和标签,用于测试。

导入MNIST数据集:
mnist = tf.keras.datasets.mnist
(x_train,y_train),(x_test,y_test) = mnist.load_data()
作为输入特征,输入神经网络时,将数据拉伸为一维数组:
tf.keras.layers.Flatten()
[ 0 0 0 48 238 252 252 _ _ _ 253 186 12 0 0 0]
import tensorflow as tf
from matplotlib import pyplot as plt

mnist = tf.keras.datasets.mnist
(x_train, y_train), (x_test, y_test) = mnist.load_data()

# 可视化训练集输入特征的第一个元素
plt.imshow(x_train[0], cmap='gray')  # 绘制灰度图
plt.show()

# 打印出训练集输入特征的第一个元素
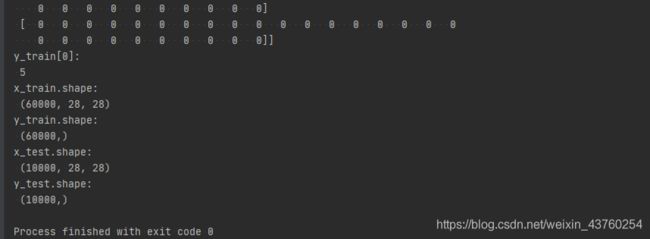
print("x_train[0]:\n", x_train[0])
# 打印出训练集标签的第一个元素
print("y_train[0]:\n", y_train[0])

# 打印出整个训练集输入特征形状
print("x_train.shape:\n", x_train.shape)
# 打印出整个训练集标签的形状
print("y_train.shape:\n", y_train.shape)
# 打印出整个测试集输入特征的形状
print("x_test.shape:\n", x_test.shape)
# 打印出整个测试集标签的形状
print("y_test.shape:\n", y_test.shape)
import tensorflow as tf

mnist = tf.keras.datasets.mnist
(x_train, y_train), (x_test, y_test) = mnist.load_data()
x_train, x_test = x_train / 255.0, x_test / 255.0

model = tf.keras.models.Sequential([
    tf.keras.layers.Flatten(),
    tf.keras.layers.Dense(128, activation='relu'),
    tf.keras.layers.Dense(10, activation='softmax')
])

model.compile(optimizer='adam',
              loss=tf.keras.losses.SparseCategoricalCrossentropy(from_logits=False),
              metrics=['sparse_categorical_accuracy'])

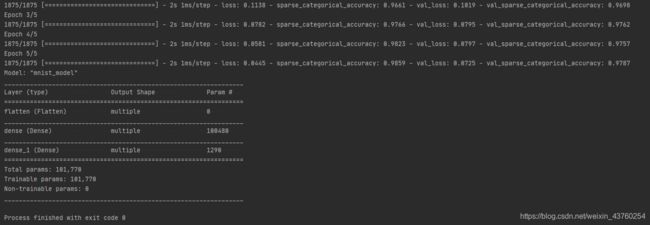
model.fit(x_train, y_train, batch_size=32, epochs=5, validation_data=(x_test, y_test), validation_freq=1)
model.summary()
用class实现手写识别分布
import tensorflow as tf
from tensorflow.keras.layers import Dense, Flatten
from tensorflow.keras import Model

mnist = tf.keras.datasets.mnist
(x_train, y_train), (x_test, y_test) = mnist.load_data()
x_train, x_test = x_train / 255.0, x_test / 255.0


class MnistModel(Model):
    def __init__(self):
        super(MnistModel, self).__init__()
        self.flatten = Flatten()
        self.d1 = Dense(128, activation='relu')
        self.d2 = Dense(10, activation='softmax')

    def call(self, x):
        x = self.flatten(x)
        x = self.d1(x)
        y = self.d2(x)
        return y


model = MnistModel()

model.compile(optimizer='adam',
              loss=tf.keras.losses.SparseCategoricalCrossentropy(from_logits=False),
              metrics=['sparse_categorical_accuracy'])

model.fit(x_train, y_train, batch_size=32, epochs=5, validation_data=(x_test, y_test), validation_freq=1)
model.summary()
3.4FASHION数据集
FASHION数据集:
提供6万张28 * 28像素点的衣裤等图片和标签,用于训练。
提供1万张28*28像素点的衣等图片和标签,用于测试.

导入FASHION数据集
fashion = tf.keras.datasets.fashion_mnist
(x_train,y_train),(x_test,y_test) = fashion.load_data()
| Label 标签 | Description 分类 |
|---|---|
| 0 | T恤 |
| 1 | 裤子 |
| 2 | 套头衫 |
| 3 | 连衣裙 |
| 4 | 外套 |
| 5 | 凉鞋 |
| 6 | 衬衫 |
| 7 | 运动鞋 |
| 8 | 包 |
| 9 | 靴子 |
用sequential方法
import tensorflow as tf
from sklearn import datasets
import numpy as np
#import相关模块

fashion = tf.keras.datasets.fashion_mnist
(x_train,y_train),(x_test,y_test) = fashion.load_data()
x_train, x_test = x_train / 255.0, x_test / 255.0
#交代训练集的输入特征x_train和y_train

np.random.seed(116)
np.random.shuffle(x_train)
np.random.seed(116)
np.random.shuffle(y_train)
tf.random.set_seed(116)
#将数据集数据打乱

model = tf.keras.models.Sequential([
    tf.keras.layers.Flatten(),
    tf.keras.layers.Dense(128, activation='relu'),
    tf.keras.layers.Dense(10, activation='softmax')
])
#搭建神经网络:有十个神经元的全连接网络,激活函数使用softmax函数,运用l2正则化。

model.compile(optimizer=tf.keras.optimizers.SGD(lr=0.1),
    loss=tf.keras.losses.SparseCategoricalCrossentropy(from_logits=False),
    metrics=['sparse_categorical_accuracy'])

#配置训练方法,评测指标

model.fit(x_train,y_train,batch_size=32,epochs=5,validation_data=(x_test, y_test),validation_freq=1)
#训练过程

model.summary()
#打印网络结构和参数统计
用class识别
import tensorflow as tf
from sklearn import datasets
import numpy as np
from tensorflow.keras.layers import Dense, Flatten
from tensorflow.keras import Model
#import相关模块

fashion = tf.keras.datasets.fashion_mnist
(x_train,y_train),(x_test,y_test) = fashion.load_data()
x_train, x_test = x_train / 255.0, x_test / 255.0
#交代训练集的输入特征x_train和y_train

np.random.seed(116)
np.random.shuffle(x_train)
np.random.seed(116)
np.random.shuffle(y_train)
tf.random.set_seed(116)
#将数据集数据打乱

class MnistModel(Model):
    def __init__(self):
        super(MnistModel, self).__init__()
        self.flatten = Flatten()
        self.d1 = Dense(128, activation='relu')
        self.d2 = Dense(10, activation='softmax')

    def call(self, x):
        x = self.flatten(x)
        x = self.d1(x)
        y = self.d2(x)
        return y

model = MnistModel()
#搭建神经网络:有十个神经元的全连接网络,激活函数使用softmax函数,运用l2正则化。

model.compile(optimizer=tf.keras.optimizers.SGD(lr=0.1),
    loss=tf.keras.losses.SparseCategoricalCrossentropy(from_logits=False),
    metrics=['sparse_categorical_accuracy'])

#配置训练方法,评测指标

model.fit(x_train,y_train,batch_size=32,epochs=5,validation_data=(x_test, y_test),validation_freq=1)
#训练过程

model.summary()
#打印网络结构和参数统计
第四章 网络八股扩展
4.1搭建网络八股总览
tf.keres搭建神经网络八股
六步法:
import
train、test、
Sequential、Class
model.compile
model.fit
model.summary
神经网络八股功能扩展
六步法:
1.自制数据集,解决本领域应用
2.数据增强,扩充数据集
3.断点续训,把参数存入文本
4.参数提取,把参数存入文本
5.acc/loss可视化,查看训练效果
6.应用程序,给图识物
import tensorflow as tf

mnist = tf.keras.datasets.mnist
(x_train, y_train), (x_test, y_test) = mnist.load_data()
x_train, x_test = x_train / 255.0, x_test / 255.0

model = tf.keras.models.Sequential([
    tf.keras.layers.Flatten(),
    tf.keras.layers.Dense(128, activation='relu'),
    tf.keras.layers.Dense(10, activation='softmax')
])

model.compile(optimizer='adam',
              loss=tf.keras.losses.SparseCategoricalCrossentropy(from_logits=False),
              metrics=['sparse_categorical_accuracy'])

model.fit(x_train, y_train, batch_size=32, epochs=5, validation_data=(x_test, y_test), validation_freq=1)
model.summary()
4.2自制数据集
自制数据集
观察数据集数据结构,给x_train,y_train,x_test,y_tese赋值。
def generateds(图片路径,标签文件):
例:
def generateda(path,txt):
#只读文件
  f = open(txt,'r')
  contents = f.readlines()
  #读取文件中所有行
  f.close()
  #关闭文件
  x,y_ = [ ] , [ ]
  #创建空链表
  for content in conyents:
  #逐行读出
       value = content.split()
       #以空格分开,图片名为value[0],标签名为value[1]
       img_path = path + value[0]
       #图片路径加上图片名拼接出图片的索引路径
       img = Image.open(img_path)
       #读入图片
       img = np.array(img.convert('L'))
       #图片变为8位宽度的灰度值np.array格式
       img = img / 255.
       #归一化处理
       x.append(img)
       #归一化数据贴到列表x
       y_.append(value[1])
       #标签贴到列表y
       print('loading : ' + content)
       #打印状态提示
    x = np.arrat(x)
    y_ = np.array(y_)
    y_ = y _.astype(np.int64)
    return x,y _
4.3数据增强(增大数据量)
image_gen_train=tf.keras.preprocessing.image.ImageDataGenerator(
rescale=所有说话间将乘以该数值
rotation_range=随机旋转角度数范围
width_shift_range=随机宽度偏移量
height_shift_range=随机高度偏移量
水平翻转:horizontal_flip=是否随机水平翻转
随机缩放:zoom_range=随机缩放的范[1-n,1+n])
image_gen_train.fit(x_train)
model.fit(x_train, y_train,batch_size=32, ……)
model.fit(image_gen_train.flow(x_train, y_train,batch_size=32), ……)
例:
image_gen_train=tf.keras.preprocessing.image.Image.ImageDataGenerator(
    rescale=1./1.,#如为图像,分母为255时,可归至0~1
    rotation_range=45,#随机45度旋转
    width_shift_range=.15,#宽度偏移
    height_shift_range=.15,#高度偏移
    horizontal_flip=False, #水平翻转
    zoom_range=0.5 #将图像随机缩放阈量50%
image_gen_train.fit(x_train)
4.4断点续训(保存模型)
读取模型:
load_weights(路径文件名)
例:
checkpoint_save_path = "./checkpoint/mnist.ckpt"
if os.path.exists(checkpoint_save_path + '.index')//通过判断是否有索引表的生成判断是否保存过模型
		 print('-------------------load the model-----------')
		 model.load_weights(checkpoint_save_path)
保存模型:
tf.keras.callbacks.ModelCheckpoint(//回调函数
filepath=路径文件名,
save_weight_only=True/False)
history=model.fit(callbacks=[cp_callback])
例:
cp_callback = tf.keras.callbacks.ModelCheckpoint(filepath=checkpoint_save_path,
								save_weights_only=True,
								save_best_only=True)
history = model.fit(x_train,y_train,batch_size=32,epochs=5,
validation_data=(x_test,y_test),validation_freq=1,
callbacks=[cp_callback])
4.5参数提取(把参数传入文本)
models.trainable_variables:返回模型中可训练的参数
设置print输出格式
np.set_printoptions(threshold=超过多少省略表示)
例:
np.set_printoptions(threshold=np.inf)#np.inf表示无限大
print(model,trainable_variables)
file = open('./weight,text','w')
for v in model,trainable_variables:
    file.write(str(v.name) + '\n')
    file.write(str(v.numpy())+'\n')
file.close()
4.6acc&loss可视化(查看训练效果)
acc曲线与loss曲线
history=model.fit(训练集数据,训练集标签,batch_size=,epochs=,
validation_split=用作测试数据的比例,validation_data=测试集,
validation_freq=测试频率)
history:
训练集loss:loss
测试集loss:val_loss
训练集准确率:sparse_categorical_accuracy
测试集准确率:val_sparse_categorical_accuracy
acc = history.history['sparse_categorical_accuracy']
val_acc=history,history['val_spatse_categorical_accuracy']
loss = history,history['loss']
val_loss = history.history['val_loss']
#显示训练集和验证集的acc和loss曲线
acc = history.history['sparse_categorical_accuracy']
loss = history.history['loss']
val_loss = history.history['val_loss']

plt.subplot(1,2,1)
plt.plot(acc,label='Training Accuracy')
plt.plot(val_acc,label='Validation Accuracy')
plt.title('Training and Validation Accuracy')
plt.legend()

plt.subplot(1,2,3)
plt.plot(loss,label='Training Loss')
plt.plot(val_loss,label='Validation Loss')
plt.title('Training and Validation Loss')
plt.legend()
plt.show()
4.7给图识物
输入一张手写数字图片----神经网络自动识别出值----输出识别结果
前向传播执行应用
predict(输入特征,batch_size=整数)返回前向传播计算结果
model = tf.keras.models.Sequential([
    tf.keras.layers,Flatten(),
    tf.keras.layers.Dense(128,activation='relu'),
    tf.keras.layers.Dense(10,activation='softmax')])
    //复现模型(前向传播)
model.load_weights(models_save_path)
    //加载参数
result = model,predict(x_predict)
    //预测结果
from PIL import Image
import numpy as np
import tensorflow as tf

model_save_path = './checkpoint/mnist.ckpt'

model = tf.keras.models.Sequential([
    tf.keras.layers.Flatten(),
    tf.keras.layers.Dense(128, activation='relu'),
    tf.keras.layers.Dense(10, activation='softmax')])

model.load_weights(model_save_path)

preNum = int(input("input the number of test pictures:"))

for i in range(preNum):
    image_path = input("the path of test picture:")
    img = Image.open(image_path)
    img = img.resize((28, 28), Image.ANTIALIAS)
    img_arr = np.array(img.convert('L'))

    for i in range(28):
        for j in range(28):
            if img_arr[i][j] < 200:
                img_arr[i][j] = 255
            else:
                img_arr[i][j] = 0

    img_arr = img_arr / 255.0
    x_predict = img_arr[tf.newaxis, ...]
    result = model.predict(x_predict)

    pred = tf.argmax(result, axis=1)

    print('\n')
    tf.print(pred)


