Dear PyGui:针对 Python 的无膨胀(Bloat-free)图形用户界面,具有最小的依赖性,托管在 hoffstadt/DearPyGui。
Dear PyGui 是一个易于使用(但功能强大)的 Python GUI 框架。Dear PyGui 提供了 Dear ImGui 的包装,该包装模拟了传统的保留(retained)模式 GUI(与 Dear ImGui 的立即(immediate)模式范例相反)。
Dear PyGui 与其他 Python GUI 框架从根本上不同。在后台,Dear PyGui 使用即时模式范例和计算机的 GPU 来实现极为动态的界面。下列平台当前支持 Dear PyGui:
| Platform | Rendering API |
|---|---|
| Windows 10 | DirectX 11 |
| macOs | Metal |
| Linux | OpenGL 3 |
Dear ImGui 以相同的方式为游戏开发人员提供了一种创建工具的简单方法,Dear PyGui 则提供了一种方便Python 开发人员为脚本创建快速而强大的 GUI 的简单方法。
与其他 Python GUI 库相比,Dear PyGui 具有以下独特之处:
- GPU 渲染
- 简单的内置异步功能支持
- 完整的主题和样式控制
- 简单的内置日志窗口
- 70多个小部件具有数百种小部件组合
- 详细的文档,示例和无与伦比的支持
安装(支持Python3.6 以上):pip install dearpygui。可以在 Github 上的 Examples 文件夹中找到各种演示用法的示例。使用show_documentation() 命令可以在此处找到文档,也可以从库中找到文档。
使用 Dear PyGui 很简单,就像创建下面的 Python 脚本一样:
from dearpygui.core import *
from dearpygui.simple import *

def save_callback(sender, data):
    print("Save Clicked")

with window("Example Window"):
    add_text("Hello, world")
    add_button("Save", callback=save_callback)
    add_input_text("string", default_value="Quick brown fox")
    add_slider_float("float", default_value=0.273, max_value=1)

start_dearpygui()
显示:
接下来,看看如何使用 Dear PyGui ("DPG")。
1 概览
Dear PyGui 由视口(viewport),窗口(windows)和小部件(widgets)组成。视口是程序的主窗口,通过调用函数 start_dearpygui 创建。
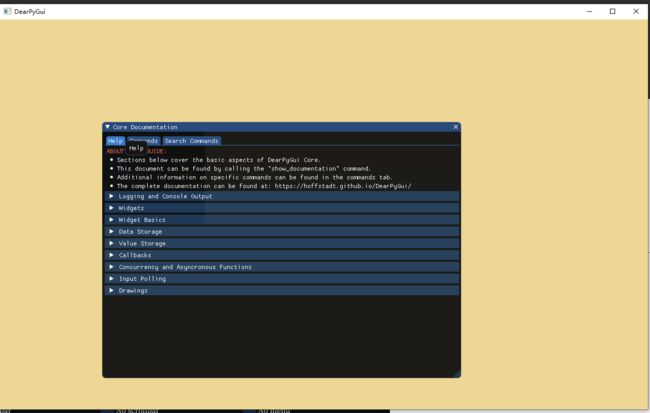
下面是视口和一个窗口的示例,其中显示了使用内置文档函数的文档:
from dearpygui.core import *
from dearpygui.simple import *

set_main_window_size(800, 800)
show_about()
show_documentation()

# when running this code please look at the about window and it will report which version of Dear PyGUI is running
start_dearpygui()
效果:

DPG 当前由两个模块 dearpygui.core 和 dearpygui.simple 组成。dearpygui.core 包含 Dear PyGui 的核心功能。其他所有内容都建立在 core 之上(包括 simple)。
dearpygui.simple 包含简单的包装程序和其他从核心创建的实用程序,以提供与 DPG 更为友好的接口。随着代码复杂度的增加,建议在适用时开始使用 simple 模块。
在整个教程中,我们将使用推荐的过程来完成各种任务。这将包括 core 功能和 simple 功能。
2 开发者工具
Dear PyGui 包含几个有用的开发人员工具,我们将在整个教程中使用它们。
from dearpygui.core import *
from dearpygui.simple import *

show_documentation()
show_debug()
show_about()
show_metrics()
show_logger()

start_dearpygui()
3 内置的日志功能
记录器(Logger)是众多强大的内置开发人员工具之一。可以通过命令 show_logger 进行访问。记录器有 6 个日志级别:
- Trace
- Debug
- Info
- Warning
- Error
- Off
看一个例子:
from dearpygui.core import *
from dearpygui.simple import *

show_logger()
set_log_level(mvTRACE)
log("trace message")
log_debug("debug message")
log_info("info message")
log_warning("warning message")
log_error("error message")

start_dearpygui()
4 创建小部件和容器
DPG 项可以细分为:
- 常规项目(即 inputs, buttons)
- 容器项目(例如,window, popup, tooltip, child)
- 布局项(即 group, next_column)
项将使用其各自的 add _***命令添加。
每个项必须具有唯一的名称。默认情况下,名称将成为标签(如果适用)。如果您想更改小部件的标签,可以:
- 放到名称的尾部的“
##”(例如"displayed_name##unique_part")后面的名称将从显示的名称中隐藏。 - 使用
label关键字将显示标签而不是项名称。
对于在函数中没有名称参数的项,将自动生成某些项名称。(即 same_line)。但是,它们有一个可选的 name 关键字,如果以后需要引用该项目,则可以填写该关键字。
from dearpygui.core import *
from dearpygui.simple import *

with window("Tutorial"):
    add_button("Apply")
    add_same_line(spacing=10)
    add_button("Apply##1")
    add_same_line(spacing=10, name="sameline1")
    add_button("Apply2", label="Apply")
    add_spacing(count=5, name="spacing1")
    add_button("Apply##3")

start_dearpygui()
容器项用于容纳其他项,并且可由任一项实现:
- 使用
add _***函数启动容器,然后end函数完成。 - 使用
dearpygui.simple和相应的容器上下文管理器(推荐方法)。
当容器项“added”时,它们被推入父堆栈。之后添加的任何项目都将属于堆栈顶部的父项。当容器项“ended”时,它们将从父堆栈弹出。
dearpygui.simple 的上下文管理器自动调用 end 函数,并允许代码折叠并在代码本身中显示层次结构。
from dearpygui.core import *
from dearpygui.simple import *

with window("Tutorial"):
    add_text("This is some text on window 2")

start_dearpygui()
默认情况下,项按提交顺序创建。但是,可以通过指定 parent 容器来无序添加项目。使用 parent 关键字会将小部件插入到父级的子级列表的末尾。如果您想将其插入其他位置,请在与 parent 关键字组合使用 before 之前,将该项目放在 parent 容器中另一个项目之前。
from dearpygui.core import *
from dearpygui.simple import *

with window("window 1"):
    with child("child 1"):
        # this is a input item added inside of the child
        add_checkbox("Checkbox")

with window("Tutorial"):
    add_text("First created widget")
    # we can even specify the parent before it was created
    add_text("This is some text on window 1", parent="window 1")
    add_text("This is some text on child 1", parent="child 1")

add_checkbox("Last created widget", parent="MainWindow",
             before="First created widget")
add_checkbox("Last created widget 2", parent="child 1", before="Checkbox")

# empty window
with window("window 3"):  # simple
    pass

start_dearpygui()
效果:

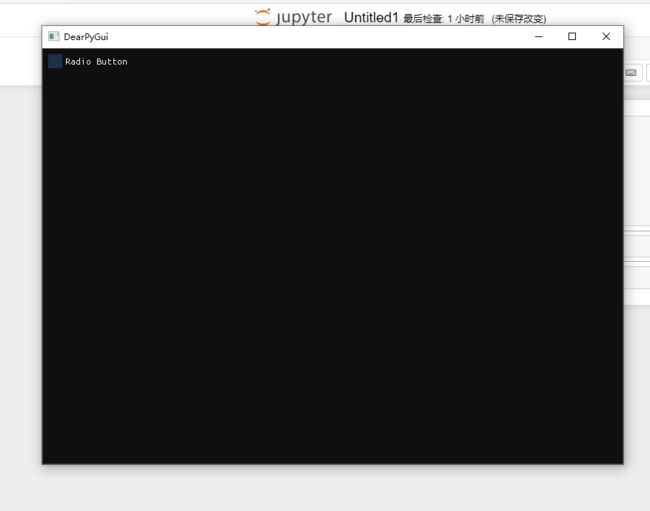
5 主窗口
可以使用 start_dearpygui 的 primary_window 关键字或使用 set_primary_window 命令将窗口设置为主窗口(即视口)。
from dearpygui.core import *
from dearpygui.simple import *

with window("Tutorial"):
    add_checkbox("Radio Button")
set_main_window_size(800, 600)
start_dearpygui(primary_window="Tutorial")
6 使用小部件
每个输入窗口小部件都有一个值,该值可以在运行时通过命令 set_value 设置,或创建时使用 default_value 关键字设置。
要访问小部件的值,我们可以使用命令 get_value。
from dearpygui.core import *
from dearpygui.simple import *

with window("Tutorial"):
    add_checkbox("Check Box", default_value=False)
    print("First value of the Check Box is: ", get_value("Check Box"))
    set_value("Check Box", True)
    print("Value after setting the Check Box is: ", get_value("Check Box"))

start_dearpygui()
7 小部件和窗口回调
每个输入窗口小部件都有一个回调,在与窗口小部件交互时会运行该回调。
回调用于为小部件提供功能。回调可以在创建时使用 callback 或在创建后使用 set_item_callback 分配给窗口小部件。在 Dear PyGui 中,应用于项目的每个回调都必须包含一个 sender 和 data 参数。
Dear PyGui 使用 sender 参数通过发送名称来通知回调哪个窗口小部件触发了回调。
各种标准回调使用 data 参数通过指定回调 callback_data 来发送其他数据。
from dearpygui.core import *
from dearpygui.simple import *

def button_callback(sender, data):
    log_debug(f"sender is: {sender}")
    log_debug(f"data is: {data}")

show_logger()  # we're going to use the logger here to show the result

with window("Tutorial"):
    add_input_text("Input Text", default_value="Hello World!")
    add_button("Apply", callback=button_callback, callback_data=get_value("Input Text"))
    add_button("Apply##2", tip="callback was set after item was created")
    set_item_callback("Apply##2", callback=button_callback, callback_data=get_value("Input Text"))

start_dearpygui()
每次与小部件进行交互时,我们都可以使用回调来更新 Python 变量的值。在下面的示例中显示:
from dearpygui.core import *
from dearpygui.simple import *

def update_var(sender, data):
    my_var = get_value("Input Checkbox")
    log_debug(my_var)

show_logger() # were going to use the logger here to show the result

with window("Tutorial"):
    add_checkbox("Input Checkbox", callback=update_var)

start_dearpygui()
但是通过使用 sender 会是更聪明的方法:
from dearpygui.core import *
from dearpygui.simple import *

def update_var(sender, data):
    my_var = get_value(sender)
    log_debug(my_var)


show_logger() # were going to use the logger here to show the result

with window("Tutorial"):
    add_checkbox("Input Checkbox", callback=update_var)
    add_input_text("Input Text", callback=update_var)
    add_input_int("Input Int", callback=update_var)

start_dearpygui()
窗口类型的窗口小部件具有特殊的回调,这些回调在诸如窗口大小调整和窗口关闭之类的事件上触发。特定于窗口的回调可以应用于任何窗口类型的小部件。on_close 将在窗口关闭时运行分配给关键字的回调,set_resize_callback 将在容器的每次调整大小时运行,并且可以使用 handler 关键字设置为任何特定窗口,默认值为“MainWindow”。
如果您希望每帧都执行一次回调,则可以使用 set_render_callback:
from dearpygui.core import *
from dearpygui.simple import *


def close_me(sender, data):
    log_debug(f"{sender} window has been closed")


def render_me(sender, data):
    log_debug(f"window {sender} has ran a render callback")


def resize_me(sender, data):
    log_debug(f"window {sender} has ran a resize callback")


# were going to use the logger to display callback replies
show_logger()
with window("Tester", on_close=close_me):
    add_text('resize this window resize callback will occur')
    add_text('close this window using the "x" button and a close callback will occur')

set_render_callback(render_me)
set_resize_callback(resize_me, handler="Tester")

start_dearpygui()
8 运行时添加和删除小部件
借助 Dear PyGui,您可以在运行时(Run-time)动态添加和删除任何项。这可以通过使用回调来运行所需项的 add _*** 命令并指定该项目所属的父项来完成。默认情况下,如果未指定父项,则将小部件添加到MainWindow。
通过在添加项之前使用关键字,您可以控制新项位于父项中的哪个项目之前。默认将新的小部件放在最后。
在此示例中,我们使用“debug”开发人员工具来查看小部件的当前状态。转到调试窗口小部件上的“App Item Layout”选项卡,此选项卡显示应用程序的状态和属性。单击“MainWindow”树项,我们可以看到 MainWindow 当前显示的小部件。尝试单击主窗口上的“Add/Delete”按钮,然后查看树的状态更改。
from dearpygui.core import *
from dearpygui.simple import *

def add_buttons(sender, data):
    add_button("New Button", parent="Secondary Window")
    add_button("New Button 2", parent="Secondary Window")

def delete_buttons(sender, data):
    delete_item("New Button")
    delete_item("New Button 2")

show_debug()

with window("Tutorial"):
    add_button("Add Buttons", callback=add_buttons)
    add_button("Delete Buttons", callback=delete_buttons)

with window("Secondary Window"):
    pass

start_dearpygui()
删除容器时,默认情况下会删除容器及其子级,除非关键字 children_only 设置为 True。
from dearpygui.core import *
from dearpygui.simple import *


def add_widgets(sender, data):
    with window("Secondary Window"):  # simple
        add_button("New Button 2", parent="Secondary Window")
        add_button("New Button", parent="Secondary Window")
        add_button("New Button 3", parent="Secondary Window")


def delete_widgets(sender, data):
    delete_item("Secondary Window")
    delete_item("New Button")


def delete_children(sender, data):
    delete_item("Secondary Window", children_only=True)


show_debug()

with window("Tutorial"):
    add_button("Add Window and Items", callback=add_widgets)
    add_button("Delete Window and Children", callback=delete_widgets)
    add_button("Delete Window's Children", callback=delete_children)

start_dearpygui()
9 值与数据存储
添加新的窗口小部件时,会将值添加到值存储系统。默认情况下,此值的标识符是小部件的名称。您可以使用 source 关键字覆盖标识符。这样做的好处之一是让多个小部件控制相同的值。
使用 get_value 从值系统检索值。可以使用 set_value 手动更改值。
为了使不同值类型的小部件在存储系统中使用相同的值,必须首先创建较大的值。
例如,创建 input_float3 时,存储的值类型为 [float, float, float]。稍后创建的 input_float2 可以使用与 input_float3 相同的源。但是,如果先创建了 input_float2,然后尝试与 input_float3 共享其源,则它将不起作用。为了使 input_float3 和 input_float2 共享同一源,我们可以创建 input_float3,需要首先创建。这是通过 add_value() 完成的。
from dearpygui.core import *
from dearpygui.simple import *


def print_me(sender, data):
    log_debug(f"checkbox values: {get_value('value_1')}")
    log_debug(f"text values: {get_value('value 2')}")
    log_debug(f"color values: {get_value('color4')}")


def reset(sender, data):
    set_value("value_1", False)
    set_value("value 2", "Hello World!")


show_logger()

with window("Tutorial"):
    add_checkbox("Radio Button1", source="value_1")
    add_checkbox("Radio Button2", source="value_1")
    add_input_text("Text Input 1", source="value 2")
    add_input_text("Text Input 2", source="value 2", password=True,
                   tip="this input text has password applied")
    add_button("Print source values", callback=print_me)
    add_button("Reset source values", callback=reset)

    # special case when linking a smaller input type widget to a larger one create the large value first
    add_value("color4", (0.0, 0.0, 0.0, 0.0))
    add_color_edit3("color edit 3", source="color4")
    add_color_edit4("color edit 4", source="color4")

start_dearpygui()
DPG 还提供用于数据存储的常规数据。使用 add_data,我们可以传入任何 Python 项以将其存储为数据项,并稍后使用 get_data("name") 进行访问。请记住,您可以将任何 Python 对象存储在数据存储中,甚至可以存储自定义数据类型。
from dearpygui.core import *
from dearpygui.simple import *

def store_data(sender, data):
    custom_data = {
        "Radio Button": get_value("Radio Button"),
        "Checkbox": get_value("Checkbox"),
        "Text Input": get_value("Text Input"),
    }
    add_data("stored_data", custom_data)

def print_data(sender, data):
    log_debug(get_data("stored_data"))

show_logger()
show_debug()

with window("Tutorial"):
    add_radio_button("Radio Button", items=["item1", "item2"])
    add_checkbox("Checkbox")
    add_input_text("Text Input")
    add_button("Store Data", callback=store_data)
    add_button("Print Data", callback=print_data)


start_dearpygui()
10 菜单栏
用于 GUI 功能的一个非常重要的小部件是菜单栏(Menu Bar)。菜单栏始终显示在窗口顶部,并具有3个主要部分:
- 菜单栏:主菜单功能区
- 菜单:下拉菜单“子菜单”
- 菜单项:可以运行回调的项目(基本上是可选的)
菜单栏从右到左添加项。菜单从上到下添加项。菜单可以根据需要嵌套。任何小部件都可以添加到菜单中。
from dearpygui.core import *
from dearpygui.simple import *


def print_me(sender, data):
    log_debug(f"Menu Item: {sender}")


show_logger()

with window("Tutorial"):
    with menu_bar("Main Menu Bar"):
        with menu("File"):
            add_menu_item("Save", callback=print_me)
            add_menu_item("Save As", callback=print_me)

            with menu("Settings"):
                add_menu_item("Setting 1", callback=print_me)
                add_menu_item("Setting 2", callback=print_me)

        add_menu_item("Help", callback=print_me)

        with menu("Widget Items"):
            add_checkbox("Pick Me", callback=print_me)
            add_button("Press Me", callback=print_me)
            add_color_picker4("Color Me", callback=print_me)

start_dearpygui()
11 文件和目录选择器对话框
通过调用 select_directory_dialog 使用目录对话框,必须为其提供 return 回调。return 回调的 data 参数将用目录路径和文件夹路径作为字符串列表填充。
通常,目录对话框由另一个小部件(例如按钮)调用,因此示例中将采用这种方式。
from dearpygui.core import *
from dearpygui.simple import *


def directory_picker(sender, data):
    select_directory_dialog(callback=apply_selected_directory)


def apply_selected_directory(sender, data):
    log_debug(data)  # so we can see what is inside of data
    directory = data[0]
    folder = data[1]
    set_value("directory", directory)
    set_value("folder", folder)
    set_value("folder_path", f"{directory}\\{folder}")


show_logger()

with window("Tutorial"):
    add_button("Directory Selector", callback=directory_picker)
    add_text("Directory Path: ")
    add_same_line()
    add_label_text("##dir", source="directory", color=[255, 0, 0])
    add_text("Folder: ")
    add_same_line()
    add_label_text("##folder", source="folder", color=[255, 0, 0])
    add_text("Folder Path: ")
    add_same_line()
    add_label_text("##folderpath", source="folder_path", color=[255, 0, 0])

start_dearpygui()
通过调用 open_file_dialog 使用文件对话框,必须为其提供 return 回调。return 回调的 data 参数将用目录路径和文件路径填充为字符串列表。扩展名是文件对话框的可选关键字,它将提供选择以根据其扩展名过滤对话框中显示的文件。
通常,文件对话框是由另一个小部件(例如按钮)调用的,因此示例中将采用这种方式。
from dearpygui.core import *
from dearpygui.simple import *

def file_picker(sender, data):
    open_file_dialog(callback=apply_selected_file, extensions=".*,.py")


def apply_selected_file(sender, data):
    log_debug(data)  # so we can see what is inside of data
    directory = data[0]
    file = data[1]
    set_value("directory", directory)
    set_value("file", file)
    set_value("file_path", f"{directory}\\{file}")

show_logger()

with window("Tutorial"):
    add_button("Directory Selector", callback=file_picker)
    add_text("Directory Path: ")
    add_same_line()
    add_label_text("##filedir", source="directory", color=[255, 0, 0])
    add_text("File: ")
    add_same_line()
    add_label_text("##file", source="file", color=[255, 0, 0])
    add_text("File Path: ")
    add_same_line()
    add_label_text("##filepath", source="file_path", color=[255, 0, 0])

start_dearpygui()
12 Plotting
Dear PyGui 具有 simple plots 和 plots,它们都具有动态能力。simple plots 将获取列表,并针对列表中的项目数绘制 y 轴数据。这些可以是折线图或直方图,如下所示。
from dearpygui.core import *
from dearpygui.simple import *

with window("Tutorial"):
    add_simple_plot("Simpleplot1", value=[0.3, 0.9, 0.5, 0.3], height=300)
    add_simple_plot("Simpleplot2", value=[0.3, 0.9, 2.5, 8.9], overlay="Overlaying", height=180, histogram=True)

start_dearpygui()
plots 比 simple plots 具有更多的功能。plots 同时使用 x 和y坐标。必须使用 add_plot 命令创建图,然后可以将数据作为线系列或散布系列添加。plots 的特点是:
- 单击并拖动:平移图
- 单击并拖动Axis:在一个方向上平移图
- 双击:将图缩放为数据
- 右键单击并拖动:缩放到某个区域
- 双击右键:打开设置
- Shift +右键单击并拖动:放大到填充当前轴的区域
- 滚动鼠标滚轮:缩放
- 在轴上滚动鼠标滚轮:仅缩放该轴
- 切换图例上的数据集以隐藏它们
另外,可以使用文本点将浮动文本放置在绘图上。
from dearpygui.core import *
from dearpygui.simple import *
from math import cos, sin


def plot_callback(sender, data):
    clear_plot("Plot")

    data1x = []
    data1y = []
    for i in range(0, 100):
        data1x.append(3.14 * i / 180)
        data1y.append(cos(3 * 3.14 * i / 180))

    data2x = []
    data2y = []
    for i in range(0, 100):
        data2x.append(3.14 * i / 180)
        data2y.append(sin(2 * 3.14 * i / 180))

    add_line_series("Plot", "Cos", data1x, data1y,
                    weight=2, color=[0, 0, 255, 100])
    add_shade_series("Plot", "Cos", data1x, data1y,
                     weight=2, fill=[255, 0, 0, 100])
    add_scatter_series("Plot", "Sin", data2x, data2y, outline=[0, 255, 0, 100])


with window("Tutorial"):
    add_button("Plot data", callback=plot_callback)
    add_plot("Plot", height=-1)

start_dearpygui()
通过使用 set_value 更改绘图调用的值,可以使 Simple plots 变得动态。如下所示。
from dearpygui.core import *
from dearpygui.simple import *
from math import sin

def on_render(sender, data):
    frame_count = get_data("frame_count")
    frame_count += 1
    add_data("frame_count", frame_count)
    plot_data = get_value("plot_data")
    if len(plot_data) > 100:
        plot_data.pop(0)
    plot_data.append(sin(frame_count/30))
    set_value("plot_data", plot_data)

with window("Tutorial"):
    add_simple_plot("Simple Plot", source="plot_data", minscale=-1.0, maxscale=1.0, height=300)
    add_data("frame_count", 0)
    set_render_callback(on_render)

start_dearpygui()
Plots 也可以是动态的。可以使用动态功能,就像清除图并使用回调(例如渲染或项目的回调)添加新数据一样容易。set_value。 如下所示。
from dearpygui.core import *
from dearpygui.simple import *
from math import cos

def plot_callback(sender, data):
    # keeping track of frames
    frame_count = get_data("frame_count")
    frame_count += 1
    add_data("frame_count", frame_count)

    # updating plot data
    plot_datax = get_data("plot_datax")
    plot_datay = get_data("plot_datay")
    if len(plot_datax) > 2000:
        frame_count = 0
        plot_datax.clear()
        plot_datay.clear()
    plot_datax.append(3.14 * frame_count / 180)
    plot_datay.append(cos(3 * 3.14 * frame_count / 180))
    add_data("plot_datax", plot_datax)
    add_data("plot_datay", plot_datay)

    # plotting new data
    clear_plot("Plot")
    add_line_series("Plot", "Cos", plot_datax, plot_datay, weight=2)

with window("Tutorial"):
    add_plot("Plot", height=-1)
    add_data("plot_datax", [])
    add_data("plot_datay", [])
    add_data("frame_count", 0)
    set_render_callback(plot_callback)

start_dearpygui()
13 Drawing/Canvas
Dear PyGui 有一个低级绘图 API,非常适合原始绘图,自定义小部件甚至动态绘图。通过调用 add_drawing 开始绘制,然后可以通过调用其各自的绘制命令来添加项目。画布的原点在左上方,y 轴指向下方。
from dearpygui.core import *
from dearpygui.simple import *

with window("Tutorial"):
    add_drawing("Drawing_1", width=300, height=300)

draw_line("Drawing_1", [10, 10], [100, 100], [255, 0, 0, 255], 1)
draw_text("Drawing_1", [0, 0], "Origin", color=[250, 250, 250, 255], size=15)
draw_arrow("Drawing_1", [50, 70], [100, 65], [0, 200, 255], 1, 10)

start_dearpygui()
Drawings 可以显示 PNG,JPEG 或 BMP类型的图像。使用 draw_image 绘制图像。使用关键字“pmin”和“pmax”,我们可以定义将图像绘制到画布上的矩形的左上和右下区域。图像将缩放以适合指定区域。使用关键字“uv_min”和“uv_max”,我们可以定义应在画布上绘制图像的哪个区域的标量。uv_min = [0,0] 和 uv_max = [1,1] 的默认值将显示整个图像,而 uv_min = [0,0] uv_max = [0.5,0.5] 的默认值仅显示图形的第一部分。
为了演示这些功能,您必须将目录更新为计算机上图像的目录,例如 SpriteMapExample.png。
from dearpygui.core import *
from dearpygui.simple import *

# please update the image directory argument with a path to an image on your computer for this example
with window("Tutorial"):
    add_drawing("Drawing_1", width=700, height=700)

draw_image("Drawing_1", 'SpriteMapExample.png', [0, 700], pmax=[200, 500], uv_min=[0, 0], uv_max=[1, 1], tag="image")
draw_image("Drawing_1", 'SpriteMapExample.png', [0, 600], pmax=[200, 300], uv_min=[0, 0], uv_max=[1, 1])
draw_image("Drawing_1", 'SpriteMapExample.png', [0, 500], pmax=[200, 100], uv_min=[0, 0], uv_max=[1, 1])
draw_image("Drawing_1", 'SpriteMapExample.png', [400, 600], pmax=[600, 400], uv_min=[0, 0], uv_max=[0.5, 0.5])
draw_image("Drawing_1", 'SpriteMapExample.png', [400, 400], pmax=[700, 50], uv_min=[0, 0], uv_max=[3.5, 2.5])

start_dearpygui()
尽管可以通过清除和重绘整个图来使图形动态化,但仍提供了一种更有效的方法。
为了使绘图动态,我们应该使用 tag 关键字标记要重绘的项目。然后,只需使用相同的标签调用绘制命令即可。这将仅删除该一项,并使用新命令将其重新绘制。
from dearpygui.core import *
from dearpygui.simple import *

def on_render(sender, data):
    counter = get_data("counter")
    counter += 1
    modifier = get_data("modifier")
    if counter < 300:
        modifier += 1
    elif counter < 600:
        modifier -= 1
    else:
        counter = 0
        modifier = 2

    xpos = 15 + modifier*1.25
    ypos = 15 + modifier*1.25
    color1 = 255 - modifier*.8
    color3 = 255 - modifier*.3
    color2 = 255 - modifier*.8
    radius = 15 + modifier/2
    segments = round(35-modifier/10)
    draw_circle("Drawing_1", [xpos, ypos], radius, [color1, color3, color2, 255], segments=segments, tag="circle##dynamic")
    add_data("counter", counter)
    add_data("modifier", modifier)

add_data("counter", 0)
add_data("modifier", 2)

with window("Tutorial"):
    add_drawing("Drawing_1", width=700, height=700)

set_render_callback(on_render)

start_dearpygui()

14 增量时间和内部时钟
Dear PyGui 有一个内置时钟,用于检查总运行时间 get_total_time,该时间以秒为单位返回总运行时间。同样使用命令 get_delta_time(),我们可以检查渲染帧之间的时间(以秒为单位)。
from dearpygui.core import *
from dearpygui.simple import *

def on_render(sender, data):
    delta_time = str(round(get_delta_time(), 4))
    total_time = str(round(get_total_time(), 4))
    set_value("delta_time", delta_time)
    set_value("total_time", total_time)

with window("Tutorial"):
    add_text("Total Time: ")
    add_same_line()
    add_label_text("##total_time_text", source="total_time")
    add_text("Delta Time: ")
    add_same_line()
    add_label_text("##delta_time_text", source="delta_time")

set_render_callback(callback=on_render)

start_dearpygui()
15 Sprites
使用带有 tags 的图形,get_delta_time 和回调在渲染时运行,我们可以创建一个精灵字符(sprite character)。对于此示例,我们需要从 GitHub 上的 examples 文件夹下载 SpriteMapExample.png 并将其放置在工作目录中的 Python 文件旁边。
通过调用 add_drawing 开始绘制,然后可以通过调用其各自的绘制命令来添加项目。画布的原点在左下方。
from dearpygui.core import *
from dearpygui.simple import *


def on_render(sender, data):
    delta_draw_time = get_data("delta_draw_time")
    draw_speed = get_value("Draw Pause")

    if delta_draw_time > draw_speed:
        if get_value("Fly Mode") == 0:
            if get_data("sprite1"):
                draw_image("Drawing_1", 'SpriteMapExample.png', top_left, pmax=bottom_right, uv_min=[.7690, 0],
                           uv_max=[.8074, .10], tag="sprite")
                add_data("sprite1", False)
            else:
                draw_image("Drawing_1", 'SpriteMapExample.png', top_left, pmax=bottom_right, uv_min=[.8074, 0],
                           uv_max=[.8461, .10], tag="sprite")
                add_data("sprite1", True)
        else:
            if get_data("sprite1"):
                draw_image("Drawing_1", 'SpriteMapExample.png', top_left, pmax=bottom_right, uv_min=[.8464, 0],
                           uv_max=[.8848, .10], tag="sprite")
                add_data("sprite1", False)
            else:
                draw_image("Drawing_1", 'SpriteMapExample.png', top_left, pmax=bottom_right, uv_min=[.8851, 0],
                           uv_max=[.9235, .10], tag="sprite")
                add_data("sprite1", True)
        add_data("delta_draw_time", 0)
    else:
        add_data("delta_draw_time", delta_draw_time + get_delta_time())


set_main_window_size(650, 800)

with window("Tutorial"):
    add_drawing("Drawing_1", width=500, height=500)
    top_left = [250, 250]
    bottom_right = [300, 300]
    draw_image("Drawing_1", 'SpriteMapExample.png', top_left,
               pmax=bottom_right, uv_min=[.7687, 0], uv_max=[1, .10], tag="sprite")
    add_text("Fly Mode:")
    add_radio_button("Fly Mode", items=["Disable", "Enable"], default_value=0)
    add_slider_float("Draw Pause", default_value=0.1, min_value=0.0, max_value=0.5,
                     tip="slows down draws by waiting until the elapsed time", format="%.4f")
    set_render_callback(on_render)
    add_data("delta_draw_time", 0.0)
    add_data("sprite1", True)

start_dearpygui()
16 Tables
Dear PyGui 有一个简单的表格 API,非常适合静态和动态表格。表小部件通过调用 add_table() 启动。要编辑表窗口小部件,我们可以使用方法 add_row(),add_column() 将行/列追加到表的最后一个插槽中。
或者,我们可以使用 insert_row insert_column 插入行/列。列和行根据其索引参数插入。如果指定的索引已经存在,则退出的列/行将被颠簸,新的行/列将被插入到指定的索引处。
默认情况下,添加或插入的行/列也将用空单元格填充未指定的单元格。
from dearpygui.core import *
from dearpygui.simple import *

with window("Tutorial"):
    add_table("Table Example", ["Header 0", "Header 1"])
    add_row("Table Example", ["row 0", "text"])
    add_row("Table Example", ["row 2", "text"])
    add_column("Table Example", "Header 3", ["data","data"])
    insert_row("Table Example", 1, ["row 1", "inserted row", "inserted row"])
    insert_column("Table Example", 2, "Header 2", ["inserted with column", "inserted column", "inserted column"])

start_dearpygui()
此外,标题和单元格可以重命名,其值也可以更改。
from dearpygui.core import *
from dearpygui.simple import *

def modify_tables(sender, data):
    log_debug(f"Table Called: {sender}")
    coord_list = get_table_selections("Table Example")
    log_debug(f"Selected Cells (coordinates): {coord_list}")
    for coordinates in coord_list:
        set_table_item("Table Example", coordinates[0], coordinates[1], "New Value")
    set_headers("Table Example", ["New Header 0", "New Header 1", "New Header 2"])


show_logger()

with window("Tutorial"):
    add_spacing(count=5)
    add_button("Modify Selected Table Values", callback=modify_tables)
    add_spacing(count=5)
    add_table("Table Example", ["Header 0", "Header 1"])
    add_row("Table Example", ["awesome row", "text"])
    add_row("Table Example", ["super unique", "unique text"])
    add_column("Table Example", "Header 2", ["text from column", "text from column"])
    add_row("Table Example", ["boring row"])

start_dearpygui()
表格单元是可选的。这意味着我们可以对表应用回调,并检索通过发送方选择的单元格,甚至获取单元格内的文本。
from dearpygui.core import *
from dearpygui.simple import *

def table_printer(sender, data):
    log_debug(f"Table Called: {sender}")
    coord_list = get_table_selections("Table Example")
    log_debug(f"Selected Cells (coordinates): {coord_list}")
    names = []
    for coordinates in coord_list:
        names.append(get_table_item("Table Example", coordinates[0], coordinates[1]))
    log_debug(names)


show_logger()

with window("Tutorial"):
    add_table("Table Example", ["Header 0", "Header 1"], callback=table_printer)
    add_row("Table Example", ["awesome row", "text"])
    add_row("Table Example", ["super unique", "unique text"])
    add_column("Table Example", "Header 3", ["text from column", "text from column"])
    add_row("Table Example", ["boring row"])

start_dearpygui()
17 Input Polling
Dear PyGui 中的 Input Polling 是通过在函数中调用所需的 polling 命令来完成的。该函数必须设置为 Windows 渲染回调,以便在该窗口处于活动状态时进行 polling。因为渲染回调在每帧都运行,所以如果执行指定的输入,Dear PyGui 可以在帧之间 polling。
所有 polling 的列表如下:
get_mouse_drag_delta()- get_mouse_pos()
- is_key_down()
- is_key_pressed()
- is_key_released()
- is_mouse_button_clicked()
- is_mouse_button_double_clicked()
- is_mouse_button_down()
- is_mouse_button_dragging()
- is_mouse_button_released()
- set_key_down_callback()
- set_key_press_callback()
- set_key_release_callback()
- set_mouse_click_callback()
- set_mouse_double_click_callback()
- set_mouse_down_callback()
- set_mouse_drag_callback()
- set_mouse_wheel_callback()
- set_render_callback()
- set_resize_callback()
有关特定命令的信息,请参阅 API Reference。
可以根据需要组合任意数量的轮询以实现所需的功能。
from dearpygui.core import *
from dearpygui.simple import *

def main_callback(sender, data):
    set_value("Mouse Position", str(get_mouse_pos()))
    set_value("A key Down", is_key_down(mvKey_A))
    set_value("A key Pressed", is_key_pressed(mvKey_A))
    set_value("A key Released", is_key_released(mvKey_A))
    set_value("Left Mouse Dragging", is_mouse_button_dragging(mvMouseButton_Left, 10))
    set_value("Left Mouse Clicked", is_mouse_button_clicked(mvMouseButton_Left))
    set_value("Left Mouse Double Clicked", is_mouse_button_double_clicked(mvMouseButton_Left))
    set_value("Shift + Left Mouse Clicked", is_key_down(mvKey_Shift) and is_mouse_button_clicked(mvMouseButton_Left))

with window("Tutorial"):
    add_label_text("A key Down", color=[0, 200, 255])
    add_label_text("A key Pressed", color=[0, 200, 255])
    add_label_text("A key Released", color=[0, 200, 255])
    add_spacing()
    add_label_text("Mouse Position", color=[0, 200, 255])
    add_label_text("Left Mouse Clicked", color=[0, 200, 255])
    add_label_text("Left Mouse Dragging", color=[0, 200, 255])
    add_label_text("Left Mouse Double Clicked", color=[0, 200, 255])
    add_label_text("Shift + Left Mouse Clicked", color=[0, 200, 255])

set_render_callback(main_callback)

start_dearpygui()
18 多线程和异步功能
对于需要较长时间的计算和回调,实现异步功能或在单独线程上运行的功能可能很有用。为此,只需调用 run_async_function。
重要的是要注意,用 async 命令运行的函数只能调用某些 Dear PyGui 命令(get_value,set_value,add_data,get_data)。
from dearpygui.core import *
from dearpygui.simple import *
from time import sleep

def long_async_callback(data, sender):
    run_async_function(long_callback, None)

def long_callback(sender, data):
    sleep(3)

show_logger()
show_metrics()

with window("Tutorial"):
    add_button("long function", callback=long_callback, tip="This will cause a 3 second freeze")
    add_button("long Asynchronous Function", callback=long_async_callback, tip="This will not freeze")

start_dearpygui()
异步函数无法访问 add_data 或 get_data。因此,当有必要将数据传递给异步函数时,必须使用数据并返回带有关键字的处理程序参数。通过“data”关键字将任何 Python 对象发送到该函数中,即可使其可以通过 async 函数访问。此外,可以通过指定的返回回调的“data”输入来访问 Async 函数返回的任何数据。
from dearpygui.core import *
from dearpygui.simple import *
from time import sleep

def long_async_preparer(data, sender):
    floaty = get_value("Async Input Data")
    run_async_function(long_callback, floaty, return_handler=long_async_return)

def long_callback(sender, data):
    sleep(3)
    return data * 2

def long_async_return(sender, data):
    log_debug(data)

def long_callback2(sender, data):
    sleep(3)
    log_debug(data * 2)

show_logger()

with window("Tutorial"):
    add_text("Input a number and see the logger window for the output of the long callback that would normally freeze the GUI")
    add_input_float("Async Input Data", default_value=1.0)
    add_button("long Function", callback=long_callback2, callback_data=get_value("Async Input Data"), tip="This is the long callback that will freeze the GUI")
    add_button("long Asynchronous Function", callback=long_async_preparer, tip="This will not freeze the GUI")

start_dearpygui()
当调用异步函数方法时,将创建一个线程池。可以配置的线程池的方面是线程数和超时时间。
使用 set_thread_count 我们可以设置线程池中的线程数。同样,我们可以使用 set_threadpool_high_performance 来告诉线程池最大化每个用户计算机的线程数。请注意,调用异步函数时,这将使 CPU 以 100% 的速度运行。
可以使用 set_threadpool_timeout 设置线程池的超时时间。在设定的时间后,这将破坏线程池并释放资源。
19 主题和风格
有关更完整的示例,请参见 show_demo。主题和窗口小部件样式可以应用于单个窗口小部件或整个应用程序。可以设置的样式属性的一些示例是:
- 字体大小
- 应用配色方案
- 圆角圆度
请参见以下示例:
from dearpygui.core import *
from dearpygui.simple import *

def apply_text_multiplier(sender, data):
    font_multiplier = get_value("Font Size Multiplier")
    set_global_font_scale(font_multiplier)

def apply_theme(sender, data):
    theme = get_value("Themes")
    set_theme(theme)

themes = ["Dark", "Light", "Classic", "Dark 2", "Grey", "Dark Grey", "Cherry", "Purple", "Gold", "Red"]

with window("Tutorial"):
    add_combo("Themes", items=themes, default_value="Dark", callback=apply_theme)

    add_slider_float("Font Size Multiplier", default_value=1.0, min_value=0.0, max_value=2.0,
                     callback=apply_text_multiplier)

start_dearpygui()
20 与其他框架集成
如果你对这款框架现有的功能还不满足。那么,它集成了其他 Python GUI 框架,你可以把它与其他框架结合在一起使用,例如:
from dearpygui.dearpygui import *
from tkinter import Tk, Label, Button

# tkinter
root = Tk()
root.title("A simple GUI")
root.button = Button(root, text="Press me")
root.button.pack()

# DearPyGui
add_slider_float("Slider")
add_button("Get Value", callback="button_callback")

setup_dearpygui()
whileTrue:
    render_dearpygui_frame()
    root.update()

cleanup_dearpygui()
在这个示例中,就把DearPyGui与tkinter结合在一起进行GUI开发。
总结
DearPyGui 是一款简单、开放、灵活的Python GUI框架,无论你是专业的开发人员,或者是满足日常工作的轻度使用用户,DearPyGui 都可以让你围绕它开发并构建一款简单、提升效率的系统。目前这款框架刚开源不久,但是,我个人认为非常值得尝试一下这款框架。