Vue-Router路由模式的选择和底层原理
1.路由类型
- Hash模式:丑,无法使用锚点定位。
- History模式:需要后端配合,IE9不兼容(可使用强制刷新处理IE9不兼容)
即可以根据两种模式的特点来进行路由选择。比如:当你的页面需要很多锚点进行定位时< a href="#new_paper" />,点击改链接跳转到页面的新闻部分,那么Hash模式是无法实现的,因为它自身带了#。
2.底层原理
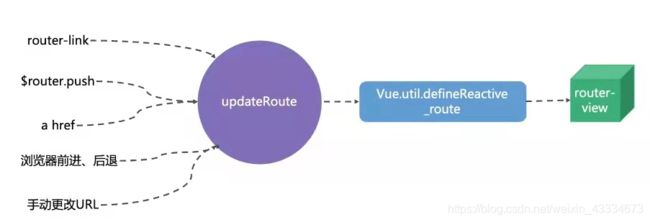
如果我们去看Vue-Router的底层代码可能会优点晦涩难懂,下面总结一下底层原理,有哪些方式可以触发路由的更新呢?下面这张图一目了然:
理解:
Vue.util.defineReactive_route这个工具库把路由的信息变成了响应式数据,而defineReactive()内部就是调用了Object.defineProperty()和依赖收集实现了路由信息的响应式,而Vue的data也是通过这种方式实现响应式。- 图中左边五种方式都会触发调用
updateRoute这个API,这个API的功能是修改路由中的响应式数据,当响应式数据被改变后就会自动触发router-view的更新,router-view会根据url和路由匹配规则进行相应组件的展示。
3.源码拓展
先来学习Vue-router的install()
3.1.1 $router和$route是如何挂载到this上的?
  Object.defineProperty(Vue.prototype, '$router', {

    get () {
      return this._routerRoot._router }   //this._routerRoot === this
  })

  Object.defineProperty(Vue.prototype, '$route', {

    get () {
      return this._routerRoot._route }   //this._routerRoot === this
  })
在vue-router的install方法中调用Object.defineProperty进行数据劫持,将$router、$route挂载到Vue的原型上。
注意:this._routerRoot其实就是Vue实例this,看下面源码,this._routerRoot指向了this
Vue.mixin({

    beforeCreate () {

      if (isDef(this.$options.router)) {

        this._routerRoot = this
        this._router = this.$options.router
        this._router.init(this)
        Vue.util.defineReactive(this, '_route', this._router.history.current)
      } else {

        this._routerRoot = (this.$parent && this.$parent._routerRoot) || this
      }
      registerInstance(this, this)
    },
    destroyed () {

      registerInstance(this)
    }
  })
为什么$route可以一直指向当前激活的路由呢?
这归功于上面代码段的:
Vue.util.defineReactive(this, '_route', this._router.history.current)
this._router.history.current即表示当前路由组件。只要监听到current的变化,就会触发_route的setter,即通知更新$route。
defineReactive源码:(数据劫持+收集依赖)
function defineReactive$$1 (
    obj,
    key,
    val,
    customSetter,
    shallow
  ) {

	//依赖收集者
    var dep = new Dep();

    var property = Object.getOwnPropertyDescriptor(obj, key);
    if (property && property.configurable === false) {

      //如果obj是不可配置的,就不用设置为响应式数据,直接return
      return
    }

    // cater for pre-defined getter/setters
    var getter = property && property.get;
    var setter = property && property.set;
    if ((!getter || setter) && arguments.length === 2) {

      val = obj[key];
    }

    var childOb = !shallow && observe(val);
	//双向绑定
    Object.defineProperty(obj, key, {

      enumerable: true,
      configurable: true,
      get: function reactiveGetter () {

        var value = getter ? getter.call(obj) : val;
        if (Dep.target) {

		  //进行依赖收集
          dep.depend();
		  /*采用依赖收集的原因:*/
          //1.data里面的数据并不是所有地方都要用到
          //2.如果我们直接更新整个视图,会造成资源浪费
		  //3.将依赖于某个变量的组件收集起来
          if (childOb) {

            childOb.dep.depend();
            if (Array.isArray(value)) {

              dependArray(value);
            }
          }
        }
        return value
      },
      set: function reactiveSetter (newVal) {

        var value = getter ? getter.call(obj) : val;
        /* eslint-disable no-self-compare */
        if (newVal === value || (newVal !== newVal && value !== value)) {

          return
        }
        /* eslint-enable no-self-compare */
        if (customSetter) {

          customSetter();
        }
        // #7981: for accessor properties without setter
        if (getter && !setter) {
      return }
        if (setter) {

          setter.call(obj, newVal);
        } else {

          val = newVal;
        }
        childOb = !shallow && observe(newVal);
        //触发依赖的组件产生更新
		dep.notify();
      }
    });
  }
3.1.2 router-view和router-link组件的注册
  import View from './components/view'
  import Link from './components/link'

  Vue.component('RouterView', View)
  Vue.component('RouterLink', Link)
使用Vue.component()对组件进行全局注册。
如果有兴趣更加深入了解源码的同学可以在github上搜索vue-router,学着尝试弄懂源码。
