概述
Mybatis是一种半自动化的ORM(Object Relational Mapping)框架,基于JDBC的实现。首先,非常推荐大家先看一下官方使用文档(有中文选择):
http://www.mybatis.org/mybatis-3/zh/index.html
该文档包含了所有Mybatis的使用方面的配置说明,大家在使用的时候如果不懂一些配置或参数是什么意思,都可以在这里进行查询。
Mybatis了解
Mybatis使用简单的XML配置或者注解将mapper接口与要执行的sql语句进行绑定,绑定完成之后映射成最终要执行的sql语句,执行完sql语句后,为我们自动实现数据库记录与Java实体对象之间的映射。
通过打印日志我们也可以看到Mybatis打印了全是sql语句,这是因为Mybatis是完全基于JDBC,并且几乎完全消除了JDBC中对参数的手工设置及对结果集的检索。
Mybatis的各种映射关系是通过SqlSession来实现的,顾名思义,就是sql的session会话,在该会话生命周期内,实现对数据库的各种操作。
在Mybatis中,我们可以编写非常灵活的sql,基于Druid或这种类似的监控管理,我们可以很方便的找到需要优化的sql,从而让sql语句完全控制在我们的手中。但正是由于Mybatis的工作方式,所以有可能会有特别多的sql语句,这偶尔也会成为开发者们头疼的问题。
Mybatis实现详解
了解了大概的流程之后,我们来看一下大概的配置说明,本文不会深入研究,只是讲一下Mybatis的各种配置的含义,具体与源码的结合将会在下一篇中逐渐开始讲解。
SqlSession
从上面可以知道,Mybatis与数据库打交道全是通过SqlSession来实现的,而SqlSession什么时候创建,又是如何创建的呢。
- 通过我们上篇文章中的例子,我们可以看到,没有通过Spring的情况下,使用SqlSession的大致流程如下:
- 读取Mybatis的全局配置文件;
- 通过SqlSessionFactoryBuilder构建SqlSessionFactory工厂,然后通过SqlSessionFactory创建SqlSession会话;
- 然后通过SqlSession进行数据库的各种操作;
- 执行完成,关闭sqlSession;
- SqlSessionFactoryBuilder目的就是用于创建SqlSessionFactory,他的生命周期很短,就是在初始化的时候才有用。
接下来,我们通过单独配置mybatis和与spring集成mybatis这两种方式来学习一下mybatis的使用。
注:本系列Mybatis代码版本全是基于Mybatis3.4,Spring版本是4,开发工具是idea2017,druid是1.0.20,Junit是4,项目使用maven管理。
Mybatis+Maven管理
1. 表结构:
-- 只有一张简单的表Student,有三个字段,id,name,age
DROP TABLE IF EXISTS `student`;
CREATE TABLE `student` (
  `id` int(10) NOT NULL,
  `name` varchar(32) DEFAULT NULL,
  `age` int(3) DEFAULT NULL,
  PRIMARY KEY (`id`)
) ENGINE=InnoDB DEFAULT CHARSET=utf8;
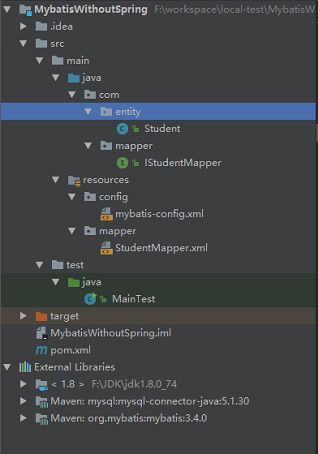
2. 工程目录:
3. pom.xml:只需要引入我们必需的mybatis包和mysql驱动包
        3.4.0


            org.mybatis
            mybatis
            ${mybatis.version}


            mysql
            mysql-connector-java
            5.1.30
Student.java和IStudentMapper.java:
package com.entity;

/**
 * Student实体
 *
 * @author zhangwugui
 * @since 2018/1/24 17:22
 */
public class Student {
    private Integer id;
    private String name;
    private Integer age;
    // get,set省略
    @Override
    public String toString() {
        return "Student{" +
                "id=" + id +
                ", name='" + name + '\'' +
                ", age=" + age +
                '}';
    }
}

//IStudentMapper
package com.mapper;

import com.entity.Student;

import java.util.List;

/**
 * TODO
 *
 * @author zhangwugui
 * @since 2018/1/24 17:28
 */
public interface IStudentMapper {
    List getAll();

    int save(Student article);

    Student update(Student article);

    int delete(int id);

    Student findStudentById(int id);
}
StudentMapper.xml
INSERT INTO Student (id, name, age) VALUES (
#{id}, #{name}, #{age}
)
UPDATE Student SET
name = #{name},
age = #{age}
WHERE id = #{id}
DELETE FROM Student
WHERE id = #{id}
mybatis-config.xml
以下是测试类:
import com.entity.Student;
import com.mapper.IStudentMapper;
import org.apache.ibatis.io.Resources;
import org.apache.ibatis.session.SqlSession;
import org.apache.ibatis.session.SqlSessionFactory;
import org.apache.ibatis.session.SqlSessionFactoryBuilder;

import java.io.IOException;
import java.io.InputStream;
import java.util.List;

/**
 * test
 *
 * @author zhangwugui
 * @since 2018/1/25 15:14
 */
public class MainTest {
    public static void main(String[] args) {
        String resource = "config/mybatis-config.xml";
        InputStream inputStream;
        SqlSession session = null;
        try {
            inputStream = Resources.getResourceAsStream(resource);
            // 构建sqlSession工厂
            SqlSessionFactory sqlSessionFactory = new SqlSessionFactoryBuilder().build(inputStream);
            // 获取sqlSession
            session = sqlSessionFactory.openSession();
            // 方法1
            String statement = "com.mapper.IStudentMapper.getAll";
            List student = session.selectList(statement);
            System.out.println(student);

            // 方法2
            IStudentMapper sessionMapper = session.getMapper(IStudentMapper.class);
            List list = sessionMapper.getAll();
            System.out.println(list);

        } catch (IOException e) {
            e.printStackTrace();
        } finally {
            session.close();
        }
    }
}
就这么简单,mybatis就配置完成了,启动main方法我们就可以进行测试了,运行一下,我们看下结果:
[Student{id=1, name='test', age=12}]
[Student{id=1, name='test', age=12}]
我们可以看下,其实配置Mybatis是特别简单的。同样,使用Mybatis进行开发也是很简单的。
下面我们来看mybatis结合spring的使用,并且使用Junit来进行测试,使用log4j来打印日志。
Spring+Mybatis+Druid+Junit
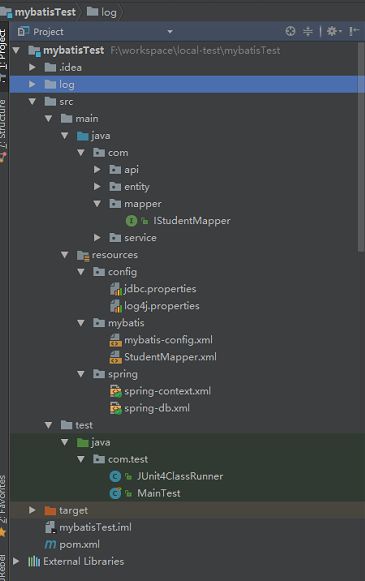
1. 表结构还是Student,我们先看下工程目录
2. pom文件:spring的包太多,这里为了避免代码太多,没有引入,大家统一引入即可
        org.mybatis
        mybatis
        ${mybatis.version}


        org.mybatis
        mybatis-spring
        1.3.0


        mysql
        mysql-connector-java
        5.1.30


        com.alibaba
        druid
        1.0.20


        junit
        junit
        4.11
        test


        javax.servlet
        jstl
        1.2


        javax.servlet
        servlet-api
        2.5


        javax.servlet.jsp
        jsp-api
        2.1


        javax.servlet
        jstl
        1.2


        org.slf4j
        slf4j-log4j12
        1.7.5
        provided


        log4j
        log4j
        1.2.14
        provided


        taglibs
        standard
        1.1.2
2. Student实体类不变,而IStudentMapper只需要添加一个注解即可。
@Repository
public interface IStudentMapper {
    List getAll();
    ...
}
3. IStudentApi.java接口和StudentServiceImpl.java实现类
public interface IStudentApi {
    List getAll();

    int save(Student article);

    Student update(Student article);

    int delete(int id);

    Student findStudentById(int id);
}
@Service
public class StudentServiceImpl implements IStudentApi{

    @Autowired
    private IStudentMapper iStudentMapper;

    @Override
    public List getAll() {
        return iStudentMapper.getAll();
    }

    @Override
    public int save(Student student) {
        return iStudentMapper.save(student);
    }

    @Override
    public Student update(Student student) {
        return iStudentMapper.update(student);
    }

    @Override
    public int delete(int id) {
        return iStudentMapper.delete(id);
    }

    @Override
    public Student findStudentById(int id) {
        return iStudentMapper.findStudentById(id);
    }
}
3. StudentMapper.xml不变,mybatis-config.xml如下
4. jdbc.properties和log4j.properties
jdbc.driver=com.mysql.jdbc.Driver
jdbc.url=jdbc:mysql://localhost:3306/my_test?useUnicode=true&characterEncoding=utf8&autoReconnect=true&rewriteBatchedStatements=TRUE
jdbc.username=root
jdbc.password=123456
### Log4j配置 ###
#定义log4j的输出级别和输出目的地(目的地可以自定义名称,和后面的对应)
#[ level ] , appenderName1 , appenderName2
log4j.rootLogger=DEBUG,console,file

#-----------------------------------#
#1 定义日志输出目的地为控制台
log4j.appender.console = org.apache.log4j.ConsoleAppender
log4j.appender.console.Target = System.out
log4j.appender.console.Threshold=DEBUG
####可以灵活地指定日志输出格式,下面一行是指定具体的格式 ###
#%c: 输出日志信息所属的类目,通常就是所在类的全名
#%m: 输出代码中指定的消息,产生的日志具体信息
#%n: 输出一个回车换行符,Windows平台为"/r/n",Unix平台为"/n"输出日志信息换行
log4j.appender.console.layout = org.apache.log4j.PatternLayout
log4j.appender.console.layout.ConversionPattern=[%c]-%m%n

#-----------------------------------#
#2 文件大小到达指定尺寸的时候产生一个新的文件
log4j.appender.file = org.apache.log4j.RollingFileAppender
#日志文件输出目录
log4j.appender.file.File=log/tibet.log
#定义文件最大大小
log4j.appender.file.MaxFileSize=10mb
###输出日志信息###
#最低级别
log4j.appender.file.Threshold=ERROR
log4j.appender.file.layout=org.apache.log4j.PatternLayout
log4j.appender.file.layout.ConversionPattern=[%p][%d{yy-MM-dd}][%c]%m%n

#-----------------------------------#
#3 druid
log4j.logger.druid.sql=INFO
log4j.logger.druid.sql.DataSource=info
log4j.logger.druid.sql.Connection=info
log4j.logger.druid.sql.Statement=info
log4j.logger.druid.sql.ResultSet=info

#4 mybatis 显示SQL语句部分
log4j.logger.org.mybatis.example=DEBUG
5. spring-context.xml和spring-db.xml
6. JUnit4ClassRunner.java和MainTest.java
package com.test;

import org.junit.runners.model.InitializationError;
import org.springframework.test.context.junit4.SpringJUnit4ClassRunner;
import org.springframework.util.Log4jConfigurer;

import java.io.FileNotFoundException;

/**
 * TODO
 *
 * @author zhangwugui
 * @since 2018/1/24 21:06
 */
public class JUnit4ClassRunner extends SpringJUnit4ClassRunner {
    static {
        try {
            Log4jConfigurer.initLogging("classpath:config/log4j.properties");
        } catch (FileNotFoundException ex) {
            System.err.println("Cannot Initialize log4j");
        }
    }
    public JUnit4ClassRunner(Class clazz) throws InitializationError {
        super(clazz);
    }
}
package com.test;

import com.api.IStudentApi;
import com.entity.Student;
import org.junit.Test;
import org.junit.runner.RunWith;
import org.slf4j.Logger;
import org.slf4j.LoggerFactory;
import org.springframework.beans.factory.annotation.Autowired;
import org.springframework.test.context.ContextConfiguration;

import java.util.List;

/**
 * 单元测试
 *
 * @author zhangwugui
 * @since 2018/1/24 18:17
 */
@RunWith(JUnit4ClassRunner.class)
@ContextConfiguration(locations = {"classpath:spring/spring-context.xml"})
public class MainTest  {
    private static final Logger logger = LoggerFactory.getLogger(MainTest.class);

    @Autowired
    private IStudentApi iStudentApi;

    @Test
    public void testGetAll() {
        logger.info("查询全部:=====");
        List list = iStudentApi.getAll();
        logger.info("结果是:======" + list.toString());
    }
}
运行单元测试,查看运行结果:
[com.test.MainTest]-查询全部:=====
[org.mybatis.spring.SqlSessionUtils]-Creating a new SqlSession
[org.mybatis.spring.SqlSessionUtils]-SqlSession [org.apache.ibatis.session.defaults.DefaultSqlSession@47406941] was not registered for synchronization because synchronization is not active
[org.springframework.jdbc.datasource.DataSourceUtils]-Fetching JDBC Connection from DataSource
[org.mybatis.spring.transaction.SpringManagedTransaction]-JDBC Connection [com.alibaba.druid.proxy.jdbc.ConnectionProxyImpl@6de6faa6] will not be managed by Spring
[com.mapper.IStudentMapper.getAll]-==>  Preparing: SELECT * FROM Student
[com.mapper.IStudentMapper.getAll]-==> Parameters:
[com.mapper.IStudentMapper.getAll]-<==      Total: 1
[com.alibaba.druid.pool.PreparedStatementPool]-{conn-10010, pstmt-20010} enter cache
[org.mybatis.spring.SqlSessionUtils]-Closing non transactional SqlSession [org.apache.ibatis.session.defaults.DefaultSqlSession@47406941]
[org.springframework.jdbc.datasource.DataSourceUtils]-Returning JDBC Connection to DataSource
[com.test.MainTest]-结果是:======[Student{id=1, name='test', age=12}]
[org.springframework.test.context.support.DirtiesContextTestExecutionListener]-After test method: context [DefaultTestContext@4678c730 testClass = MainTest, testInstance = com.test.MainTest@6767c1fc, testMethod = testGetAll@MainTest, testException = [null], mergedContextConfiguration = [MergedContextConfiguration@29ee9faa testClass = MainTest, locations = '{classpath:spring/spring-context.xml}', classes = '{}', contextInitializerClasses = '[]', activeProfiles = '{}', propertySourceLocations = '{}', propertySourceProperties = '{}', contextLoader = 'org.springframework.test.context.support.DelegatingSmartContextLoader', parent = [null]]], class dirties context [false], class mode [null], method dirties context [false].
到此,我们基于Spring+Mybatis+Druid+Junit的配置正式结束了。通过这些简单的配置,我们可以大致了解spring与Mybatis的运行方式。其中,遇到了一个问题,就是Junit单元测试不打印日志的问题,该问题解决方式参考:
Junit单元测试使用log4j输出日志
下篇文章,我们将开始从源码的角度去分析Mybatis的流程。

