电商平台 lnmp 架构之 nginx mysql php 的部署(1)
电商平台 lnmp 之 nginx mysql php 部署(1)
-
- 1. nginx 部署
- 2. mysql 的部署
- 3. php 部署
1. nginx 部署
在 nginx 官网下载 nginx 的源码包;此处我们选择的是稳定版 nginx-1.18.0.tar.gz ;
- 解压
[root@server1 ~]# ls
nginx-1.18.0.tar.gz
[root@server1 ~]# tar zxf nginx-1.18.0.tar.gz 	##解压
[root@server1 ~]# ls
nginx-1.18.0  nginx-1.18.0.tar.gz
[root@server1 ~]# cd nginx-1.18.0
[root@server1 nginx-1.18.0]# ls
##解压之后,如果看到里面有 configure 脚本,
表示是 gmake,gmake:GNU组织的 make,是开源的;
cmake:商业化 ##
auto     CHANGES.ru  configure  html     man     src
CHANGES  conf        contrib    LICENSE  README
- 编译
在编译前,可以在源码包中输入./configure - - help来获得编译帮助;帮助里的 - -without代表默认有的选项,如果在脚本后加上这个参数,代表把它去掉,- -with代表没有激活的功能。

输入命令 ./configure --prefix=/usr/local/nginx --with-http_ssl_module --with http_stub_status_module来开始编译;
其中--prefix=/usr/local/nginx表示自定义安装目录, -- with-XXX_ module选项表示指明安装对应的模块,--without-XXX_ module选项表示指明不安装对应的模块;
注意:如果在配置的时候不设定安装路径,默认情况下会自动安装到/usr/local/目录下,将相关信息分布在该目录下的其他目录中;为了方便查找与使用,我们可以在配置的时候自定义路径/usr/local/nginx。
开始编译之后会提示一些出现的问题,缺少依赖性软件;只需根据提示依次安装即可;
1)yum install -y gcc安装 gcc ,解压后的源码 nginx 是C语言,源码编译就需要安装 gcc;
安装完成之后再次编译: ./configure --prefix=/usr/local/nginx --with-http_ssl_module --with http_stub_status_module
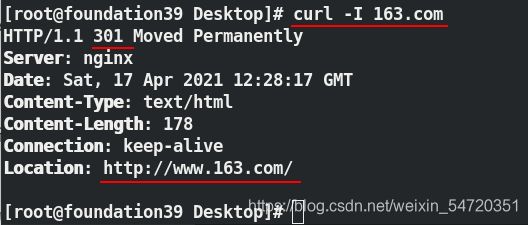
2)PCRE library不符合要求,这个库用于网站的重写,重定向;
比如:curl -I 163.com,在访问域名时,重定向到www上;
根据错误,安装 yum install -y pcre-develpcre-devel库文件,在Redhat 里,所有的开发库文件都是以-devel结尾;
安装完成之后再次编译: ./configure --prefix=/usr/local/nginx --with-http_ssl_module --with http_stub_status_module
3) http状态监控需要Openssl library的支持,在Linux上都是用openssl来做加密的;

根据错误, yum install openssl-devel -y安装openssl-devel库;
安装完成之后再次编译: ./configure --prefix=/usr/local/nginx --with-http_ssl_module --with http_stub_status_module
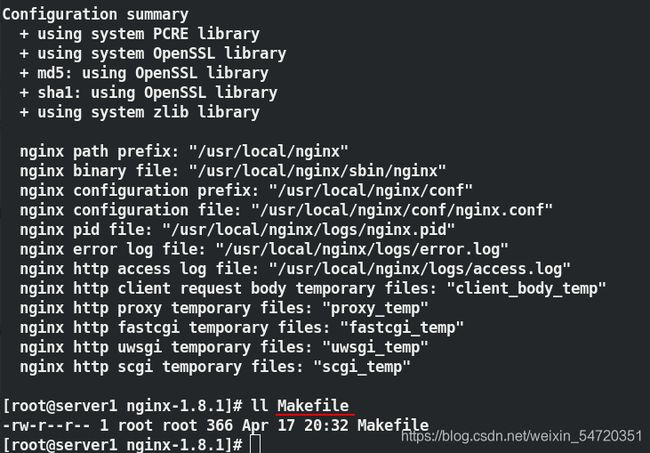
没有报错完成之后,configure命令是为了在当前环境生成 Makefile文件;
configure 配置的所有参数,最终都会写入/nginx-1.18.0/Makefile文件中;
4) make
接下的 make ,是按照 Makefile 文件来进行编译,编译完成之后会在当前目录生成符合当前系统的二进制程序;
注: make进行编译。编译后如果出现问题,可以使用make clean将编译参数清空然后重新编译。
5) make install
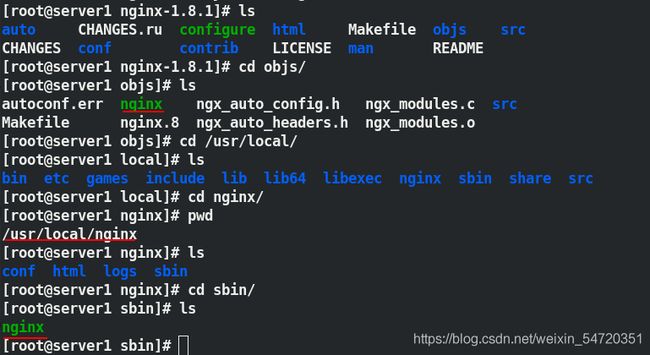
然后 make install,编译好的程序会在/nginx-1.18.0/objs/nginx 中,同时会拷贝到刚才指定的位置 /usr/local/nginx/sbin 中 ;
6) 安装完成后,进入/usr/local/nginx/目录下的sbin里面存放的是nginx,在该目录下输入./nginx即可启动:
/usr/local/nginx/ 目录下各个文件的含义:
conf:存放nginx的配置文件;
html:是默认提供的web服务的根目录;
logs:是nginx日志的存放目录;
sbin:存放nginx的二进制文件,可以使用nginx二进制文件启动nginx.
- 优化二进制程序
这个二进制程序有点大,要进行优化,把bug去掉
此处可以删除之前的 nginx 的目录,关闭 debug 然后再次 configure 、make 、 make install,也可以执行 make clean 命令,清理编译的内容。
此处有源码包存在,直接删除之前的解压后的包,再次编译即可。
关闭debug
[root@server1 nginx-1.18.0]# cd
[root@server1 ~]# ls
nginx-1.18.0  nginx-1.18.0.tar.gz
[root@server1 nginx-1.18.0]# vim auto/cc/gcc
# debug
#CFLAGS="$CFLAGS -g"
如图所示:
然后重新make make install;
再次编译完成之后,查看大小:
- nginx 的启动脚本
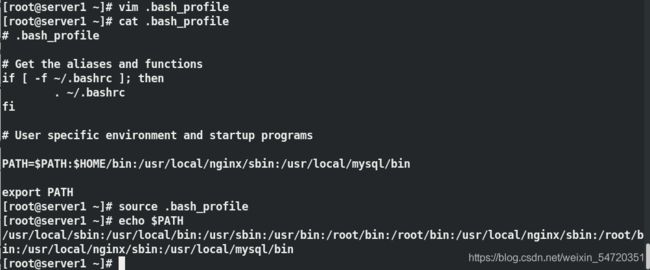
nginx 二进制程序编译完成之后默认在 /usr/local/nginx/sbin下,如果要启动 nginx ,就要甬道绝对路径的方式来启动或者进入到该目录中执行该脚本,就显得很麻烦;可以将其写在系统的PATH环境里面;

添加完环境变量之后,输入命令 source .bash_profile来让其生效;
然后就可以直接执行 nginx 来启动 nginx;启动之后,可以来查看 nginx 的进程状态。

输入命令netstat -antlp来查看端口信息,nginx 的80 端口是我们所需要的;
注:此处要安装yum install net-tools -y端口查询工具。
测试
输入命令curl localhost本地测试;

也可以网页访问 172.25.25.1该 IP 为安装 nginx 的主机 ip 。
- 目录介绍
nginx 的默认发布目录在/usr/local/nginx/html下;
可以通过人为方式来更改默认发布的内容,编辑文件,更改发布内容;

查看测试效果,访问测试文件172.25.25.1/tes/html,效果如下所示:
- nginx 的常用命令
[root@server1 ~]# nginx 					##开启
[root@server1 ~]# nginx -s reload		##重载
[root@server1 ~]# nginx -s stop			##关闭
注: 一旦开启就不要再次重复开启,否则会报如下的错误。
2. mysql 的部署
在mysql 官网 https://www.mysql.com/downloads/ 下载官方社区版本源码包的,要带有 boost ,此处安装 mysql-5.7.31 的版本;
- 解压
[root@server1 ~]# ls
mysql-5.7.31               nginx-1.18.0
mysql-boost-5.7.31.tar.gz  nginx-1.18.0.tar.gz
[root@server1 ~]# cd mysql-5.7.31/
[root@server1 mysql-5.7.31]# ls
boost           configure.cmake      libbinlogevents      mysql-test  regex             support-files
BUILD           dbug                 libbinlogstandalone  mysys       scripts           testclients
client          Docs                 libmysql             mysys_ssl   source_downloads  unittest
cmake           Doxyfile-perfschema  libmysqld            packaging   sql               VERSION
CMakeLists.txt  extra                libservices          plugin      sql-common        vio
cmd-line-utils  include              LICENSE              rapid       storage           win
config.h.cmake  INSTALL              man                  README      strings           zlib
- 源码编译
在解压之后生成的目录中可以看到,mysql 与 nginx 不同,没有configure;因为MySQL属于Oracle公司的产品,使用的是cmake;
编译时,一定要在源码目录的顶级路径里面。
[root@server1 mysql-5.7.31]# cd boost/
[root@server1 boost]# ls
boost_1_59_0
[root@server1 boost]# cd boost_1_59_0/
[root@server1 boost_1_59_0]# ls
boost
[root@server1 boost_1_59_0]# pwd
/root/mysql-5.7.31/boost/boost_1_59_0				##boost 路径
[root@server1 mysql-5.7.31]# yum install cmake -y
## 由于mysql 安装需要用到 cmake 所以要先下载
[root@server1 mysql-5.7.31]# cmake \
-DCMAKE_INSTALL_PREFIX=/usr/local/mysql \			##安装目录
-DMYSQL_DATADIR=/usr/local/mysql/data \				##数据库存放目录
-DMYSQL_UNIX_ADDR=/usr/local/mysql/data/mysql.sock \##Unix socket 文件路径
-DWITH_INNOBASE_STORAGE_ENGINE=1 \					##安装 innodb 存储引擎
-DDEFAULT_CHARSET=utf8 \							##使用 utf8 字符
-DDEFAULT_COLLATION=utf8_general_ci \				##校验字符
-DEXTRA_CHARSETS=all	\							##安装所有扩展字符集
-DWITH_BOOST=/root/mysql-5.7.31/boost/boost_1_59_0	##制定 boost 路径
输入命令 cmake -DCMAKE_INSTALL_PREFIX=/usr/local/mysql -DMYSQL_DATADIR=/usr/local/mysql/data -DMYSQL_UNIX_ADDR=/usr/local/mysql/data/mysql.sock -DWITH_INNOBASE_STORAGE_ENGINE=1 -DDEFAULT_CHARSET=utf8 -DDEFAULT_COLLATION=utf8_general_ci -DEXTRA_CHARSETS=all -DWITH_BOOST=/root/mysql-5.7.31/boost/boost_1_59_0开始编译,在编译的过程中会出现一些依赖性需要解决,依次安装需要的包即可;
第一次出现的问题:
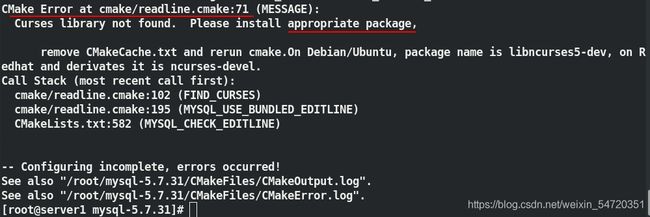
根据错误, yum install ncurses-devel -y安装ncurses-devel库;
然后再次编译: cmake -DCMAKE_INSTALL_PREFIX=/usr/local/mysql -DMYSQL_DATADIR=/usr/local/mysql/data -DMYSQL_UNIX_ADDR=/usr/local/mysql/data/mysql.sock -DWITH_INNOBASE_STORAGE_ENGINE=1 -DDEFAULT_CHARSET=utf8 -DDEFAULT_COLLATION=utf8_general_ci -DEXTRA_CHARSETS=all -DWITH_BOOST=/root/mysql-5.7.31/boost/boost_1_59_0
根据提示删除缓存:rm -fr CMakeCache.txt;
然后再次编译: cmake -DCMAKE_INSTALL_PREFIX=/usr/local/mysql -DMYSQL_DATADIR=/usr/local/mysql/data -DMYSQL_UNIX_ADDR=/usr/local/mysql/data/mysql.sock -DWITH_INNOBASE_STORAGE_ENGINE=1 -DDEFAULT_CHARSET=utf8 -DDEFAULT_COLLATION=utf8_general_ci -DEXTRA_CHARSETS=all -DWITH_BOOST=/root/mysql-5.7.31/boost/boost_1_59_0
第二次出现问题:

根据错误, yum install gcc-c++ -y;
安装完成之后根据提示删除缓存:rm -fr CMakeCache.txt;
然后再次编译: cmake -DCMAKE_INSTALL_PREFIX=/usr/local/mysql -DMYSQL_DATADIR=/usr/local/mysql/data -DMYSQL_UNIX_ADDR=/usr/local/mysql/data/mysql.sock -DWITH_INNOBASE_STORAGE_ENGINE=1 -DDEFAULT_CHARSET=utf8 -DDEFAULT_COLLATION=utf8_general_ci -DEXTRA_CHARSETS=all -DWITH_BOOST=/root/mysql-5.7.31/boost/boost_1_59_0
第三次出现问题:

根据错误, yum install bison -y;
安装完成之后根据提示删除缓存:rm -fr CMakeCache.txt;
然后再次编译: cmake -DCMAKE_INSTALL_PREFIX=/usr/local/mysql -DMYSQL_DATADIR=/usr/local/mysql/data -DMYSQL_UNIX_ADDR=/usr/local/mysql/data/mysql.sock -DWITH_INNOBASE_STORAGE_ENGINE=1 -DDEFAULT_CHARSET=utf8 -DDEFAULT_COLLATION=utf8_general_ci -DEXTRA_CHARSETS=all -DWITH_BOOST=/root/mysql-5.7.31/boost/boost_1_59_0
直至编辑不再报错:
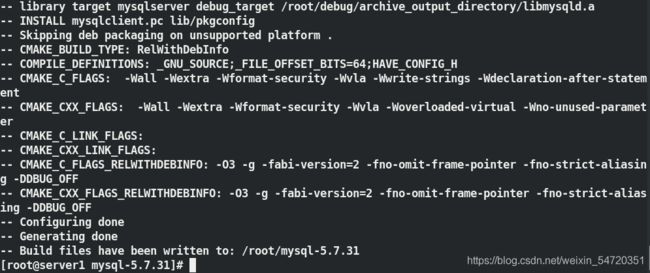
make :此过程时间的长短会根据 cpu 的能力,往往都需要较长的时间
当出现如图所示的提示时,说明 make 成功;

然后执行 make install 向向/usr/local/mysql中连续写入数据即可编译完成,当编译完成之后便会生成/usr/local/mysql这个目录。
cmake在编译的过程中有颜色,有进度。
- mysql 启动脚本和环境变量设定
生成启动脚本
[root@server1 mysql-5.7.31]# cd /usr/local/mysql/
[root@server1 mysql]# du -sh
1.9G	.
[root@server1 mysql]# ls
bin  docs  include  lib  LICENSE  man  mysql-test  README  README-test  share  support-files
[root@server1 mysql]# cd support-files/
[root@server1 support-files]# ls
magic  mysqld_multi.server  mysql-log-rotate  mysql.server
[root@server1 support-files]# cp mysql.server /etc/init.d/mysql			##复制脚本到启动目录
[root@server1 support-files]# ll /etc/init.d/mysqld		##脚本一定要有可执行的权限
-rwxr-xr-x 1 root root 10576 Apr 17 23:14 /etc/init.d/mysqld
[root@server1 mysql-5.7.31]# cd mysql-test/
[root@server1 mysql-test]# ls
asan.supp            CTestTestfile.cmake  Makefile              mysql-test-run.pl  std_data
CMakeFiles           extra                mtr                   r                  suite
cmake_install.cmake  include              mtr.out-of-source     README             t
CMakeLists.txt       lib                  mysql-stress-test.pl  README.gcov        valgrind.supp
collections          lsan.supp            mysql-test-run        README.stress
[root@server1 mysql-test]# vim /etc/my.cnf
[root@server1 mysql-test]# cat /etc/my.cnf
[mysqld]
datadir=/usr/local/mysql/data				##数据目录
socket=/usr/local/mysql/data/mysql.sock		##编译的路经
symbolic-links=0
添加环境变量
[root@server1 bin]# pwd
/usr/local/mysql/bin		##MySQL的指令都在/usr/local/mysql/bin目录里
[root@server1 bin]# ls
innochecksum       mysqlcheck                  mysql_embedded             mysqltest_embedded
lz4_decompress     mysql_client_test           mysqlimport                mysql_tzinfo_to_sql
myisamchk          mysql_client_test_embedded  mysql_install_db           mysql_upgrade
myisam_ftdump      mysql_config                mysql_plugin               mysqlxtest
myisamlog          mysql_config_editor         mysqlpump                  perror
myisampack         mysqld                      mysql_secure_installation  replace
my_print_defaults  mysqld_multi                mysqlshow                  resolveip
mysql              mysqld_safe                 mysqlslap                  resolve_stack_dump
mysqladmin         mysqldump                   mysql_ssl_rsa_setup        zlib_decompress
mysqlbinlog        mysqldumpslow               mysqltest
配置环境变量如图所示:
- mysql 初始化
在/usr/local/mysql下没有数据目录,需要做一个初始化;
[root@server1 ~]# mysqld --verbose --help |less  		##查看帮助
[root@server1 ~]# useradd -u 1000 -M -d /usr/local/mysql/data -s /sbin/nologin mysql
##创建用户,源码不会像rpm包会自动创建相应的用户,需要我们自己创建
##不创建家目录,制定数据目录为 /usr/local/mysql/data
[root@server1 mysql]# mysqld --verbose --help |less
[root@server1 mysql]# mysqld --initialize --user=mysql	##生成数据库密码,自动读取/etc/my.cnf,生成临时密码,初始化密码只允许登陆。
初始化
![]()
更改数据库密码
[root@server1 mysql]# /etc/init.d/mysqld start		##开启数据库,数据库在开启之后就不要重复开启,以免 socket 冲突
Starting MySQL.Logging to '/usr/local/mysql/data/server1.err'.
 SUCCESS!
[root@server1 mysql]# netstat -antlp | grep :3306		##查看数据库开启之后的端口3306
tcp6       0      0 :::3306                 :::*                    LISTEN      11280/mysqld
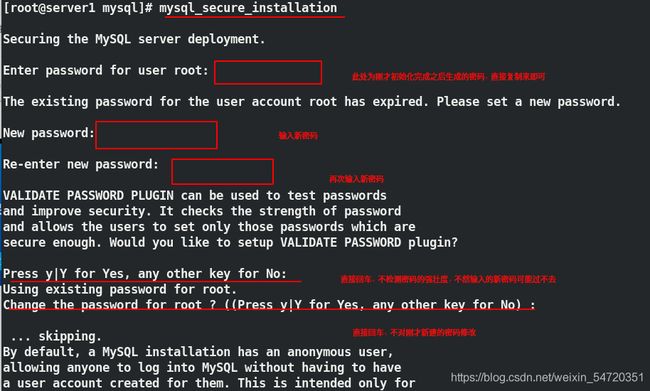
输入 mysql_secure_installatin修改数据库密码;
在修改密码之后,用更改的密码成功登陆数据库,至此数据库编译结束。
3. php 部署
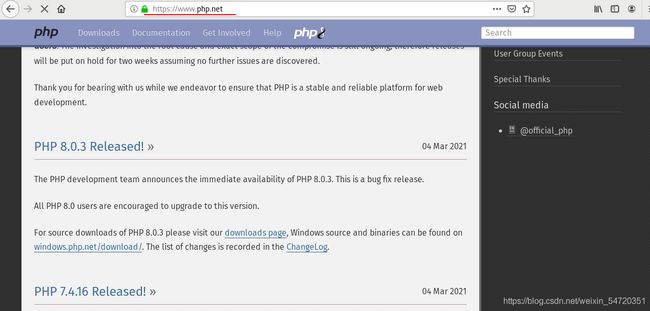
在 php 官网 https://www.php.net 下载所需要的源码包,此处我们下载的为 php-7.4.12.tar.bz2版本;
- 解压
[root@server1 ~]# yum search bzip				##由于 php 包为 bz2 的压缩格式,需要下载 bzip 的解压工具
[root@server1 ~]# ls
mysql-5.7.31               nginx-1.18.0.tar.gz
mysql-boost-5.7.31.tar.gz  php-7.4.12.tar.bz2
nginx-1.18.0
[root@server1 ~]# tar jxf php-7.4.12.tar.bz2	##解压
[root@server1 ~]# ls
mysql-5.7.31               nginx-1.18.0.tar.gz
mysql-boost-5.7.31.tar.gz  php-7.4.12
nginx-1.18.0               php-7.4.12.tar.bz2
- 源码编译
1)创建用户
此处安装的 php 是为了和前面安装的 nginx 构成 lnmp 架构,所以应该和 nginx 的用户保持一致;
由于前面没有为 nginx 创建用户,需要在此处创建用户;
创建一个名为 nginx 的用户,PHP和nginx都使用这个用户;
修改mysql的用户和用户组
[root@server1 php-7.4.12]# nginx 			##开启 nginx
[root@server1 php-7.4.12]# useradd -M -d /usr/local/nginx/ -s /sbin/nologin nginx		##不指定用户的家目录,数据目录为/usr/local/nginx/
[root@server1 php-7.4.12]# id nginx
uid=1001(nginx) gid=1001(nginx) groups=1001(nginx)
[root@server1 nginx]# cd /usr/local/nginx/conf/
[root@server1 conf]# ls
fastcgi.conf            koi-utf             nginx.conf           uwsgi_params
fastcgi.conf.default    koi-win             nginx.conf.default   uwsgi_params.default
fastcgi_params          mime.types          scgi_params          win-utf
fastcgi_params.default  mime.types.default  scgi_params.default
[root@server1 conf]# vim nginx.conf
[root@server1 conf]# head -n 5 nginx.conf

user nginx nginx;							##编辑文件内容,将用户和组都更改为 nginx;
worker_processes  1;
#error_log  logs/error.log;
[root@server1 conf]# nginx -s reload 		##重新加载 nginx
[root@server1 conf]# ps aux
nginx     3833  0.0  0.0  46420  2024 ?        S    21:14   0:00 nginx: worker process
root      3842  0.0  0.0 155360  1880 pts/1    R+   21:15   0:00 ps aux
- 编译
在 /php-7.4.12 里存在configure,属于gmake;可以用 ./configure - -help 查看其参数帮助;
[root@server1 php-7.4.12]# ./configure --prefix=/usr/local/php --with-config-file-path=/usr/local/php/etc
--enable-mysqlnd 		##驱动
--with-pdo-mysql --with-mysqli
--with-openssl-dir 		##加密
--enable-gd			##开启图形
 --with-zlib-dir 		##压缩
--with-curl 			##支持curl 命令
--with-pear 			##php 重要扩展
--enable-inline-optimization 	##优化选项
--enable-soap 			##动态编译支持
--enable-sockets 		##socket 支持
--enable-mbstring
--enable-fpm 			##fpm 观念器
--with-fpm-user=nginx 		##用户身份,用什么身份运行,尽量和nginx 一致
--with-fpm-group=nginx 		##用户组身份
--with-fpm-systemd
开始编译
在 /php-7.4.12目录中执行 ./configure --prefix=/usr/local/php --with-config-file-path=/usr/local/php/etc --enable-mysqlnd --with-pdo-mysql --with-mysqli --with-openssl-dir --enable-gd --with-zlib-dir --with-curl --with-pear --enable-inline-optimization --enable-soap --enable-sockets --enable-mbstring --enable-fpm --with-fpm-user=nginx --with-fpm-group=nginx --with-fpm-systemd,会遇到一些依赖性需要解决;
第一个问题:需要libsystemd的版本高于209;
根据错误,yum install systemd-devel.x86_64 -y安装 systemd-devel 安装包;
安装完成之后再次执行 ./configure --prefix=/usr/local/php --with-config-file-path=/usr/local/php/etc --enable-mysqlnd --with-pdo-mysql --with-mysqli --with-openssl-dir --enable-gd --with-zlib-dir --with-curl --with-pear --enable-inline-optimization --enable-soap --enable-sockets --enable-mbstring --enable-fpm --with-fpm-user=nginx --with-fpm-group=nginx --with-fpm-systemd继续编译;
第二个问题:
根据错误,yum install libxml2-devel -y
安装 systemd-devel 安装包;
安装完成之后再次执行 ./configure --prefix=/usr/local/php --with-config-file-path=/usr/local/php/etc --enable-mysqlnd --with-pdo-mysql --with-mysqli --with-openssl-dir --enable-gd --with-zlib-dir --with-curl --with-pear --enable-inline-optimization --enable-soap --enable-sockets --enable-mbstring --enable-fpm --with-fpm-user=nginx --with-fpm-group=nginx --with-fpm-systemd继续编译;
第三个问题:
根据错误,yum install sqlite-devel.x86_64 -y
安装 systemd-devel 安装包;
安装完成之后再次执行 ./configure --prefix=/usr/local/php --with-config-file-path=/usr/local/php/etc --enable-mysqlnd --with-pdo-mysql --with-mysqli --with-openssl-dir --enable-gd --with-zlib-dir --with-curl --with-pear --enable-inline-optimization --enable-soap --enable-sockets --enable-mbstring --enable-fpm --with-fpm-user=nginx --with-fpm-group=nginx --with-fpm-systemd继续编译;
第四个问题:

根据错误,yum install libcurl-devel.x86_64 -y
安装 systemd-devel 安装包;
安装完成之后再次执行 ./configure --prefix=/usr/local/php --with-config-file-path=/usr/local/php/etc --enable-mysqlnd --with-pdo-mysql --with-mysqli --with-openssl-dir --enable-gd --with-zlib-dir --with-curl --with-pear --enable-inline-optimization --enable-soap --enable-sockets --enable-mbstring --enable-fpm --with-fpm-user=nginx --with-fpm-group=nginx --with-fpm-systemd继续编译;
第五个问题:

根据错误,yum install libpng-devel.x86_64 -y
安装 systemd-devel 安装包;
安装完成之后再次执行 ./configure --prefix=/usr/local/php --with-config-file-path=/usr/local/php/etc --enable-mysqlnd --with-pdo-mysql --with-mysqli --with-openssl-dir --enable-gd --with-zlib-dir --with-curl --with-pear --enable-inline-optimization --enable-soap --enable-sockets --enable-mbstring --enable-fpm --with-fpm-user=nginx --with-fpm-group=nginx --with-fpm-systemd继续编译;
第六个问题:此处的依赖性的解决 Redhat 本身没有可以支持的安装包,需要去网上下载下来然后再安装;
根据错误,yum install oniguruma-6.8.2-1.el7.x86_64.rpm oniguruma-devel-6.8.2-1.el7.x86_64.rpm -y
安装 systemd-devel 安装包;
安装完成之后再次执行 ./configure --prefix=/usr/local/php --with-config-file-path=/usr/local/php/etc --enable-mysqlnd --with-pdo-mysql --with-mysqli --with-openssl-dir --enable-gd --with-zlib-dir --with-curl --with-pear --enable-inline-optimization --enable-soap --enable-sockets --enable-mbstring --enable-fpm --with-fpm-user=nginx --with-fpm-group=nginx --with-fpm-systemd继续编译;
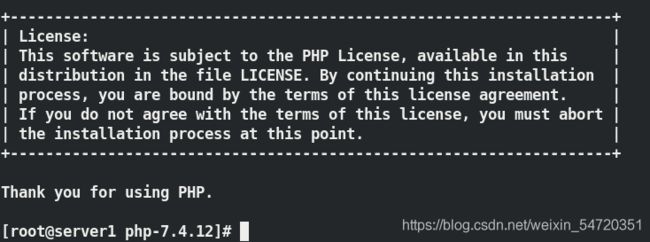
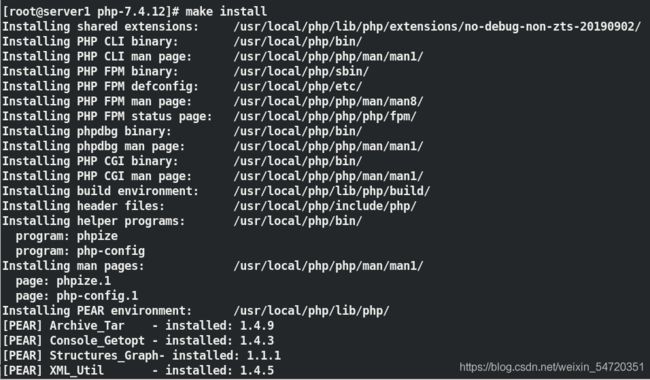
当没有错误时,编译完成之后的效果如图所示:
make
make 完成之后的效果如图所示:
make install
- 通过脚本重载 php
在编译时,configure 后加了systemd,默认会生成 systemctl 的启动后台,但是默认的位置并不是想要的需要更改;
在 php 的源码中将启动 systemd 的脚本/php-7.4.12/sapi/fpm/init.d.php-fpm 拷贝到 /etc/init.d /下,给定执行权限;
这种启动方式是在 systemd 以前,最常用的;
[root@server1 fpm]# pwd
/root/php-7.4.12/sapi/fpm
[root@server1 fpm]# ls
config.m4  init.d.php-fpm     Makefile.frag  php-fpm.8.in     php-fpm.service     status.html.in  www.conf.in
CREDITS    init.d.php-fpm.in  php-fpm        php-fpm.conf     php-fpm.service.in  tests
fpm        LICENSE            php-fpm.8      php-fpm.conf.in  status.html         www.conf
[root@server1 fpm]# cp init.d.php-fpm /etc/init.d/php-fpm	##复制启动脚本到对应的位置
[root@server1 fpm]# chmod +x /etc/init.d/php-fpm 			##给脚本执行的权限
[root@server1 fpm]# /etc/init.d/php-fpm 					##直接调用该脚本,系统会打印相应的帮助
Usage: /etc/init.d/php-fpm {start|stop|force-quit|restart|reload|status|configtest}
补充:
cgi 和 fcgi 区别:
php 无法平滑加载
cgi 的更改修改每次重启 apache 才可以生效,没有后台;
fcgi 可以平滑加载有后台;调用脚本 reload 就可以了。
- 配置文件
在安装路径中的 php-fpm.conf.default 是 php 控制器的配置文件模板;
复制成配置文件;
配置文件中全部都是注释的内容,注释后面是否有默认值,该有的不能为空。
[root@server1 etc]# pwd
/usr/local/php/etc
[root@server1 etc]# ls
pear.conf  php-fpm.conf.default  php-fpm.d
[root@server1 etc]# cp php-fpm.conf.default php-fpm.conf		##生成配置文件
[root@server1 etc]# vim php-fpm.conf
 13 [global]
 14 ; Pid file
 15 ; Note: the default prefix is /usr/local/php/var
 16 ; Default Value: none
 17 pid = run/php-fpm.pid		#修改配置文件中PID的位置
在 /root/php-7.4.12/etc/php-fpm.d/ 目录下有 www.conf.default ;将其复制成 www.conf 配置文件;
[root@server1 php-fpm.d]# ls
www.conf.default
[root@server1 php-fpm.d]# cp www.conf.default www.conf
 23 user = nginx				##用户身份正常,说明编译成功
 24 group = nginx
---
 36 listen = 127.0.0.1:9000		##默认监听的是本机127.0.0.1:9000端口;需要远程连接就需要打开该端口
---
---
114 pm.max_children = 5			##默认开启的服务数量最大是 5
115
116 ; The number of child processes created on startup.
117 ; Note: Used only when pm is set to 'dynamic'
118 ; Default Value: (min_spare_servers + max_spare_servers) / 2
119 pm.start_servers = 2		##默认开启2个,;此值的修改根据自己的生产环境设置,此处的实验不做更改
120
121 ; The desired minimum number of idle server processes.
122 ; Note: Used only when pm is set to 'dynamic'
123 ; Note: Mandatory when pm is set to 'dynamic'
124 pm.min_spare_servers = 1	##默认最小空闲1个
如下图所示;
- 启动 php
php.ini-productionPHP的生产文件
PHP配置文件的命名方式一定是php.ini
[root@server1 ~]# cd php-7.4.12
[root@server1 php-7.4.12]# ls
appveyor             config.log       ext         Makefile             php.ini-production  travis
azure                config.nice      EXTENSIONS  Makefile.fragments   README.md           TSRM
azure-pipelines.yml  config.status    include     Makefile.objects     README.REDIST.BINS  UPGRADING
build                configure        libs        modules              run-tests.php       UPGRADING.INTERNALS
buildconf            configure.ac     libtool     NEWS                 sapi                win32
buildconf.bat        CONTRIBUTING.md  LICENSE     pear                 scripts             Zend
CODING_STANDARDS.md  docs             main        php.ini-development  tests
[root@server1 php-7.4.12]# cp php.ini-production /usr/local/php/etc/php.ini		##生成php配置文件,配置文件一定是 php.ini 命名方式
[root@server1 php-7.4.12]# /etc/init.d/php-fpm start		##开启 php
Starting php-fpm  done
开启之后过滤,查看端口信息:


