本文出自:http://blog.csdn.net/dt235201314/article/details/78133932
一丶效果图
二丶需求功能点技术点
1.业务想要的大致模样
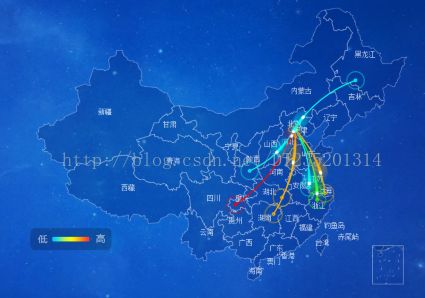
呈现地图及省份,高热点地域颜色越红,前五以不同色值标注
2.程序员表示
移动端没有控件及框架,开发的话需要大量时间。前段有相关框架,不如前段做吧...
3.项目经理表示
手机屏幕就那么大,不适合展示整张中国地图,展示的话文字小,体验感也不高,设计师切个半屏图,程序员加点动画展现数据...
最终讨论效果如图
4.技术点
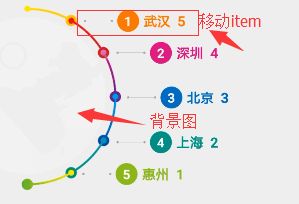
1.根据设计师给的背景图,测量文字显示位置
2.平移呈现动画 ObjectAnimator平移动画即可
三丶看代码
1.造数据
实体类MapViewEntity.Java
public class MapViewEntity implements Serializable {
   public String overviewName;//区块名称
   public String overviewSubName;//区块子名称
   public List areaList;//区域列表数据

   public static class Area implements Serializable {
       public int ranking;//排名
       public String areaName;//区域名称
       public int areaCount;//数量
   }
}
写成public,可省去get set方法
public void getData(){
   areaList = new ArrayList<>();
   MapViewEntity.Area area1= new MapViewEntity.Area();
   area1.areaName = "武汉";
   area1.areaCount = 5;
   area1.ranking = 1;
   MapViewEntity.Area area2= new MapViewEntity.Area();
   area2.areaName = "深圳";
   area2.areaCount = 4;
   area2.ranking = 2;
   MapViewEntity.Area area3= new MapViewEntity.Area();
   area3.areaName = "北京";
   area3.areaCount = 3;
   area3.ranking = 3;
   MapViewEntity.Area area4= new MapViewEntity.Area();
   area4.areaName = "上海";
   area4.areaCount = 2;
   area4.ranking = 4;
   MapViewEntity.Area area5= new MapViewEntity.Area();
   area5.areaName = "惠州";
   area5.areaCount = 1;
   area5.ranking = 5;
   areaList.add(area1);
   areaList.add(area2);
   areaList.add(area3);
   areaList.add(area4);
   areaList.add(area5);
}
这里只造用到的数据
2.MyViewActivity
@Override
protected void onCreate(Bundle savedInstanceState) {
    super.onCreate(savedInstanceState);
    setContentView(R.layout.map_view_activity);
    MapView mapView = (MapView) findViewById(R.id.mapview);
    getData();
    mapView.init(areaList);
}
xml布局里面就一个TextView和自定义MapView(略)
MapView.Java
public class MapView extends LinearLayout {
    private DecimalFormat format=new DecimalFormat("###,###,###");
    public MapView(Context context) {
        super(context);
        setOrientation(HORIZONTAL);
    }

    public MapView(Context context, @Nullable AttributeSet attrs) {
        super(context, attrs);
        setOrientation(HORIZONTAL);
    }

    public MapView(Context context, @Nullable AttributeSet attrs, int defStyleAttr) {
        super(context, attrs, defStyleAttr);
        setOrientation(HORIZONTAL);
    }

    int bgHeight = 0, bgWidth = 0;

    public void init(List datas) {
        removeAllViews();
        if (datas == null) {
            return;
        }
        //左侧背景图
        ImageView imageView = new ImageView(getContext());
        Bitmap bg = BitmapFactory.decodeResource(getResources(), R.mipmap.map_bg);

        if (bg != null) {
            imageView.setImageBitmap(bg);
            bgHeight = bg.getHeight();
            bgWidth = bg.getWidth();
        }
        addView(imageView);
        final LinearLayout itemContainer = new LinearLayout(getContext());
        itemContainer.setOrientation(VERTICAL);
        for (int i = 0; i < datas.size(); i++) {
            View item = LayoutInflater.from(getContext()).inflate(R.layout.map_view_item, itemContainer, false);
            TextView indexView = (TextView) item.findViewById(R.id.index);
            TextView textView = (TextView) item.findViewById(R.id.text);
            GradientDrawable indexDrawable = (GradientDrawable) indexView.getBackground();
            int color = Color.parseColor("#FA7401");
            switch (i) {
                case 0:
                    color = Color.parseColor("#FA7401");
                    break;
                case 1:
                    color = Color.parseColor("#D2007F");
                    break;
                case 2:
                    color = Color.parseColor("#006FBF");
                    break;
                case 3:
                    color = Color.parseColor("#009C85");
                    break;
                case 4:
                    color = Color.parseColor("#8FC41E");
                    break;
            }
            indexDrawable.setColor(color);
            indexView.setBackground(indexDrawable);
            MapViewEntity.Area area=datas.get(i);
            indexView.setText(area.ranking + "");
            textView.setTextColor(color);
            textView.setText(area.areaName+"  "+format.format(area.areaCount));
            itemContainer.addView(item);
        }
        LayoutParams lp = new LayoutParams(ViewGroup.LayoutParams.MATCH_PARENT, ViewGroup.LayoutParams.WRAP_CONTENT);
        lp.leftMargin = -bgWidth;
        addView(itemContainer, lp);
        //修正位置(瞎计算)
        getViewTreeObserver().addOnPreDrawListener(new ViewTreeObserver.OnPreDrawListener() {
            @Override
            public boolean onPreDraw() {
                float degree0 = (float) Math.sin(Math.PI * 30.0 / 180.0);
                float degree1 = (float) Math.sin(Math.PI * 60.0 / 180.0);
                float degree2 = (float) Math.sin(Math.PI * 90.0 / 180.0);
                int shift = (int) (getResources().getDisplayMetrics().density * 7);
                for (int i = 0; i < itemContainer.getChildCount(); i++) {
                    final View item = itemContainer.getChildAt(i);
                    LayoutParams lp = (LayoutParams) item.getLayoutParams();
                    switch (i) {
                        case 0:
                            lp.leftMargin = (int) (bgWidth * degree0) + shift * 4;
                            lp.topMargin = (int) (bgHeight * degree0) / 22;
                            break;
                        case 1:
                            lp.leftMargin = (int) (bgWidth * degree1) + shift * 2;
                            lp.topMargin = (int) (bgHeight * degree1) / 16;
                            break;
                        case 2:
                            lp.leftMargin = (int) (bgWidth * degree2) + shift;
                            lp.topMargin = (int) (bgHeight * degree2) / 8;
                            break;
                        case 3:
                            lp.leftMargin = (int) (bgWidth * degree1) + shift * 2;
                            lp.topMargin = (int) (bgHeight * degree2) / 8;
                            break;
                        case 4:
                            lp.leftMargin = (int) (bgWidth * degree0) + shift * 4;
                            lp.topMargin = (int) (bgHeight * degree1) / 16;
                            break;
                    }
                    item.setLayoutParams(lp);
                    item.setVisibility(View.GONE);
                    item.postDelayed(new Runnable() {
                        @Override
                        public void run() {
                            ObjectAnimator anim = ObjectAnimator.ofFloat(item, "translationX", -bgWidth, 0);
                            anim.setDuration(1000);
                            anim.addListener(new AnimatorListenerAdapter() {
                                @Override
                                public void onAnimationStart(Animator animation) {
                                    super.onAnimationStart(animation);
                                    item.setVisibility(View.VISIBLE);
                                }
                            });
                            anim.start();
                        }
                    }, (i + 1) * 300);
                }
                getViewTreeObserver().removeOnPreDrawListener(this);
                return false;
            }
        });
    }
}
直接看init()方法,传入要展示的值
1.首先添加背景图,并获取宽高
2.添加LinearLayout设置垂直布局
3.将文字显示需要动画的部分,添加到LinearLayout
map_view_item
图解:
for循环
根据个数动态添加移动布局,遍历添加对应数值
switch (i)添加不同颜色
最后测量item的显示位置,瞎测量
为什么说瞎测量呢?
背景图的高度,近似等于直径长度,所以top值是可以通过控制被除数调整的
背景图的宽度等于半径+X(当然x你可以通过工具测量),所得有一个参数+-来调整
各tiem的值同样通过switch (i)分配
动画平移,参考前面文章,不再赘述
四丶下载链接,欢迎star
https://github.com/JinBoy23520/CoderToDeveloperByTCLer


