- 连续性变量图例
- 分类变量图例
- 添加自定义的图例
- 图例的位置
本文是对于ComplexHeatmap作者说明的学习笔记。如果想看原文可去:https://jokergoo.github.io/ComplexHeatmap-reference/book/a-list-of-heatmaps.html
热图的很多标示都是通过图例来发现怎么变化的。这个我们可以通过通过legend参数来观察图例的变化。如果是在热图绘制当中的话,可以通过热图或者注释当中的heatmap_legend_param或者annotation_legend_param来设置参数的变化
连续性变量图例
主要可以修改的参数包括:
- 垂直图例的说明
color_bar: 设置颜色的是否是分类的。 title: 设置图例的主要名称 title_gp: 自定义标题 title_position: 名称的位置。支持四个参数topleft; topcenter; leftcenter-rot; lefttop-rot at: 图例标注的位置 label:图例标注位置的个性化标签 labels_gp: 标签的自定义
legend_height/grid_width: 图例的长度和宽度 border: 边框的颜色
- 水平图例的说明
默认的是垂直图例。通过direction = "horizontal"参数我们可以调整为水平的图例。其他的基本设置参数和垂直的一样。处理宽度变为legend_width。另外可以通过labels_rot: 调整标签的旋转度数。
library(ComplexHeatmap)
## Loading required package: grid
## ========================================
## ComplexHeatmap version 2.0.0
## Bioconductor page: http://bioconductor.org/packages/ComplexHeatmap/
## Github page: https://github.com/jokergoo/ComplexHeatmap
## Documentation: http://jokergoo.github.io/ComplexHeatmap-reference
##
## If you use it in published research, please cite:
## Gu, Z. Complex heatmaps reveal patterns and correlations in multidimensional
##   genomic data. Bioinformatics 2016.
## ========================================
library(circlize)
## ========================================
## circlize version 0.4.6
## CRAN page: https://cran.r-project.org/package=circlize
## Github page: https://github.com/jokergoo/circlize
## Documentation: http://jokergoo.github.io/circlize_book/book/
##
## If you use it in published research, please cite:
## Gu, Z. circlize implements and enhances circular visualization
##   in R. Bioinformatics 2014.
## ========================================
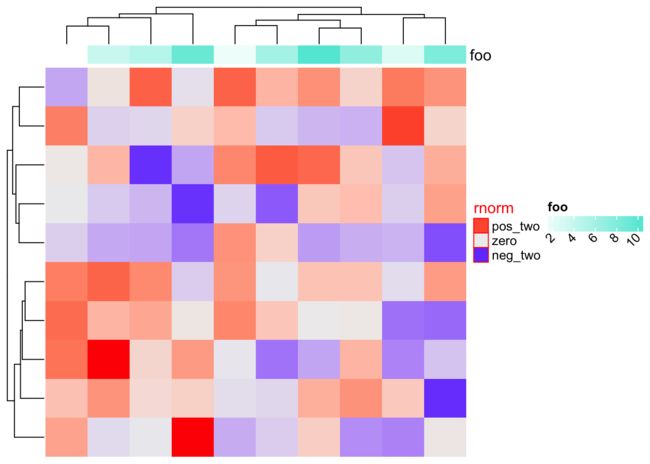
Heatmap(matrix(rnorm(100), 10),
    heatmap_legend_param = list(
        title = "rnorm", at = c(-2, 0, 2),
        title_gp = gpar(col = "red"),
        labels = c("neg_two", "zero", "pos_two"),
        border = "red", color_bar = "discrete"
    ),
    top_annotation = HeatmapAnnotation(
        foo = 1:10,
        annotation_legend_param = list(foo = list(title = "foo_top_anno"),
                                               labels_rot = 45, direction = "horizontal")
    ))
分类变量图例
主要可以修改的参数包括:
legend_gp: 设置图例的颜色 title: 设置图例的主要名称 title_gp: 自定义标题 titler_position: 名称的位置。支持四个参数topleft; topcenter; leftcenter-rot; lefttop-rot at: 图例标注的位置 label:图例标注位置的个性化标签 labels_gp: 标签的自定义 ncol/nrow: 设置分类变量分布的行数。 by_row: 排列方式,是否是按照行来排列 gap: 设置不同列之间的距离 grid_height/grid_height: 调整图例的宽度和高度 type: 图例除了可以用颜色来标示也可以使用线段活着形状了标示。目前主要包括points; lines; boxplot
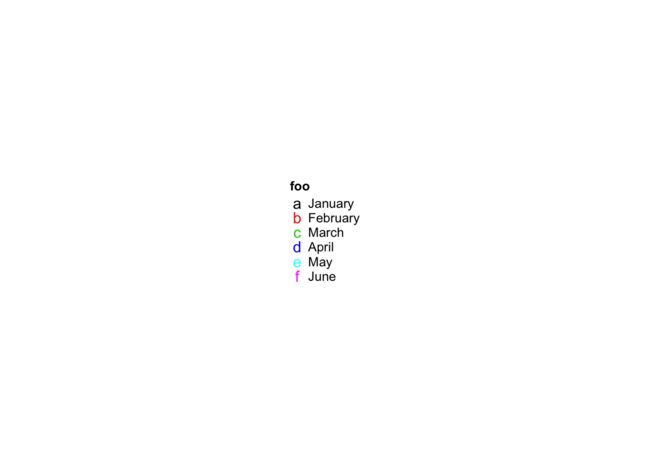
lgd = Legend(labels = month.name[1:6], title = "foo", type = "points",
    pch = letters[1:6], legend_gp = gpar(col = 1:6), background = "white")
draw(lgd)
添加自定义的图例
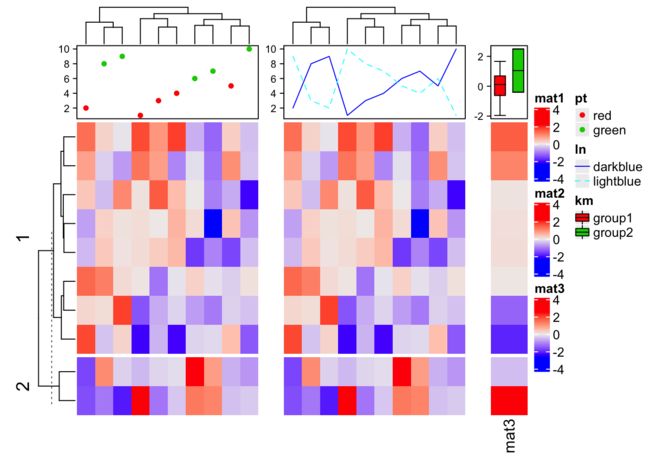
我们可以通过legend来形成图例。然后在draw函数当中的annotation_legend_list参数来添加自定义图例
ha1 = HeatmapAnnotation(pt = anno_points(1:10, gp = gpar(col = rep(2:3, each = 5)),
    height = unit(2, "cm")), show_annotation_name = FALSE)
ha2 = HeatmapAnnotation(ln = anno_lines(cbind(1:10, 10:1), gp = gpar(col = 4:5, lty = 1:2),
    height = unit(2, "cm")), show_annotation_name = FALSE)
m = matrix(rnorm(100), 10)
ht_list = Heatmap(m, name = "mat1", top_annotation = ha1) +
          Heatmap(m, name = "mat2", top_annotation = ha2) +
          Heatmap(m[, 1], name = "mat3",
            top_annotation = HeatmapAnnotation(
                summary = anno_summary(gp = gpar(fill = 2:3))
          ), width = unit(1, "cm"))
lgd_list = list(
    Legend(labels = c("red", "green"), title = "pt", type = "points", pch = 16,
        legend_gp = gpar(col = 2:3)),
    Legend(labels = c("darkblue", "lightblue"), title = "ln", type = "lines",
        legend_gp = gpar(col = 4:5, lty = 1:2)),
    Legend(labels = c("group1", "group2"), title = "km", type = "boxplot",
        legend_gp = gpar(fill = 2:3))
)
draw(ht_list, ht_gap = unit(7, "mm"), row_km = 2, annotation_legend_list = lgd_list)
图例的位置
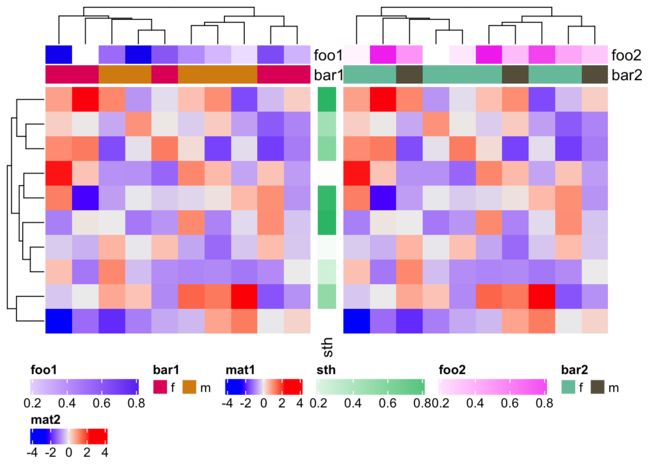
我们可以通过draw函数当中的heatmap_legend_side以及annotation_legend_side参数来选择图例的位置。这两个参数接受四个参数: left, right, bottom and top
m = matrix(rnorm(100), 10)
ha1 = HeatmapAnnotation(foo1 = runif(10), bar1 = sample(c("f", "m"), 10, replace = TRUE),
    annotation_legend_param = list(
        foo1 = list(direction = "horizontal"),
        bar1 = list(nrow = 1)))
ha2 = HeatmapAnnotation(foo2 = runif(10), bar2 = sample(c("f", "m"), 10, replace = TRUE),
    annotation_legend_param = list(
        foo2 = list(direction = "horizontal"),
        bar2 = list(nrow = 1)))
ht_list = Heatmap(m, name = "mat1", top_annotation = ha1,
        heatmap_legend_param = list(direction = "horizontal")) +
    rowAnnotation(sth = runif(10),
        annotation_legend_param = list(sth = list(direction = "horizontal"))) +
    Heatmap(m, name = "mat2", top_annotation = ha2,
        heatmap_legend_param = list(direction = "horizontal"))
draw(ht_list, merge_legend = TRUE, heatmap_legend_side = "bottom",
    annotation_legend_side = "bottom")


