ubuntu 18.04 mmdetection 训练mask_rcnn
目录
- Git
- 数据集准备
- 配置
-
- 修改coco.py
- 修改class_names.py
- 修改coco_instance.py
- 修改schedules_1x.py
- 修改default_runtime.py
- 修改mask_rcnn_r50_fpn.py
- 训练
- 测试
- 训练其他网络的建议
Git
官网
安装教程以及数据集准备,可以根据自己想要跑的网络准备。下面记录一下这次跑mask_rcnn的过程。
数据集准备
这次在数据上面花了很多时间,一开始自己使用精灵标注助手标注,但是感觉后续处理很麻烦。后来借鉴了一下别人做数据集的方式,采用labelme进行标注,再通过mask出的区域,反算出物体的位置标签。
我在训练mask_rcnn的时候,采用的是coco数据集的格式,首先,先按照coco数据集的格式,创建文件夹。建议将data放在mmdetection。
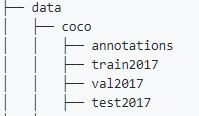
之后,需要调用一个labelme2coco.py脚本,生成instance.json文件(coco数据集格式),另外这个脚本需要把labelme生成的json和图片放在一起,当然也可以不放在一起,可以自己根据情况修改。

# -*- coding:utf-8 -*-

import argparse
import json
import matplotlib.pyplot as plt
import skimage.io as io
import cv2
from labelme import utils
import numpy as np
import glob
import PIL.Image
from shapely.geometry import Polygon


class labelme2coco(object):
    def __init__(self, labelme_json=[], save_json_path='./new.json'):
        '''
        :param labelme_json: 所有labelme的json文件路径组成的列表
        :param save_json_path: json保存位置
        '''
        self.labelme_json = labelme_json
        self.save_json_path = save_json_path
        self.images = []
        self.categories = []
        self.annotations = []
        # self.data_coco = {
     }
        self.label = []
        self.annID = 1
        self.height = 0
        self.width = 0

        self.save_json()

    def data_transfer(self):
        for num, json_file in enumerate(self.labelme_json):
            with open(json_file, 'r') as fp:
                data = json.load(fp)  # 加载json文件
                self.images.append(self.image(data, num))
                for shapes in data['shapes']:
                    # label=shapes['label'].split('_')
                    label = shapes['label']
                    print(shapes['label'])
                    print(label)
                    if label not in self.label:
                        self.categories.append(self.categorie(label))
                        self.label.append(label)
                    points = shapes['points']
                    self.annotations.append(self.annotation(points, label, num))
                    self.annID += 1
        print(self.label)

    def image(self, data, num):
        image = {
     }
        img = utils.img_b64_to_arr(data['imageData'])  # 解析原图片数据
        # img=io.imread(data['imagePath']) # 通过图片路径打开图片
        # img = cv2.imread(data['imagePath'], 0)
        height, width = img.shape[:2]
        img = None
        image['height'] = height
        image['width'] = width
        image['id'] = num + 1
        image['file_name'] = data['imagePath'].split('/')[-1]

        self.height = height
        self.width = width

        return image

    def categorie(self, label):
        categorie = {
     }
        categorie['supercategory'] = label
        categorie['id'] = len(self.label) + 1  # 0 默认为背景
        categorie['name'] = label
        return categorie

    def annotation(self, points, label, num):
        annotation = {
     }
        annotation['segmentation'] = [list(np.asarray(points).flatten())]
        poly = Polygon(points)
        area_ = round(poly.area, 6)
        annotation['area'] = area_
        annotation['iscrowd'] = 0
        annotation['image_id'] = num + 1
        # annotation['bbox'] = str(self.getbbox(points)) # 使用list保存json文件时报错(不知道为什么)
        # list(map(int,a[1:-1].split(','))) a=annotation['bbox'] 使用该方式转成list
        annotation['bbox'] = list(map(float, self.getbbox(points)))

        annotation['category_id'] = self.getcatid(label)
        annotation['id'] = self.annID
        return annotation

    def getcatid(self, label):
        for categorie in self.categories:
            if label == categorie['name']:
                return categorie['id']
        return -1

    def getbbox(self, points):
        # img = np.zeros([self.height,self.width],np.uint8)
        # cv2.polylines(img, [np.asarray(points)], True, 1, lineType=cv2.LINE_AA) # 画边界线
        # cv2.fillPoly(img, [np.asarray(points)], 1) # 画多边形 内部像素值为1
        polygons = points
        mask = self.polygons_to_mask([self.height, self.width], polygons)
        return self.mask2box(mask)

    def mask2box(self, mask):
        '''从mask反算出其边框
        mask:[h,w] 0、1组成的图片
        1对应对象,只需计算1对应的行列号(左上角行列号,右下角行列号,就可以算出其边框)
        '''
        # np.where(mask==1)
        index = np.argwhere(mask == 1)
        rows = index[:, 0]
        clos = index[:, 1]
        # 解析左上角行列号
        left_top_r = np.min(rows)  # y
        left_top_c = np.min(clos)  # x

        # 解析右下角行列号
        right_bottom_r = np.max(rows)
        right_bottom_c = np.max(clos)

        # return [(left_top_r,left_top_c),(right_bottom_r,right_bottom_c)]
        # return [(left_top_c, left_top_r), (right_bottom_c, right_bottom_r)]
        # return [left_top_c, left_top_r, right_bottom_c, right_bottom_r]# [x1,y1,x2,y2]
        return [left_top_c, left_top_r, right_bottom_c - left_top_c,
                right_bottom_r - left_top_r]  # [x1,y1,w,h] 对应COCO的bbox格式

    def polygons_to_mask(self, img_shape, polygons):
        mask = np.zeros(img_shape, dtype=np.uint8)
        mask = PIL.Image.fromarray(mask)
        xy = list(map(tuple, polygons))
        PIL.ImageDraw.Draw(mask).polygon(xy=xy, outline=1, fill=1)
        mask = np.array(mask, dtype=bool)
        return mask

    def data2coco(self):
        data_coco = {
     }
        data_coco['images'] = self.images
        data_coco['categories'] = self.categories
        data_coco['annotations'] = self.annotations
        return data_coco

    def save_json(self):
        self.data_transfer()
        self.data_coco = self.data2coco()
        # 保存json文件
        json.dump(self.data_coco, open(self.save_json_path, 'w'), indent=4)  # indent=4 更加美观显示


labelme_json = glob.glob('./*.json')
# labelme_json=['./1.json']

labelme2coco(labelme_json, 'instances_train2017.json')
注意:没有shapely的,可以pip install shapely 直接下载
在tran2017文件夹运行labelme2coco.py之后,会在当前目录生成instances_train2017.json文件,同理,在val2017文件夹运行labelme2coco.py,代码最后一行需要修改成labelme2coco(labelme_json, ‘instances_val2017.json’),会在当前目录生成instances_val2017.json文件。
之后,将生成的instances_train2017.json和instances_val2017.json移动到annotations。

数据集到这一步已经制作完成。
配置
修改coco.py
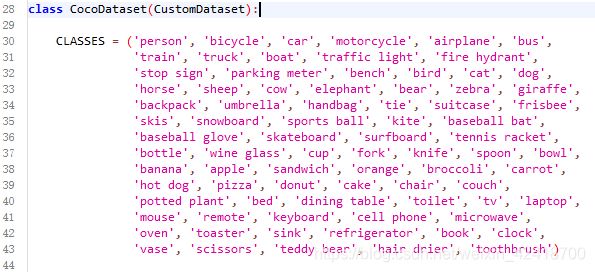
coco.py文件在 mmdetection/mmdet/datasets下,将CLASSES替换成自己的classes.
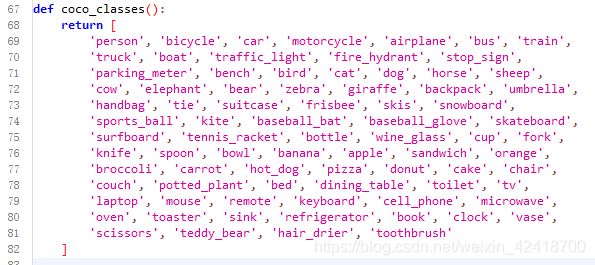
修改class_names.py
class_names.py在mmdetection/mmdet/core/evaluation,将return的内容改成自己的class。
修改coco_instance.py
coco_instance.py在mmdetection/configs/base/datasets下,主要根据自己的数据集修改mean和std。

修改schedules_1x.py
schedules_1x.py在mmdetection/configs/base/schedules下,lr(学习率)官方是8张GPU ==> 0.02,如果没有特别说明学习率,一般都是线性计算的,即4张GPU就0.01,两张就0.005,以此类推。
另外如果要修改total_epochs,别忘了修改10行的step, step两个值一般为total_epochs的80%和90%,表示在该epochs修改学习率。

修改default_runtime.py
default_runtime.py在**mmdetection/configs/base**下,根据自己的情况修改1, 4,13行的内容,其他地方基本不用改。

修改mask_rcnn_r50_fpn.py
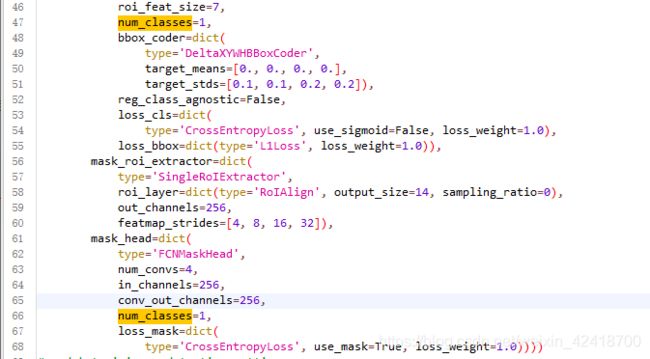
mask_rcnn_r50_fpn.py在mmdetection/configs/base/models下,将pretrained改成None,(否则会下载权重),将num_classes改成自己的类别。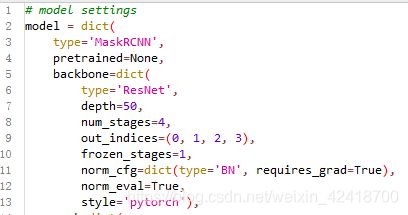
训练
#单GPU
python tools/train.py $ {
CONFIG_FILE} [可选参数]
#多GPU
./tools/dist_train.sh $ {
CONFIG_FILE} $ {
GPU_NUM} [可选参数]
CONFIG_FILE为训练的网络参数。
GPU_NUM为GPU数量。
可选参数为:
--no-validate(不建议):默认情况下,在训练期间,代码库将在每k个epoch(默认值为1,可以像这样修改)进行评估。若要禁用此行为,请使用--no-validate。
--work-dir ${
WORK_DIR}:覆盖配置文件中指定的工作目录。
--resume-from ${
CHECKPOINT_FILE}:从先前的检查点文件继续。
--cfg-options 'Key=value':在使用的配置中覆盖一些设置。
注意:
resume-from同时加载模型权重和优化器状态,并且epoch也从指定的检查点继承。它通常用于恢复意外中断的训练过程。
为了更清楚地使用,load-from不建议使用原件,而可以--cfg-options 'load_from="path/to/you/model"'改用。它仅加载模型权重,训练时期从0开始,通常用于微调。
#我这次训练mask_rcnn
#不指定--work-dir参数会在默认路径下保存。
python tools/train.py configs/mask_rcnn/mask_rcnn_r50_fpn_1x_coco.py
mask_rcnn_r50_fpn_1x_coco.py 内容
训练只有,会在默认路径work_dirs下生成对应网络的文件夹,文件夹里包含日志和权重。

测试
# 单GPU
python tools/test.py ${
     CONFIG_FILE} ${
     CHECKPOINT_FILE} [--out ${
     RESULT_FILE}] [--eval ${
     EVAL_METRICS}] [--show] [--cfg-options]

# 多GPU
./tools/dist_test.sh ${
     CONFIG_FILE} ${
     CHECKPOINT_FILE} ${
     GPU_NUM} [--out ${
     RESULT_FILE}] [--eval ${
     EVAL_METRICS}] [--cfg-options]

可选参数:

RESULT_FILE:输出结果的文件名采用pickle格式。如果未指定,结果将不会保存到文件中。
EVAL_METRICS:要根据结果评估的项目。允许的值取决于数据集,例如proposal_fast,proposal,bbox,segm可用于COCO, mAP,recall用于PASCAL VOC。Cityscapes可以通过cityscapes以及所有COCO指标进行评估。
--show:如果指定,检测结果将绘制在图像上并显示在新窗口中。它仅适用于单个GPU测试,并用于调试和可视化。请确保您的环境中可以使用GUI,否则您可能会遇到类似的错误cannot connect to X server。
--show-dir:如果指定,检测结果将绘制在图像上并保存到指定目录。它仅适用于单个GPU测试,并用于调试和可视化。您不需要环境中的GUI即可使用此选项。
--show-score-thr:如果指定,则得分低于此阈值的检测将被删除。
--cfg-options:如果指定,则使用的配置中的某些设置将被覆盖。
#我的测试命令
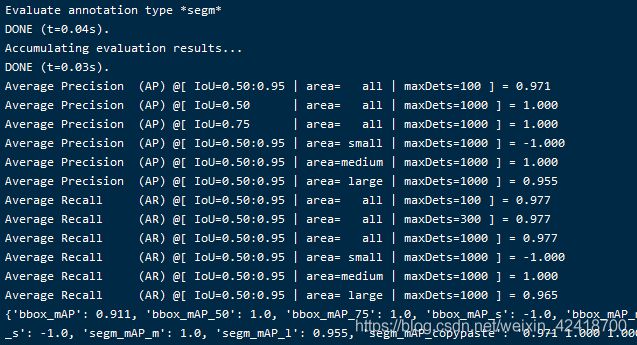
python tools/test.py configs/mask_rcnn/mask_rcnn_r50_fpn_1x_coco.py work_dirs/mask_rcnn_r50_fpn_1x_coco/epoch_12.pth --show-dir work_dirs/result --eval segm
训练其他网络的建议
训练其他网络应该大同小异,修改对应的参数即可。我的思路是先找到config目录下想要训练的网络,比如faster_rcnn下的faster_rcnn_r50_fpn_1x_coco.py,打开之后,根据自己的需求修改对应的文件即可。

另外,数据的格式并不一定要求coco,现在mmdetection支持很多数据集格式,有兴趣的可以去官网上面看看。
