apk加固是每一个app发布之前必须要做的事情;如果一个apk没有加固那么别人就很容易被别人反编译,看到这其中的原码,虽然现在有代码混淆、把业务写到native层,但是这都是治标不治本。反编译的技术在更新,那么保护Apk的技术就不能停止,虽然网上有很多加固的第三方框架,但是这加固的原理还是有必要去了解一下的,其实加固有些人认为很高深的技术,其实不然,说的简单点就是对源Apk的dex进行加密,然后在套上一层壳即可,当然这里还有一些细节需要处理,这就是本文需要介绍的内容了。
加固原理
1.在主工程中添加一个Module这个module就是用来给apk加壳用的。
2.在主工程中添加一个java的中lib库这个是用来加密主apk的dex、生成加固后的apk
一个apk需要启动系统会去解压这个apk去得用dex文件,去解析这些dex文件去启动改apk,因为要把这个主apk的dex加密来达到不被反编译的效果,所以这些dex文件已经被加密了,系统去加载这些dex文件肯定是会报错的。为了能让apk能正常启动那就应该要去启动这个壳的Application。所以得在app的AndroidManifest注册壳的Application;这样才能正常的启动App。
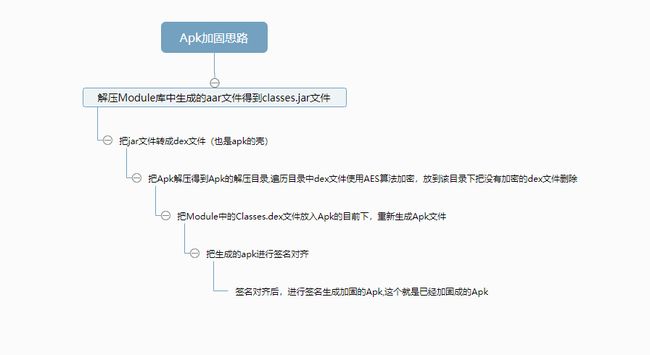
下面的Apk加固的流程图:
加密的流程
先要生成Module中的aar库,生成后要解压该库得apk的壳dex包,在proxy_tools的java库中进行加密
生成apk的壳文件(jar转dex)
        File aarFile = new File("proxy_core/build/outputs/aar/proxy_core-debug.aar");
        File aarTemp = new File("proxy_tools/temp");
        Zip.unZip(aarFile, aarTemp);
        File classesJar = new File(aarTemp, "classes.jar");
        File classesDex = new File(aarTemp, "classes.dex");
        Process process = null;
        try {
            process = Runtime.getRuntime().exec("cmd /c dx --dex --output " + classesDex.getAbsolutePath()
                    + " " + classesJar.getAbsolutePath());
        } catch (IOException e) {
            e.printStackTrace();
        }
        try {
            process.waitFor();
        } catch (InterruptedException e) {
            e.printStackTrace();
        }
        if (process.exitValue() != 0) {
            throw new RuntimeException("dex error");
        }
通过这样的操作就可以把aar中的jar转换成dex包了,这样apk的壳dex就可以得到了。
加密apk中的dex文件
 //下面加密码APK中所有的dex文件
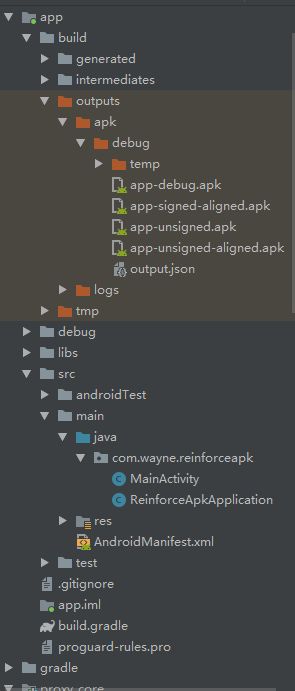
        File apkFile = new File("app/build/outputs/apk/debug/app-debug.apk");
        File apkTemp = new File("app/build/outputs/apk/debug/temp");
        //把apk解压出来
        Zip.unZip(apkFile, apkTemp);

        //只要dex文件拿出来加密
        File dexFiles[] = apkTemp.listFiles(new FilenameFilter() {
            @Override
            public boolean accept(File file, String s) {
                return s.endsWith(".dex");
            }
        });

        //进行AES加密
        AES.init(AES.DEFAULT_PWD);
        for (File dexFile : dexFiles) {
            try {
                byte[] bytes = Utils.getBytes(dexFile);
                byte[] encrypt = AES.encrypt(bytes);
                FileOutputStream fileOutputStream = new FileOutputStream(new File(apkTemp,
                        "secret-" + dexFile.getName()));
                fileOutputStream.write(encrypt);
                fileOutputStream.flush();
                fileOutputStream.close();
                dexFile.delete();//删除没有加密的dex
            } catch (Exception e) {
                e.printStackTrace();
            }
        }
这样就进行了apk中的dex文件加密,加密完成后需要把壳dex文件放到apk的目录下生成新apk文件。
重新生成apk文件
        //把dex放入apk解压路径中,重新生成apk文件
        classesDex.renameTo(new File(apkTemp, "classes.dex"));
        File unSignedApk = new File("app/build/outputs/apk/debug/app-unsigned.apk");
        try {
            //生未签名的apk
            Zip.zip(apkTemp, unSignedApk);
        } catch (Exception e) {
            e.printStackTrace();
        }
新的apk已经生成,下面就要签名对齐
新apk的签名对齐
        //4.签名对齐
        File alignedApk = new File("app/build/outputs/apk/debug/app-unsigned-aligned.apk");
        try {
            process = Runtime.getRuntime().exec("cmd /c zipalign -v -p 4 " + unSignedApk.getAbsolutePath()
                    + " " + alignedApk.getAbsolutePath());
        } catch (IOException e) {
            e.printStackTrace();
        }
        try {
            process.waitFor();
        } catch (InterruptedException e) {
            System.out.println("exception " + e.toString());
            e.printStackTrace();
        }
签名对齐后这样就可以签名生成可以运行的apk了
签名生成可以运行的apk文件
        File jskFile = new File("proxy_tools/proxy.jks");
        System.out.println("开始签名");
        try {
            process = Runtime.getRuntime().exec("cmd /c apksigner sign --ks " + jskFile.getAbsolutePath()
                    + " --ks-key-alias qwert --ks-pass pass:123456 --key-pass pass:123456 --out "
                    + signedApk.getAbsolutePath() + " " + alignedApk.getAbsolutePath());
            System.out.println("签名完成");
        } catch (IOException e) {
            e.printStackTrace();
        }
        try {
            process.waitFor();
        } catch (InterruptedException e) {
            e.printStackTrace();
        }
        if (process.exitValue() != 0) {
            throw new RuntimeException("signed apk error");
        }
        System.out.println("生成apk成功");
    }
到这里加密部分的已经完成,加密完成后就可以进行解密操作了。
解密流程
在解密之前先说一下apk安装后都会在/data/app/包名-xxx/生成一个叫base.apk的文件,这个是文件是apk中的所有dex文件一个包,所以需要拿到这个base.apk中的dex进行解密。
        File apkFile = new File(getApplicationInfo().sourceDir);
        Log.d(TAG,"apk的路径:"+apkFile.getAbsolutePath());

        File versionDir = getDir(app_name+"_"+ app_version,MODE_PRIVATE);
        File appDir = new File(versionDir,"app");
        File dexFile = new File(appDir,"dexDir");

        //得用我们的需要加载的dex文件
        List dexFiles = new ArrayList<>();

        if(MD5.verification(dexFile)){
            //把apk解压出来
            Zip.unZip(apkFile,appDir);
            //获取目录下所有文件
            File [] files = appDir.listFiles();
             for(File file : files){
                 String name = file.getName();
                 Log.d(ProxyApplication.class.getName(),"dexName:"+name);
                 if(name.endsWith(".dex") &&!TextUtils.equals(name,"classes.dex")){
                     AES.init(AES.DEFAULT_PWD);
                     //读取文件内容
                     try {
                         byte[] bytes = Utils.getBytes(file);
                         //解密
                         byte[] decrypt = AES.decrypt(bytes);

                         FileOutputStream fileOutputStream = new FileOutputStream(file);
                         fileOutputStream.write(decrypt);
                         fileOutputStream.flush();
                         fileOutputStream.close();
                         dexFiles.add(file);
                     } catch (Exception e) {
                         e.printStackTrace();
                     }
                 }
             }
        }else {
            for(File file : dexFile.listFiles()){
                dexFiles.add(file);
            }
        }
        //加载解密后的dex文件到系统
        try {
            loadDex(dexFiles,versionDir);
        } catch (Exception e) {
            e.printStackTrace();
        }
这里就已经完成了dex文件的解密,接下来的就应该把解密后的dex文件交给系统处理让它去运行apk。
把dex交给系统处理
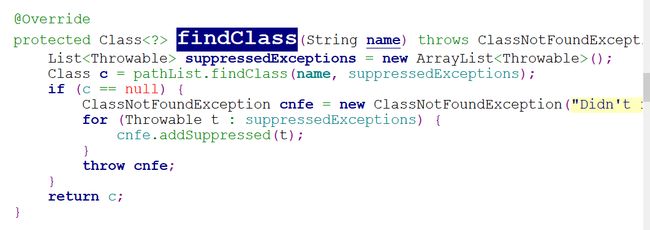
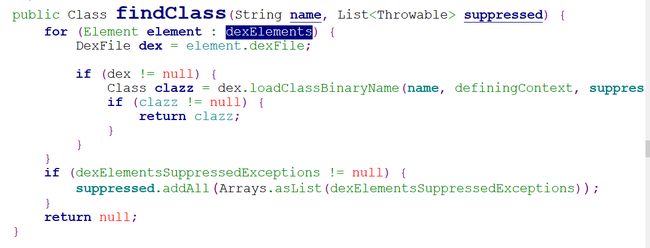
要把已经解密好的dex文件交给系统,那么首先要知道系统是如何的加载dex文件的,只有搞懂系统是如何的加载dex文件的才能把已经解密好的dex文件交给系统;getClassLoader这个方法相信我们都不陌生了,通过查看系统原码发现这个getClassLoader返回的ClassLoader是具体实现是一个叫PathClassLoader的类,这个类在系统原码中看到只有构造方法就没有其它的方法了,那再往它的父类中看,它的父类是一个叫BaseDexClassLoader通过查看里面的方法可以看到有一个findClass的方法去加载这些类。findClass这个类又调用了pathList的里面的findClass方法,那个这个pathList又是什么呢?这个pathList是一个叫DexPathList的类,那再到DexPathList中查看这个findClass方法干了什么事情?下面这个就是DexPathList里面的findClass方法
通过上面的代码可以看出这个DexPathList中的findClass方法是在遍历一个叫dexElements的一个数组来生成Class对象;接下就要找这个dexElements数组是在哪里被初始化的呢?通过查看DexPathList这个类的构造方法发现这个dexElements是通过一个叫makePathElements的方法来完成初始化的。
到这里就已经知道系统是如何加载dex文件的,那么已经的解密好的dex文件要放到系统的dexElements中才能被系统加载到,系统是调用makePathElements方法去生成的dexElements数组,那么我们也可以通过反射的去调用这个方法生成一个自已的dexElements数组,再将自已的dexElement数组和系统的dexElements数组合并一个新数组设置到这个DexPathList中。
private void loadDex(List dexFiles,File versionDir) throws Exception{
        //通过查看源码我们可以知道系统存放dex是用一个数组存的:dexElements,而dexElements是DexPathList的成员
        Field pathListField = Utils.findField(getClassLoader(),"pathList");
        Object pathList = pathListField.get(getClassLoader());
        Field dexElementsFieId = Utils.findField(pathList,"dexElements");

        //这个是DexPathList里面的原始数据,也就是系统中的dexElements数组
        Object dexElements[] = (Object[]) dexElementsFieId.get(pathList);

        //构建自已的dexElement
        Method makeDexElements = Utils.findMethod(pathList,"makePathElements",List.class,File.class,List.class);
        ArrayList suppressedExceptions = new ArrayList();
        Object[] mCustomDexElements = (Object[]) makeDexElements.invoke(pathList,dexFiles,versionDir,suppressedExceptions);

        //合并数组
        Object newElements = Array.newInstance(dexElements.getClass().getComponentType(),dexElements.length+mCustomDexElements.length);
        System.arraycopy(dexElements,0,newElements,0,dexElements.length);
        System.arraycopy(mCustomDexElements,0,newElements,dexElements.length,mCustomDexElements.length);

        //替换掉classloader中的elements数组
        dexElementsFieId.set(pathList,newElements);


    }
通过反射的就把解密的dex文件生成dexElements数组,再和系统的dexElements合并生成一个新数组替换掉DexPathList中的dexElements就达到交给系统处理效果。
总结
apk加固后主dex文件已经是看不到原码,只能看壳的dex文件中的原码,这样就达到了加固的效果,但是这样做还是不够完善,因为主App的Application已经是没有用了,这个问题的解决方法请到apk加固二中查看。
apk加固二https://www.jianshu.com/p/67feffa9bff3
如果大家在看的时候如果有错误的地方欢迎指出,我们共同进步。


