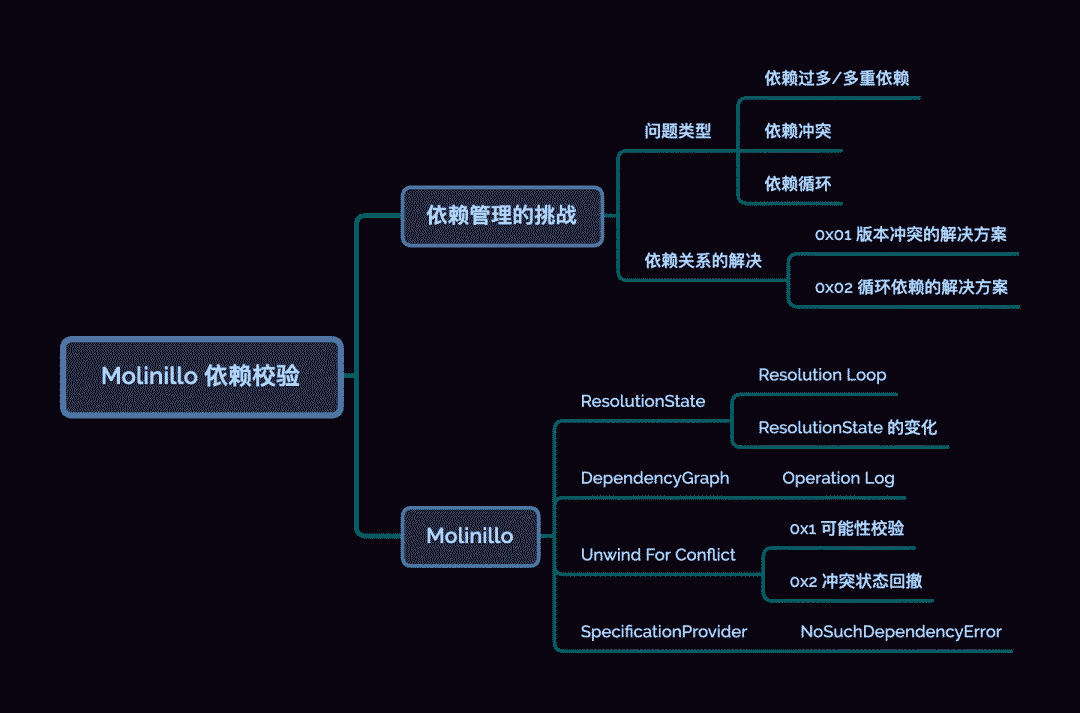
7. Molinillo 依赖校验
引子
通过「PodSpec 管理策略」对 CocaPods-Core 的分析,我们大体了解了 Pod 是如何被解析、查询与管理的。有了这些整体概念之后,我们就可以逐步深入 pod install 的各个细节。
今天我们就来聊聊 Pod 的依赖校验工具 --- Molinillo[1]。
开始前,需要聊聊依赖校验的背景。
依赖管理的挑战
同大多数包管理工具一样 Pod 会将传递依赖的包用扁平化的形式,安装至 workspace 目录 (即:Pods/)。
依赖传递:pod A 依赖于 pod B,而 pod B 依赖 Alamofire。
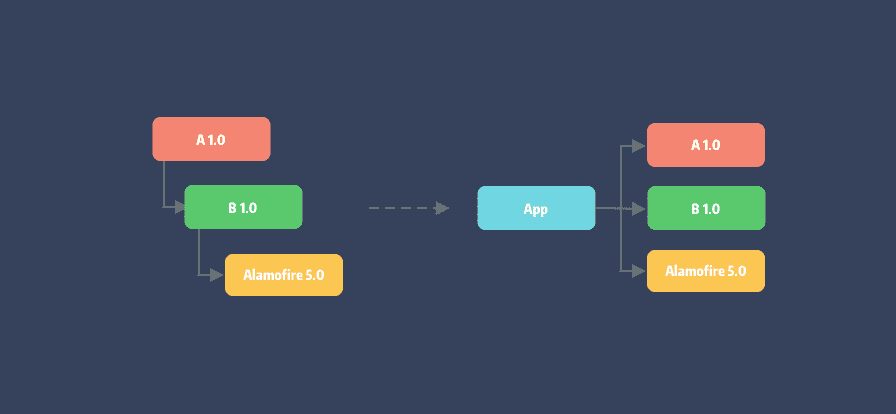
可以看到,经依赖解析原有的依赖树被拍平了,安装在同层目录中。
然而在大型项目中,遇到的更多情况可能像下面这样:
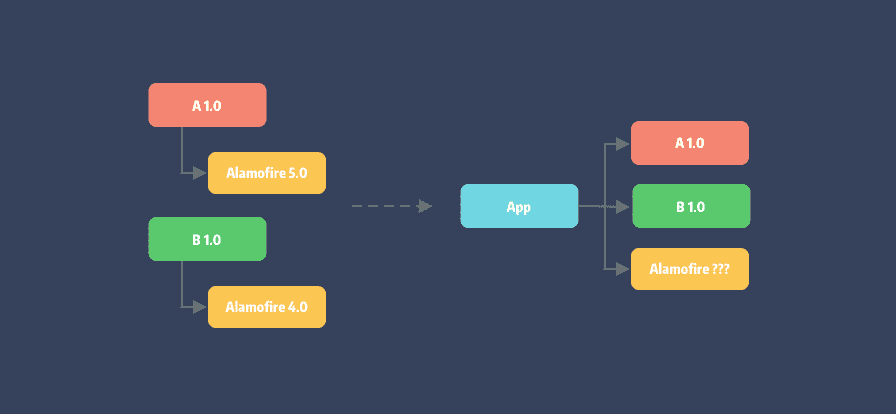
依赖冲突: 即 pod A 和 pod B 分别依赖不同版本的 Alamofire。这就是 依赖地狱[2] 的开始。
依赖地狱:指在操作系统中由于软件之间的依赖性不能被满足而引发的问题。
随着项目的迭代,我们不断引入依赖并最终形成错综复杂的网络。这使得项目的依赖性解析变得异常困难,甚至出现 致命错误[3]。
那么,产生的问题有哪些类型 ?
问题类型
依赖过多/多重依赖
即项目存在大量依赖关系,或者依赖本身有其自身依赖(依赖传递),导致依赖层级过深。像微信或淘宝这样的超级应用,其中的单一业务模块都可能存在这些问题,这将使得依赖解析过于复杂,且容易产生依赖冲突和依赖循环。
依赖冲突
即项目中的两个依赖包无法共存的情况。可能两个依赖库内部的代码冲突,也可能其底层依赖互相冲突。上面例子中因 Alamofire 版本不同产生的问题就是依赖冲突。
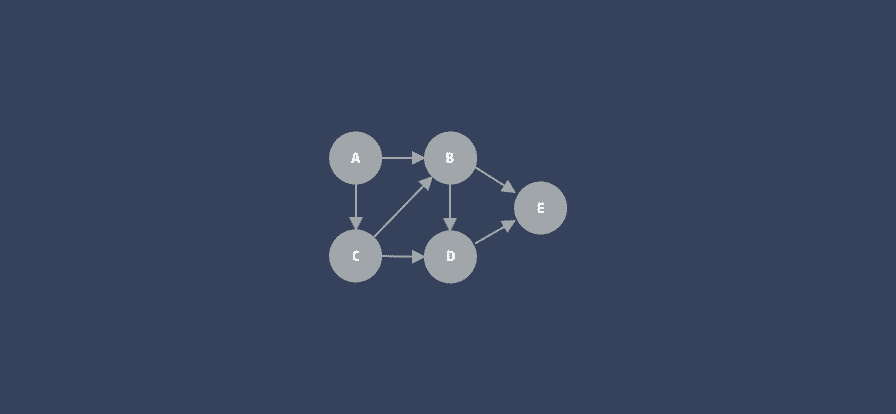
依赖循环
即依赖性关系形成一个闭合环路。如下图三个 pod 库之间互相依赖产生循环:

要判断依赖关系中是否存在依赖环,则需要通依赖仲裁算法来解决。
依赖关系的解决
对于依赖过多或者多重依赖问题,我们可通过合理的架构和设计模式来解决。而依赖校验主要解决的问题为:
检查依赖图是否存在版本冲突;
判断依赖图是否存在循环依赖;
版本冲突的解决方案
对于版本冲突可通过修改指定版本为带兼容性的版本范围问题来避免。如上面的问题有两个解决方案:
通过修改两个
pod的Alamofire版本约束为~> 4.0来解决。去除两个
pod的版本约束,交由项目中的Podfile来指定。
不过这样会有一个隐患,由于两个 Pod 使用的主版本不同,可能带来 API 不兼容,导致 pod install 即使成功了,最终也无法编译或运行时报错。
还有一种解决方案,是基于语言特性来进行依赖性隔离。如 npm 的每个传递依赖包如果冲突都可以有自己的 node_modules 依赖目录,即一个依赖库可以存在多个不同版本。

循环依赖的解决方案
循环依赖则需要需要进行数学建模生成 DAG 图,利用拓扑排序的拆点进行处理。通过确定依赖图是否为 DAG 图,来验证依赖关系的合理性。
一个 DAG 图的示例:
DAG 是图论中常见的一种描述问题的结构,全称 有向无环图 (Directed Acyclic Graph)。想了解更多,可查看冬瓜的文章 --- 「从拓扑排序到 Carthage 依赖校验算法」。
另外,各种包管理工具的依赖校验算法也各不相同,有如 Dart 和 SwiftPM 所使用的 PubGrub[4],作者号称其为下一代依赖校验算法,Yarn 的 Selective dependency resolutions[5],还有我们今天聊到的 Molinillo。
Molinillo
Molinillo 作为通用的依赖解析工具,它不仅应用在 CocoaPods 中,在 Bundler 1.9 版本也采用 Molinillo。另外,值得注意的是 Bundler 在 Ruby 2.6 中被作为了默认的 Gem 工具内嵌。可以说 Ruby 相关的依赖工具都通过 Molinillo 完成依赖解析。
ResolutionState
Molinillo 算法的核心是基于回溯 (Backtracking)[6] 和 [向前检查 (forward checking)](https://en.wikipedia.org/wiki/Look-ahead_(backtracking "向前检查 (forward checking)")),整个过程会追踪栈中的两个状态 DependencyState 和 PossibilityState。
module Molinillo
# 解析状态
ResolutionState = Struct.new(
# [String] 当前需求名称
:name,
# [Array光看 state 定义大家可能觉得云里雾里。这里很有必要解释一下:
我们说的需求 (requirement) 到底是指什么呢?大家可以理解为在 Podfile 中声明的 pod。之所以称为需求,是由于无法判断定义的 dependency 是否合法。 假设它合法,又是否存在符合需求限制版本的解呢 ?即是否存在对应的 PodSpec 我们不而知。因此,这些未知状态称为统一被可能性 possibility。
Tips: 了解这个概念非常重要,这也是笔者在几乎写完本文的情况下,才想明白这些变量名的意义。????
Resolution Loop
我们先通过图来了解一下 Molinillo 的核心流程 (先忽略异常流):
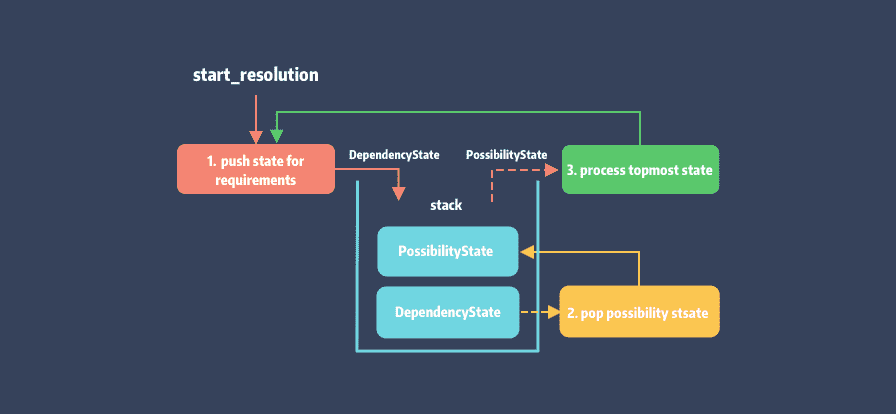
可以看到整个流程就是不断的将 requirement 的 possibility 过滤和处理,一层层剥离转换为 DependencyState,如此循环往复。
Molinillo 的入口为 Resolution::resolve 方法,也是上图对应的实现,逻辑如下:
# lib/molinillo/resolution.rb

def resolve
  # 1. 初始化 timer 统计耗时初始位置打点
  # 2. 内部会调用 push_initial_state 初始化 DependencyState 压栈
  # 3. 初始化 DependencyGraph 实例
  start_resolution

  while state
    break if !state.requirement && state.requirements.empty?
    # 输出一个进度占位
    indicate_progress
    if state.respond_to?(:pop_possibility_state) # DependencyState
      # 调试日志入口
      # 如果环境变量 MOLINILLO_DEBUG 是非 nil 就输出 log
      # 这里的调试日志有助于排查 Pod 组件的依赖问题
      debug(depth) { "Creating possibility state for #{requirement} (#{possibilities.count} remaining)" }
      state.pop_possibility_state.tap do |s|
        if s
          states.push(s)
          activated.tag(s)
        end
      end
    end
    # 处理栈顶 Possibility State
    process_topmost_state
  end
 # 遍历 Dependency Graph
  resolve_activated_specs
ensure
  end_resolution
end
首先
#start_resolution会初始化 timer 用于统计解析耗时,在这个方法中还会调用#push_initial_state初始化DependencyState入栈,以及DependencyGraph初始化。获取栈顶
state检查是否存在待解析需求,接着调用#pop_possibility_state进行state转换并入栈。调用
#process_topmost_state处理栈顶的 Possibility State,如果当前 state 可被激活,则将该 Possiblity 存入DependencyGraph对应顶点的 payload 中。否则判定为冲突,需要进行状态回滚。循环直到 state 的可能性全部处理结束。
调用
#resolve_activated_specs,遍历DependencyGraph以存储更新需求的可能性,解析结束。
当然,依赖处理并非这么简单,复杂的过滤和回溯逻辑都隐藏在 #process_topmost_state 中。
ResolutionState 的变化
其实从 ResolutionState 的定义能够看出,为了方便回溯和数据还原,state 是以 Struct 结构定义的。同时在每次 #pop_possibility_state 中,通过 #dup[7] 对 diff 数据进行了复制。
这里用依赖传递的例子来展示解析后状态栈的变化。假设我们在 Podfile 中声明了 A,B,C 三个依赖,他们的关系为:A -> B -> C。
target 'Example' do
  pod 'C', :path => '../'
  pod 'B', :path => '../'
  pod 'A', :path => '../’
end
在 #resolve_activated_specs 方法设置断点,在解析结束时打印状态栈 @states(简化处理后)如下:
 [
   #,
   #
   #
   #
   # 省略了 C、C、A、A...
   #
可以看到栈内保存的 states 中 DependencyState 与 PossibilityState 是成对出现的。不过最后入栈的 DependencyState 是一个空状态,requirements 也为空,此时无法再 pop state 循环结束。
DependencyGraph
其实包括 Molinillo 在内的依赖解析工具都会在运行期间对依赖关系进行建模来构建依赖图,毕竟这是我们表达依赖关系的方式。那么 DependencyGraph (以下简称 dg ) 是如何定义:
module Molinillo

  class DependencyGraph
    # 有向边
    Edge = Struct.new(:origin, :destination, :requirement)
    # @return [{String => Vertex}] 用字典保存顶点, key 为顶点名称(即 requirement.name)
    attr_reader :vertices
    # @return [Log] 操作日志
    attr_reader :log
  ...
end
另外 Vertex 定义如下:
module Molinillo
class DependencyGraph
class Vertex
attr_accessor :name
# @return [Object] 顶点的元数据,reqiuremnt 对应的 possiblity
attr_accessor :payload
# @return [Array熟悉图论的同学都了解,图的保存常用的方式是邻接表和邻接矩阵。
Molinillo 则通过 map + list,vertext 字典与边集数组来保存。如果仅用边集数组来查询顶点本身效率并不高,好在顶点直接用了字典保存了。
Molinillo 通过栈来维护解析状态,不断将解析结果 possibility 存入 dg 的 payload 中,同时记录了各个顶点的依赖关系,即 dg 的出度和入度。

在有向图中对于一个顶点来说,如果 Molinillo 则通过 map + list,v一条边的终点是这个顶点,这条边就是这个顶点的入度;
在有向图中对于一个顶点来说,如果一条边的起点是这个顶点,这条边就是这个顶点的出度。
当成功解析的一刻,dg 图也构建完毕。
Operation Log
当解析过程出现冲突时,状态栈要回溯直接 pop 一下就完事了,而 dg 咋办 ? 它可没法 pop。
好在 Molinillo 设计了 Operation Log 机制,通过 Log 记录 dg 执行过的操作。这些操作类型包括:AddEdgeNoCircular、AddVertex、DeleteEdge、DetachVertexNamed、SetPayload、Tag。
Log 结构如下:
# frozen_string_literal: true

module Molinillo
  class DependencyGraph
    class Log
      def initialize
        @current_action = @first_action = nil
      end

      def pop!(graph)
        return unless action = @current_action
        unless @current_action = action.previous
          @first_action = nil
        end
        action.down(graph)
        action
      end

      # 回撤到指定的操作节点
      def rewind_to(graph, tag)
        loop do
          action = pop!(graph)
          raise "No tag #{tag.inspect} found" unless action
          break if action.class.action_name == :tag && action.tag == tag
        end
      end

      private

      # 插入操作节点
      def push_action(graph, action)

        action.previous = @current_action
        @current_action.next = action if @current_action
        @current_action = action
        @first_action ||= action
        action.up(graph)
      end
      ...
    end
  end
end
标准的链表结构,Log 提供了当前指针 @current_action 和表头指针 @first_action 便于链表的遍历。接着看看 Action:
# frozen_string_literal: true

module Molinillo
  class DependencyGraph

    class Action
      # @return [Symbol] action 名称
      def self.action_name
        raise 'Abstract'
      end

      # 对图执行正向操作
      def up(graph)
        raise 'Abstract'
      end

      # 撤销对图的操作
      def down(graph)
        raise 'Abstract'
      end

      # @return [Action,Nil] 前序节点
      attr_accessor :previous
      # @return [Action,Nil] 后序节点
      attr_accessor :next
    end
  end
end
Action 本身是个抽象类,Log 通过 Action 子类的 #up、#down 来完成对 dg 的操作和撤销。所提供的 Action 中除了 Tag 特殊一点,其余均是对 dg 的顶点和边的 CURD 操作。这里以 AddVertex 为例:
# frozen_string_literal: true

require_relative 'action'
module Molinillo
  class DependencyGraph
  # @!visibility private
    class AddVertex < Action # :nodoc:
      def self.action_name
        :add_vertex
      end

      # 操作添加顶点
      def up(graph)
        if existing = graph.vertices[name]
          @existing_payload = existing.payload
          @existing_root = existing.root
        end
        vertex = existing || Vertex.new(name, payload)
        graph.vertices[vertex.name] = vertex
        vertex.payload ||= payload
        vertex.root ||= root
        vertex
      end

      # 删除顶点
      def down(graph)
        if defined?(@existing_payload)
          vertex = graph.vertices[name]
          vertex.payload = @existing_payload
          vertex.root = @existing_root
        else
          graph.vertices.delete(name)
        end
      end

      # @return [String] 顶点名称 (或者说依赖名称)
      attr_reader :name
      # @return [Object] 顶点元数据
      attr_reader :payload
      # @return [Boolean] 是否为根
      attr_reader :root
  ...
    end
  end
end
Action 子类均声明为 private 的,通过 Log 提供的对应方法来执行。
def tag(graph, tag)
  push_action(graph, Tag.new(tag))
end

def add_vertex(graph, name, payload, root)
  push_action(graph, AddVertex.new(name, payload, root))
end

def detach_vertex_named(graph, name)
  push_action(graph, DetachVertexNamed.new(name))
end

def add_edge_no_circular(graph, origin, destination, requirement)
  push_action(graph, AddEdgeNoCircular.new(origin, destination, requirement))
end

def delete_edge(graph, origin_name, destination_name, requirement)
  push_action(graph, DeleteEdge.new(origin_name, destination_name, requirement))
end

def set_payload(graph, name, payload)
  push_action(graph, SetPayload.new(name, payload))
end
最后 log 声明的这些方法会由 dg 直接调用,如 #addVertext:
module Molinillo
  class DependencyGraph
    def add_vertex(name, payload, root = false)
      log.add_vertex(self, name, payload, root)
    end
    ...
  end
end
Unwind For Conflict
有了 op log 之后我们还需要一样重要的东西:哨兵节点。由 Tag 类来承载:
# frozen_string_literal: true
module Molinillo
  class DependencyGraph
    # @!visibility private
    class Tag < Action

      def up(graph)
      end

      def down(graph)
      end

      attr_reader :tag

      def initialize(tag)
        @tag = tag
      end
    end
  end
end
作为哨兵节点 Tag 的 #up 与 #down 操作总是成对出现的。在 Molinillo 中有两处需要进行状态回溯,分别为可能性校验和冲突状态回撤。
可能性校验
#possibility_satisfies_requirements? 方法用于冲突产生的前后,用于判断该可能性能否同时满足多个需求:
def possibility_satisfies_requirements?(possibility, requirements)
  name = name_for(possibility)

  activated.tag(:swap)
  activated.set_payload(name, possibility) if activated.vertex_named(name)
  satisfied = requirements.all? { |r| requirement_satisfied_by?(r, activated, possibility) }
  activated.rewind_to(:swap)

  satisfied
end
为了直观的说明参数,我们举个例子。Case 1假设 Podfile 中存在 pod A 和 B,且 A、B 分别依赖了 Alamofire 3.0 和 4.0,那么对应的参数为:
possibility: #
requirements: [
  3.0 source=nil external_source=nil>,    4.0 source=nil external_source=nil>
]
现在来看方法实现:
首先
activated就是 Podfile 解析生成的 dg 对象,这里将 symbol:swap作为标识用于稍后的回撤;调用
#set_payload将顶点 Alamofire 的 payload 修改为 possibility 版本;遍历 requirements 并调用代理的
#requirement_satisfied_by以校验 possiblity 在 dg 中存在的可能性;调用
#rewind_to将顶点的修改回撤至:swap前的状态,最后返回检验结果。
Tips: 此处的代理是指 CocoaPods,它做为 Molinillo 的 client 实现了很多代理方法,后续会聊到。
作为候选项 possibility 当然不止一个,代理提供的查询方法 #search_for(dependency) 会返回所有符合 requiremnt 名称的依赖。在 CocoaPods 中,就是通过 Pod::Source 查询获得所有版本的 Pod::Specification,具体可以看上一篇文章:PodSpec 管理策略[8]。
冲突状态回撤
依赖解析过程出现冲突属于正常情况,此时通过回撤也许可以避免部分冲突,找出其它可行解。Molinillo 通过定义 Conflict 来记录当前的冲突的必要信息:
Conflict = Struct.new(
  :requirement,
  :requirements,
  :existing,
  :possibility_set,
  :locked_requirement,
  :requirement_trees,
  :activated_by_name,
  :underlying_error
)
重点关注 underlying_error,它记录了所拦截的指定类型错误,并用于状态回撤时的一些判断依据 (后面会解释)。这里我们先看一下定义的错误类型:
# frozen_string_literal: true

module Molinillo

  class ResolverError < StandardError; end

  # 错误信息:"Unable to find a specification for `#{dependency}`"
  class NoSuchDependencyError < ResolverError ... end

  # 错误信息:"There is a circular dependency between ..."
  class CircularDependencyError < ResolverError ... end

  # 当出现版本冲突时抛出
  # 错误信息:"Unable to satisfy the following requirements:\n\n ..."
  class VersionConflict < ResolverError ... end
end
除了主动拦截错误之外,possiblity 不存在时也会主动生成冲突,同时进入状态回撤处理。发生冲突后调用 #create_conflict 和 #unwind_for_conflict 两个方法分别用于生成 Conflict 对象和状态回撤。
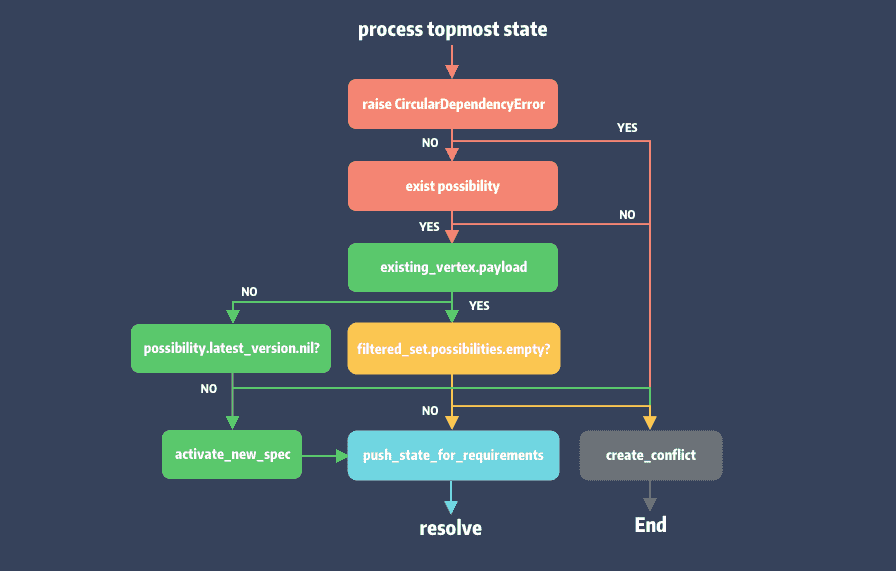
def process_topmost_state
  if possibility
    attempt_to_activate
  else
    create_conflict
    unwind_for_conflict
  end
rescue CircularDependencyError => underlying_error
  create_conflict(underlying_error)
  unwind_for_conflict
end

def attempt_to_activate
  debug(depth) { 'Attempting to activate ' + possibility.to_s }
  existing_vertex = activated.vertex_named(name)
  if existing_vertex.payload
    debug(depth) { "Found existing spec (#{existing_vertex.payload})" }
    attempt_to_filter_existing_spec(existing_vertex)
  else
    latest = possibility.latest_version
    possibility.possibilities.select! do |possibility|
      requirement_satisfied_by?(requirement, activated, possibility)
    end
    if possibility.latest_version.nil?
      # ensure there's a possibility for better error messages
      possibility.possibilities << latest if latest
      create_conflict
      unwind_for_conflict
    else
      activate_new_spec
    end
  end
end

def attempt_to_filter_existing_spec(vertex)
  filtered_set = filtered_possibility_set(vertex)
  if !filtered_set.possibilities.empty?
    activated.set_payload(name, filtered_set)
    new_requirements = requirements.dup
    push_state_for_requirements(new_requirements, false)
  else
    create_conflict
    debug(depth) { "Unsatisfied by existing spec (#{vertex.payload})" }
    unwind_for_conflict
  end
end
可以看到这 3 个方法中处理了 4 处冲突的情况。其中 #process_topmost_state 方法拦截了 CircularDependencyError 并将其记录在 Conflict 的 underlying_error 中,其余的都是因为 possibility 可行解不存在而主动抛出冲突。
我们简化成下面的状态图:
可以理解 possiblity 状态机,通过不断检查可能性,一旦出错主动生成异常。为什么要这么做 ?因为状态回溯的成本是很高的,一旦发生意味着我们之前检查工作可能就白费了。这也是 Molinillo 前向查询的充电,通过提早暴露问题,提前回溯。
unwind_for_conflict
了解了冲突时如何产生之后,接下来该 #unwind_for_conflict 登场了:
def unwind_for_conflict
  details_for_unwind = build_details_for_unwind
  unwind_options = unused_unwind_options
  debug(depth) { "Unwinding for conflict: #{requirement} to #{details_for_unwind.state_index / 2}" }
  conflicts.tap do |c|
    sliced_states = states.slice!((details_for_unwind.state_index + 1)..-1)
    raise_error_unless_state(c)
    activated.rewind_to(sliced_states.first || :initial_state) if sliced_states
    state.conflicts = c
    state.unused_unwind_options = unwind_options
    filter_possibilities_after_unwind(details_for_unwind)
    index = states.size - 1
    @parents_of.each { |_, a| a.reject! { |i| i >= index } }
    state.unused_unwind_options.reject! { |uw| uw.state_index >= index }
  end
end
冲突回溯就涉及到前面说过的两个状态需要处理,分别是状态栈 @states 和 dg 内容的回溯。@state 本身是数组实现的,其元素是各个状态的 state, 要回溯到指定的 state 则要利用 state_index,它保存在 UnwindDetails 中:
UnwindDetails = Struct.new(
  :state_index,
  :state_requirement,
  :requirement_tree,
  :conflicting_requirements,
  :requirement_trees,
  :requirements_unwound_to_instead
)

class UnwindDetails
  include Comparable
  ...
end
这里解释一下 requirement_trees,这里是指以当前需求作为依赖的需求。以上面的 Case 1 为例,当前冲突的 requirement 就是 Alamofire,对应 requirement_trees 就是依赖了 Alamofire 的 Pod A 和 B:
[
  [
    ,
     3.0 ...>
  ],[
    ,
     4.0 ...>
  ]
]
#build_details_for_unwind 主要用于生成 UnwindDetails,大致流程如下:
def build_details_for_unwind
  current_conflict = conflicts[name]
  binding_requirements = binding_requirements_for_conflict(current_conflict)
  unwind_details = unwind_options_for_requirements(binding_requirements)

  last_detail_for_current_unwind = unwind_details.sort.last
  current_detail = last_detail_for_current_unwind

  # filter & update details options
  ...
  current_detail
end
以 conflict.requirement 为参数,执行
#binding_requirements_for_conflict以查找出存在冲突的需求 binding_requirements。查询是通过代理的#search_for(dependency)方法;通过
#unwind_options_for_requirements遍历查询到的 binding_requirements 获取 requirement 对应的 state 以及该 state 在栈中的 index,用于生成 unwind_details;对 unwind_details 排序,取 last 作为 current_detail 并进行其他相关的修改。
关于如何获取 state_index 和 unwind_details:
def unwind_options_for_requirements(binding_requirements)
  unwind_details = []

  trees = []
  binding_requirements.reverse_each do |r|
    partial_tree = [r]
    trees << partial_tree
    unwind_details << UnwindDetails.new(-1, nil, partial_tree, binding_requirements, trees, [])
    # 1.1 获取 requirement 对应的 state
    requirement_state = find_state_for(r)
    # 1.2 确认 possibility 存在
    if conflict_fixing_possibilities?(requirement_state, binding_requirements)
      # 1.3 生成 detail 存入 unwind_details
      unwind_details << UnwindDetails.new(
        states.index(requirement_state),
        r,
        partial_tree,
        binding_requirements,
        trees,
        []
      )
    end

    # 2. 沿着 requirement 依赖树的父节点获取其 state
    parent_r = parent_of(r)
    next if parent_r.nil?
    partial_tree.unshift(parent_r)
    requirement_state = find_state_for(parent_r)
    # 重复 1.2, 1.3 步骤 ...

    # 6. 沿着依赖树,重复上述操作
    grandparent_r = parent_of(parent_r)
    until grandparent_r.nil?
      partial_tree.unshift(grandparent_r)
      requirement_state = find_state_for(grandparent_r)
      # 重复 1.2、1.3 步骤 ...
      parent_r = grandparent_r
      grandparent_r = parent_of(parent_r)
    end
  end

  unwind_details
end
确认 state_index 后,栈回溯反而比较简单了,直接 #slice! 即可:
sliced_states = states.slice!((details_for_unwind.state_index + 1)..-1)
dg 回撤还是 activated.rewind_to(sliced_states.first || :initial_state) if sliced_states。回撤结束后,流程重新回到 Resolution Loop。
SpecificationProvider
最后一节简单聊聊 SpecificationProvider。为了更好的接入不同平台,同时保证 Molinillo 的通用性和灵活性,作者将依赖描述文件查询等逻辑抽象成了代理。
SpecificationProvider 作为单独的 Module 声明了接入端必须实现的 API:
module Molinillo
   module SpecificationProvider

    def search_for(dependency)
      []
    end

    def dependencies_for(specification)
      []
    end
    ...
  end
end
而 Provider 就是在 Molinillo 初始化的时候注入的:
require_relative 'dependency_graph'

module Molinillo

  class Resolver
    require_relative 'resolution'

    attr_reader :specification_provider
    attr_reader :resolver_ui

    def initialize(specification_provider, resolver_ui)
      @specification_provider = specification_provider
      @resolver_ui = resolver_ui
    end

    def resolve(requested, base = DependencyGraph.new)
      Resolution.new(specification_provider,
                     resolver_ui,
                     requested,
                     base).
        resolve
    end
  end
end
而在 CocoaPods 中的初始化方法则是:
# /lib/CocoaPods/resolver.rb
def resolve
  dependencies = @podfile_dependency_cache.target_definition_list.flat_map do |target|
    @podfile_dependency_cache.target_definition_dependencies(target).each do |dep|
      next unless target.platform
      @platforms_by_dependency[dep].push(target.platform)
    end
  end.uniq
  @platforms_by_dependency.each_value(&:uniq!)
  @activated = Molinillo::Resolver.new(self, self).resolve(dependencies, locked_dependencies)
  resolver_specs_by_target
rescue Molinillo::ResolverError => e
  handle_resolver_error(e)
end
该方法则处于 pod install 中的 resolve dependencies 阶段:

NoSuchDependencyError
另外,为了更好的处理产生的异常,同时保证核心逻辑对 provider 的无感知,Molinillo 将代理方法做了一层隔离,并且对异常做了统一拦截:
module Molinillo
  module Delegates

    module SpecificationProvider

      def search_for(dependency)
        with_no_such_dependency_error_handling do
          specification_provider.search_for(dependency)
        end
      end

      def dependencies_for(specification)
        with_no_such_dependency_error_handling do
          specification_provider.dependencies_for(specification)
        end
      end

      ...

      private

      def with_no_such_dependency_error_handling
        yield
      rescue NoSuchDependencyError => error
        if state
          ...
        end
        raise
      end
    end
  end
end
总结
本篇文章从依赖解析的状态维护、状态存储、状态回溯三个维度来解构 Molinillo 的核心逻辑,它们分别对应了 ResolutionState、DependencyGraph、UnwindDetail 这三种数据结构。
一开始写这篇内容时,头脑中对于这些概念是未知的,因为一开始就直接看了作者对 Molinillo 的架构阐述[9]更是完全找不到思绪,好在我有 VSCode !
最终依据不同 Case 下的数据呈现,一点点的进行源码调试,大致摸清的 Molinillo 的状态是如何变化转移的。最后一点,英文和数据结构还是很重要的,possiblity 你理解了吗 ?
知识点问题梳理
这里罗列了五个问题用来考察你是否已经掌握了这篇文章,如果没有建议你加入收藏再次阅读:
说说 Resolution 栈中的 state 是如何转移的 ?
DependencyGraph 的数据通过什么方式进行回撤的 ?
#process_topmost_state处理了几种 conflict 情况 ?UnwindDetail 的 state_index 是如何获取的 ?
作者如何利用 SpecificationProvider 来解偶的 ?
参考资料
[1]
Molinillo: https://github.com/CocoaPods/Molinillo
[2]依赖地狱: https://www.wikiwand.com/zh-hans/%E7%9B%B8%E4%BE%9D%E6%80%A7%E5%9C%B0%E7%8B%B1
[3]致命错误: https://www.wikiwand.com/en/Fatal_exception_error
[4]PubGrub: https://medium.com/@nex3/pubgrub-2fb6470504f
[5]Selective dependency resolutions: https://classic.yarnpkg.com/en/docs/selective-version-resolutions
[6]回溯 (Backtracking): https://en.wikipedia.org/wiki/Backtracking
[7]#dup: https://stackoverflow.com/questions/10183370/whats-the-difference-between-rubys-dup-and-clone-methods
PodSpec 管理策略: https://zhuanlan.zhihu.com/p/275680356
[9]Molinillo 的架构阐述: https://github.com/CocoaPods/Molinillo/blob/master/ARCHITECTURE.md