一. DialogFragment源码分析。
因为是Fragment,我们先从onCreate生命周期入手。
 @Override
    public void onCreate(@Nullable Bundle savedInstanceState) {
        super.onCreate(savedInstanceState);
        // 一般这样设置样式
        setStyle(.....);
    }
先来DialogFragment中有个style方法
    public void setStyle(int style, @StyleRes int theme) {
        this.mStyle = style;
        if (this.mStyle == 2 || this.mStyle == 3) {
            this.mTheme = 16973913;
        }

        if (theme != 0) {
            this.mTheme = theme;
        }

    }
可以看出这里并没有做什么操做,只是把传进来的style和theme存到全局变量。
因为fragment不会无缘无故去走他的生命周期方法,所以入口方法就是show()方法。
    public void show(FragmentManager manager, String tag) {
        this.mDismissed = false;
        this.mShownByMe = true;
        FragmentTransaction ft = manager.beginTransaction();
        ft.add(this, tag);
        ft.commit();
    }
可以看出这里先设置了两个属性mDismissed和mShownByMe 。很可惜的是源码中并没有给这两个属性添加注释,那就只能猜了,从命名上猜和编程习惯猜mDismissed是记录这个Dialog是否dismiss,mShownByMe 是记录是否是用户调起的show方法。
然后用manager.beginTransaction()拿到FragmentTransaction,抽象理解就是当前这个外层页面的FragmentManager的事物,然后把当前fragment添加到外层界面的FragmentManager,commit就是提交。
加了会怎么样?那还用说,我们先看看Activity动态展示Fragment的代码,我随便去网上copy一段代码
        getSupportFragmentManager()
                .beginTransaction()
                .add(布局的ID , fragment)
                .commit();
就都是这样的操作,所以你说添加了会怎样,当然是走Fragment的生命周期啊。按照Fragment的生命周期钩子来走,按顺序看看DialogFragment有重写哪些生命周期方法。
    public void onAttach(Context context) {
        super.onAttach(context);
        if (!this.mShownByMe) {
            this.mDismissed = false;
        }

    }
这里做了一个判断,应该是为了安全性考虑,如果这个Dialog不是由我们调用show方法展示的话,还记得在show方法中有设置this.mDismissed = false;吗 , 如果不是调用show方法,而恰巧这个Fragment的生命周期又被调用了。所以这里为了安全考虑补上this.mDismissed = false。
然后调用onCreate
    public void onCreate(@Nullable Bundle savedInstanceState) {
        super.onCreate(savedInstanceState);
        this.mShowsDialog = this.mContainerId == 0;
        if (savedInstanceState != null) {
            this.mStyle = savedInstanceState.getInt("android:style", 0);
            this.mTheme = savedInstanceState.getInt("android:theme", 0);
            this.mCancelable = savedInstanceState.getBoolean("android:cancelable", true);
            this.mShowsDialog = savedInstanceState.getBoolean("android:showsDialog", this.mShowsDialog);
            this.mBackStackId = savedInstanceState.getInt("android:backStackId", -1);
        }

    }
this.mShowsDialog = this.mContainerId == 0这个容器ID mContainerId 我也不太清楚是什么,先跳过。
下面 if (savedInstanceState != null) {......} 是就恢复数据的操作。可以看到官网在onCreate中的恢复数据的写法是怎么写的,十分建议学会使用这种做法,能让代码更为安全。
相应的可以先来直接看看保存数据的做法
    public void onSaveInstanceState(@NonNull Bundle outState) {
        super.onSaveInstanceState(outState);
        if (this.mDialog != null) {
            Bundle dialogState = this.mDialog.onSaveInstanceState();
            if (dialogState != null) {
                outState.putBundle("android:savedDialogState", dialogState);
            }
        }

        if (this.mStyle != 0) {
            outState.putInt("android:style", this.mStyle);
        }

        if (this.mTheme != 0) {
            outState.putInt("android:theme", this.mTheme);
        }

        if (!this.mCancelable) {
            outState.putBoolean("android:cancelable", this.mCancelable);
        }

        if (!this.mShowsDialog) {
            outState.putBoolean("android:showsDialog", this.mShowsDialog);
        }

        if (this.mBackStackId != -1) {
            outState.putInt("android:backStackId", this.mBackStackId);
        }

    }
可以看到保存fragment的数据之前,先保存dialog的数据。
我们继续来看生命周期onActivityCreated
    public void onActivityCreated(@Nullable Bundle savedInstanceState) {
        super.onActivityCreated(savedInstanceState);
        if (this.mShowsDialog) {
            View view = this.getView();
            if (view != null) {
                if (view.getParent() != null) {
                    throw new IllegalStateException("DialogFragment can not be attached to a container view");
                }

                this.mDialog.setContentView(view);
            }

            Activity activity = this.getActivity();
            if (activity != null) {
                this.mDialog.setOwnerActivity(activity);
            }

            this.mDialog.setCancelable(this.mCancelable);
            this.mDialog.setOnCancelListener(this);
            this.mDialog.setOnDismissListener(this);
            if (savedInstanceState != null) {
                Bundle dialogState = savedInstanceState.getBundle("android:savedDialogState");
                if (dialogState != null) {
                    this.mDialog.onRestoreInstanceState(dialogState);
                }
            }

        }
    }
可以看出这里就是把view设置给Dialog,而这个view就是我们在onCreateView方法中所返回的view。所以先前需要判断view.getParent(),因为一个子view不能同时拥有两个父view。
this.mDialog.setOwnerActivity(activity);这个好像是把activity传给Dialog,因为Dialog里面肯定要用到activity的地方。后面的代码就是设置能关闭,设置Cancel和Dismiss时的监听,还有获取savedInstanceState保存的数据。
这些操作写在这里,我估计是因为此时activity的创建才刚走完。
然后是onStart
    public void onStart() {
        super.onStart();
        if (this.mDialog != null) {
            this.mViewDestroyed = false;
            this.mDialog.show();
        }
    }
记录mViewDestroyed 为false , 然后展示Dialog。
可以看出在onStart生命周期中才展示Dialog,此时页面已经展示出来。
看看弹框页面消失的操作
    public void onStop() {
        super.onStop();
        if (this.mDialog != null) {
            this.mDialog.hide();
        }
    }
Fragment隐藏时把Dialog也隐藏,相当于把他两的状态都绑在一起。
    public void onDestroyView() {
        super.onDestroyView();
        if (this.mDialog != null) {
            this.mViewDestroyed = true;
            this.mDialog.dismiss();
            this.mDialog = null;
        }

    }
mViewDestroyed = true, 记录当前页面已经关闭,此时dialog也跟着dismiss,并且this.mDialog = null;释放掉内存(GC过后再不到这个引用,会来释放掉)。这里虽然没什么难理解的,但是这4行代码写得非常好,值得学习。
最后
    public void onDetach() {
        super.onDetach();
        if (!this.mShownByMe && !this.mDismissed) {
            this.mDismissed = true;
        }

    }
这里和dismissInternal方法我感觉是有一种是做了多线程的感觉,所以加了双向判断,看起来感觉有点绕。dismissInternal方法是Dialog关闭时调用的。
    void dismissInternal(boolean allowStateLoss) {
        if (!this.mDismissed) {
            this.mDismissed = true;
            this.mShownByMe = false;
            if (this.mDialog != null) {
                this.mDialog.dismiss();
            }

            this.mViewDestroyed = true;
            if (this.mBackStackId >= 0) {
                this.getFragmentManager().popBackStack(this.mBackStackId, 1);
                this.mBackStackId = -1;
            } else {
                FragmentTransaction ft = this.getFragmentManager().beginTransaction();
                ft.remove(this);
                if (allowStateLoss) {
                    ft.commitAllowingStateLoss();
                } else {
                    ft.commit();
                }
            }

        }
    }
如果生命周期onDetach先执行,mShownByMe 还是为true,所以onDetach中的判断不会走,之后还会走dismissInternal。如果dismissInternal先执行,mDismissed为false,走判断里的方法,
mDismissed = true
his.mShownByMe = false
if (this.mDialog != null) {
       this.mDialog.dismiss();
}
表示没走onDestroyView方法,所以这里再走一次this.mDialog.dismiss();
mViewDestroyed = true
mBackStackId 回退状态,一般流程会等于-1,这时让外层的FragmentManager移除当前Fragment。
我觉得这里就是处理一个多线程的结果,调用的顺序可以是以下几种情况
(1)onDestroyView - > onDetach -> dismissInternal
(2)onDestroyView - > dismissInternal-> onDetach
(3)dismissInternal- > onDestroyView -> onDetach
所以可以看出,最主要的方法是dismissInternal,它一定会调用,哪怕是在Fragment销毁之后。所以这里我有个问题:fragment销毁了,那this就有可能被释放为空吧,那 ft.remove(this);这个操作不是有可能报空指针吗?这个要看FragmentManager的源码之后才知道,也许它在里面有判空操作。
他的这个多线程的逻辑应该是挺稳定的,就是看着会很绕,如果先调生命周期再调dismissInternal基本是没问题,如果先调dismissInternal再调onDestroyView 的话,onDestroyView里面的this.mDialog.dismiss();还是会走一遍,只不过mViewDestroyed已经为true,不会再走dismissInternal里面的逻辑。
而且Dialog内部的dismiss方法里的逻辑也有判断,防止多次调用。
所以可以看出java的多线程是一个很麻烦的家伙,为了保证调用顺序没问题,需要加一大堆判断,而且久了可能连自己也看得懵,不好意思扯远了。
最后还有一个方法没讲到—— onCreateDialog
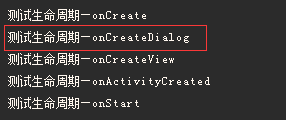
他是在调用fragment的onGetLayoutInflater方法时调用的,onGetLayoutInflater方法是在fragment中的getLayoutInflater()方法调用后调用的,而这个getLayoutInflater()我暂时也找不到在哪里调用,但是我们可以通过打印的方式来判断onCreateDialog再哪个生命周期之间调用。
可以看到,是在调onCreateView之前调用的。
所以说DialogFragment里面的Dialog在onCreate之后创建,在onStart中展示,在onDestroyView中关闭。
也能看出,Fragment中其实并没有做什么复杂的逻辑操作,都是在处理生命周期、保存数据这些操作,可以看出这很符合谷歌说的建议用DialogFragment代替Dialog的概念,确实是加了一层用于管理的Fragment。所以最核心的功能还是Dialog的功能,最核心的代码还是Dialog的代码。
二.Dialog源码简单分析
相比DialogFragment,这里我不会像上面一样那么详细的分析,我只会分析某些方法。
从DialogFragment可以在知道在onCreate之后创建Dialog
    @NonNull
    public Dialog onCreateDialog(@Nullable Bundle savedInstanceState) {
        return new Dialog(this.getActivity(), this.getTheme());
    }
我们进去看看构造方法做了什么
    Dialog(@NonNull Context context, @StyleRes int themeResId, boolean createContextThemeWrapper) {
        if (createContextThemeWrapper) {
            if (themeResId == ResourceId.ID_NULL) {
                final TypedValue outValue = new TypedValue();
                context.getTheme().resolveAttribute(R.attr.dialogTheme, outValue, true);
                themeResId = outValue.resourceId;
            }
            mContext = new ContextThemeWrapper(context, themeResId);
        } else {
            mContext = context;
        }

        mWindowManager = (WindowManager) context.getSystemService(Context.WINDOW_SERVICE);

        final Window w = new PhoneWindow(mContext);
        mWindow = w;
        w.setCallback(this);
        w.setOnWindowDismissedCallback(this);
        w.setOnWindowSwipeDismissedCallback(() -> {
            if (mCancelable) {
                cancel();
            }
        });
        w.setWindowManager(mWindowManager, null, null);
        w.setGravity(Gravity.CENTER);

        mListenersHandler = new ListenersHandler(this);
    }
首先如果判断是否在创建时有传theme
这就是我们之前说的传0表示没样式。
可以额外说说这个默认的样式(这章暂时用不上),可以在themes.xml中找到
- @style/Theme.Dialog
- @layout/dialog_title_icons
- @layout/dialog_custom_title
- @layout/dialog_title
- @dimen/dialog_padding
- 0dp
mContext = new ContextThemeWrapper(context, themeResId);
就是把themeResId给保存到ContextThemeWrapper里面。
之后创建一个Window ,final Window w = new PhoneWindow(mContext);并且设置一些监听的事件,并且设置Gravity居中(所以默认的Dialog都是居中显示)。
其实可以模仿他们这里的获取windowManger的方法
mWindowManager = (WindowManager) context.getSystemService(Context.WINDOW_SERVICE);
这样就创建好了Dialog,Dialog就是一个window。
然后设置布局给Dialog
可以看出在onActivityView中把布局设置给Dialog,跳进去看源码
    public void setContentView(@NonNull View view, @Nullable ViewGroup.LayoutParams params) {
        mWindow.setContentView(view, params);
    }
也就是给这个window设置View
之后看看Dialog的展示
在onStart中展示Dialog,跳进去看源码
   public void show() {
        if (mShowing) {
            if (mDecor != null) {
                if (mWindow.hasFeature(Window.FEATURE_ACTION_BAR)) {
                    mWindow.invalidatePanelMenu(Window.FEATURE_ACTION_BAR);
                }
                mDecor.setVisibility(View.VISIBLE);
            }
            return;
        }

        mCanceled = false;

        if (!mCreated) {
            dispatchOnCreate(null);
        } else {
            // Fill the DecorView in on any configuration changes that
            // may have occured while it was removed from the WindowManager.
            final Configuration config = mContext.getResources().getConfiguration();
            mWindow.getDecorView().dispatchConfigurationChanged(config);
        }

        onStart();
        mDecor = mWindow.getDecorView();

        if (mActionBar == null && mWindow.hasFeature(Window.FEATURE_ACTION_BAR)) {
            final ApplicationInfo info = mContext.getApplicationInfo();
            mWindow.setDefaultIcon(info.icon);
            mWindow.setDefaultLogo(info.logo);
            mActionBar = new WindowDecorActionBar(this);
        }

        WindowManager.LayoutParams l = mWindow.getAttributes();
        boolean restoreSoftInputMode = false;
        if ((l.softInputMode
                & WindowManager.LayoutParams.SOFT_INPUT_IS_FORWARD_NAVIGATION) == 0) {
            l.softInputMode |=
                    WindowManager.LayoutParams.SOFT_INPUT_IS_FORWARD_NAVIGATION;
            restoreSoftInputMode = true;
        }

        mWindowManager.addView(mDecor, l);
        if (restoreSoftInputMode) {
            l.softInputMode &=
                    ~WindowManager.LayoutParams.SOFT_INPUT_IS_FORWARD_NAVIGATION;
        }

        mShowing = true;

        sendShowMessage();
    }
mWindow.getDecorView()这个要详细说又要扯到window,一直扯其它的估计都讲不完,所以这里先不讲window。先把这行代码理解成获取window顶层的view。
然后设置ActionBar,一般我们都没有的。
之后这行就很熟悉,就是设置window的属性
WindowManager.LayoutParams l = mWindow.getAttributes();
之后就是处理软键盘的操作。注意,这个show方法中最关键的方法就是显示window的页面,也就是这句代码(因为window的相关内容不打算在这章讲),所以先了解。
mWindowManager.addView(mDecor, l);
最后在记录当前状态为展示。
我们再来额外先看看隐藏的方法
    public void hide() {
        if (mDecor != null) {
            mDecor.setVisibility(View.GONE);
        }
    }
可以看出并没有关闭window,只是对view做setVisibility隐藏操作。
最后看看关闭弹框
在onDestroyView中关闭Dialog,跳进去看看源码
    void dismissDialog() {
        if (mDecor == null || !mShowing) {
            return;
        }

        if (mWindow.isDestroyed()) {
            Log.e(TAG, "Tried to dismissDialog() but the Dialog's window was already destroyed!");
            return;
        }

        try {
            mWindowManager.removeViewImmediate(mDecor);
        } finally {
            if (mActionMode != null) {
                mActionMode.finish();
            }
            mDecor = null;
            mWindow.closeAllPanels();
            onStop();
            mShowing = false;

            sendDismissMessage();
        }
    }
也很简单,就是移除窗口,然后再改变状态。
mWindowManager.removeViewImmediate(mDecor);
可能有人会问,咦,那为什么没有看到在哪里设置样式。
如果我们传的是资源文件来设置样式的话,资源文件会传给context,context会传给window,样式的设置就是在window内部设置的。如果我们动态设置样式的话,一般都写
getDialog().getWindow().XXXXXXX
这样设置也是传给window来设置。
三. 总结
从源码我们可以看出,DialogFragment实质上还是操作Dialog,而Dialog实质上是操作Window。所以我们是不是得出一个结论,如果想测试某个属性对Dialog有什么影响,基本上可以直接测这条属性对Window有什么影响。
之后我总结的Dialog的一些属性的分析,就可以写到Window相关的地方,关键的还是window,但是window的源码就没Dialog的这么简单了,这个之后再讲。

