2017-03-31 iOS_Docs
变更记录
| 序号 | 录入时间 | 备注 |
|---|---|---|
| 1 | 2017-03-31 | 新建文章 |
| 2 | 2018-02-28 | 更新引言 |
| 3 | 2018-04-22 | 更新目录,去除标签 |
| 4 | 2019-09-30 | 更新图片 |
| 5 | 2020-03-21 | 更新格式 |
TODO
- 更新Xib和AutoLayout
- Xcode11新特性
引言
对于iOS开发中,
Xcode是我们天天打交道使用的官方开发工具,经过许多个版本的迭代,Xcode已经越来越好用,功能越来越强大,开发者虽然经常使用,但是不一定清楚Xcode的一切奇赢技巧。本篇将介绍从常用快捷键、debug方法以及常见问题等来全面介绍Xcode。
目录
[Build settings reference](#Build settings reference)
[Scheme Menu](#Scheme Menu)
添加文件
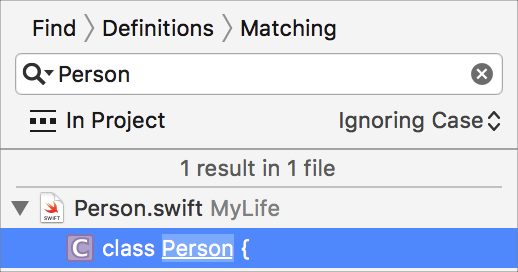
搜索
Signing
Distribution发布App
Debug
[Code Test](#Code Test)
附录
参考
Build settings reference
构建设置参考
Scheme Menu
Use the scheme menu to switch the active scheme and destination. You can also use the scheme menu to create, edit, and manage schemes, and to add and download simulators.
使用“计划”菜单切换活动方案和目标。您还可以使用“计划”菜单创建、编辑和管理计划,并添加和下载模拟器。
Schemes and destinations are distinct. Schemes specify the settings for building, running, testing, profiling, analyzing, and archiving your project.
Destinations specify installation locations for your app.
Typically, a scheme exists for each target in your project. Destinations exist for physical devices and simulators.
计划和目的地是不同的。计划指定设置、运行、测试、分析、分析和归档项目的设置。目的地指定应用程序的安装位置。通常,项目中的每个目标存在一个计划。目的地存在物理设备和模拟器。
添加文件
如果要将文件和文件夹驻留在项目文件夹中,请选择此选项。
Copy the files and folders into the project:
Select “Copy items if needed.”如果希望该组结构与文件结构相同
Create groups for each folder: Select “Create groups.”如果要将文件夹及其内容显示在项目导航器中,但实际上不驻留在项目中,请选择此选项。文件夹引用是项目导航器中文件系统中的文件夹的引用。
Create references for each folder: Select “Create folder references.”
删除文件
浏览项目中的类、函数和其他符号
搜索
1. Find and replace content in a project
2. Find symbol references
3. Find the call hierarchy of a method
4. Scope a find or replace operation
Add code annotations to the jump bar
Add a
to-doitem: Insert a comment with the prefix TODO:. For example: // TODO: [your to-do item].Add a bug fix reminder: Insert a comment with the prefix
FIXME:. For example: // FIXME: [your bug fix reminder].Add a heading: Insert a comment with the prefix
MARK:. For example: // MARK: [your section heading].Add a separator line: To add a separator above an annotation, add a hyphen (-) before the comment portion of the annotation. For example: // MARK: - [your content]. To add a separator below an annotation, add a hyphen (-) after the comment portion of the annotation. For example: // MARK: [your content] -.
Create and use code snippets
Auto Layout Guide
AutoLayout Guide
Signing
1. Add apple ID
2. Assign a project to a team
In order to sign your app, each target in your Xcode project must be assigned to the same team. If you enroll as an individual, you’re considered a one-person team. If you are not a member of the Apple Developer Program, Xcode will create a personal team for you.
3. Launch an app on a device
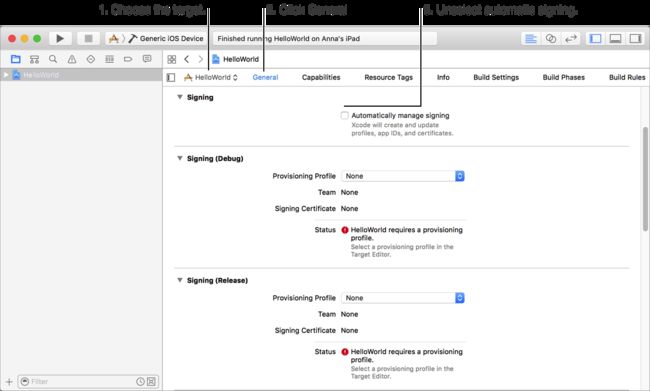
4. Manually sign your app
Use manual signing if you want to create your own provisioning profiles and signing identities. For example, you use one build configuration to develop for the store and another build configuration to develop for distribution outside of the store. You’ll need to sign in to your developer account to perform some of the signing steps manually. Your team role determines what tasks you can perform in Xcode and the developer account.
4.1 Enable manual signing
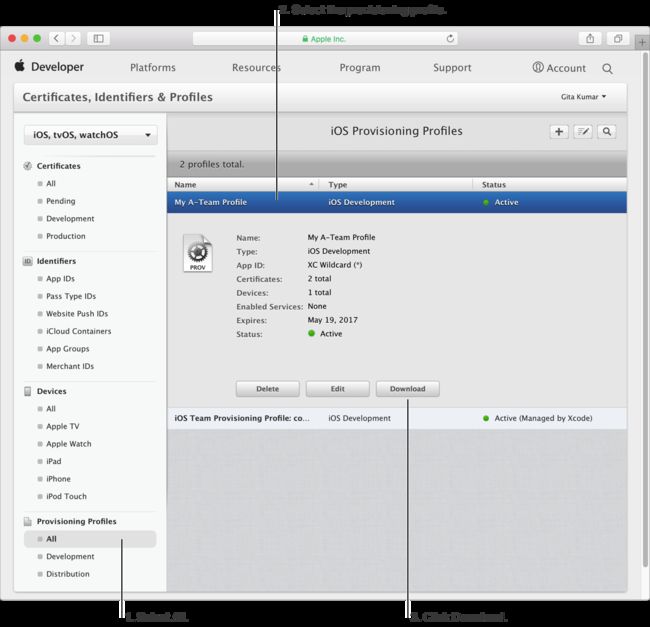
4.2 Download the provisioning profile from your developer account
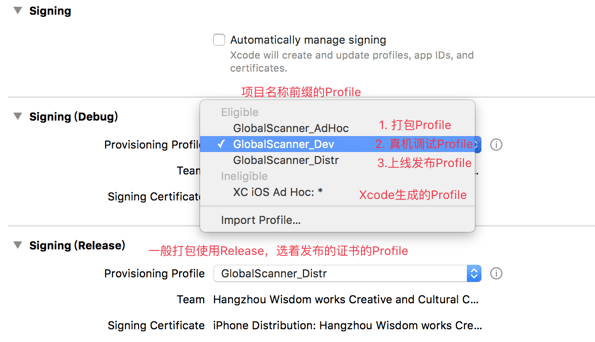
4.3 Import the provisioning profile
4.4 Profile讲解
商店供应配置文件是分发配置文件,授权您的应用程序使用某些应用程序服务,并确保你是一个上传你的应用程序。存储配置文件包含单个应用程序ID,该应用程序ID匹配一个或多个应用程序和分发证书。你的配置应用程序ID间接通过Xcode使用某些应用程序的服务。通过设置权限和执行其他配置步骤,启用和配置应用程序服务。有的权利是App ID启用(一套你的团队创建的应用程序),和其他人在Xcode项目。当你上传你的应用程序商店,Xcode签署应用程序包与分布在存储配置文件引用的证书。
https://developer.apple.com/library/content/documentation/IDEs/Conceptual/AppDistributionGuide/Art/store_provisioning_2x.png
查阅设备上的provisioning profiles
4.5 检查Code Signing
4.6 **Ad Hoc讲解
An ad hoc provisioning profile is a distribution provisioning profile that allows your app to be installed on designated devices and to use app services without the assistance of Xcode. It’s one of the two types of distribution provisioning profiles that you can create for apps. (You use the other type of distribution provisioning profile later to submit your app to the store.) An ad hoc provisioning profile ensures that test versions of your app aren’t copied and distributed without your knowledge.
When you’re ready to distribute your app to testers, you create an ad hoc provisioning profile specifying an App ID that matches one or more of your apps, a set of test devices, and a single distribution certificate.
https://developer.apple.com/library/content/documentation/IDEs/Conceptual/AppDistributionGuide/Art/ad_hoc_provisioning_2x.png
Each device in an ad hoc provisioning profile is identified by its unique device ID (UDID). The devices you register and add to a provisioning profile are stored in your developer account. Each individual or organization can register up to 100 devices per product family per membership year for development and testing. You can register 100 devices of each type per year. For iOS apps, you can register 100 iPad, 100 iPhone, and 100 iPod Touch devices.
https://developer.apple.com/library/content/documentation/IDEs/Conceptual/AppDistributionGuide/Art/AdHocProfileLaunch_2x.png
You signed the iOS App file using the distribution certificate specified in the ad hoc provisioning profile. The ad hoc provisioning profile was included in the app bundle when you built and archived the app. Then you installed the app on a test device. The app successfully launches if the app’s bundle ID matches the App ID, the signature matches the distribution certificate, and the device is in the device list of the ad hoc provisioning profile.
Bundle ID讲解
Bundle ID精确地标识单个应用程序。在开发过程中,当应用程序分发给客户时,一个束ID被用来提供设备和操作系统。例如,游戏中心和应用程序购买使用Bundle ID,以确定您的应用程序时,使用这些应用程序服务。首选项系统使用此字符串来标识给定偏好应用程序。同样,启动服务使用Bundle ID来定位一个能够打开特定文件的应用程序,它使用给定标识符的第一个应用程序。Bundle ID也用于验证应用程序的签名。
Bundle ID字符串必须是一个统一的类型标识符(UTI)只包含字母数字字符(a-z、A-Z、0-9),连字符(-),和周期(。)。字符串应该是反向DNS格式。例如,如果您的组织的域名acme.com和你创建一个应用程序命名为您好,您可以指定字符串com.acme.hello作为你的应用程序的包ID。
在开发过程中,您使用一个应用程序的BundleID在许多不同的地方,以鉴定你的应用程序。
Specifically, the bundle ID is located and used as follows:
In the Xcode project, the bundle ID is stored in the information property list file (Info.plist). This file is later copied into your app’s bundle when you build the project.
In iTunes Connect, you enter the bundle ID to identify your app. After your first build is uploaded to iTunes Connect, you can’t change your bundle ID or delete the associated explicit App ID.
In your developer account, Xcode creates an App ID that matches the app’s bundle ID. If the App ID is an explicit App ID, it exactly matches the bundle ID. However, unlike domain names, bundle IDs are case sensitive. If the App ID is lowercase, your bundle ID needs to be lowercase, too.
In iCloud, the container IDs you specify in your Xcode project are based on the bundle IDs of one or more apps.
Distribution发布App
Validate an archive of your app
Validate an archive of your app to find out whether it meets minimum store submission requirements.
开发完打包成Archive后,在提交到AppStore之前可以通过Validate archive来验证Archive是否有配置问题。
Review validation issues found, if any, and click Done.
If no issues are found, a green checkmark appears.
If Xcode doesn’t find an iTunes Connect record for your app, the validation fails. In iTunes Connect, create a record for your app and ensure that the bundle ID matches the bundle ID in your Xcode project.
Debug
- 使用调试区域来控制和检查正在运行的应用程序
变量视图显示可用在代码您现在的位置范围检查的变量列表。这份名单是披露的层次结构,揭示了一个可变的结构各部分的值作为你逐步扩大披露三角形。
该控制台包含一个交互式终端类文本区域。您可以使用它来直接与互动LLDB,请参阅使用打印描述的输出,并与您的应用程序的标准输入和输出工作。
在调试区域中查看变量
在调试区域中,单击暂停按钮或等待您的应用程序在您先前设置的断点处停止。
范围中的变量出现在调试区域的变量视图中。
要查看变量的结构,请展开变量左侧的公开三角形。
从变量视图左下角的弹出菜单中选择一个范围选项。
显示最近访问的变量:选择自动。
仅显示局部变量:选择本地。
显示所有变量,寄存器,全局变量和静态:选择全部。
要过滤结果,请在右下角的搜索字段中输入文本。
Specialized Debugging Workflows
This chapter focuses on often encountered but more specialized debugging scenarios and highlights the Xcode debugging tools used to work with them.
Enable Zombie Objects.
Enable Zombie Objects. Replace deallocated objects with a “zombie” object that traps any attempt to use it. When you send a message to a zombie object, the runtime logs an error and crashes. You can look at the backtrace to see the chain of calls that triggered the zombie detector.
开启Zombie模式之后会导致内存上升,因为所以已经被释放(引用计数为0)的对象被僵尸对象取代,并未真的释放掉。这个时候再给僵尸对象发送消息,就会抛出异常,并打印出异常信息,你可以轻松的找到错误代码位置,结束Zombies时会释放。它的主要功能是检测野指针调用。iOS开发之Xcode常用调试技巧总结
Using the Address Sanitizer
一旦启用了地址清洁程序,Xcode将在下次运行时重新编译您的应用程序,并添加工具来立即捕获内存违规并停止应用程序。你可以在这样发生的地方检查问题。还提供其他诊断信息,例如故障地址与堆上的有效对象之间的关系以及分配/释放信息,这有助于您快速找出并修复问题。
将应用程序的代码添加到应用程序的代码中会产生性能损失,但是地址清洁程序的效率足以使用交互式应用程序定期使用。有关更多信息和地址清洁剂的演示,请参见此视频演示:WWDC 2015:高级调试和地址消毒剂。
Using the Thread Sanitizer
When enabled, the thread sanitizer checks for uninitialized mutexes, thread leaks, unsafe calls in signal handlers, and data races.
Like the address sanitizer, running an app with the thread sanitizer introduces a small performance penalty, which should be negligible when interacting with most apps. For more information and a demo of thread sanitizer in action, see this video presentation: WWDC 2016: Thread Sanitizer and Static Analysis.
参考
- iOS崩溃crash大解析
- 如何定位Obj-C野指针随机Crash(一):先提高野指针Crash率
更多Debug知识点请参考
Debugging with Xcode
断点
发生异常时暂停
当测试发生故障暂停
Code Test
View and adjust performance tests
附录
调试技巧
真机调试直接截图到Mac
Xcode快捷键
1. Open Quickly
都知道 Cmd + Option + O ,但是你知道怎么在辅助编辑器中打开吗?按住Alt + Enter, enjoy~
2. 交换上下行代码: Cmd + Option + [ or Cmd + Option + ]
3. To jump to the definition. 光标所在处Command + Control + J
或者在辅助编辑器中打开
⌘⌥⌃+J.
4.切换多个编辑器焦点:
Command + J
5. 文件切换
- ⌃+1 - Related items menu that shows files related to what you are currently working on
- ⌃+2 - Previous and next buttons to navigate
between your most recent files
The rest of the jump bar consists of heierarchial navigation with each level given a separate shortcut. - ⌃+4 - Project level navigation
- ⌃+5 - Switch between header and implementation files
- ⌃+6 - Navigation within a file
6. 在辅助编辑器中跳转到变量的定义: Command + Alt + 鼠标点击对应变量名
7. 在点击文件名时候,按住Alt将让文件在辅助编辑器中打开
8. 在光标位置显示Help: ⌃ + ⌘ + ⇧ + /
9. Filter in Navigator
本来热键是Cmd + Option + J,发现貌似不起作用,就改成Cmd + Option + O
10. 断点全部disable
Cmd+ Y,灰色
删除添加某个断点 Cmd + \
[Xcode8 适配iOS10时遇见的一些坑
](http://m.blog.csdn.net/article/details?id=52602098)
注意:Xcode8内置了开启注释的功能,位置在这里
快捷键的设置在这里
加速你的Xcode!
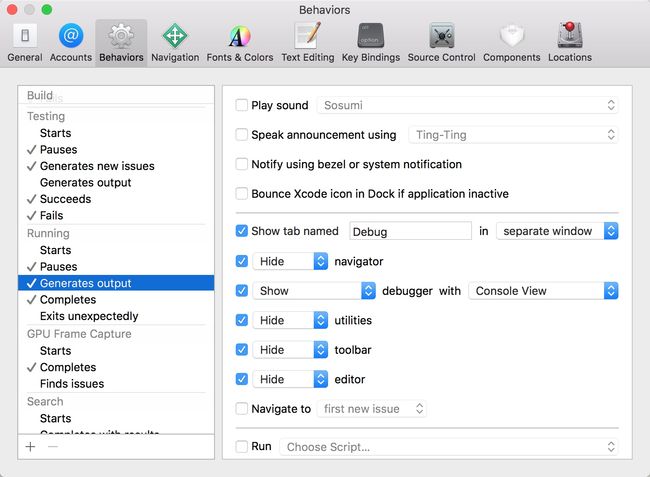
在Xcode启动的时候,设置Behaviors:
默认是:
可以将调试的Debug放在另一个窗口,隐藏一些不需要的NaviBar
在断点的时候:
还可以自定义场景,比如写代码的时候:
还可以跑脚本
Xcode 8的坑
- 代码注释不能用的解决办法
这个是因为苹果解决xcode ghost,把插件屏蔽了。
解决方法
打开终端,命令运行:
sudo /usr/libexec/xpccachectl
然后必须重启电脑后生效 -
权限以及相关设置
注意,添加的时候,末尾不要有空格
我们需要打开info.plist文件添加相应权限的说明,否则程序在iOS10上会出现崩溃。
具体如下图:
- 麦克风权限:Privacy - Microphone Usage Description 是否允许此App使用你的麦克风?
- 相机权限: Privacy - Camera Usage Description 是否允许此App使用你的相机?
- 相册权限: Privacy - Photo Library Usage Description 是否允许此App访问你的媒体资料库?通讯录权限: Privacy - Contacts Usage Description 是否允许此App访问你的通讯录?
- 蓝牙权限:Privacy - Bluetooth Peripheral Usage Description 是否许允此App使用蓝牙?
- 语音转文字权限:Privacy - Speech Recognition Usage Description 是否允许此App使用语音识别?
- 日历权限:Privacy - Calendars Usage Description 是否允许此App使用日历?
- 定位权限:Privacy - Location When In Use Usage Description 我们需要通过您的地理位置信息获取您周边的相关数据
- 定位权限: Privacy - Location Always Usage Description 我们需要通过您的地理位置信息获取您周边的相关数据
- 定位的需要这么写,防止上架被拒。
- 字体变大,原有frame需要适配
经有的朋友提醒,发现程序内原来2个字的宽度是24,现在2个字需要27的宽度来显示了。。
希望有解决办法的朋友,评论告我一下耶,谢谢啦 -
推送
如下图的部分,不要忘记打开。所有的推送平台,不管是极光还是什么的,要想收到推送,这个是必须打开的哟
PS.苹果这次对推送做了很大的变化,希望大家多查阅查阅,处理推送的代理方法也变化了。
// 推送的代理
[]
iOS10收到通知不再是在
[application: didReceiveRemoteNotification:]方法去处理, iOS10推出新的代理方法,接收和处理各类通知(本地或者远程)
- (void)userNotificationCenter:(UNUserNotificationCenter *)center willPresentNotification:(UNNotification *)notification withCompletionHandler:(void (^)(UNNotificationPresentationOptions))completionHandler { //应用在前台收到通知 NSLog(@"========%@", notification);}- (void)userNotificationCenter:(UNUserNotificationCenter *)center didReceiveNotificationResponse:(UNNotificationResponse *)response withCompletionHandler:(void (^)())completionHandler { //点击通知进入应用 NSLog(@"response:%@", response);}
- 屏蔽杂乱无章的bug
更新Xcode8之后,新建立工程,都会打印一堆莫名其妙看不懂的Log.
如这些
subsystem: com.apple.UIKit, category: HIDEventFiltered, enable_level: 0, persist_level: 0, default_ttl: 0, info_ttl: 0, debug_ttl: 0, generate_symptoms: 0, enable_oversize: 1,
屏蔽的方法如下:
Xcode8里边 Edit Scheme-> Run -> Arguments, 在Environment Variables里边添加
OS_ACTIVITY_MODE = Disable
- iOS 10 字体随着手机系统字体而改变
当我们手机系统字体改变了之后,那我们App的label也会跟着一起变化,这需要我们写很多代码来进一步处理才能实现,但是iOS 10 提供了这样的属性adjustsFontForContentSizeCategory来设置。因为没有真机,具体实际操作还没去实现,如果理解错误帮忙指正。
    UIFont 的preferredFontForTextStyle: 意思是指定一个样式,并让字体大小符合用户设定的字体大小。
   */
    myLabel.font =[UIFont preferredFontForTextStyle: UIFontTextStyleHeadline]; /*
 Indicates whether the corresponding element should automatically update its font when the device’s UIContentSizeCategory is changed.
 For this property to take effect, the element’s font must be a font vended using +preferredFontForTextStyle: or +preferredFontForTextStyle:compatibleWithTraitCollection: with a valid UIFontTextStyle.
 */
//是否更新字体的变化
myLabel.adjustsFontForContentSizeCategory = YES;
自定义Xcode快捷键
参考
- Xcode Help 官方文档
- Supercharging Your Xcode Efficiency
- Xcode Tips and Tricks - Part 1: Introduction | Ray Wenderlich
- PART 16: 208: Xcode Tips & Tricks
- Becoming an Xcode Power User


