MVVM Light 一个窗口承载两个视图
原文地址:http://www.codeproject.com/Articles/323187/MVVMLight-Using-Two-Views
本文并不是对原文逐句翻译,为了尽量通俗易懂,本人对原文有所增删。
如果你对MVVM还不太熟悉可以先看看本人之前的关于MVVM的博客:
http://www.cnblogs.com/zhangzhi19861216/archive/2013/03/19/WPF-MVM.html
如果你对MVVMLight不太了解,在阅读本文前,最好先阅读本人之前的一片译文:
http://www.cnblogs.com/zhangzhi19861216/archive/2013/03/20/2971400.html
在之前的文章中,我快速展示了如何用MVVMLight创建一个单View、单Window的WPF应用程序。但是WPF应用程序的趋势是一个窗口承载多个视图,
以便减少弹出的对话框或子窗口。本文展示了用MVVM模式构建一个简单的一个窗口承两个视图的应用程序。
在开始之前:
1、 需要VS2010
2、 确保你安装了NUget
3、 用Manage Nuget Package 引用并且添加 MVVM Light。
4、 这篇文章的源码在 github上。
注意,为了简洁起见,博文中的很多代码,特别是Xaml省略了,所以读者最好去github下载源码进行阅读。
承载多个视图
这个应用程序的结构类似之前的文章,我们有个MainWindow,ViewModelLocator和MainViewModel。
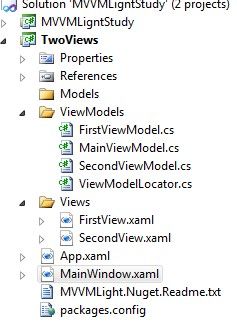
一张图片胜过千言万语,所以事不宜迟,这里是VS2010中的项目结构视图:

该项目为典型的MVVM风格:3个文件夹分别为Model,ViewModel和View。在当前项目,我们没有任何的Model,因此它可以忽略不计。
我们从View开始:在Views文件夹下我们创建两个UserControl——FirstView.xaml和SecondView.xaml。
FirstView.xaml和我们上篇文章 一致,而SecondView.xaml仅包含一个Lable元素。
所有涉及两个视图切换的操作都在MainViewModel.cs, MainWindow.xaml, and App.xaml当中.
首先看看MainWindow XAML,如下所示:
<Window x:Class="TwoViews.MainWindow"

        DataContext="{Binding Main,

                              Source={StaticResource Locator}}">

    <Grid>

        <Grid.RowDefinitions>

            <RowDefinition Height="Auto" />

            <RowDefinition Height="Auto" />

        </Grid.RowDefinitions>


        <ContentControl Content="{Binding CurrentViewModel}" />


        <DockPanel Grid.Row="1" >

            <Button Command="{Binding SecondViewCommand}"

                    Content="Second View"

                    DockPanel.Dock="Right" />

            <Button Command="{Binding FirstViewCommand}"

                    Content="First View"

                    DockPanel.Dock="Left" />

        </DockPanel>

    </Grid>

</Window>
看上面的代码,像之前一样,我们使用ViewModelLocator绑定我们的Main 视图模型到MainWindow。然而,这一次,我们有一个ContentControl绑定到一个称为CurrentViewModel(定义在MainViewModel当中)的新属性,并且有两个按钮分别绑定一个命令。
获取源码(译者所建项目):
files.cnblogs.com/zhangzhi19861216/ MVVMLigntStudy.rar
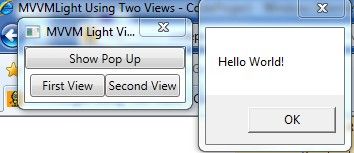
我们打开项目运行一下:

(First View)

(Second View)
我们看到,当分别点击按钮,有两个View在切换(实际上是我们的ViewModel在更新)。
让我们来看看MainViewModel.cs的代码:
 public class MainViewModel : ViewModelBase

    {


        private ViewModelBase _currentViewModel;


        readonly static SecondViewModel _secondViewModel = new SecondViewModel();


        readonly static FirstViewModel _firstViewModel = new FirstViewModel();


        public ViewModelBase CurrentViewModel

        {

            get

            {

                return _currentViewModel;

            }

            set

            {

                if (_currentViewModel == value)

                    return;

                _currentViewModel = value;

                RaisePropertyChanged("CurrentViewModel");

            }

        }


        public ICommand FirstViewCommand { get; private set; }


        public ICommand SecondViewCommand { get; private set; }


        public MainViewModel()

        {

            CurrentViewModel = MainViewModel._firstViewModel;

            FirstViewCommand = new RelayCommand(() => ExecuteFirstViewCommand());

            SecondViewCommand = new RelayCommand(() => ExecuteSecondViewCommand());

        }


        private void ExecuteFirstViewCommand()

        {

            CurrentViewModel = MainViewModel._firstViewModel;

        }


        private void ExecuteSecondViewCommand()

        {

            CurrentViewModel = MainViewModel._secondViewModel; ;

        }

    }
MainViewModel定义了三个ViewModel(_currentViewModel、_secondViewModel 、_firstViewModel),和两命令(FirstViewCommand,SecondViewCommand),两个命令分别调用如下两个方法:
private void ExecuteFirstViewCommand()

        {

            CurrentViewModel = MainViewModel._firstViewModel;

        }


        private void ExecuteSecondViewCommand()

        {

            CurrentViewModel = MainViewModel._secondViewModel; ;

        }
每次触发命令(点击FirstView或者SecondView按钮),其实都是在_firstViewModel和_secondViewModel之间切换——把它们赋给CurrentViewModel,而MainWindow.xaml中的ContentControl元素绑定的就是CurrentViewModel,因此跟着更新。
疑惑:ViewModel之间的切换,如何引起View的不同显示呢?
接下来看看App.xaml:
<Application x:Class="TwoViews.App"

             xmlns:views="clr-namespace:TwoViews.Views"

             xmlns:vm="clr-namespace:TwoViews.ViewModels"

             StartupUri="MainWindow.xaml"

             >

    <Application.Resources>

        <vm:ViewModelLocator x:Key="Locator"  />

        <DataTemplate DataType="{x:Type vm:SecondViewModel}">

            <views:SecondView />

        </DataTemplate>

        <DataTemplate DataType="{x:Type vm:FirstViewModel}">

            <views:FirstView />

        </DataTemplate>

    </Application.Resources>

</Application>
在这里,我们使用DataTemplate 将ViewModel通过View表现出来。
例如,毫不夸张地说:“如果我的数据类型应该是FirstViewModel,那么WPF框架应该呈现的是FirstView用户控件。
译者注:在WPF中我们可以使用DataTemplate为自己的数据(视图模型中的数据)定制显示方式,也就是说虽然某数据数据是一定的,
但我们可以做到(通过View)让它的表现方式多种多样。
本文就翻译到这里,翻译的章节次序和原文不太相符。因为我觉得这样更容易理解。
如果文中出现错误或者歧义,请指正。
译文源码:files.cnblogs.com/zhangzhi19861216/ MVVMLigntStudy.rar
原文源码:https://github.com/barrylapthorn/MvvmLightExamples
译者注:
看到原文下面留言:Nothing to download? 估计是进入原文源码下载页面,读者找不到源码下载地址。
提示:进入原文下载页面后,点击Zip按钮即可,这主要是很多读者对github不太熟悉。
如果你对MVVMLight感兴趣,而你的英文实在不怎么好,推荐你阅读如下国内作者的博客:
http://www.cnblogs.com/phoenixtrees/archive/2011/05/01/2033847.html
http://blog.csdn.net/duanzilin/article/details/6387639
接下来我还会翻译更多关于WPF的文章,希望大家多多支持,多交流。