关于用Pytorch搭建Deeplabv3+的笔记(成功案例)
需要的第三方库
pytorch、tqdm、spicy、tensorboardx、sklearn、numpy、matplotlib
参数的传入
这里为什么要先说参数传入呢,因为这里用到了一个很方便调参的库,叫做argparse。
首先,我们可以通过
parser = argparse.ArgumentParser()
创建一个解析器,这一行代码,相当于是创建了一个创建一个 ArgumentParser 对象,里面盛放了将命令行解析成 Python 数据类型所需的全部信息。
那我们怎么将参数信息传递进去呢?
这里我们用这样一个例子来解释,如下图所示,这样便可在解析器中添加我们希望盛放进去的参数;其中 “–dataset” 对应我们需要传入参数的名字,type即对应传入参数的类型(默认情况下,解析器会将命令行参数当作简单字符串读入。 然而,命令行字符串经常应当被解读为其他类型,例如 float 或 int。 add_argument() 的 type 关键字允许执行任何必要的类型检查和类型转换),default为我们设置的默认参数:相当于传入的参数即为’voc’,choices容纳了我们允许成为传入参数的各种参数,就是决定哪些参数可以传给default,即:‘cityscapes’、'voc’可以书写default后面,其他无论什么值,都不能写在default后面,否则便会报错;help的作用则是做一个阐释,个人感觉作用类似于参数文档
![]()
那这段代码所传的参数到底是什么呢?
其实就相当于有一个关键字参数,叫dataset,我们默认其值为’voc’,同时我们允许它为’cityscapes’,如若不然,就报错
介绍完参数传入的方法,便要说说其在我们搭建网络中的作用,其实从上面也可以看出,我们可以利用这个模块,创建一个函数,其return的就是我们训练与测试中所需的所有参数,再用一个参数来控制是进行训练或测试,我们便可以在一个py文件中同时书写训练与测试的代码,最后只通过调参的方式来对其进行控制
数据预处理
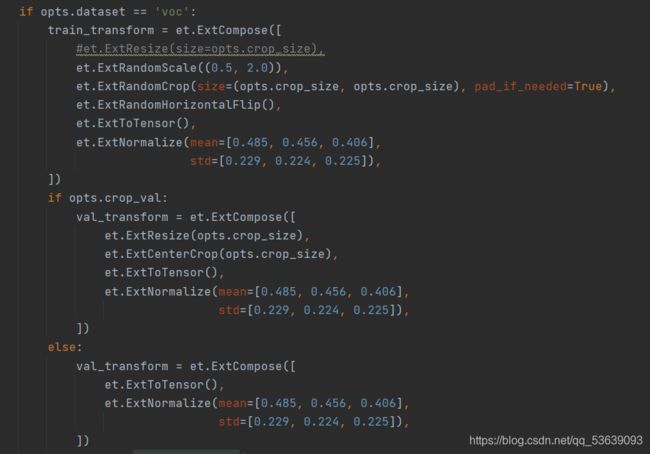
其中,训练集、测试集处理如下:
大致内容为调整比例、随即裁剪、填充、水平翻转、数据标准化处理
接着是得到处理后的数据集:

其中VOCSegmentation类的定义如下:
class VOCSegmentation(data.Dataset):
    cmap = voc_cmap()
    def __init__(self,
                 root,
                 year='2012',
                 image_set='train',
                 download=False,
                 transform=None):

        is_aug=False
        if year=='2012_aug':
            is_aug = True
            year = '2012'

        self.root = os.path.expanduser(root)
        self.year = year
        self.url = DATASET_YEAR_DICT[year]['url']
        self.filename = DATASET_YEAR_DICT[year]['filename']
        self.md5 = DATASET_YEAR_DICT[year]['md5']
        self.transform = transform

        self.image_set = image_set
        base_dir = DATASET_YEAR_DICT[year]['base_dir']
        voc_root = os.path.join(self.root, base_dir)
        image_dir = os.path.join(voc_root, 'JPEGImages')

        if download:
            download_extract(self.url, self.root, self.filename, self.md5)

        if not os.path.isdir(voc_root):
            raise RuntimeError('Dataset not found or corrupted.' +
                               ' You can use download=True to download it')

        if is_aug and image_set=='train':
            mask_dir = os.path.join(voc_root, 'SegmentationClassAug')
            assert os.path.exists(mask_dir), "SegmentationClassAug not found, please refer to README.md and prepare it manually"
            split_f = os.path.join( self.root, 'train_aug.txt')#'./datasets/data/train_aug.txt'
        else:
            mask_dir = os.path.join(voc_root, 'SegmentationClass')
            splits_dir = os.path.join(voc_root, 'ImageSets/Segmentation')
            split_f = os.path.join(splits_dir, image_set.rstrip('\n') + '.txt')

        if not os.path.exists(split_f):
            raise ValueError(
                'Wrong image_set entered! Please use image_set="train" '
                'or image_set="trainval" or image_set="val"')

        with open(os.path.join(split_f), "r") as f:
            file_names = [x.strip() for x in f.readlines()]

        self.images = [os.path.join(image_dir, x + ".jpg") for x in file_names]
        self.masks = [os.path.join(mask_dir, x + ".png") for x in file_names]
        assert (len(self.images) == len(self.masks))

    def __getitem__(self, index):
        img = Image.open(self.images[index]).convert('RGB')
        target = Image.open(self.masks[index])
        if self.transform is not None:
            img, target = self.transform(img, target)

        return img, target


    def __len__(self):
        return len(self.images)

    @classmethod
    def decode_target(cls, mask):
        """decode semantic mask to RGB image"""
        return cls.cmap[mask]
可以利用这个类,得到对应的经过处理的数据集,其存放路径和下载地址存放在这个名为DATASET_YEAR_DICT的字典中,可在此类中直接调用,完成下载的操作
DATASET_YEAR_DICT定义如下:
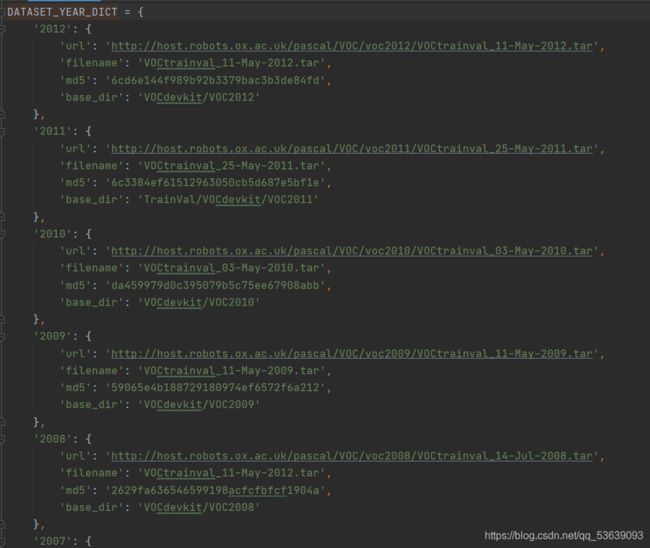
这里的2012等年份同时也对应了前面的参数传入中的year参数
最后将上述处理得到的数据集封在一个函数get_dataset中,其参数为之前所说的parser中存放的参数,再return训练集和测试集
训练过程
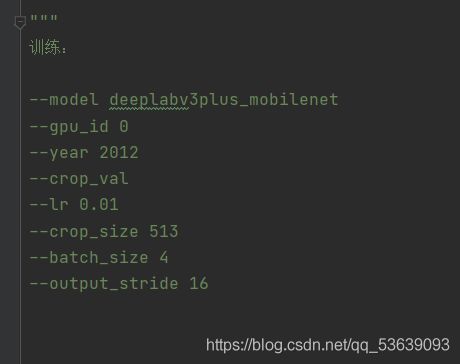
首先放出训练过程中使用的参数,由于GPU性能的原因,这里选用了对算力要求较小的mobilenet,gpu_id为0的即为我的RTX2060,year参数其实是对数据集的选取,这里选择的是voc2012,crop_val则决定了在数据预处理过程中是否对测试集进行resize和CenterCrop,即缩放和中央裁剪,其余参数与CNN网络基本相同,不再赘述;值得注意的是这个output_stride,其对应着矩阵经过多次卷积、pooling操作之后,尺寸缩小的值,在本例中,取其值为16,则最后的feature map大小为513/16=32.0625
对于主干网络的选择,这里采用了一个文件夹backbone存放了各种主干网络,在定义的mobilenet类中,我们可以将输入直接放入定义的网络中进行处理,也可以选择直接下载权重文件对输入进行处理,这里提供了下载地址:

本次使用的是预训练的权重文件,对mobilenet的网络结构不做过多阐述。下面是利用预训练权重文件得到的实例化model

主干网络定义完成后,再对空洞卷积(即ASPP部分)进行编写:
class ASPP(nn.Module):
    def __init__(self, in_channels, atrous_rates):
        super(ASPP, self).__init__()
        out_channels = 256
        modules = []
        modules.append(nn.Sequential(
            nn.Conv2d(in_channels, out_channels, 1, bias=False),
            nn.BatchNorm2d(out_channels),
            nn.ReLU(inplace=True)))

        rate1, rate2, rate3 = tuple(atrous_rates)
        modules.append(ASPPConv(in_channels, out_channels, rate1))
        modules.append(ASPPConv(in_channels, out_channels, rate2))
        modules.append(ASPPConv(in_channels, out_channels, rate3))
        modules.append(ASPPPooling(in_channels, out_channels))

        self.convs = nn.ModuleList(modules)

        self.project = nn.Sequential(
            nn.Conv2d(5 * out_channels, out_channels, 1, bias=False),
            nn.BatchNorm2d(out_channels),
            nn.ReLU(inplace=True),
            nn.Dropout(0.1),)

    def forward(self, x):
        res = []
        for conv in self.convs:
            #print(conv(x).shape)
            res.append(conv(x))
        res = torch.cat(res, dim=1)
        return self.project(res)
其中,AtrousSeparableConvolution(空洞可分离卷积)、ASPPConv、ASPPPooling定义如下:
class AtrousSeparableConvolution(nn.Module):
    """ Atrous Separable Convolution
    """
    def __init__(self, in_channels, out_channels, kernel_size,
                            stride=1, padding=0, dilation=1, bias=True):
        super(AtrousSeparableConvolution, self).__init__()
        self.body = nn.Sequential(
            # Separable Conv
            nn.Conv2d( in_channels, in_channels, kernel_size=kernel_size, stride=stride, padding=padding, dilation=dilation, bias=bias, groups=in_channels ),
            # PointWise Conv
            nn.Conv2d( in_channels, out_channels, kernel_size=1, stride=1, padding=0, bias=bias),
        )

        self._init_weight()

    def forward(self, x):
        return self.body(x)

    def _init_weight(self):
        for m in self.modules():
            if isinstance(m, nn.Conv2d):
                nn.init.kaiming_normal_(m.weight)
            elif isinstance(m, (nn.BatchNorm2d, nn.GroupNorm)):
                nn.init.constant_(m.weight, 1)
                nn.init.constant_(m.bias, 0)

class ASPPConv(nn.Sequential):
    def __init__(self, in_channels, out_channels, dilation):
        modules = [
            nn.Conv2d(in_channels, out_channels, 3, padding=dilation, dilation=dilation, bias=False),
            nn.BatchNorm2d(out_channels),
            nn.ReLU(inplace=True)
        ]
        super(ASPPConv, self).__init__(*modules)

class ASPPPooling(nn.Sequential):
    def __init__(self, in_channels, out_channels):
        super(ASPPPooling, self).__init__(
            nn.AdaptiveAvgPool2d(1),
            nn.Conv2d(in_channels, out_channels, 1, bias=False),
            nn.BatchNorm2d(out_channels),
            nn.ReLU(inplace=True))

    def forward(self, x):
        size = x.shape[-2:]
        x = super(ASPPPooling, self).forward(x)
        return F.interpolate(x, size=size, mode='bilinear', align_corners=False)
至此,ASPP部分已编写完成
完整的deeplabv3+结构与正向传播过程如下:
class DeepLabHeadV3Plus(nn.Module):
    def __init__(self, in_channels, low_level_channels, num_classes, aspp_dilate=[12, 24, 36]):
        super(DeepLabHeadV3Plus, self).__init__()
        self.project = nn.Sequential(
            nn.Conv2d(low_level_channels, 48, 1, bias=False),
            nn.BatchNorm2d(48),
            nn.ReLU(inplace=True),
        )

        self.aspp = ASPP(in_channels, aspp_dilate)

        self.classifier = nn.Sequential(
            nn.Conv2d(304, 256, 3, padding=1, bias=False),
            nn.BatchNorm2d(256),
            nn.ReLU(inplace=True),
            nn.Conv2d(256, num_classes, 1)
        )
        self._init_weight()

    def forward(self, feature):
        #print(feature.shape)
        low_level_feature = self.project( feature['low_level'] )#return_layers = {'layer4': 'out', 'layer1': 'low_level'}
        #print(low_level_feature.shape)
        output_feature = self.aspp(feature['out'])
        #print(output_feature.shape)
        output_feature = F.interpolate(output_feature, size=low_level_feature.shape[2:], mode='bilinear', align_corners=False)
        #print(output_feature.shape)
        return self.classifier( torch.cat( [ low_level_feature, output_feature ], dim=1 ) )

    def _init_weight(self):
        for m in self.modules():
            if isinstance(m, nn.Conv2d):
                nn.init.kaiming_normal_(m.weight)
            elif isinstance(m, (nn.BatchNorm2d, nn.GroupNorm)):
                nn.init.constant_(m.weight, 1)
                nn.init.constant_(m.bias, 0)
参照网络结构图,对上面的传播过程能理解的更透彻
self.project处理的是来自DCNN的Low-Level Features,再与经过空洞卷积和上采样的feature进行concat,最后的self.classifier包含上图的3*3 Conv和上采样,最后得到输出
deeplabv3+结构定义完成后,需要将backbone与上述框架连接起来,于是定义了一个_segm_mobilenet函数来完成与mobilenet进行连接的工作
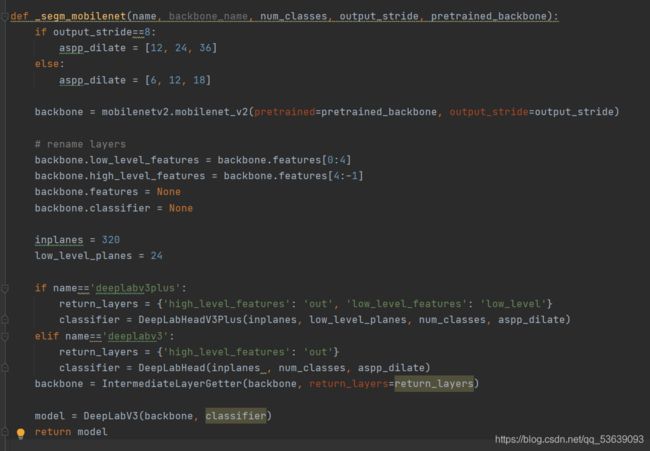
再通过_load_model函数存放完整的网络结构

最后定义一个deeplabv3plus_mobilenet函数将其实例化

同理,可以生成多个网络模型,我们可以得到以下网络:

本次使用的是mobilenet,故model如下:
![]()
优化器的定义如下:
其中lr_policy参数默认设为poly

损失函数计算如下:
其中loss_type参数默认设为cross_entropy

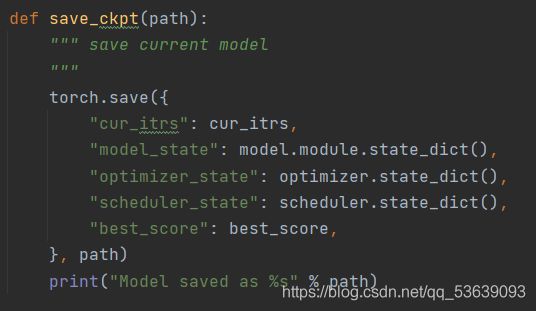
权重文件存储函数定义如下:
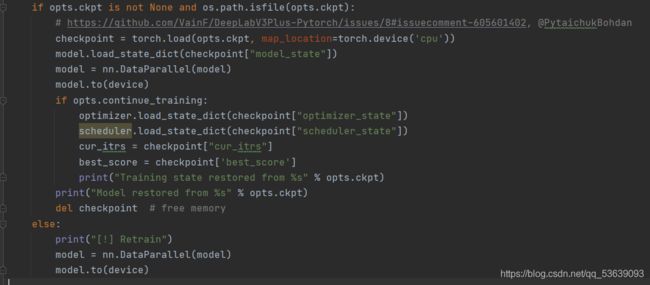
若checkpoints文件夹下已存在权重文件,则以下代码生效:
其主要作用为判断是否存在权重文件,若存在,可选择清除并重新训练;也可以直接使用,用于预测
完整的训练的代码如下:
        # =====  Train  =====
        model.train()
        cur_epochs += 1
        for (images, labels) in train_loader:
            cur_itrs += 1

            images = images.to(device, dtype=torch.float32)
            labels = labels.to(device, dtype=torch.long)

            optimizer.zero_grad()
            outputs = model(images)
            loss = criterion(outputs, labels)
            loss.backward()
            optimizer.step()

            np_loss = loss.detach().cpu().numpy()
            interval_loss += np_loss
            if vis is not None:
                vis.vis_scalar('Loss', cur_itrs, np_loss)

            if (cur_itrs) % 10 == 0:
                interval_loss = interval_loss/10
                print("Epoch %d, Itrs %d/%d, Loss=%f" %
                      (cur_epochs, cur_itrs, opts.total_itrs, interval_loss))
                interval_loss = 0.0

            if (cur_itrs) % opts.val_interval == 0:
                save_ckpt('checkpoints/latest_%s_%s_os%d.pth' %
                          (opts.model, opts.dataset, opts.output_stride))
                print("validation...")
                model.eval()
                val_score, ret_samples = validate(
                    opts=opts, model=model, loader=val_loader, device=device, metrics=metrics, ret_samples_ids=vis_sample_id)
                print(metrics.to_str(val_score))
                if val_score['Mean IoU'] > best_score:  # save best model
                    best_score = val_score['Mean IoU']
                    save_ckpt('checkpoints/best_%s_%s_os%d.pth' %
                              (opts.model, opts.dataset,opts.output_stride))

                if vis is not None:  # visualize validation score and samples
                    vis.vis_scalar("[Val] Overall Acc", cur_itrs, val_score['Overall Acc'])
                    vis.vis_scalar("[Val] Mean IoU", cur_itrs, val_score['Mean IoU'])
                    vis.vis_table("[Val] Class IoU", val_score['Class IoU'])

                    for k, (img, target, lbl) in enumerate(ret_samples):
                        img = (denorm(img) * 255).astype(np.uint8)
                        target = train_dst.decode_target(target).transpose(2, 0, 1).astype(np.uint8)
                        lbl = train_dst.decode_target(lbl).transpose(2, 0, 1).astype(np.uint8)
                        concat_img = np.concatenate((img, target, lbl), axis=2)  # concat along width
                        vis.vis_image('Sample %d' % k, concat_img)
                model.train()
            scheduler.step()

            if cur_itrs >=  opts.total_itrs:
                return
完整的测试的代码如下:
def validate(opts, model, loader, device, metrics, ret_samples_ids=None):
    """Do validation and return specified samples"""
    metrics.reset()
    ret_samples = []
    if opts.save_val_results:
        if not os.path.exists('results'):
            os.mkdir('results')
        denorm = utils.Denormalize(mean=[0.485, 0.456, 0.406],
                                   std=[0.229, 0.224, 0.225])
        img_id = 0

    with torch.no_grad():
        for i, (images, labels) in tqdm(enumerate(loader)):

            images = images.to(device, dtype=torch.float32)
            labels = labels.to(device, dtype=torch.long)

            outputs = model(images)
            preds = outputs.detach().max(dim=1)[1].cpu().numpy()
            targets = labels.cpu().numpy()

            metrics.update(targets, preds)
            if ret_samples_ids is not None and i in ret_samples_ids:  # get vis samples
                ret_samples.append(
                    (images[0].detach().cpu().numpy(), targets[0], preds[0]))

            if opts.save_val_results:
                for i in range(len(images)):
                    image = images[i].detach().cpu().numpy()
                    target = targets[i]
                    pred = preds[i]

                    image = (denorm(image) * 255).transpose(1, 2, 0).astype(np.uint8)
                    target = loader.dataset.decode_target(target).astype(np.uint8)
                    pred = loader.dataset.decode_target(pred).astype(np.uint8)

                    Image.fromarray(image).save('results/%d_image.png' % img_id)
                    Image.fromarray(target).save('results/%d_target.png' % img_id)
                    Image.fromarray(pred).save('results/%d_pred.png' % img_id)

                    fig = plt.figure()
                    plt.imshow(image)
                    plt.axis('off')
                    plt.imshow(pred, alpha=0.7)
                    ax = plt.gca()
                    ax.xaxis.set_major_locator(matplotlib.ticker.NullLocator())
                    ax.yaxis.set_major_locator(matplotlib.ticker.NullLocator())
                    plt.savefig('results/%d_overlay.png' % img_id, bbox_inches='tight', pad_inches=0)
                    plt.close()
                    img_id += 1

        score = metrics.get_results()
    return score, ret_samples
话说回一开始,我们如何通过调参来完成训练和测试的转换呢?
这里定义了一个函数:

将test_only参数设置为True,则测试代码被调用,训练代码停止,results文件夹中生成结果;
参考资料:
https://blog.csdn.net/The_Time_Runner/article/details/97941409
https://blog.csdn.net/yy_diego/article/details/82851661?ops_request_misc=%257B%2522request%255Fid%2522%253A%2522161932192016780274159374%2522%252C%2522scm%2522%253A%252220140713.130102334…%2522%257D&request_id=161932192016780274159374&biz_id=0&utm_medium=distribute.pc_search_result.none-task-blog-2alltop_positive~default-1-82851661.first_rank_v2_pc_rank_v29&utm_term=argparse
https://blog.csdn.net/halchan/article/details/98876875
https://www.bilibili.com/video/BV1WK411u7YJ
https://blog.csdn.net/heruili/article/details/102909560?ops_request_misc=%257B%2522request%255Fid%2522%253A%2522161933798016780366578097%2522%252C%2522scm%2522%253A%252220140713.130102334…%2522%257D&request_id=161933798016780366578097&biz_id=0&utm_medium=distribute.pc_search_result.none-task-blog-2allsobaiduend~default-2-102909560.first_rank_v2_pc_rank_v29&utm_term=Separable
https://blog.csdn.net/sinat_29047129/article/details/103642140?ops_request_misc=%257B%2522request%255Fid%2522%253A%2522161933532916780261925875%2522%252C%2522scm%2522%253A%252220140713.130102334…%2522%257D&request_id=161933532916780261925875&biz_id=0&utm_medium=distribute.pc_search_result.none-task-blog-2alltop_positive~default-1-103642140.first_rank_v2_pc_rank_v29&utm_term=miou

