AngularJs-指令和指令之间的交互(动感超人)
前言:
上节我们学习到了指令和控制器之间的交互,通过给指令添加动作,调用了控制器中的方法。本节我们学习指令和指令之间是如何交互的,我们通过一个小游戏来和大家一起学习,听大漠老师说这是国外的人写的demo,我们可以借鉴学习。
1,动感超人

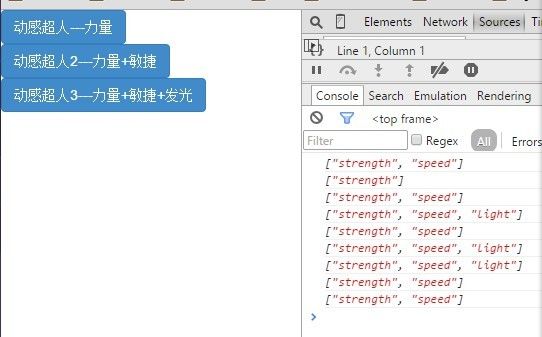
上面的三个按钮,代表三个超人,在此想问下,哪些想看超人的朋友们是不是有种被骗了的感觉?
当我们的鼠标移动到哪个超人的身上的时候,就会输入这个超人所拥有的超能力(力量 + 敏捷 + 发光)
<!DOCTYPE html>

<html ng-app="MyModule">

<head>

    <meta charset="utf-8">

    <link rel="stylesheet" href="css/bootstrap.min.css">

    <title>指令之间的交互</title>

</head>

<body>

    <div class="row">

        <div class="col-md-3">

            <superman strength>动感超人---力量</superman>

        </div>

        <div class="col-md-3">

            <superman strength speed>动感超人2---力量+敏捷</superman>

        </div>

        <div class="col-md-3">

            <superman strength speed light>动感超人3---力量+敏捷+发光</superman>

        </div>

    </div>

</body>

<script src="js/angular-1.3.0.js"></script>

<script src="js/directive-directive.js"></script>

</html>
ok,我们先创建了四个指令,一个是通过 E 的模式创建的叫做 superman,另外三个是通过 A 模式创建的 (strength、speed和light)。
var myModule = angular.module('MyModule',[]); myModule.directive('superman',function(){ return{ scope:{}, restrict:'AE', controller:function($scope){ $scope.abilities=[]; this.addStrength=function(){ $scope.abilities.push("strength"); }; this.addSpeed = function(){ $scope.abilities.push('speed'); }; this.addLight = function(){ $scope.abilities.push('light'); } }, link:function(scope,element,attrs){ element.addClass('btn btn-primary'); element.bind('mouseenter',function(){ console.log(scope.abilities); }) } } }); myModule.directive('strength',function(){ return{ require:'^superman', link:function(scope,element,attr,supermanCtl){ supermanCtl.addStrength(); } } }) myModule.directive('speed',function(){ return{ require:'^superman', link:function(scope,element,attr,supermanCtl){ supermanCtl.addSpeed(); } } }) myModule.directive('light',function(){ return{ require:'^superman', link:function(scope,element,attr,supermanCtl){ supermanCtl.addLight(); } } })
上面的代码,最主要的就是 superman的这个指令,里面有些我们还没有认识的元素,我们下面介绍下:
- scope:{}这个是创建一个独立的作用域。
- controller,这个和我们angular中的控制器有些不同,这个主要是写一些指令的对外方法。
好,我们再来介绍下面的三个指令,我们就说一个就好了,其它的都一样的。
在这三个控制器也有新增的东西:
- require:"^superman",这个是告诉angularJS,当前的指令,依赖于哪个指令。我们现在的 strength指令依赖于superman的指令
- link方法中的第四个参数,叫做父控制器,只要是指令写了require参数,就可以使用这个参数了,它可以访问父级contorller的方法中提供的一些属性和方法。
2,总结
我们从代码上可以看出,我们的三个超人拥有超能力多少是和拥有的指令多少成正比的。他们都有一个父的指令,父指令提供了超能力的力量(我们可以理解为数据)。子指令控制了是否追加这些功能。