在上次的Network Visualization之后,这次接着是Style Transfer,选择的还是PyTorch版本,个人认为这次代码还是比较简单有趣,也是直接在StyleTransfer-PyTorch.ipynb编写完成的。这次自己编一编,感觉再去看教程和视频就非常有感觉,也有很多收获(之前看lecture pdf一点感觉都没有)。
按教程看来,风格迁移(style transfer)的思想其实从纹理合成来的(Texture Synthesis)。用简短的话描述风格迁移就是:
拿两张图像,一张为内容图像(content source),一张为风格图像(style source),然后生成一张图像。通过构造一个总的损失函数,减小损失使生成的图像能够匹配内容特征与网络各层的风格特征,对生成图像像素进行梯度下降,减小总损失,就能使生成的图像既具有内容图像的内容,也有风格图像的风格。
教程开头给出的示意图:
所以这里最主要的就是损失函数的构造,幸运的是,作业里面已经给出了损失函数的公式。分别为( 注意,这里损失都是feature map之间的分离度的衡量):
- Content loss:生成图像与内容源图像某一层feature map之间的内容deviation
- Style loss:生成图像与风格源图像某几层feature map之间的风格deviation
- Total-variation regularization:全变差正则化,具体见下文
Content loss
就如上面所说,内容损失是用来描述生成图像与内容源图像某一层feature map之间的内容deviation,我们只关注网络某一层(层)的特征图feature map为 . 是在层通道数, 和 是高和宽。 我们将其reshape后计算(其实就内容损失不必要进行reshape,其实就是每个像素之间的差)。假设 是生成图像的feature map , 内容源图像的feature map,其中 。给出内容损失函数如下,其中是内容损失权值:
其实就是两张图像像素值的平方差,然后加权求和,代码如下:
def content_loss(content_weight, content_current, content_original):
    """
    Compute the content loss for style transfer.

    Inputs:
    - content_weight: Scalar giving the weighting for the content loss.
    - content_current: features of the current image; this is a PyTorch Tensor of shape
      (1, C_l, H_l, W_l).
    - content_target: features of the content image, Tensor with shape (1, C_l, H_l, W_l).

    Returns:
    - scalar content loss
    """
    # *****START OF YOUR CODE (DO NOT DELETE/MODIFY THIS LINE)*****

    N_l, C_l, H_l, W_l = content_current.shape
    F = content_current.view(C_l, H_l*W_l)
    P = content_original.view(C_l, H_l*W_l)
    ct_loss = content_weight * torch.sum((F - P)**2)
    return ct_loss

    # *****END OF YOUR CODE (DO NOT DELETE/MODIFY THIS LINE)*****
里面主要用了一个view函数,其作用和reshape函数一样
Style loss
损失函数比内容损失稍微麻烦一点,不能直接相减,因为这不能很好地衡量两张图像之间的风格偏差,这里用的是一种有效又计算简单的描述符——Gram Matrix.这个Gram描述符能较好的衡量图像的风格相关性,就如协方差(covariance)矩阵,但这个计算更容易高效一些,具体就是对于一个feature map 形状为 , Gram matrix的形状是 ,因为它的计算公式如下:
一开始写了个循环的,结果后面生成图像非常慢,后来想到向量化,发现就是乘以它的转置就能直接得到整个Gram Matrix,效率就高多了(后来发现lecture 13的57页就有,捂脸)
还有一点与内容损失不一样的地方是风格损失是用到多层的的feature map的Gram Matrix,一层之间的损失乘以权值为:
其中 是生成图像的feature map来的Gram matrix, 是源风格图像的feature map的Gram Matrix 。最终的风格损失是多层损失的求和:
以下是求Gram Matrix的代码(有关gram matrix的讨论可以看这里),主要有用到维度转换的一个函数torch.permute()和高维tensor矩阵相乘的函数torch.matmul()(注意torch.mm()函数只适用二维矩阵相乘):
def gram_matrix(features, normalize=True):
    """
    Compute the Gram matrix from features.

    Inputs:
    - features: PyTorch Tensor of shape (N, C, H, W) giving features for
      a batch of N images.
    - normalize: optional, whether to normalize the Gram matrix
        If True, divide the Gram matrix by the number of neurons (H * W * C)

    Returns:
    - gram: PyTorch Tensor of shape (N, C, C) giving the
      (optionally normalized) Gram matrices for the N input images.
    """
    # *****START OF YOUR CODE (DO NOT DELETE/MODIFY THIS LINE)*****
#     Way 1 inefficient
#     N, C, H, W = features.shape
#     F = features.reshape(N, C, H * W)
#     gram = torch.zeros(N, C, C)
#     for n in range(N):
#         for i in range(C):
#             for j in range(C):
#                 gram[n,i,j] = torch.sum(F[n,i,:] * F[n,j,:])

    # Way 2
    N, C, H, W = features.shape
    F = features.view(N, C, -1)
    F_T = F.permute(0, 2, 1)
    gram = F.matmul(F_T)

    if normalize:
        gram /= (H * W * C)

    return gram
    # *****END OF YOUR CODE (DO NOT DELETE/MODIFY THIS LINE)*****
根据上面的公式可以很容易写出风格损失代码,刚开始看输入参数的说明还不太明白,可以写看一下文件中下一个cell的style_loss_test()函数,能够知道各个输入参数代表什么:
# Now put it together in the style_loss function...
def style_loss(feats, style_layers, style_targets, style_weights):
    """
    Computes the style loss at a set of layers.

    Inputs:
    - feats: list of the features at every layer of the current image, as produced by
      the extract_features function.
    - style_layers: List of layer indices into feats giving the layers to include in the
      style loss.
    - style_targets: List of the same length as style_layers, where style_targets[i] is
      a PyTorch Tensor giving the Gram matrix of the source style image computed at
      layer style_layers[i].
    - style_weights: List of the same length as style_layers, where style_weights[i]
      is a scalar giving the weight for the style loss at layer style_layers[i].

    Returns:
    - style_loss: A PyTorch Tensor holding a scalar giving the style loss.
    """
    # Hint: you can do this with one for loop over the style layers, and should
    # not be very much code (~5 lines). You will need to use your gram_matrix function.
    # *****START OF YOUR CODE (DO NOT DELETE/MODIFY THIS LINE)*****

    sl_loss = 0.0
    for i in range(style_layers.__len__()):
        sl_loss += style_weights[i] * torch.sum((gram_matrix(feats[style_layers[i]].clone()) - style_targets[i])**2)
    return sl_loss

    # *****END OF YOUR CODE (DO NOT DELETE/MODIFY THIS LINE)*****
Total-variation regularization
除了上面两种损失以外,还可以加入一种正则化手段:全变差正则化(Total-variation regularization),证明能够增加图像的平滑度,具体计算就是图片的相邻的行像素相减,相邻的列像素相减,如图所示(列相减的情况类似):

具体公式就是:
这可以不用循环写:
def tv_loss(img, tv_weight):
    """
    Compute total variation loss.

    Inputs:
    - img: PyTorch Variable of shape (1, 3, H, W) holding an input image.
    - tv_weight: Scalar giving the weight w_t to use for the TV loss.

    Returns:
    - loss: PyTorch Variable holding a scalar giving the total variation loss
      for img weighted by tv_weight.
    """
    # Your implementation should be vectorized and not require any loops!
    # *****START OF YOUR CODE (DO NOT DELETE/MODIFY THIS LINE)*****

    tv1 = torch.sum((img[:,:,:,1:] - img[:,:,:,:-1])**2)
    tv2 = torch.sum((img[:,:,1:] - img[:,:,:-1])**2)
    t_v_loss = tv_weight * (tv1 + tv2)
    return t_v_loss

    # *****END OF YOUR CODE (DO NOT DELETE/MODIFY THIS LINE)*****
之后还有:
- 特征反演(Feature Inversion):从原始噪声,将风格权值设为0,开始生成与源内容图像相近的一张图
- 纹理合成(texture synthesis):将内容权值设为0,合成一张包含有源风格图像中纹理特征的图像
这些都只要改一下权值就可以了
结果
200次迭代后的以tubingen为内容源图像,以composition_vii为风格源图像生成的风格迁移图:

200次迭代后的以tubingen为内容源图像,以the_scream为风格源图像生成的风格迁移图:
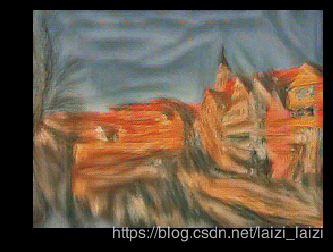
200次迭代后的以tubingen为内容源图像,以starry_night为风格源图像生成的风格迁移图:

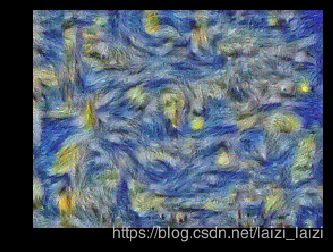
200次迭代后的以tubingen为内容源图像,以starry_night为风格源图像生成的特征反演(Feature Inversion)图:

200次迭代后的以tubingen为内容源图像,以starry_night为风格源图像生成的纹理合成(texture synthesis)图:
链接
前后面的作业博文请见:
- 上一次的博文:NetworkVisualization-PyTorch
- 下一次的博文:Generative Adversarial Networks (GANs)对抗生成网络
写得不好之处,还请多多包涵,可以在下方评论交流~~~