SSH远程访问及控制
前言
- 服务器的管理方式有很多,但大多数企业服务器是通过远程登录的方式来进行管理的。尤其是当需要从一个工作站管理数以百计的服务器主机时,远程登录管理方式更加具有优势。通过学习使用SSH来进行网络服务,远程登录管理,利用TCP Wrappers进行访问控制。
- SSH(Secure Shell)是一种安全通道协议,主要用来实现字符界面的远程登录、远程复制等功能。SSH 协议对通信双方的数据传输进行了加密处理,其中包括用户登录时输入的用户口令。与早期的 Telent(远程登录)、RSH(Remote Shell,远程执行命令)、RCP(Remote File Copy,远程文件复制)等应用相比,SSH 协议提供了更好的安全性。
1.OpenSSH服务器
1.1 SSH(Secure Shell)协议
- 是一种安全通道协议;
- 对通信数据进行了加密处理,用于远程管理;
1.2 OpenSSH
- 服务名称:sshd
- 服务端主程序:/usr/sbin/sshd
- 服务端配置文件:/etc/ssh/sshd_config
1.3 服务监听选项
- 端口号,协议版本,监听IP地址
- 禁用反向解析
[root@server1 ~]# vi /etc/ssh/sshd_config
[root@server1 ~]# systemctl restart sshd
[root@server1 ~]# pkill sshd
[root@server1 ~]# netstat -anpt | grep sshd
......
Port 10200             //监听端口号默认是22,最大65535
Protocol 2             //使用SSH V2 协议
ListenAddress 0.0.0.0  //监听地址,默认允许所有可以访问,目标地址
UseDNS no              //禁用DNS 反向解析
1.4 用户登录控制
- sshd 服务默认允许 root 用户登录,但在 Internet 中使用时是非常不安全的。普遍的做法如下:先以普通用户远程登入,进入安全 Shell 环境后,根据实际需要使用 su 命令切换为 root 用户。
- 关于 sshd 服务的用户登录控制,通常应禁止 root 用户或密码为空的用户登录。另外, 可以限制登录验证的时间(默认为 2 分钟)及最大重试次数,若超过限制后仍未能登录则断开连接。
注意:
- AllowUsers不要与DenyUsers同时用;
1.4.1 ssh配置信息
- 限制登录时间,不允许root用户登录
[root@server1 ~]# vi /etc/ssh/sshd_config
[root@server1 ~]# systemctl restart shhd
LoginGraceTime 2m    //限制登录验证时间
PermitRootLogin no   //不允许root用户登录
MaxAuthTries 6       //最大密码重试次数
PermitEmptyPasswords no     //允许空密码登录
1.4.2 设置登录方式
- 设置只允许liming从客户机192.168.100.1上远程登录在服务器上
[root@server1 ~]# vi /etc/ssh/sshd_config
[root@server1 ~]# systemctl restart sshd
[root@server1 ~]# useradd liming       创建用户
[root@server1 ~]# passwd liming

白名单
AllowUsers liming@192.168.100.1 #规定liming只能在192.168.100.1的客户机进行远程登录
# DenyUsers liming@20.0.0.11   拒绝liming在192.168.100.1客户机上进行远程登录
- 在客户机上测试
[root@server2 ~]# ssh [email protected]
[liming@server1 ~]$ whoami
liming
[liming@server1 ~]$ ifconfig
1.4.3 登录验证方式
对于服务器的远程管理,除了用户账号的安全控制以外,登录验证的方式也非常重要。
sshd 服务支持两种验证方式——密码验证、密钥对验证,可以设置只使用其中一种方式, 也可以两种方式都启用。
- 密码验证:对服务器中本地系统用户的登录名称、密码进行验证。这种方式使用最 为简便,但从客户端角度来看,正在连接的服务器有可能被假冒;从服务器角度来 看,当遭遇密码穷举(暴力破解)攻击时防御能力比较弱。
- 密钥对验证:要求提供相匹配的密钥信息才能通过验证。通常先在客户端中创建一对密钥文件(公钥、私钥),然后将公钥文件放到服务器中的指定位置。远程登录时,系统将使用公钥、私钥进行加密/解密关联验证,大大增强了远程管理的安全性。该方式不易被假冒,且可以免交互登录,在 Shell 中被广泛使用。
[root@localhost ~]# vim /etc/ssh/sshd_config
PasswordAuthentication  yes				//启用密码验证
PubkeyAuthentication  yes					//启用密钥对验证
AuthorizedKeysFile  .ssh/authorized_keys	//指定公钥库文件
…… //省略部分内容
[root@localhost ~]# systemctl restart sshd
注意:
- 当密码验证、密钥对验证都启用时,服务器将优先使用密钥对验证。对于安全性要求较 高的服务器,建议将密码验证方式禁用,只允许启用密钥对验证方式;若没有特殊要求,则两种方式都可启用。
2.使用SSH 客户端程序
- 在 CentOS 7.4 系统中,OpenSSH 客户端由 openssh-clients 软件包提供(默认已安装),其中包括 ssh 远程登录命令,以及 scp、sftp 远程复制和文件传输命令等。实际上,任何支持 SSH 协议的客户端程序都可以与 OpenSSH 服务器进行通信,如 Windows 平台中的 Xshell、SecureCRT、Putty 等图形工具。
2.1 命令程序 ssh 远程登录
1)通过 ssh 命令可以远程登录 sshd 服务,为用户提供一个安全的 Shell 环境,以便对服务器进行管理和维护。使用时应指定登录用户、目标主机地址作为参数。例如,若要登录主机 172.16.16.10,以对方服务器的 linfeng 用户进行验证,可以执行以下操作。
[root@localhost ~]# ssh [email protected]
The authenticity of host '172.16.16.10 (172.16.16.10)' can't be established.
ECDSA key fingerprint is d9:61:d2:c4:72:a8:16:b2:7b:94:04:4d:f0:c2:2b:b9.
Are you sure you want to continue connecting (yes/no)? yes //接受密钥
Warning: Permanently added '172.16.16.10' (ECDSA) to the list of known hosts.
linfeng@172.16.16.10's password:	//输入密码
2)当用户第一次登录 SSH 服务器时,必须接受服务器发来的 ECDSA 密钥(根据提示输入“yes”)后才能继续验证。接收的密钥信息将保存到~/.ssh/known_hosts 文件中。密码验证成功以后,即可登录目标服务器的命令行环境中了,就好像把客户端的显示器、键盘连接到服务器一样。
[linfeng@localhost ~]$ whoami	//确认当前用户linfeng
[linfeng@localhost ~]$ ifconfig ens33 | grep "inet "
//确认当前主机地址(引号内有空格) inet 172.16.16.10 netmask 255.255.255.0 broadcast 172.16.16.255
3)如果sshd 服务器使用了非默认的端口号(如 2345),则在登录时必须通过“-p”选项指定端口号。例如,执行以下操作将访问主机 192.168.4.22 的 2345 端口,以对方服务器的jerry 用户验证登录。
[root@localhost ~]# ssh -p 2345 jerry@172.16.16.22
jerry@172.16.16.22's password:	//输入密码
[jerry@localhost ~]$
2.2 命令程序 scp 远程复制
- 通过 scp 命令可以利用 SSH 安全连接与远程主机相互复制文件。使用 scp 命令时,除了必须指定复制源、目标之外,还应指定目标主机地址、登录用户,执行后根据提示输入验证口令即可。例如,以下操作分别演示了下行、上行复制的操作过程,将远程主机中的 /etc/passwd 文件复制到本机,并将本机的/etc/vsftpd 目录复制到远程主机。
[root@localhost ~]# scp [email protected]:/etc/passwd /root/pwd254.txt
root@172.16.16.10's password:
passwd	100% 2226	2.2KB/s	00:00
[root@localhost ~]# scp -r /etc/vsftpd/ [email protected]:/opt
root@172.16.16.10's password:
ftpusers	100%   125	0.1KB/s	00:00
user_list	100%   361	0.4KB/s	00:00
vsftpd.conf	100% 5030	4.9KB/s	00:00
vsftpd_conf_migrate.sh	100%   338	0.3KB/s	00:00
2.3 命令程序 sftp 安全 FTP
- 通过 sftp 命令可以利用 SSH 安全连接与远程主机上传、下载文件,采用了与 FTP 类似的登录过程和交互式环境,便于目录资源管理。例如,以下操作依次演示了 sftp 登录、浏览、文件上传等过程。
[root@localhost ~]# sftp [email protected]
Connecting to 172.16.16.10...
tsengyia@172.16.16.10's password:	//输入密码sftp> ls
sftp> put /boot/config-3.10.0-514.el7.x86_64	//上传文件Uploading /boot/config-3.10.0-514.el7.x86_64 to
/home/tsengyia/config-3.10.0-514.el7.x86_64
/boot/config-3.10.0-514.el7.x86_64	100%	103KB   68.0KB/s	00:00 sftp> ls
config-3.10.0-514.el7.x86_64
sftp> bye	//退出登录
[root@localhost ~]#
2.4 图形工具 Xshell
- 图形工具 Xshell 是 Windows 下一款功能非常强大的安全终端模拟软件,支持 Telnet、SSH、SFTP 等协议,可以方便地对Linux 主机进行远程管理。安装并运行 Xshell 后,在新建会话窗口中指定远程主机的 IP 地址、端口号等相关信息, 然后单击“连接”按钮,根据提示接受密钥、验证密码后即可成功登录目标主机。
3.构建密钥对验证的SSH 体系
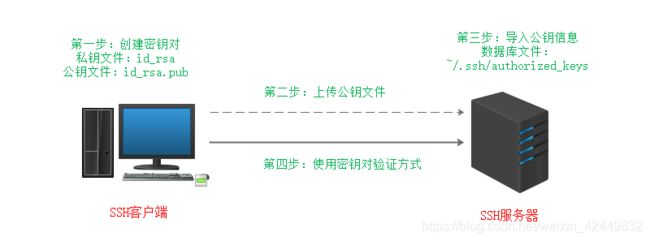
密钥对验证方式可以为远程登录提供更好的安全性,在 CentOS 7.4 服务器、客户端中构建密钥对验证 SSH 体系的基本过程如下:以 RSA 加密算法为例,整个过程包括四步
- 首先要在 SSH 客户端以 zhangsan 用户身份创建密钥对;
- 并且要将创建的公钥文件上传至 SSH 服务器端;
- 然后要将公钥信息导入服务器端的目标用户 lisi 的公钥数据库;
- 最后以服务器端用户 lisi 的身份登录验证。
3.1 在客户端创建密钥对
- 在 CentOS 7.4 客户端中,通过 ssh-keygen 工具为当前用户创建密钥对文件。可用的加密算法为 RSA、ECDSA 或 DSA 等(ssh-keygen 命令的“-t”选项用于指定算法类型)。例如,以 zhangsan 用户登录客户端,并生成基于 ECDSA 算法的 SSH 密钥对(公钥、私钥)文件,操作如下所示:
[zhangsan@localhost ~]$ ssh-keygen -t ecdsa
Generating public/private ecdsa key pair.
Enter file in which to save the key (/home/zhangsan/.ssh/id_ecdsa):		//指定私钥位置
Created directory '/home/zhangsan/.ssh'.
Enter passphrase (empty for no passphrase):	//设置私钥短语
Enter same passphrase again:	//确认所设置的短语
Your identification has been saved in /home/zhangsan/.ssh/id_ecdsa.
Your public key has been saved in /home/zhangsan/.ssh/id_ecdsa.pub.
The key fingerprint is:

……	//省略部分内容
- 上述操作过程中,提示指定私钥文件的存放位置时,一般直接按 Enter 键即可,最后生成的私钥、公钥文件默认存放在宿主目录中的隐藏文件夹.ssh 下。私钥短语用来对私钥文件进行保护,当使用该私钥验证登录时必须正确提供此处所设置的短语。
[zhangsan@localhost ~]$ ls -lh ~/.ssh/id_ecdsa*	//确认生成的密钥文件
-rw------- 1 zhangsan zhangsan 227 10 月 14 19:45 /home/zhangsan/.ssh/id_ecdsa
-rw-r--r-- 1 zhangsan zhangsan 192 10 月 14 19:45 /home/zhangsan/.ssh/id_ecdsa.pub
注意:
新生成的密钥对文件中,id_ecdsa 是私钥文件,权限默认为 600,对于私钥文件必须妥善保管,不能泄露给他人;id_ecdsa.pub 是公钥文件,用来提供给 SSH 服务器。
3.1 将公钥文件上传至服务器
- 将上一步生成的公钥文件上传至服务器,并部署到服务器端用户的公钥数据库中。上传公钥文件时可以选择 SCP、FTP、Samba、HTTP 甚至发送 E-mail 等任何方式。例如,可以通过 SCP 方式将文件上传至服务器的/tmp 目录下。
[zhangsan@localhost ~]$ scp ~/.ssh/id_ecdsa.pub root@172.16.16.10:/tmp
3.2 在服务器中导入公钥文本
- 在服务器中,目标用户(指用来远程登录的账号 lisi)的公钥数据库位于~/.ssh 目录, 默认的文件名是“authorized_keys”。如果目录不存在,需要手动创建。当获得客户端发送过来的公钥文件以后,可以通过重定向将公钥文本内容追加到目标用户的公钥数据库。
[root@localhost ~]# mkdir /home/lisi/.ssh/
[root@localhost ~]# cat /tmp/id_ecdsa.pub >> /home/lisi/.ssh/authorized_keys
[root@localhost ~]# tail -1 /home/lisi/.ssh/authorized_keys

强调:
要求除了登录的目标用户或 root 用户,同组或其他用户对该文件不能有写入权限,否则可能无法成功使用密钥对验证。除此之外,应确认 sshd 服务是否支持密钥对验证方式。
3.4 在客户端使用密钥对验证
当私钥文件(客户端)、公钥文件(服务器)均部署到位以后,就可以在客户端中进行测试了。
- 首先确认客户端中当前的用户为 zhangsan;
- 然后通过 ssh 命令以服务器端用户lisi 的身份进行远程登录。
如果密钥对验证方式配置成功,则在客户端将会要求输入私钥短语,以便调用私钥文件进行匹配(若未设置私钥短语,则直接登入目标服务器)。
[zhangsan@localhost ~]$ ssh lisi@172.16.16.22
[lisi@localhost ~]$ whoami
lisi	//成功登录服务器
此时表示SSH 密钥对验证体系已经构建完成。
4.TCP Wrappers 访问控制
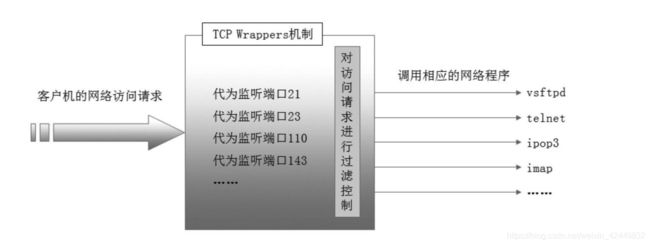
- 在 Linux 系统中,许多网络服务针对客户端提供了访问控制机制,如 Samba、BIND、HTTPD、OpenSSH 等。本节将介绍另一种防护机制——TCP Wrappers(TCP 封套),以作为应用服务与网络之间的一道特殊防线,提供额外的安全保障。
4.1 TCP Wrappers 概述
TCP Wrappers 将 TCP 服务程序“包裹”起来,代为监听 TCP 服务程序的端口,增加了一个安全检测过程,外来的连接请求必须先通过这层安全检测,获得许可后才能访问真正的服务程序。
- 直接使用 tcpd 程序对其他服务程序进行保护,需要运行 tcpd;
- 由其他网络服务程序调用 libwrap.so.*链接库, 不需要运行 tcpd 程序。
通常,链接库方式的应用要更加广泛,也更有效率。例如,vsftpd、sshd 及超级服务器xinetd 等,都调用了 libwrap 共享库(使用 ldd 命令可以查看程序的共享库)。
[root@localhost ~]# ldd /usr/sbin/sshd | grep "libwrap"
libwrap.so.0 => /lib64/libwrap.so.0 (0x00007fb178fce000)
注意:
- xinetd 是一个特殊的服务管理程序,通常被称为超级服务器。xinetd 通过在/etc/xinetd.d 目录下为每个被保护的程序建立一个配置文件,调用 TCP Wrappers 机制来提供额外的访问控制保护。
4.2 TCP Wrappers 的访问策略
TCP Wrappers 机制的保护对象为各种网络服务程序,针对访问服务的客户端地址进行访问控制。对应的两个策略文件为/etc/hosts.allow 和/etc/hosts.deny,分别用来设置允许和拒绝的策略。
4.2.1 策略的配置格式
两个策略文件的作用相反,但配置记录的格式相同,如下所示:
<服务程序列表>: <客户端地址列表>
服务程序列表、客户端地址列表之间以冒号分隔,在每个列表内的多个项之间以逗号分隔。
(1)服务程序列表
服务程序列表可分为以下几类:
- ALL:代表所有的服务。
- 单个服务程序:如“vsftpd”。
- 多个服务程序组成的列表:如“vsftpd,sshd”。
(2)客户端地址列表
客户端地址列表可分为以下几类:
- ALL:代表任何客户端地址。
- LOCAL:代表本机地址。
- 单个 IP 地址:如“192.168.4.4”。
- 网络段地址:如“192.168.4.0/255.255.255.0”。
- 以“.”开始的域名:如“.bdqn.com”匹配 bdqn.com 域中的所有主机。
- 以“.”结束的网络地址:如“192.168.4.”匹配整个 192.168.4.0/24 网段。
- 嵌入通配符“”“?”:前者代表任意长度字符,后者仅代表一个字符,如“10.0.8.2” 匹配以 10.0.8.2 开头的所有 IP 地址。不可与以“.”开始或结束的模式混用。
- 多个客户端地址组成的列表:如“192.168.1.,172.16.16.,.bdqn.com”。
4.2.2 访问控制的基本原则
- 关于 TCP Wrappers 机制的访问策略, 应用时遵循以下顺序和原则: 首先检查/etc/hosts.allow 文件,如果找到相匹配的策略,则允许访问;否则继续检查/etc/hosts.deny 文件,如果找到相匹配的策略,则拒绝访问;如果检查上述两个文件都找不到相匹配的策略,则允许访问。
4.2.3 TCP Wrappers 配置实例
- 实际使用 TCP Wrappers 机制时,较宽松的策略可以是“允许所有,拒绝个别”,较严格的策略是“允许个别,拒绝所有”。前者只需在 hosts.deny 文件中添加相应的拒绝策略就可以了;后者则除了在 hosts.allow 中添加允许策略之外,还需要在 hosts.deny 文件中设置“ALL:ALL”的拒绝策略。
- 例如,若只希望从 IP 地址为 61.63.65.67 的主机或者位于 192.168.2.0/24 网段的主机访问 sshd 服务,其他地址被拒绝,可以执行以下操作。
[root@localhost ~]# vi /etc/hosts.allow
sshd:61.63.65.67,192.168.2.*
[root@localhost ~]# vi /etc/hosts.deny
sshd:ALL


