Mac上使用docker环境进行C++开发的实践
背景
最近换上了mbp作为开发工具,在mbp上默认的c++环境是clang+LLVM那一套工具链,虽然说是相比gnu更加先进,但是因为我的代码经常需要在linux服务器和本机上跑,而clang和gnu的编译器在编译器参数,api支持等方面还是存在一定差异,最简单的libc++和libstdc++的标准库的不同就能浪费大量的时间在上面做兼容。我想了如下几个方案,并最终采用了docker的方案。
- 把整个mac的编译环境改成gnu那一套,问题:可能导致mac上一些需要编译的工具出现潜在问题
- 写代码的时候就考虑clang和gnu环境的兼容性,问题:对不同标准库的api不够熟悉,了解的性价比不高
- 抛弃本地环境,完全在服务器开发,问题:受到网络环境的影响大,调试不够方便
- 起一个linux的本地docker作为开发环境(完美)
确定使用docker环境开发后,第二个问题是用什么工具开发,如果你只使用vscode,那么你可以先跳过docker镜像制作的部分,vscode已经提供了c++镜像,只需要安装remote插件,就可以达到几乎开箱即用的效果。但是你如果像我一样调试的时候还是喜欢clion的强大功能,那么你可以先从docker镜像制作看起。
docker镜像制作
在我的docker环境中,我采用了比较新自己也比较熟悉的ubuntu作为基础环境,增加了一些常用工具和方便的连接docker所需要的一些工具。完整的docker环境可以在我的github查看docker-cpp-dev-environment
step0: 在mac上安装docker,直接在官网下载一个dmg,安装好,就能在顶栏看到一个小鲸鱼的标志,运行命令行,docker image ls不会报错,说明安装成功
step1: 首先是dockerfile的编写:
# 基础镜像
FROM ubuntu:20.04
# 作者信息版本信息
LABEL version="v2" \
      maintainer="Sunchao "

# 可用命令行参数配置的boost版本信息
ARG BOOST_VERSION=1.73.0
ARG BOOST_VERSION_=1_73_0
ENV BOOST_VERSION=${BOOST_VERSION}
ENV BOOST_VERSION_=${BOOST_VERSION_}
ENV BOOST_ROOT=/usr/include/boost
# tzdata直接安装时可能需要手动选择时区,添加该环境变量让其不要通过交互,自动选择
ENV DEBIAN_FRONTEND=noninteractive
# apt换源,加快构建速度
COPY sources.list /etc/apt/sources.list

RUN apt-get update
# 安装openssh 和 rsync是用于clion的远程部署和连接docker开发
RUN apt install -y --no-install-recommends tzdata build-essential cmake gdb openssh-server rsync vim git wget

# 配置 sshd和rsnyc, 允许root登陆 关闭usePAM 允许rsnc
RUN mkdir /var/run/sshd
RUN sed -ri 's/^#PermitRootLogin\s+.*/PermitRootLogin yes/' /etc/ssh/sshd_config &&  sed -ri 's/UsePAM yes/#UsePAM yes/g' /etc/ssh/sshd_config && sed -ri 's/RSYNC_ENABLE=false/RSYNC_ENABLE=true/g' /etc/default/rsync

# config rsync service
COPY rsync.conf /etc
# 设置root的密码
RUN echo 'root:000000' |chpasswd
RUN mkdir /root/sync
# install boost
RUN wget --max-redirect 3 --no-check-certificate https://dl.bintray.com/boostorg/release/${BOOST_VERSION}/source/boost_${BOOST_VERSION_}.tar.gz
RUN mkdir -p /usr/include/boost && tar zxf boost_${BOOST_VERSION_}.tar.gz -C /usr/include/boost --strip-components=1 && rm *.tar.gz
# 在docker-compose的启动方式中,最后这一步将会启动ssh和rsync服务
COPY entrypoint.sh /sbin
RUN chmod +x /sbin/entrypoint.sh
ENTRYPOINT [ "/sbin/entrypoint.sh" ]
step2: 然后是docker-compose.yml的编写
version: "3"

services:
  env:
    build: .
    container_name: linux-env
    # 将docker的22端口转发到本机45678 873端口转发到8730,873用于文件同步
    ports:
      - "45678:22"
      - "8730:873"
    cap_add:
      - ALL
step3: 其他用到的文件:
rsync.conf
# 编辑配置信息
max connections = 8
log file = /var/log/rsync.log
timeout = 300

[sync] # 模块名
comment = sync
# path为需要同步的文件夹路径
path = /root/sync
read only = no
list = yes
uid = root
gid = root
sources.list
deb http://mirrors.tuna.tsinghua.edu.cn/ubuntu/ focal main restricted
deb http://mirrors.tuna.tsinghua.edu.cn/ubuntu/ focal-updates main restricted
deb http://mirrors.tuna.tsinghua.edu.cn/ubuntu/ focal universe
deb http://mirrors.tuna.tsinghua.edu.cn/ubuntu/ focal-updates universe
deb http://mirrors.tuna.tsinghua.edu.cn/ubuntu/ focal multiverse
deb http://mirrors.tuna.tsinghua.edu.cn/ubuntu/ focal-updates multiverse
deb http://mirrors.tuna.tsinghua.edu.cn/ubuntu/ focal-backports main restricted universe multiverse
deb http://mirrors.tuna.tsinghua.edu.cn/ubuntu/ focal-security main restricted
deb http://mirrors.tuna.tsinghua.edu.cn/ubuntu/ focal-security universe
deb http://mirrors.tuna.tsinghua.edu.cn/ubuntu/ focal-security multiverse
entrypoint.sh
#!/bin/bash

/usr/bin/rsync --daemon --config=/etc/rsync.conf
/usr/sbin/sshd -D
在制作完docker镜像后,可以选择将自己的镜像托管到阿里云的镜像管理服务中。如果你想要一个配置好的ubuntu的cpp开发环境,你可以直接使用我托管的镜像 registry.cn-shanghai.aliyuncs.com/wang_sc/ubuntu-cpp-develop:v2,如何将自己的镜像托管到阿里云可以参考这篇博客,我用的是最基本的推送的方式。
在Clion中使用
在clion中,通过deployment和ssh分别同步文件和运行及调试。具体的逻辑是首先我们自己启动一个开启了ssh和rsync的docker,clion采用远程调试的方式连接docker进行同步和调试运行。
step1: 启动一个docker。在上一节制作好的docker的路径上,运行docker-compose up -d启动一个容器。
step2: 在preference中添加一个远程调试工具链

步骤2点进去添加一个远程主机:

密码和端口就是之前设置的root密码和22端口映射出来的端口
step3: 添加一个cmake配置,使用远程主机的工具链进行编译运行
工具链的部分就处理完了,接下来将项目同步到docker容器中
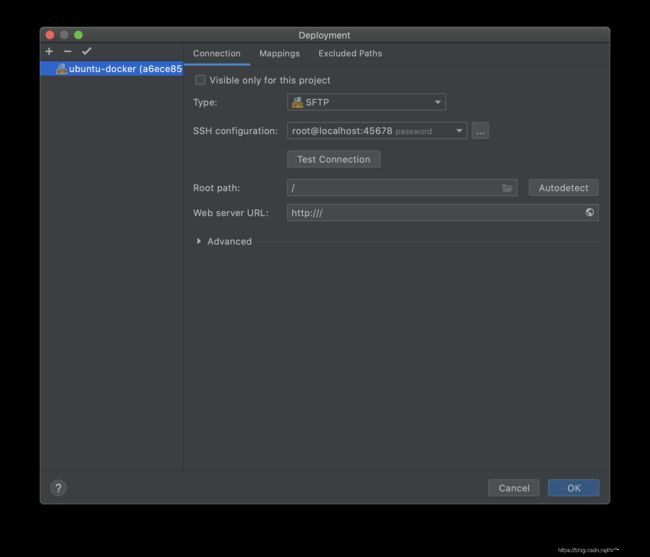
step4: 设置deployment参数
ssh 连接配置和之前的远程主机配置一致

设置好本地文件夹和docker中的文件夹的关系映射

配置到这里就完成了,应该可以看到多个一个remote的配置,选择该配置进行编译调试

在vscode中使用
vscode提供了remote系列的远程开发工具,非常好用,具体的文档可以参考这个container tutorial
在vscode中通过docker开发有两种方案,
- 使用vscode提供的docker容器,傻瓜式开发
- 使用自己的dockerfile和镜像
方案1 开箱即用的傻瓜方案
step0: 确保mac上已安装docker并开启deamon(顶栏上小鲸鱼稳定)
step1:安装remote development 插件, 这个插件会安装三个插件包括ssh,container和WSL。
step2: command + shift + p 打开panel工具,选择remote-containers: open in container,

选择一个需要打开的工程的文件夹,然后会打开一个选择镜像的下拉框,选择C++,然后选择一个系统版本,等待docker安装完成。

这样其实就已经是一个docker开发环境了。在vscode的默认策略中,本地的文件夹会被挂在到docker容器中,直接在vscode中对项目进行开发,关闭docker后也是能够保留下来的。
但是对于docker新手,尤其需要注意的是,如果不是挂在上去的文件夹,默认情况下容器中的文件是会随着容器销毁而消失的所以不要在该工程文件夹以外的地方保存文件,当然,这只是对新手而言,当你熟悉docker后,有不同的办法可以改变这一点。
方案2 用上自己的docker镜像
step0: 确保mac上已安装docker并开启deamon(顶栏上小鲸鱼稳定)
step1:安装remote development 插件, 这个插件会安装三个插件包括ssh,container和WSL。
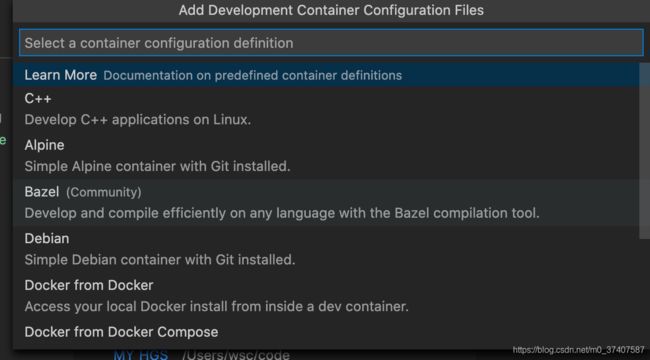
step2: command + shift + p 打开panel工具,选择remote-containers: Add development container configuration file,

这一步和方案1很相似,我们选择C++之后随便选择一个系统,添加好配置文件的模板,这一步和方案1的区别是vscode不会直接去下载配置文件中的docker镜像,我们马上要把它改成我们自己的镜像

step3: 这时,文件夹中应该已经多了一个.devcontainer的文件夹,里面包含两个文件包括一个devcontainer.json和Dockerfile,我们只需要对Dockerfile进行简单的修改,在from 中引入我们自己做好的image,作为基础image,并且在devcontainer.json的最后注释掉"remoteUser": "vscode"以允许root用户登陆,既可。
devcontainer.json
{

	// !!!改动处 换了个名字
	"name": "cpp-docker",
	"build": {

		"dockerfile": "Dockerfile",
		// Update 'VARIANT' to pick an Debian / Ubuntu OS version: debian-10, debian-9, ubuntu-20.04, ubuntu-18.04
		//"args": { "VARIANT": "ubuntu-20.04" }
	},
	"runArgs": [ "--cap-add=SYS_PTRACE", "--security-opt", "seccomp=unconfined"],

	// Set *default* container specific settings.json values on container create.
	"settings": {

		"terminal.integrated.shell.linux": "/bin/bash"
	},

	// Add the IDs of extensions you want installed when the container is created.
	"extensions": [
		"ms-vscode.cpptools"
	],

	// Use 'forwardPorts' to make a list of ports inside the container available locally.
	// "forwardPorts": [],

	// Use 'postCreateCommand' to run commands after the container is created.
	// "postCreateCommand": "gcc -v",

	// Comment out connect as root instead. More info: https://aka.ms/vscode-remote/containers/non-root.
	// !!! 改动处
	// "remoteUser": "vscode"
}
Dockerfile
# See here for image contents: https://github.com/microsoft/vscode-dev-containers/tree/v0.148.1/containers/cpp/.devcontainer/base.Dockerfile

# [Choice] Debian / Ubuntu version: debian-10, debian-9, ubuntu-20.04, ubuntu-18.04
# ARG VARIANT="buster"
# FROM mcr.microsoft.com/vscode/devcontainers/cpp:0-${VARIANT}
FROM registry.cn-shanghai.aliyuncs.com/wang_sc/ubuntu-cpp-develop:v2
# [Optional] Uncomment this section to install additional packages.
# RUN apt-get update && export DEBIAN_FRONTEND=noninteractive \
#     && apt-get -y install --no-install-recommends
step4: command + shift + p 打开panel,第一次选择 rebuild and reopen in container,既可进入对应环境。