redux+axios请求数据
在使用redux之前我们需要先安装 redux和redux-thunk
yarn add redux redex-thunk
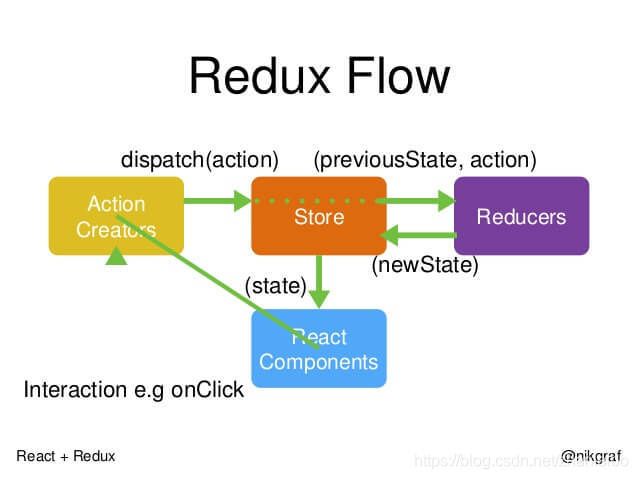
安装完成后,我们还需要了解rudex的工作流程

首先,用户发出 Action。
store.dispatch(action);
然后,Store 自动调用 Reducer,并且传入两个参数:当前 State 和收到的 Action。 Reducer 会返回新的 State 。
let nextState = todoApp(previousState, action);
State 一旦有变化,Store 就会调用监听函数。
// 设置监听函数
store.subscribe(listener);
listener可以通过store.getState()得到当前状态。如果使用的是 React,这时可以触发重新渲染 View。
function listerner() {
  let newState = store.getState();
  component.setState(newState);
}
**
应用实例
**
本文请求的数据来自小度商城
首先使用
npx create-react-app redux
来创建一个新的react
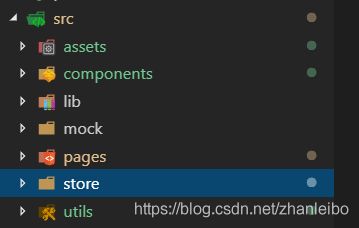
同时在src文件夹中新建一个stroe文件夹

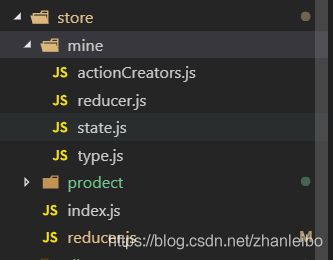
接下来就是在store文件夹中分别创建 index.js reducer.js和你要管理的文件夹,本文的是详情页模块的数据。在prodect文件夹中分别创建actionCreators.js reducer.js state.js type.js四个文件。如图所示:

在index.js文件中
import { createStore,applyMiddleware } from 'redux'

import thunk from 'redux-thunk'
import reducer from './reducer'

const store = createStore( reducer,applyMiddleware( thunk ) )


export default store
在reducer.js文件中写
import {combineReducers} from 'redux'
import mine from './mine/reducer'
import prodect from './prodect/reducer'
const reducer = combineReducers({
    mine
})
export default reducer
actionCreators.js
import * as type from './type.js'
import http from 'utils/http';
const  actionCreators = {
     getProdect({spuNo}){
        return async(dispatch) => {
                const result = await http({
                url: '/api/products/spu_skus/v3?',
                params: {
                    timestamp: Date.now(),
                    spuNo:spuNo,
                    channelId: 0,
                    platformId: 2,
                }
            })
            console.log(result.data.data[0][0])
            const action = {
                type: type.GET_PRODECT,
                payload:result.data.data[0][0]
            }
            dispatch( action )
        }
    }
}
export default actionCreators
在actionCreators.js中的aixos我们使用了http进行了一次分装,以及对请求数据设置了反向代理。
http.js
import axios from 'axios'

const http = ({
  url,
  params,
  headers,
  method
}) => {
  return new Promise( (resolve,reject) => {
    axios({
      url,
      params,
      headers,
      method
    }).then ( res => {
      resolve( res )
    } ).catch(  error => console.log( error ))

  })
}


export default http
反向代理文件setupProxy.js
module.exports = function (app) {
  // app.use( proxy( 标识,配置 ) )
  // https://m.lagou.com/listmore.json
  app.use(proxy('/api', {
    target: 'https://dumall.baidu.com',
    changeOrigin: true
  }))

}
reducer.js
import state from './state.js'
import * as type from './type.js'

const reducer = (previousState = state,action) => {
    let newState = {
        ...previousState
    }
    switch (action.type) {
        case type.GET_PRODECT:
            newState.prodect=action.payload
            break;

        default:
            break;
    }
    return newState
}
export default reducer
state.js
const state = {
    prodect:null
}
export default state
type.js
export const GET_PRODECT='GET_PRODECT'
为了使用起来更加规范,我们还需要封装一个文件get_prodect.js。
import {connect} from 'react-redux'
import {bindActionCreators} from 'redux'
const GetProdect = ({
    actionCreators,
    stateType,
    UIComponent
}) => {
    return  connect(state => state[stateType],dispatch => {
        return bindActionCreators(actionCreators,dispatch)
    })(UIComponent)
}
export default GetProdect
经过以上的几部简单操作之后,我们的redux就已经配置完成了,接下来 我将要使用它进行请求数据。
import React, { Component, Fragment } from 'react'
import GetProdect from 'utils/get_store/get_prodect'
import actionCreators from 'store/prodect/actionCreators'

class Product extends Component {
    render() {
        return (

                {this.props.prodect && this.props.prodect.price}//这一步非常重要,如果没有判断数据是否存在,将会报错提示没有数据。

        )
    }

    componentDidMount(){
        let spuNo =this.props.location.pathname.slice(1).split('/')[1]
        this.props.getProdect({spuNo})
    }
}

export default GetProdect({
    actionCreators,
    stateType:'prodect',
    UIComponent:Product
})
这样我们就可以在请求到详情页中的数据,实现动态传参。