使用SSM框架实现增删改查
springmvc的理解:https://blog.csdn.net/qq_41879385/article/details/82885516

本项目的jsp页面使用bootstrap前端框架:https://blog.csdn.net/qq_41879385/article/details/82431238

编译器eclipse,数据库MySQL5.5.25,jdk1.8,tomcat7.0

MySQL5.5.25安装教程:https://mp.csdn.net/postedit/82215828

在项目中用到的二维码:https://blog.csdn.net/qq_41879385/article/details/81625354
整合项目的时候,整个页面会比较长,所以难免会出现一些不耐烦,没耐心的看,旁边就有我的QQ号啊,直接找我要源码不就行了哈哈。不过我还是建议耐心静下心来看,真的对你帮助很大,要源码的这种方式应该属于初学者。
项目名为:小说书籍网,有问题或者想找我要源码的,都可以到旁边有个我的联系方式。备注CSDN博客。
一、目录结构:
二、数据库
数据库设计,数据脚本下载:https://download.csdn.net/download/qq_41879385/10696480,因为博客已经没有免费下载的功能了,所以C币只选最少的,1个就行。
三、项目开始
在pojo包中创建Novel.java(代表novel表)、Coltype.java(代表coltype),当然,里面的字段、类型跟这两张表是一样的。
但是我还要再加一张表:PageNovel.java,这个是分页的表,呃,实体类的话大家都会,我这里就不在贴出来了。贴出一个分页的类:
PageNovel.java:
package cn.item.pojo;

public class PageNovel {
	private String novelName;
	private String novelColumn;
	private Integer page = 1;
	private Integer start;
	private Integer size = 10;

	public String getNovelName() {
		return novelName;
	}
	public void setNovelName(String novelName) {
		this.novelName = novelName;
	}
	public String getNovelColumn() {
		return novelColumn;
	}
	public void setNovelColumn(String novelColumn) {
		this.novelColumn = novelColumn;
	}
	public Integer getPage() {
		return page;
	}
	public void setPage(Integer page) {
		this.page = page;
	}
	public Integer getStart() {
		return start;
	}
	public void setStart(Integer start) {
		this.start = start;
	}
	public Integer getSize() {
		return size;
	}
	public void setSize(Integer size) {
		this.size = size;
	}

}
在Java Resources下创建一个与src同路径的文件夹config,注意包的名字
在config下创建ApplicationContext-dao.xml:
ApplicationContext-service.xml:
ApplicationContext-trans.xml:
db.properties:
jdbc.driver=com.mysql.jdbc.Driver
jdbc.url=jdbc:mysql://localhost:3306/你的表名写这?characterEncoding=utf-8
jdbc.username=root
jdbc.password=你的密码写这
log4j.properties:
# Global logging configuration
log4j.rootLogger=DEBUG, stdout
# Console output...
log4j.appender.stdout=org.apache.log4j.ConsoleAppender
log4j.appender.stdout.layout=org.apache.log4j.PatternLayout
log4j.appender.stdout.layout.ConversionPattern=%5p [%t] - %m%n
SpringMvc.xml:
SqlMapConfig.xml:
web.xml:
  NovelBook

    index.html
    index.htm
    index.jsp
    default.html
    default.htm
    default.jsp


    contextConfigLocation
    classpath:ApplicationContext-*.xml


    org.springframework.web.context.ContextLoaderListener


    springMvc
    org.springframework.web.servlet.DispatcherServlet

      contextConfigLocation
      classpath:SpringMvc.xml

    1


    springMvc
    *.action


    CharacterEncodingFilter
    org.springframework.web.filter.CharacterEncodingFilter

      encoding
      utf-8


    CharacterEncodingFilter
    /*
以上的是配置文件,其实我都是直接复制的,然后在修改一下里面的一些包名。注意包名
业务层:service:
NovelService.java:
package cn.item.service;

import java.util.List;

import cn.item.pojo.Coltype;
import cn.item.pojo.Novel;
import cn.item.pojo.PageNovel;

public interface NovelService {

	public List findDictByCode(String code);

	public List findCustomerByVo(PageNovel vo);
	public Integer findCustomerByVoCount(PageNovel vo);

	public Novel findNovelById(Long id);

	public void updateNovelById(Novel novel);

	public void deleteNovelById(long id);

	public void insertNovelById(Novel novel);

}
NovelServiceImpl.java:
package cn.item.service;

import java.util.List;

import org.springframework.beans.factory.annotation.Autowired;
import org.springframework.stereotype.Service;

import cn.item.dao.DictMapper;
import cn.item.dao.NovelMapping;
import cn.item.pojo.Coltype;
import cn.item.pojo.Novel;
import cn.item.pojo.PageNovel;

@Service
public class NovelServiceImpl implements NovelService{

	@Autowired
	private DictMapper dictMapper;
	@Autowired
	private NovelMapping novelMapping;

	@Override
	public List findDictByCode(String code) {
		List list = dictMapper.findDictByCode(code);
		return list;
	}

	@Override
	public List findCustomerByVo(PageNovel vo) {
		List list = novelMapping.findCustomerByVo(vo);
		return list;
	}

	@Override
	public Integer findCustomerByVoCount(PageNovel vo) {
		Integer count = novelMapping.findCustomerByVoCount(vo);
		return count;
	}

	@Override
	public Novel findNovelById(Long id) {
		Novel novel = novelMapping.findNovelById(id);
		return novel;
	}

	@Override
	public void updateNovelById(Novel novel) {
		novelMapping.updateNovelById(novel);
	}

	@Override
	public void deleteNovelById(long id) {
		novelMapping.deleteNovelById(id);
	}

	@Override
	public void insertNovelById(Novel novel) {
		novelMapping.insertNovelById(novel);
	}

}
数据访问层:dao,也有人用Mapping,都可以:
NovelMapping.java:是小说主表的sql语句的方法,方法名是与service相同的:
package cn.item.dao;

import java.util.List;

import cn.item.pojo.Novel;
import cn.item.pojo.PageNovel;

public interface NovelMapping {

	public List findCustomerByVo(PageNovel vo);
	public Integer findCustomerByVoCount(PageNovel vo);

	public Novel findNovelById(Long id);

	public void updateNovelById(Novel novel);

	public void deleteNovelById(long id);

	public void insertNovelById(Novel novel);

}
接下就写映射文件:NovelMapping.xml:注意名称空间不能有空格,之前有次做项目还因为名称空间多了一个空格,结果找了半天没找到原因,在这里提醒大家注意:
and a.novel_name LIKE '%${novelName}%'
and a.novel_column=#{novelColumn}
UPDATE novel
novel_name=#{novel_name},
novel_column=#{novel_column},
author_name=#{author_name},
author_Introduction=#{author_Introduction},
novel_content=#{novel_content},
WHERE novel_id=#{novel_id}
delete from novel where novel_id =#{id}
INSERT INTO `novel`(`novel_name`,`novel_column`,`author_name`,`author_Introduction`,`novel_content`)
VALUE(#{novel_name},#{novel_column},#{author_name},#{author_Introduction},#{novel_content});
接下就写DictMapper.java,这个类是为了下拉做的:
package cn.item.dao;

import java.util.List;

import cn.item.pojo.Coltype;

public interface DictMapper {
	public List findDictByCode(String code);

}
和DictMapper.java的映射文件:DictMapper.xml:
那么,实体类、数据访问层、业务层都写好了,接下可以写控制层:NovelController.java:
package cn.item.controller;

import java.util.List;

import javax.annotation.Resource;

import org.springframework.beans.factory.annotation.Autowired;
import org.springframework.beans.factory.annotation.Value;
import org.springframework.stereotype.Controller;
import org.springframework.ui.Model;
import org.springframework.web.bind.annotation.RequestMapping;
import org.springframework.web.bind.annotation.ResponseBody;

import cn.itcast.utils.Page;
import cn.item.dao.NovelMapping;
import cn.item.pojo.Coltype;
import cn.item.pojo.Novel;
import cn.item.pojo.PageNovel;
import cn.item.service.NovelService;

@Controller
@RequestMapping("/novel")
public class NovelController {
	@Resource
	private NovelMapping novelMapping;

	@Autowired
	private NovelService novelService;

	@Value("${novel.col.name}")
	private String column;

	@RequestMapping("/list")
	public String list(PageNovel vo,Model model) throws Exception{

		//小说类型
		List columnList=novelService.findDictByCode(column);

		if(vo.getNovelName()!=null){
			vo.setNovelName(new String(vo.getNovelName().getBytes("iso8859-1"),"utf-8"));
		}
		if(vo.getPage()==null){
			vo.setPage(1);
		}

		vo.setStart((vo.getPage() - 1) * vo.getSize());

		//查询数据库的全部数据
		List resultList = novelService.findCustomerByVo(vo);
		Integer count = novelService.findCustomerByVoCount(vo);

		Page page= new Page();
		page.setTotal(count);			//总条数
		page.setSize(vo.getSize()); 	//每页显示条数
		page.setPage(vo.getPage());		//总页数
		page.setRows(resultList);		//分页的数据

		model.addAttribute("page", page);

		//下拉菜单
		model.addAttribute("fromType", columnList);

		model.addAttribute("novelName", vo.getNovelName());
		model.addAttribute("novelcolumn", vo.getNovelColumn());

		return "novel";
	}

	@RequestMapping("/detail")
	@ResponseBody
	public Novel detail(Long id) throws Exception{
		Novel novel = novelService.findNovelById(id);
		return novel;
	}

	@RequestMapping("/update")
	public String update(Novel novel) throws Exception{
		novelService.updateNovelById(novel);
		return "novel";
	}

	@RequestMapping("/delete")
	public String delete(long id) throws Exception{
		novelService.deleteNovelById(id);
		return "novel";
	}

	@RequestMapping("/insert")
	public String insert(Novel novel) throws Exception{
		novelService.insertNovelById(novel);
		return "novel";
	}

}
嗯,控制层就这么一个:接下来可以写jsp了。
第一步,在WEB-INF下创建jsp文件夹,里面创建novel.jsp,在SpringMvc.xml中已经配置完整视图解析器了。
在novel.jsp头部创建c标签:
<%@ taglib prefix="c" uri="http://java.sun.com/jsp/jstl/core"%>下面是完整的jsp页面代码:
<%@ page language="java" contentType="text/html; charset=UTF-8"
pageEncoding="UTF-8"%>
<%@ page trimDirectiveWhitespaces="true"%>
<%@ taglib prefix="c" uri="http://java.sun.com/jsp/jstl/core"%>
<%
String path = request.getContextPath();
String basePath = request.getScheme() + "://" + request.getServerName() + ":" + request.getServerPort()
+ path + "/";
%>
网站
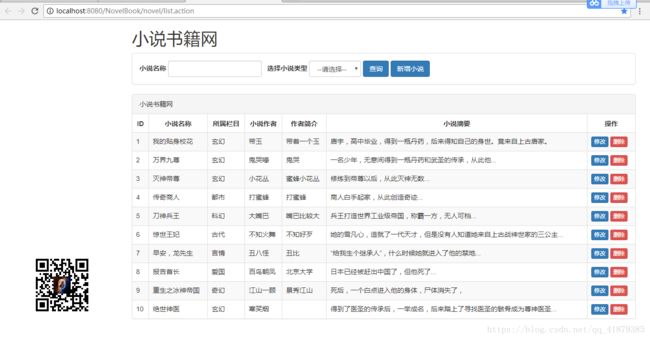
运行效果:数据可能有点少,因为我之前数据库重装结果一不小心就把整个数据库的文件全部删除了,当时我真的心痛啊,编写了2年是SQL语句一下子全部没了,我叫那个心痛啊,不过还好本人数据库还算牛逼一点嘻嘻,很快有些了一个数据,呃,在我给的数据库脚本中是有添加的SQL语句的,用那些sql语句就可以添加了。
这个页面是有用到bootstrap的,在本文章的头部就有贴出bootstrap的使用教程。
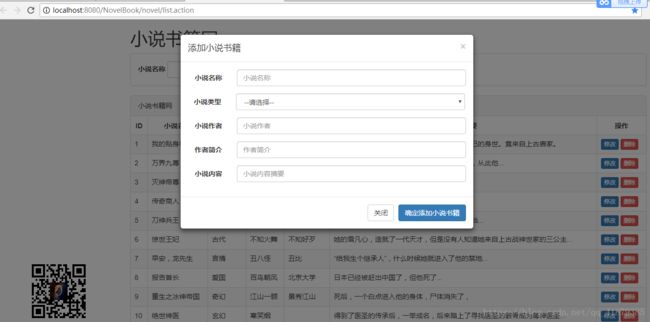
增加效果:利用了bootstrap的模态框效果:
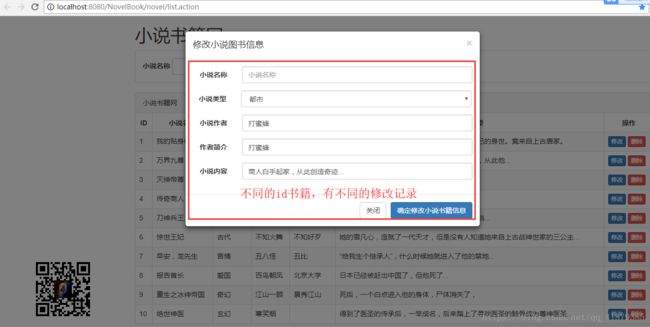
修改也是一样的:但是修改功能有个小细节,在点击修改的时候,在模态框都会显示不同数据的不同数据,什么意思呢,就比如你点8号的修改,在跳出来的模态框就回显示8号的数据信息,而点击7号的修改按钮,就会显示7号的数据信息。
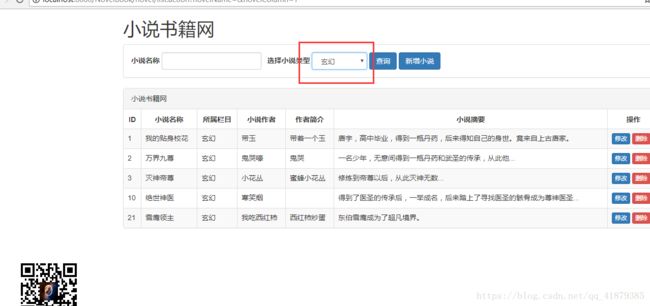
下拉查询:
条件查询:
自此,本项目的整合就到这里了,谢谢点赞,如有问题欢迎评论,我随时都会上博客。
附上源码下载地址:百度网盘。代码有问题及时联系我QQ3506346737,尽快修正。
链接:https://pan.baidu.com/s/1h5iIuyZHL0jCXibahB53jg
提取码:7kia


