uiautomator2+mitmproxy+weditor+Python3抖音数据抓取
一、uiautomator2
UiAutomator是Google提供的用来做安卓自动化测试的一个Java库,基于Accessibility服务。功能很强,可以对第三方App进行测试,获取屏幕上任意一个APP的任意一个控件属性,并对其进行任意操作,但有两个缺点:1. 测试脚本只能使用Java语言 2. 测试脚本要打包成jar或者apk包上传到设备上才能运行。
我们希望测试逻辑能够用Python编写,能够在电脑上运行的时候就控制手机。这里要非常感谢 Xiaocong He (@xiaocong),他将这个想法实现了出来(见xiaocong/uiautomator),原理是在手机上运行了一个http rpc服务,将uiautomator中的功能开放出来,然后再将这些http接口封装成Python库。 因为xiaocong/uiautomator这个库,已经很久不见更新。所以我们直接fork了一个版本,为了方便做区分我们就在后面加了个2 openatx/uiautomator2
除了对原有的库的bug进行了修复,还增加了很多新的Feature。主要有以下部分:
- 设备和开发机可以脱离数据线,通过WiFi互联(基于atx-agent)
- 集成了openstf/minicap达到实时屏幕投频,以及实时截图
- 集成了openstf/minitouch达到精确实时控制设备
- 修复了xiaocong/uiautomator经常性退出的问题
- 代码进行了重构和精简,方便维护
- 实现了一个设备管理平台(也支持iOS) atxserver2
- 扩充了toast获取和展示的功能
这里要先说明下,因为经常有很多人问 openatx/uiautomator2 并不支持iOS测试,需要iOS自动化测试,可以转到这个库 openatx/facebook-wda。
PS: 这个库 https://github.com/NeteaseGame/ATX 目前已经不维护了,请尽快更换。
这里有一份快速参考,适合已经入门的人 QUICK REFERENCE GUIDE,欢迎多提意见。
Requirements
- Android版本 4.4+
- Python 3.6+ (社区反馈3.8.0不支持, 但是3.8.2支持)
如果用python2的pip安装,会安装本库的老版本0.2.3;如果用python3.5的pip安装,会安装本库的老版本0.3.3;两者均已经不会再维护;PYPI上的最近版本是这个:https://pypi.org/project/uiautomator2/
QUICK START
先准备一台(不要两台)开启了开发者选项的安卓手机,连接上电脑,确保执行adb devices可以看到连接上的设备。
运行pip3 install -U uiautomator2 安装uiautomator2
运行python3 -m uiautomator2 init安装包含httprpc服务的apk到手机+atx-agent, minicap, minitouch (在过去的版本中,这一步是必须执行的,但是从1.3.0之后的版本,当运行python代码u2.connect()时就会自动推送这些文件了)
命令行运行python打开python交互窗口。然后将下面的命令输入到窗口中。
import time
import uiautomator2 as u2


d = u2.connect_wifi('10.0.64.231')
# d = u2.connect() # connect to device
print(d.info)
# print(d.service("uiaotumator").running)
#查看uiaotumator服务是否开启
print(d.uiautomator.running())
#启动 停止 uiautomator 服务
# print(d.uiautomator.start())
print(d.uiautomator.stop())
#查看age运营状态,如果atx停止需要重新usb连接唤醒或者app手机上开启
print(d.agent_alive)
#获取设备信息
# print(d.device_info)

print(d.window_size())
print(d.wlan_ip)

time.sleep(3)
#usb链接
# d = u2.connect_usb('BQU4RWBEYLSORS5L')
# d = u2.connect() # connect to device
# print(d.info)

#adb-usb链接
# d = u2.connect_adb_wifi('10.0.64.231:5555')
# d = u2.connect() # connect to device
# print(d.info)


#启动手机app
#1.通过aapt获取包名: ./aapt2 dump badging /Users/wangyun/Downloads/aweme_aweGW_v11.2.0_97887f5.apk
#2.通过editor获取包名
#3.通过 weditor获取包名
pakagename = 'com.ss.android.ugc.aweme'
d.app_start(pakagename)
time.sleep(5)
d.app_stop(pakagename)
二、mitmproxy
mitmproxy安装:
pip3 install -i https://pypi.doubanio.com/simple/ --trusted-host pypi.doubanio.com mitmproxymitmproxy 只能liunx启动
mitmdump:可以进行windows,mac,liunx Python交互。
mitmweb:可视化界面
启动方式:
1.直接控制台输入:mitmdump 或者mitmweb
2.指定端口:mitmdump -p
2.指定端口和交互脚本:mitmdump -s test.py -p
如:
mitmdump -s tls_passthrough.py -p 8889
tls_passthrough.py 文件代码
#@Time:2020/6/1 10:54 上午
#@Author:wangyun
#@File:tls_passthrough.py


"""
This inline script allows conditional TLS Interception based
on a user-defined strategy.
Example:
    > mitmdump -s tls_passthrough.py
    1. curl --proxy http://localhost:8080 https://example.com --insecure
    // works - we'll also see the contents in mitmproxy
    2. curl --proxy http://localhost:8080 https://example.com --insecure
    // still works - we'll also see the contents in mitmproxy
    3. curl --proxy http://localhost:8080 https://example.com
    // fails with a certificate error, which we will also see in mitmproxy
    4. curl --proxy http://localhost:8080 https://example.com
    // works again, but mitmproxy does not intercept and we do *not* see the contents
Authors: Maximilian Hils, Matthew Tuusberg
"""
import collections
import random
import requests
import os
from enum import Enum
import time

import mitmproxy
from mitmproxy import ctx
from mitmproxy.exceptions import TlsProtocolException
from mitmproxy.proxy.protocol import TlsLayer, RawTCPLayer


class InterceptionResult(Enum):
    success = True
    failure = False
    skipped = None


class _TlsStrategy:
    """
    Abstract base class for interception strategies.
    """

    def __init__(self):
        # A server_address -> interception results mapping
        self.history = collections.defaultdict(lambda: collections.deque(maxlen=200))

    def should_intercept(self, server_address):
        """
        Returns:
            True, if we should attempt to intercept the connection.
            False, if we want to employ pass-through instead.
        """
        raise NotImplementedError()

    def record_success(self, server_address):
        self.history[server_address].append(InterceptionResult.success)

    def record_failure(self, server_address):
        self.history[server_address].append(InterceptionResult.failure)

    def record_skipped(self, server_address):
        self.history[server_address].append(InterceptionResult.skipped)


class ConservativeStrategy(_TlsStrategy):
    """
    Conservative Interception Strategy - only intercept if there haven't been any failed attempts
    in the history.
    """

    def should_intercept(self, server_address):
        if InterceptionResult.failure in self.history[server_address]:
            return False
        return True


class ProbabilisticStrategy(_TlsStrategy):
    """
    Fixed probability that we intercept a given connection.
    """

    def __init__(self, p):
        self.p = p
        super(ProbabilisticStrategy, self).__init__()

    def should_intercept(self, server_address):
        return random.uniform(0, 1) < self.p


class TlsFeedback(TlsLayer):
    """
    Monkey-patch _establish_tls_with_client to get feedback if TLS could be established
    successfully on the client connection (which may fail due to cert pinning).
    """

    def _establish_tls_with_client(self):
        server_address = self.server_conn.address

        try:
            super(TlsFeedback, self)._establish_tls_with_client()
        except TlsProtocolException as e:
            tls_strategy.record_failure(server_address)
            raise e
        else:
            tls_strategy.record_success(server_address)


# inline script hooks below.

tls_strategy = None


def load(l):
    l.add_option(
        "tlsstrat", int, 0, "TLS passthrough strategy (0-100)",
    )


def configure(updated):
    global tls_strategy
    if ctx.options.tlsstrat > 0:
        tls_strategy = ProbabilisticStrategy(float(ctx.options.tlsstrat) / 100.0)
    else:
        tls_strategy = ConservativeStrategy()


def next_layer(next_layer):
    """
    This hook does the actual magic - if the next layer is planned to be a TLS layer,
    we check if we want to enter pass-through mode instead.
    """
    if isinstance(next_layer, TlsLayer) and next_layer._client_tls:
        server_address = next_layer.server_conn.address

        if tls_strategy.should_intercept(server_address):
            # We try to intercept.
            # Monkey-Patch the layer to get feedback from the TLSLayer if interception worked.
            next_layer.__class__ = TlsFeedback
        else:
            # We don't intercept - reply with a pass-through layer and add a "skipped" entry.
            mitmproxy.ctx.log("TLS passthrough for %s" % repr(next_layer.server_conn.address), "info")
            next_layer_replacement = RawTCPLayer(next_layer.ctx, ignore=True)
            next_layer.reply.send(next_layer_replacement)
            tls_strategy.record_skipped(server_address)


def request(flow):
    # ctx.log.error(str(flow.request.url))
    ctx.log.warn('哈哈,我拦截到请求信息头了')


def response(flow):
    print('-------------------------------')
    ctx.log.error(str(flow.response.status_code))
    ctx.log.warn(str(flow.request.url))
    print('-------------------------------')
    ctx.log.warn('哈哈,我拦截到请求信息包了')
    ctx.log.warn(str(flow.response.text))

    followesUrl ='user/follower/list'
    if followesUrl in flow.request.url:
        print('抓到了响应user/follower/list')


    if 'video/tos/cn/tos' in flow.request.url:
        ctx.log.warn('哈哈,我拦截到请求video/tos/cn/tos')
        name = str(time.time())[:9]+str(random.randint(0,9))+'.mp4'


        do_load_media(flow.request.url,'./data/video/'+name)

def do_load_media(url, path):
    ctx.log.warn('哈哈,开始下载视频了:'+str(url))


    try:
        headers = {
            'User-Agent': 'Mozilla/5.0 (Macintosh; Intel Mac OS X 10_14_2) AppleWebKit/537.36 (KHTML, like Gecko) '
                          'Chrome/71.0.3578.98 Safari/537.36'}
        pre_content_length = 0
        # 循环接收视频数据
        while True:
            # 若文件已经存在,则断点续传,设置接收来需接收数据的位置
            if os.path.exists(path):
                headers['Range'] = 'bytes=%d-' % os.path.getsize(path)
            res = requests.get(url, stream=True, headers=headers)

            content_length = int(res.headers['content-length'])
            # 若当前报文长度小于前次报文长度,或者已接收文件等于当前报文长度,则可以认为视频接收完成
            if content_length < pre_content_length or (
                    os.path.exists(path) and os.path.getsize(path) == content_length) or content_length == 0:
                break
            pre_content_length = content_length

            # 写入收到的视频数据
            with open(path, 'ab') as file:
                file.write(res.content)
                file.flush()
                print('下载成功,file size : %d   total size:%d' % (os.path.getsize(path), content_length))
    except Exception as e:
        print(e)
可以现在到抖音视频,因为其他json数据乱码,正在破解中


使用Mitmdump 抓取app有关https 时出现 Cannot establish TLS with client错误
Cannot establish TLS with client 错误,安卓手机:谷歌在安卓7.0修改了安全策略,用户添加的CA证书不能再用于安全连接。(如果是苹果手机装了证书后信任证书就可以正常抓取)
解决方法1:使用安卓 7.0以下版本的手机。
解决方式2:root 手机,安装 xposed 使用 JustTrustMe 去掉 ssl。(不root的方式就是使用 virtualxposed、太极、虚拟大师)
网上有大神说用 mitmproxy github 中的 tls_passthrough.py 可以解决!
自己试了一下,使用这个tls_passthrough.py只是把出现错误是跳过,实际还是抓取不到数据。(可能我没看懂还方式不对?)
https://github.com/mitmproxy/mitmproxy/blob/master/examples/complex/tls_passthrough.py
抖音视频信息抓取脚本
import time
import uiautomator2 as u2
class Dodyin(object):
def __init__(self,ids,type=1):
# self.d = u2.connect_usb('BQU4RWBEYLSORS5L')
# self.d = u2.connect_usb(serial)
if type == 1:
self.d = u2.connect_usb(ids)
elif type ==2:
self.d = u2.connect_wifi(ids)
else:
self.d = u2.connect_adb_wifi(ids)
self.startApp()
self.handle_watcher()
def startApp(self):
self.d.unlock()
pakagename = 'com.ss.android.ugc.aweme'
self.d.app_stop(pakagename)
self.d.app_start(pakagename)
self.d.wait_activity('com.ss.android.ugc.aweme.main.MainActivity',timeout=20)
def stopApp(self):
self.d.watcher.stop()
pakagename = 'com.ss.android.ugc.aweme'
self.d.app_stop(pakagename)
self.d.app_clear(pakagename)
def handle_watcher(self):
# 检测有弹出按钮的时候跳过,我知道了
self.d.watcher.when('//*[@resource-id="com.ss.android.ugc.aweme:id/cws"]/android.widget.LinearLayout[1]').click()
#跳过广告
self.d.watcher.when('//*[@resource-id="com.ss.android.ugc.aweme:id/eh"]').click()
#点击重试
self.d.watcher.when('//*[@resource-id="com.ss.android.ugc.aweme:id/b53"]').click()
# 启动监控器
self.d.watcher.start()
def getSize(self):
return self.d.window_size()
def swipeVideo(self):
x,y = self.getSize()
x1 = x/2
y1 = y*0.8
y2 = y*0.25
sum1 = 0
while sum1 <100:
self.d.swipe(x1,y1,x1,y2,duration =0.2)
sum1 = sum1+1
time.sleep(1)
nickname = self.d.xpath('//*[@resource-id="com.ss.android.ugc.aweme:id/title"]').get_text()
print('nickname:'+nickname)
title = self.d.xpath('//*[@resource-id="com.ss.android.ugc.aweme:id/a91"]').get_text()
print('title:'+title)
desc = self.d(resourceId='com.ss.android.ugc.aweme:id/dd9').get_text()
print('desc:'+desc)
aixin = self.d.xpath('//*[@resource-id="com.ss.android.ugc.aweme:id/aq1"]').get_text()
print('爱心:'+aixin)
comments = self.d.xpath('//*[@resource-id="com.ss.android.ugc.aweme:id/aa3"]').get_text()
print('评论:' + comments)
zhuanfa = self.d.xpath('//*[@resource-id="com.ss.android.ugc.aweme:id/ewv"]').get_text()
print('转发:' + zhuanfa)
# if sum1 == 9:
# self.commontVideo()
def commontVideo(self):
self.d.xpath('//*[@resource-id="com.ss.android.ugc.aweme:id/aa1"]').click()
#翻动评论
x, y = self.getSize()
x1 = x / 2
y1 = y * 0.9
y2 = y * 0.65
sum1 = 0
while sum1 < 10:
self.d.swipe(x1, y1, x1, y2,
duration=0.2)
sum1 = sum1 + 1
time.sleep(1)
#发布评论
if sum1 == 9:
self.d(text='留下你的精彩评论吧').click()
self.d('').set_text()
if __name__ =="__main__":
d = Dodyin('设备号',1)
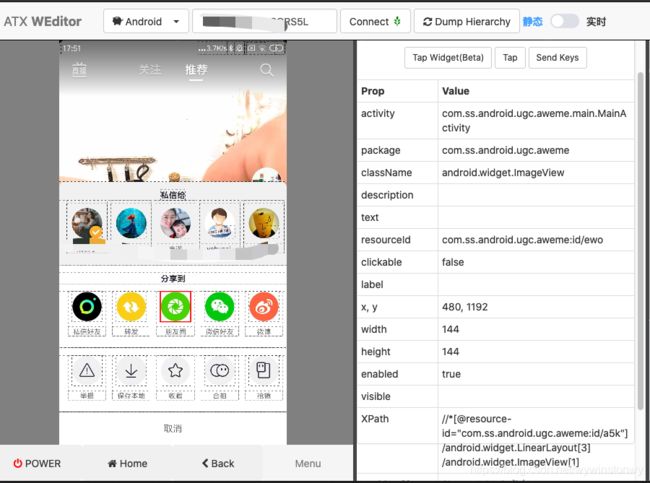
d.swipeVideo()三、weditor界面分析
weditor安装:
pip3 install -i https://pypi.doubanio.com/simple/ --trusted-host pypi.doubanio.com weditor启动weditor
命令行直接输入:weditor
默认端口:http://localhost:17310/
通过weditor可以定位元素,activity,以及控件xpath路径。