网络模型:
OSI参考模型,TCP/IP参考模型。
网络通讯要素:
IP地址(InetAddress):
网络中设备的标识;
不易记忆,可用主机名;
本地回环地址:127.0.0.1;
主机名:localhost。
public class IPDemo {

    public static void main(String[] args) throws UnknownHostException {
        // 获取本地主机ip地址对象
        InetAddress ip=InetAddress.getLocalHost();

        //获取其他主机IP地址对象
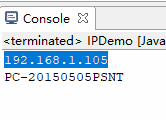
        ip=InetAddress.getByName("192.168.1.105");//InetAddress.getByName("PC-20150505PSNT");

        System.out.println(ip.getHostAddress());
        System.out.println(ip.getHostName());
    }
}
端口号:
用于标识进程的逻辑地址,不同进程的标识;
有效端口:0-65535,其中0-1024系统使用或保留端口。
传输协议:
通讯的规则;
常见协议:TCP,UDP。
UDP:
将数据及源和目的封装在数据包中,不需要建立连接;
每个数据包的大小限制在64k内;
因无连接,是不可靠协议;
不需要建立连接,速度快。
TCP:
建立连接,形成传输数据的通道;
在连接中进行大数据量传输;
通过三次握手完成连接,是可靠协议;
必须建立连接,效率会稍低。
Socket:
Scoket就是为网络服务提供的一种机制;
通信的两端都有Socket;
网络通信其实就是Socket间的通信;
数据在两个Socket间通过IO传输。
UDP传输:
DatagramSocket与DatagramPacket;
建立发送端,接收端;
调用Socket的发送接收方法;
关闭Socket;
发送端与接收端是两个独立的运行程序。
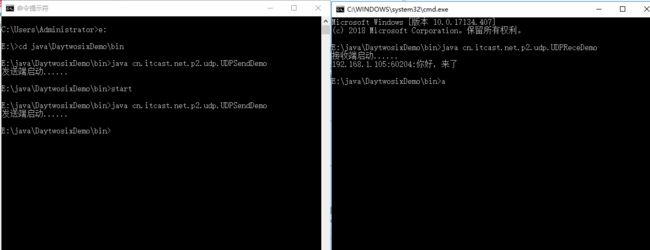
发送端:在发送端,要在数据包对象中明确目的地IP及端口。
public class UDPSendDemo {

    public static void main(String[] args) throws IOException {

        System.out.println("发送端启动......");
        /*
        创建UDP传输的发送端。
        思路:
        1,建立udp的socket服务。
        2,将要发送的数据封装到数据包中。
        3,通过udp的socket服务将数据包发送出去。
        4,关闭socket服务。
        */
        //1,udpsocket服务。使用DatagramSocket对象。
        DatagramSocket ds=new DatagramSocket(8888);//设置端口号

        //2,将要发送的数据封装到数据包中
        String str="laile1laile";
        //使用DatagramPacket将数据封装到该对象中
        byte[] buf=str.getBytes();

        DatagramPacket dp=new DatagramPacket(buf,buf.length,InetAddress.getByName("192.168.1.105"),10000);

        //3,通过udp的socket服务将数据包发送出去。使用send方法。
        ds.send(dp);

        //4,关闭资源
        ds.close();
    }
}
接收端:在接收端,要指定监听的端口。
public class UDPReceDemo {
    public static void main(String[] args) {

        System.out.println("接收端启动....");
        /*
        建立UDP接收端思路:
        1,建立udp socket服务,因为是要接受数据,必须明确一个接口号
        2,创建数据包,用于存储接收到的数据。方便使用数据包对象的方法解析这些数据。
        3,使用socket服务的receive方法将接受的数据存储到数据包中。
        4,通过数据包对的方法解析数据包中的数据。
        5,关闭资源。
        */
        //1,建立udp socket服务。
        DatagramSocket ds = new DatagramSocket(10000);


        //2,创建数据包。
        byte[] buf = new byte[1024];
        DatagramPacket dp = new DatagramPacket(buf,buf.length);

        //3,使用接收方法将数据存储到数据包中。
        ds.receive(dp);//阻塞式的。

        //4,通过数据包对象的方法,解析其中的数据,比如,地址,端口,数据内容。
        String ip = dp.getAddress().getHostAddress();
        int port = dp.getPort();
        String text = new String(dp.getData(),0,dp.getLength());

        System.out.println(ip+":"+port+":"+text);

        //5,关闭资源。
        ds.close();
    }

}
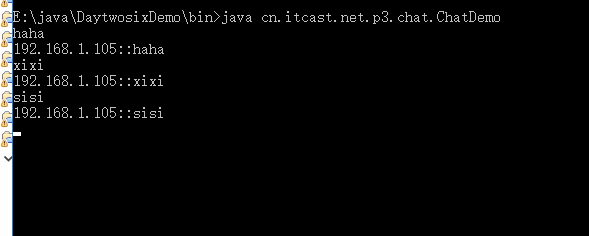
聊天程序:
public class UDPSendDemo2 {

    public static void main(String[] args) throws IOException {

        System.out.println("发送端启动......");
        /*
        创建UDP传输的发送端。
        思路:
        1,建立udp的socket服务。
        2,将要发送的数据封装到数据包中。
        3,通过udp的socket服务将数据包发送出去。
        4,关闭socket服务。
        */
        //1,udpsocket服务。使用DatagramSocket对象。
        DatagramSocket ds=new DatagramSocket();//设置端口号

        //2,将要发送的数据封装到数据包中
//      String str="你好,来了";
        BufferedReader bufr=new BufferedReader(new InputStreamReader(System.in));
        String line=null;

        while((line=bufr.readLine())!=null){
            //使用DatagramPacket将数据封装到该对象中
        byte[] buf=line.getBytes();

        DatagramPacket dp=new DatagramPacket(buf,buf.length,InetAddress.getByName("192.168.1.105"),10000);

        //3,通过udp的socket服务将数据包发送出去。使用send方法。
        ds.send(dp);

        if("886".equals(line))
            break;
        }


        //4,关闭资源
        ds.close();
    }
}
public class UDPReceDemo2 {

    public static void main(String[] args) throws IOException {

        System.out.println("接收端启动......");
        /*
         * 建立UDP接收端的思路。
         * 1,建立udp socket服务,因为是要接收数据,必须要明确一个端口号。
         * 2,创建数据包,用于存储接收到的数据。方便用数据包对象的方法解析这些数据.
         * 3,使用socket服务的receive方法将接收的数据存储到数据包中。
         * 4,通过数据包的方法解析数据包中的数据。
         * 5,关闭资源
         */

        //1,建立udp socket服务。
        DatagramSocket ds = new DatagramSocket(10000);

        while(true){
            //2,创建数据包。
        byte[] buf = new byte[1024];
        DatagramPacket dp = new DatagramPacket(buf,buf.length);

        //3,使用接收方法将数据存储到数据包中。
        ds.receive(dp);//阻塞式的。

        //4,通过数据包对象的方法,解析其中的数据,比如,地址,端口,数据内容。
        String ip = dp.getAddress().getHostAddress();
        int port = dp.getPort();
        String text = new String(dp.getData(),0,dp.getLength());

        System.out.println(ip+":"+port+":"+text);
        }


        //5,关闭资源。
//      ds.close();


    }

}
基于多线程的小聊天程序:
public class Send implements Runnable {

    private DatagramSocket ds;


    public Send(DatagramSocket ds) {
        this.ds = ds;
    }


    @Override
    public void run() {

        try {
            BufferedReader bufr = new BufferedReader(new InputStreamReader(System.in));
            String line = null;

            while((line=bufr.readLine())!=null){


                byte[] buf = line.getBytes();
                DatagramPacket dp =
                        new DatagramPacket(buf,buf.length,InetAddress.getByName("192.168.1.255"),10001);
                ds.send(dp);

                if("886".equals(line))
                    break;
            }

            ds.close();
        } catch (Exception e) {
        }

    }
}
public class Rece implements Runnable {

    private DatagramSocket ds;

    public Rece(DatagramSocket ds) {
        this.ds = ds;
    }


    @Override
    public void run() {
        try {
            while (true) {

                // 2,创建数据包。
                byte[] buf = new byte[1024];
                DatagramPacket dp = new DatagramPacket(buf, buf.length);

                // 3,使用接收方法将数据存储到数据包中。
                ds.receive(dp);// 阻塞式的。

                // 4,通过数据包对象的方法,解析其中的数据,比如,地址,端口,数据内容。
                String ip = dp.getAddress().getHostAddress();
                int port = dp.getPort();
                String text = new String(dp.getData(), 0, dp.getLength());

                System.out.println(ip + "::" + text);
                if(text.equals("886")){
                    System.out.println(ip+"....退出聊天室");
                }

            }
        } catch (Exception e) {

        }

    }
}
public class ChatDemo {

    public static void main(String[] args) throws IOException {

        DatagramSocket send=new DatagramSocket();

        DatagramSocket rece=new DatagramSocket(10001);

        new Thread(new Send(send)).start();
        new Thread(new Rece(rece)).start();
    }
}
TCP传输:
Socket和ServerSocket;
建立客户端和服务器;
建立连接后,通过Socket中的IO流进行数据的传输;
关闭socket;
同样,客户端与服务器是两个独立的应用程序。
基本思路(客户端):
客户端需要明确服务器的ip地址以及端口,这样才可以去试着建立连接,如果连接失败,会出现异常;
连接成功,说明客户端与服务端建立了通道,那么通过IO流就可以进行数据的传输,而Socket对象已经提供了输入流和输出流对象,通过getInputStream(),getOutputStream()获取即可;
与服务端通讯结束后,关闭Socket。
基本思路(服务端):
服务端需要明确它要处理的数据是从哪个端口进入的;
当有客户端访问时,要明确是哪个客户端,可通过accept()获取已连接的客户端对象,并通过该对象与客户端通过IO流进行数据传输;
当该客户端访问结束,关闭该客户端。
客户端:
通过Socket建立对象并指定要连接的服务端主机以及端口。
public class ClientDemo {

    public static void main(String[] args) throws UnknownHostException, IOException {
        //客户端发送数据到服务端
        /*
        tcp传输,客户端建立的过程:
        1,创建tcp客户端socket服务。使用的是Socket对象。
            建议该对象一创建就明确目的地--要连接的主机。
        2,如果连接建立成功,说明数据传输通道已建立。
            该通道就是socket流,是底层建立好的。既然是流,就有输入和输出。
            想要输入或者输出流对象,可以找Socket来获取。
            可以通过getOutputStream和getInutStream来获取两个字节流。
        3,使用输出流,将数据写出
        4,关闭资源
        */
        //创建客户端socket服务
        Socket socket=new Socket("192.168.1.105",10002);

        //获取socket流中的输出流
        OutputStream out=socket.getOutputStream();

        //使用输出流将指定的数据写出去
        out.write("又来了".getBytes());

        //关闭资源
        socket.close();
    }

}
服务端:
建立服务端需要监听一个端口。
public class ServerDemo {

    public static void main(String[] args) throws IOException {
        //服务端接收客户端发送过来的数据,并打印在控制台上
        /*
        建立tcp服务端的思路:
        1,创建服务端socket服务。通过ServerSocket对象。
        2,服务端必须对外提供一个端口,否则客户端无法连接。
        3,获取连接过来的客户端对象。
        4,通过客户端对象获取socket流读取客户端发来的数据并打印在控制台上。
        5,关闭资源。关客户端,关服务端。
        */
        //1,创建服务端对象
        ServerSocket ss=new ServerSocket(10002);

        //2,获取连接过来的客户端对象
        Socket s=ss.accept();

        String ip=s.getInetAddress().getHostAddress();

        //3,通过socket对象获取输入流,要读取客户端发来的数据
        InputStream in=s.getInputStream();

        byte[] buf=new byte[1024];

        int len=in.read(buf);
        String text=new String(buf,0,len);
        System.out.println(ip+":"+text);

        s.close();
        ss.close();
    }

}
public class ClientDemo2 {

    public static void main(String[] args) throws UnknownHostException, IOException {
        //客户端发送数据到服务端
        /*
        tcp传输,客户端建立的过程:
        1,创建tcp客户端socket服务。使用的是Socket对象。
            建议该对象一创建就明确目的地--要连接的主机。
        2,如果连接建立成功,说明数据传输通道已建立。
            该通道就是socket流,是底层建立好的。既然是流,就有输入和输出。
            想要输入或者输出流对象,可以找Socket来获取。
            可以通过getOutputStream和getInutStream来获取两个字节流。
        3,使用输出流,将数据写出
        4,关闭资源
        */
        //创建客户端socket服务
        Socket socket=new Socket("192.168.1.105",10002);

        //获取socket流中的输出流
        OutputStream out=socket.getOutputStream();

        //使用输出流将指定的数据写出去
        out.write("又来了".getBytes());

        //读取服务端返回的数据,使用socket读取流
        InputStream in=socket.getInputStream();
        byte[] buf=new byte[1024];

        int len=in.read(buf);

        String text=new String(buf,0,len);
        System.out.println(text);

        //关闭资源
        socket.close();
    }
}
public class ServerDemo2 {

    public static void main(String[] args) throws IOException {
        //服务端接收客户端发送过来的数据,并打印在控制台上
        /*
        建立tcp服务端的思路:
        1,创建服务端socket服务。通过ServerSocket对象。
        2,服务端必须对外提供一个端口,否则客户端无法连接。
        3,获取连接过来的客户端对象。
        4,通过客户端对象获取socket流读取客户端发来的数据并打印在控制台上。
        5,关闭资源。关客户端,关服务端。
        */
        //1,创建服务端对象
        ServerSocket ss=new ServerSocket(10002);

        //2,获取连接过来的客户端对象
        Socket s=ss.accept();

        String ip=s.getInetAddress().getHostAddress();

        //3,通过socket对象获取输入流,要读取客户端发来的数据
        InputStream in=s.getInputStream();

        byte[] buf=new byte[1024];

        int len=in.read(buf);
        String text=new String(buf,0,len);
        System.out.println(ip+":"+text);


        //使用客户端socket对象的输出流给客户端返回数据
        OutputStream out=s.getOutputStream();
        out.write("收到".getBytes());

        s.close();
        ss.close();
    }
}
Tcp传输最容易出现的问题:
客户端连接上服务端,两端都在等待,没有任何数据传输。
通过例程分析: 因为read方法或者readLine方法是阻塞式。
解决方法:自定义结束标记,使用shutdownInput,shutsownOutput方法。
字母大小写转换服务器:
public class TransClient {

    public static void main(String[] args) throws UnknownHostException, IOException {
        // 客户端
        /*
        思路:
        1,有socket端点
        2,数据源--键盘
        3,目的--socket
        4,接收服务器的数据--源:socket
        5,将数据显示再打印出来--目的:控制台
        6,在这些流中操作的数据,都是文本数据

        转换客户端:
        1,创建socket客户端对象
        2,获取键盘录入
        3,将录入的信息发送给socket输出流
        */
        //1,创建socket客户端对象
        Socket s=new Socket("192.168.1.105",10004);

        //2,获取键盘录入
        BufferedReader bufr=new BufferedReader(new InputStreamReader(System.in));

        //3,socket输出流
//      new BufferedWriter(new OutputStreamWriter(s.getOutputStream()));
        PrintWriter out=new PrintWriter(s.getOutputStream(),true);//true:开启自动刷新

        //4,socket输入流,读取服务端返回的大写数据
        BufferedReader bufIn=new BufferedReader(new InputStreamReader(s.getInputStream()));

        String line=null;

        while((line=bufr.readLine())!=null){
            if("over".equals(line))
                break;
//          out.print(line+"\r\n");
//          out.flush();
            out.println(line);

            //读取服务端发回的一行大写数据
            String upperStr=bufIn.readLine();
            System.out.println(upperStr);
        }
        s.close();

    }
}
public class TransServer {

    public static void main(String[] args) throws IOException {
        /*
        转换服务端
        分析:
        1,serversocket服务
        2,获取socket对象
        3,源:socket,读取客户端发过来的需要转换的数据
        4,目的:显示在控制台上
        5,将数据转成大写发给客户端
        */
        ServerSocket ss=new ServerSocket(10004);

        Socket s=ss.accept();

        String ip=s.getInetAddress().getHostAddress();
        System.out.println(ip+"......connected");

        BufferedReader bufIn=new BufferedReader(new InputStreamReader(s.getInputStream()));

        PrintWriter out=new PrintWriter(s.getOutputStream(),true);

        String line=null;
        while((line=bufIn.readLine())!=null){
            System.out.println(line);
            out.println(line.toUpperCase());
//          out.println(line.toUpperCase()+"\r\n");
//          out.flush();
        }
        s.close();
        ss.close();
    }
}
客户端上传文本到服务器:
public class UploadServer {

    public static void main(String[] args) throws IOException {
        System.out.println("上传服务端。。。。。。。。。");

        ServerSocket ss = new ServerSocket(10005);

        Socket s = ss.accept();

        System.out.println(s.getInetAddress().getHostAddress()+".....connected");

        BufferedReader bufIn = new BufferedReader(new InputStreamReader(s.getInputStream()));

        BufferedWriter bufw = new BufferedWriter(new FileWriter("d:\\server.txt"));

        String line = null;

        while((line=bufIn.readLine())!=null){

//          if("over".equals(line))
//              break;
            bufw.write(line);
            bufw.newLine();
            bufw.flush();
        }


        PrintWriter out = new PrintWriter(s.getOutputStream(),true);
        out.println("上传成功");

        bufw.close();

        s.close();
        ss.close();
    }
}
public class UploadClient {

    public static void main(String[] args) throws UnknownHostException, IOException {

        System.out.println("上传客户端。。。。。。");

        /*File file = new File("d:\\client.txt");
        System.out.println(file.exists());*/


        Socket s = new Socket("192.168.1.105",10005);

        BufferedReader bufr =
                new BufferedReader(new FileReader("d:\\client.txt"));

        PrintWriter out = new PrintWriter(s.getOutputStream(),true);


        String line = null;
        while((line=bufr.readLine())!=null){

            out.println(line);
        }

        //告诉服务端,客户端写完了。
        s.shutdownOutput();
//      out.println("!@#$%^&*(");

        BufferedReader bufIn = new BufferedReader(new InputStreamReader(s.getInputStream()));

        String str = bufIn.readLine();
        System.out.println(str);

        bufr.close();
        s.close();

    }

}
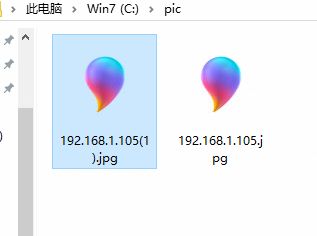
上传图片:
public class UploadTask implements Runnable {

    private static final int SIZE=1024*1024*8;

    private Socket s;

    public UploadTask(Socket s) {
        this.s = s;
    }

    @Override
    public void run() {

        int count = 0;
        String ip = s.getInetAddress().getHostAddress();
        System.out.println(ip + ".....connected");

        try{

        // 读取客户端发来的数据。
        InputStream in = s.getInputStream();

        // 将读取到数据存储到一个文件中。
        File dir = new File("c:\\pic");
        if (!dir.exists()) {
            dir.mkdirs();
        }
        File file = new File(dir, ip + ".jpg");
        //如果文件已经存在于服务端
        while(file.exists()){
            file = new File(dir,ip+"("+(++count)+").jpg");
        }


        FileOutputStream fos = new FileOutputStream(file);

        byte[] buf = new byte[1024];

        int len = 0;

        while ((len = in.read(buf)) != -1) {


            fos.write(buf, 0, len);

            if(file.length()>SIZE){
                System.out.println(ip+"文件体积过大");

                fos.close();
                s.close();


                System.out.println(ip+"...."+file.delete());

                return ;
            }
        }

        // 获取socket输出流,将上传成功字样发给客户端。
        OutputStream out = s.getOutputStream();
        out.write("上传成功".getBytes());

        fos.close();
        s.close();
        } catch (IOException e) {

        }
    }
}
public class UploadPicServer {

    public static void main(String[] args) throws IOException {

        //创建tcp的socket服务端
        ServerSocket ss=new ServerSocket(10006);

        while(true){
            Socket s=ss.accept();

            new Thread(new UploadTask(s)).start();
        }
    }
}
public class UploadPicClient {

    public static void main(String[] args) throws UnknownHostException, IOException {

        //创建客户端socket
        Socket s=new Socket("192.168.1.105",10006);

        //读取客户端要上传的图片文件
        FileInputStream fis=new FileInputStream("c:\\0.jpg");

        //获取socket输出流,将读到的图片数据发送给服务端
        OutputStream out=s.getOutputStream();

        byte[] buf=new byte[1024];

        int len=0;

        while((len=fis.read(buf))!=-1){
            out.write(buf,0,len);
        }

        //告诉服务端数据发送完毕,让服务器停止读取
        s.shutdownInput();

        //读取服务端发回的内容
        InputStream in=s.getInputStream();
        byte[] bufIn=new byte[1024];

        int lenIn=in.read();
        String text=new String(buf,0,lenIn);
        System.out.println(text);

        fis.close();
        s.close();
    }
}
模拟Tomcat:
public class MyTomcat {

    public static void main(String[] args) throws IOException {

        ServerSocket ss=new ServerSocket(8889);//设置端口

        Socket s=ss.accept();
        System.out.println(s.getInetAddress().getHostAddress()+"....connect");

        InputStream in=s.getInputStream();

        byte[] buf=new byte[1024];

        int len=in.read(buf);
        String text=new String(buf,0,len);
        System.out.println(text);

        //给客户端一个反馈信息
        PrintWriter out=new PrintWriter(s.getOutputStream(),true);

        out.println("欢迎光临z");

        s.close();
        ss.close();

    }
}
可在浏览器中输入(IP地址:8889)回显数据。
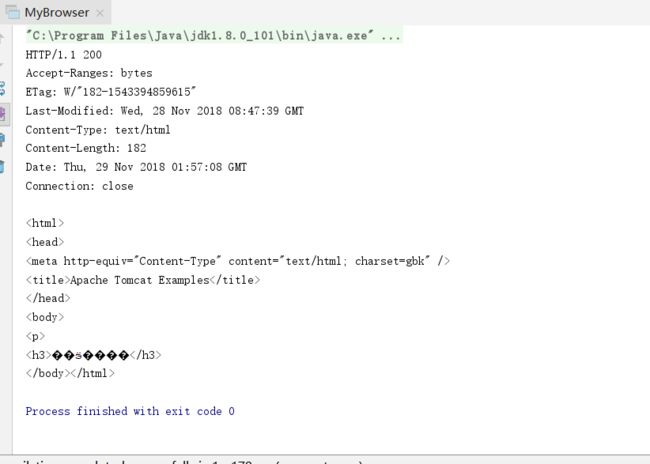
模拟浏览器:
public class MyBrowser {

    public static void main(String[] args) throws UnknownHostException, IOException {

        Socket s=new Socket("192.168.1.105",8080);

        //模拟浏览器,给tomcat服务端发送符合http协议的请求消息
        PrintWriter out=new PrintWriter(s.getOutputStream(),true);
        out.println("GET /myweb/1.html HTTP/1.1");
        out.println("Accept: */*");
        out.println("Host: 192.168.1.105:8080");
        out.println("Connection: close");
        out.println();
        out.println();

        InputStream in=s.getInputStream();

        byte[] buf=new byte[1024];
        int len=in.read(buf);

        String str=new String(buf,0,len);
        System.out.println(str);

        s.close();

    }

}
URL和URLConnection:
public class URLDemo {

    public static void main(String[] args) throws IOException {

        String str_url="http://192.168.1.105:8080/myweb/1.html?name=lisi";

        URL url=new URL(str_url);

        System.out.println("getProtocol:"+url.getProtocol());
        System.out.println("getHost:"+url.getHost());
        System.out.println("getPort:"+url.getPort());
        System.out.println("getFile:"+url.getFile());
        System.out.println("getPath:"+url.getPath());
        System.out.println("getQuery:"+url.getQuery());
    }

}
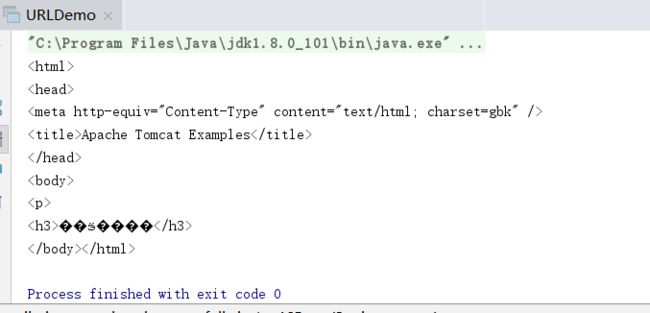
public class URLDemo {

    public static void main(String[] args) throws IOException {

        String str_url="http://192.168.1.105:8080/myweb/1.html?name=lisi";

        URL url=new URL(str_url);

        InputStream in=url.openStream();

        byte[] buf=new byte[1024];
        int len=in.read(buf);

        String text=new String(buf,0,len);

        System.out.println(text);

        in.close();
    }

}
public class URLDemo {

    public static void main(String[] args) throws IOException {

        String str_url="http://192.168.1.105:8080/myweb/1.html?name=lisi";

        URL url=new URL(str_url);

        //获取url对象的Url连接器对象。将连接封装成了对象:java内置的可以解析的具体协议对象+socket
        URLConnection conn=url.openConnection();
        String value=conn.getHeaderField("Content-Type");
        System.out.println(value);

        InputStream in=conn.getInputStream();

        byte[] buf=new byte[1024];
        int len=in.read(buf);

        String text=new String(buf,0,len);

        System.out.println(text);

        in.close();
    }

}
网络结构:
C/S --client/server:
特点:该结构的软件,客户端和服务端都需要编写,可开发成本较高,维护较为麻烦。
好处:客户端在本地可以分担一部分运算。
B/S--browsr/server:
特点:该结构的软件,只开发服务器端,客户端直接由浏览器取代。开发成本较低,维护更为简单。
缺点:所有运算都要在服务端完成。

