Ubuntu Server 20.04上安装OpenLDAP和phpLDAPadmin
文章目录
-
-
- 一、参考
- 二、安装OpenLDAP和phpLDAPadmin
-
- 1. 安装OpenLDAP服务端
- 2. 安装phpLDAPadmin
- 3. 添加组织单位
- 4. 添加组
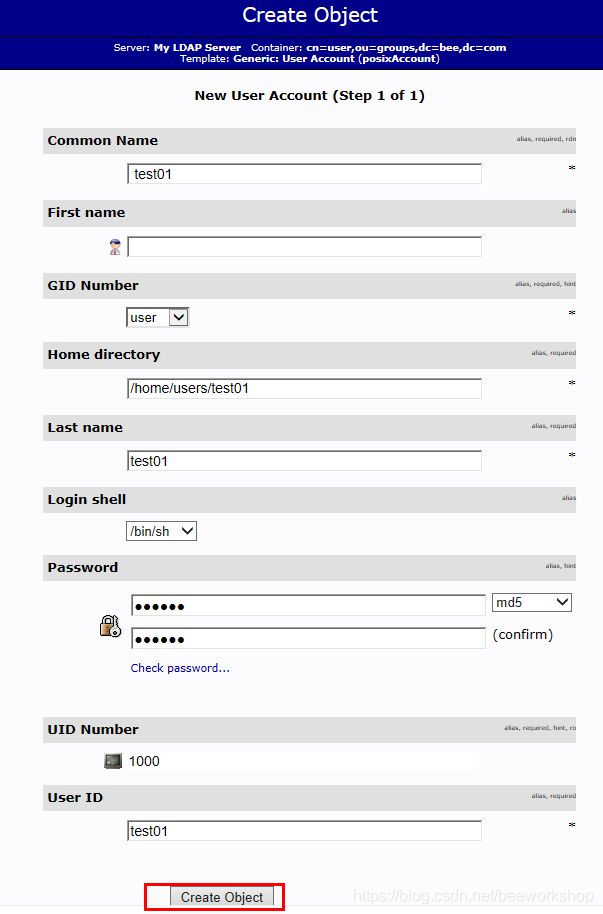
- 5. 创建用户
- 6. LDAP客户端配置
- 三、在LDAP服务器端配置用户
-
- 1. 在phpLDAPadmin界面中更改用户密码
- 2. LDIF配置文件
- 3. 在LDAP服务器端通过命令行配置用户
- 四、使用TCP Wrappers保护LDAP服务
-
一、参考
- https://www.techrepublic.com/article/how-to-install-openldap-and-phpldapadmin-on-ubuntu-server-20-04/
- https://blog.csdn.net/lodianm/article/details/105386314(主要参考)
- https://www.jianshu.com/p/e6de94d15d47
二、安装OpenLDAP和phpLDAPadmin
1. 安装OpenLDAP服务端
# 下载软件
apt-get update
apt-get install slapd ldap-utils -y

# 配置slapd
dpkg-reconfigure slapd
# 查看配置结果
slapcat

# 安装apache
apt install apache2
2. 安装phpLDAPadmin
# 安装
apt-get install phpldapadmin -y
# 配置
vim /etc/phpldapadmin/config.php
==================================================================
$servers->setValue('server','name','My LDAP Server'); # 不用改
$servers->setValue('server','host','127.0.0.1'); # 不用改
$servers->;setValue('server','base',array('dc=hive,dc=lan')); # hive和lan(hive.lan)改成你的
$servers->setValue('login','auth_type','session'); # 不用改
$servers->setValue('login','bind_id','cn=admin,dc=hive,dc=lan'); # WEB登陆界面中自动填写的用户名(cn=admin,dc=hive,dc=lan),可用//注释掉。信息可看命令slapcat的输出。
$servers->setValue('auto_number','min',array('uidNumber'=>10000,'gidNumber'=>10000)); # 改下
$config->custom->appearance['hide_template_warning'] = true; # 改下

# 关闭apache的默认界面
a2dissite 000-default.conf
systemctl restart apache2

# 登陆管理页面
http://SERVER_IP/phpldapadmin
# username形如cn=admin,dc=hive,dc=lan
# 输入你的admin password
3. 添加组织单位
4. 添加组
5. 创建用户


直接填写last name就可以了——其他相关项会自动填写。

这里Login shell配置界面只支持/bin/sh。在Ubuntu20中/bin/sh -> dash,不是bash。
所以用户ssh登陆之后是不执行.bashrc的。这导致用户登陆后命令行提示符为$,且不支持命令行补全,不支持history,不支持颜色显示等bash特性。这时可以运行bash即可:
$ bash
或者可以修改/etc/phpldapadmin/templates/creation/posixAccount.xml
<attribute id="loginShell">
        <display>Login shelldisplay>
        <order>9order>
        <page>1page>

        <type>selecttype>
        <value id="/bin/sh">/bin/shvalue>
        <value id="/bin/csh">/bin/cshvalue>
        <value id="/bin/tsh">/bin/tshvalue>
        <value id="/bin/bash">/bin/bashvalue> 在这里新增/bin/bash条目
attribute>


注意上图两个cn=test01是显示问题,刷新或者logout再login就显示正常了。
此外,可以验证用户的密码。


6. LDAP客户端配置
- 安装客户端软件包
apt-get update
apt-get install ldap-utils libpam-ldap libnss-ldap nslcd
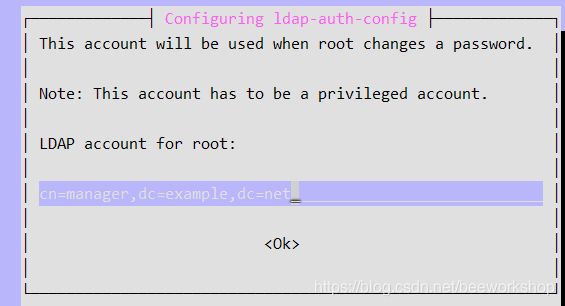
- 进入设置界面

可以使用多个URI(使用空格分割)指向多台LDAP服务器,以备不测。尽量使用IP地址,防止DNS解析故障造成的问题。


这里要把ldapi:///更改为ldap://ip
相关的配置在/etc/ldap.conf文件中。


可以使用如下方式对上述配置进行微调(optional)
英语中optional更倾向于不选择。
dpkg-reconfigure nslcd
dpkg-reconfigure ldap-auth-config
- 配置/etc/nsswitch.conf增加ldap的认证
passwd:         files systemd ldap
group:          files systemd ldap
shadow:         files ldap
gshadow:        files ldap
- 更新PAM配置
pam-auth-update
更新时如下选择

家目录中会拷贝bash的模版文件/etc/skel/
$ ls -a /etc/skel/
.  ..  .bash_logout  .bashrc  .profile
- 重启客户端服务
systemctl restart nslcd nscd
此时使用ssh登陆一下LDAP客户端测试看看。
三、在LDAP服务器端配置用户
1. 在phpLDAPadmin界面中更改用户密码
2. LDIF配置文件
- LDIF文件为何物
http://blog.chinaunix.net/uid-30540544-id-5284844.html
https://www.openldap.org/doc/admin24/backends.html#LDIF - LDIF文件格式
http://blog.chinaunix.net/uid-30540544-id-5288795.html
或者使用命令man ldif查看 - 密码策略的配置
https://www.openldap.org/doc/admin24/overlays.html#Password%20Policies
3. 在LDAP服务器端通过命令行配置用户
- 创建包含users和groups信息的ou(organizational unit)
vim /your/path/users-ou.ldif
dn: ou=animals,dc=bee,dc=com
objectClass: organizationalUnit
objectClass: top
ou: animals

dn: ou=zoo,dc=bee,dc=com
objectClass: organizationalUnit
objectClass: top
ou: zoo
将dc=bee,dc=com改成你domain的对应。
- 修改SLAPD数据库的访问控制
vim /your/path/update-mdb-acl.ldif
n: olcDatabase={
     1}mdb,cn=config
changetype: modify
replace: olcAccess
olcAccess: to attrs=userPassword,shadowLastChange,shadowExpire
  by self write
  by anonymous auth
  by dn.subtree="gidNumber=0+uidNumber=0,cn=peercred,cn=external,cn=auth" manage
  by dn.exact="cn=readonly,ou=animals,dc=bee,dc=com" read
  by * none
olcAccess: to dn.exact="cn=readonly,ou=animals,dc=bee,dc=com" by
  dn.subtree="gidNumber=0+uidNumber=0,cn=peercred,cn=external,cn=auth" manage by * none
olcAccess: to dn.subtree="dc=bee,dc=com" by dn.subtree="gidNumber=0+uidNumber=0,cn=peercred,cn=external,cn=auth" manage
  by users read
  by * none
将dc=bee,dc=com改成你domain的对应。
- 更新LDAP数据库的访问控制列表
ldapadd -Y EXTERNAL -H ldapi:/// -f update-mdb-acl.ldif
- 使用ou信息更新数据库
ldapadd -Y EXTERNAL -H ldapi:/// -f users-ou.ldif
- 新增一个新用户账号
uid就是用户名
vim /your/path/user.ldif
dn: uid=tiger,ou=animals,dc=bee,dc=com
objectClass: inetOrgPerson
objectClass: posixAccount
objectClass: shadowAccount
uid: tiger
cn: tiger
sn: tigerman
loginShell: /bin/bash
uidNumber: 10000
gidNumber: 10000
homeDirectory: /home/tiger
shadowMax: 60
shadowMin: 1
shadowWarning: 7
shadowInactive: 7
shadowLastChange: 0

dn: cn=tiger,ou=zoo,dc=bee,dc=com
objectClass: posixGroup
cn: tiger
gidNumber: 10000
memberUid: tiger
- 添加新用户
ldapadd -Y EXTERNAL -H ldapi:/// -f user.ldif
- 为用户设置密码
ldappasswd -H ldapi:/// -Y EXTERNAL -S "uid=tiger,ou=animals,dc=bee,dc=com"
uid为用户名,组织单元ou改为你的,dc=bee,dc=com对应你的域名domain(bee.com)。
可以使用如下命令产生密码的哈希:
$ slappasswd
New password:
Re-enter new password:
{
     SSHA}0MP6O2gKZLeqXhCjQwTQWBtc3S3EZtoT
记录回显的哈希值。
- 创建新用户
vim /your/path/readonly-user.ldif
dn: cn=readonly,ou=animals,dc=bee,dc=com
objectClass: organizationalRole
objectClass: simpleSecurityObject
cn: readonly
userPassword: {
     SSHA}0MP6O2gKZLeqXhCjQwTQWBtc3S3EZtoT
description: Bind DN user for LDAP Operations
用你记录的哈希值替换上边的{SSHA}处。
- 添加新用户到数据库
ldapadd -Y EXTERNAL -H ldapi:/// -f readonly-user.ldif
四、使用TCP Wrappers保护LDAP服务
https://www.openldap.org/doc/admin24/security.html#TCP%20Wrappers
vim /etc/hosts.allow
slapd: 10.0.0.0/255.0.0.0 127.0.0.1 : ALLOW
slapd: ALL : DENY


