【CV9】Python3+Opencv4:图像操作,数字验证码识别,图像拼接/保存器
文章目录
- 1.安装
- 2.画图
- 3.几何变换
-
- 3.1 位计算
- 3.2 遮挡
- 3.3 通道切分合并
- 3.4 金字塔
- 3.5 缩放
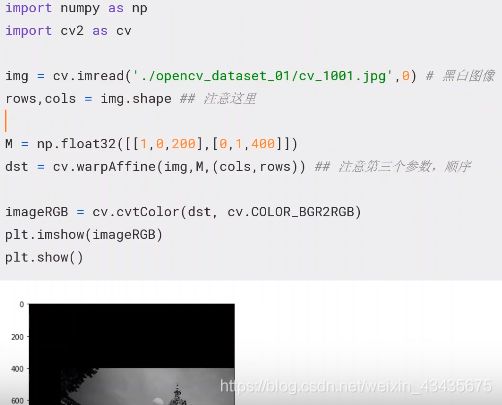
- 3.6 平移
- 3.7 旋转
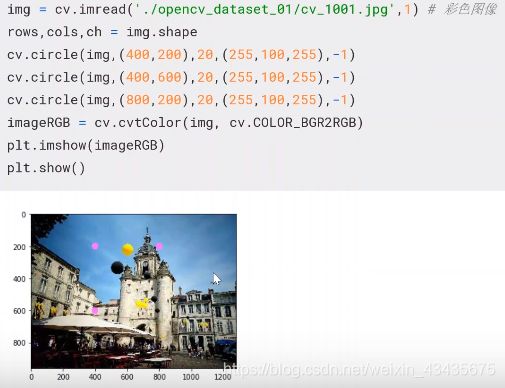
- 3.8 仿射变换
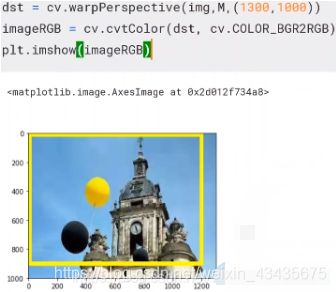
- 3.9 透视变换
- 4.形态学
- 5.模糊(平滑)
- 6.色彩空间转换
- 7.二值化
- 8.图像梯度
- 9.canny边缘检测
- 10.视频操作
-
- 10.1 读取摄像头视频
- 10.2 读取视频文件
- 10.3 视频写入
- 10.4 视频提取指定颜色
- 11.直方图
- 12.模板匹配
- 13.直线/圆/轮廓检测
- 14.人脸检测
- 15.数字验证码识别
- 16.图像拼接/保存器
1.安装
pip install opencv-python,下面第一行是扩展模块,第二行是OCR

附:如果cv.不提醒代码提示功能,ctrl+左键就可以查看源码,先pip上图前两行:
xxx\Anaconda3\Lib\site-packages\cv2\__init__.py中删除原来程序,写入下段程序:
import sys
import os
import importlib
os.environ["PATH"] += os.pathsep + os.path.dirname(os.path.realpath(__file__))
from .cv2 import *
globals().update(importlib.import_module('cv2.cv2').__dict__)
2.画图
import numpy as np
import cv2
import matplotlib.pyplot as plt
def show(image):
    plt.imshow(image)
    plt.axis('off')
    plt.show()
image = np.zeros((300,300,3),dtype='uint8')
show(image)

green = (0,255,0)  # opencv:RGB
cv2.line(image,(0,0),(300,300),green) # 左上角(0,0),右下角(300,300)
show(image)

blue = (0,0,255)
cv2.line (image,(300,0),(150,150),blue,5)  # 这里5为粗细,默认为1
show(image)

red = (255,0,0)
cv2.rectangle(image,(10,10),(60,60),red,2) # 2改则为-1则为红色实心填充矩形
show(image)

(cx,cy)=image.shape[1]//2,image.shape[0]//2  # 宽/2,高/2,则为圆心
white = (255,255,255)
for r in range(0,151,15): #0到150,151取不到,步长15
    cv2.circle(image,(cx,cy),r,white,2)
show(image)

image = np.zeros((300,300,3),dtype='uint8')
for i in range(10):
    radius=np.random.randint(5,20) # 半径取值
    color=np.random.randint(0,255,size=(3,)).tolist() # tolist()变列表[],颜色取值
    pt=np.random.randint(0,300,size=(2,)) # 圆心取值
    cv2.circle(image,tuple(pt),radius,color,-1) # 画图
show(image)

image = cv2.imread('C:/Users/yuta/Desktop/img3/20190720072950_000256_cc8cdaa6430.JPG')
image = cv2.cvtColor(image, cv2.COLOR_BGR2RGB)
show(image)

3.几何变换
# -*- encoding: utf-8 -*-
# -*- coding=GBK -*-
import cv2
import os
import numpy as np
import matplotlib as plt
import matplotlib.pyplot as plt
for imgname in os.listdir("C:/Users/yuta/Desktop/img3"):
     imgpath = "C:/Users/yuta/Desktop/img3/"+imgname
     print(imgpath)
     src = cv2.imread(imgpath)

     a = cv2.flip(src,1) # 水平翻转
     b = cv2.flip(src, 0) # 垂直翻转
     c = cv2.flip(src, -1) # 水平+垂直
     d = src[200:,150:-150]  # 剪裁,x方向:200到最后,y方向:150到 下往上150

     cv2.imshow('input image', b)
     cv2.waitKey(0)
     M = np.ones(src.shape,dtype='uint8')*100 # 生成和图片形状相同并且全为100的数据
     e = cv2.add(src,M)  # 所有像素加100,往255白发展,调亮度
     f = cv2.subtract(src, M)

     cv2.imshow('input image', e)
     cv2.waitKey(0)
# 图像加法
print(cv2.add(np.unit8([200]),np.uint8([100]))) #输出[[255]],图像范围0-255,300也转为255
# 普通加法
print(np.unit8([200])+np.uint8([100]))  #[44],unit8也0-255,加到255重新记为1
# 图像减法
print(cv2.subtract(np.uint8([50]),np.uint8([100]))) #输出[[0]],图像范围0-255,-50转为0
# 普通减法
print(np.uint8([50])-np.unit8([100])) #输出[206]
3.1 位计算
     rectangle = np.zeros((300,300,3),dtype='uint8')
     white = (255,255,255)
     cv2.rectangle(rectangle,(25,25),(275,275),white,-1) # (25,25)初始,(275,275)终止,-1填充

     cv2.imshow('input image', rectangle)
     cv2.waitKey(0)

与:有0为0,或:有1为1,异或:同0

     circle = np.zeros((300,300,3),dtype='uint8')
     white = (255, 255, 255)
     cv2.circle(circle,(150,150),150,white,-1) # (150,150)圆心,150半径

     cv2.imshow('input image', circle)
     cv2.waitKey(0)

     g = cv2.bitwise_and(rectangle,circle) # AND与,有0变0即有黑变黑
     h = cv2.bitwise_or(rectangle,circle)  # OR或,有白变白
     i = cv2.bitwise_xor(rectangle,circle) # XOR异或,黑白变白,黑黑和白白变黑

     cv2.imshow('input image', g)
     cv2.waitKey(0)

3.2 遮挡
     mask = np.zeros(src.shape,dtype='uint8')
     white = (255,255,255)
     cv2.rectangle(mask,(50,50),(250,350),white,-1)  # 创建黑色遮挡

     cv2.imshow('input image', mask)
     cv2.waitKey(0)

	 masked = cv2.bitwise_and(src, mask)
     cv2.imshow('input image', masked)
     cv2.waitKey(0)

3.3 通道切分合并
     (R,G,B) = cv2.split(src)   #cv2.imshow('input image',G),分开就是三张单通道黑白,print(R.shape)
     merged = cv2.merge([R,G,B])

     cv2.imshow('input image', merged) #产生彩色原图
     cv2.waitKey(0)
3.4 金字塔


imgpath = "C:/Users/yuta/Desktop/img3/20190720072950_000256_cc8cdaa64390.JPG"
src1 = cv2.imread(imgpath)
for i in range(3):
    src1=cv2.pyrDown(src1)  #不能j=
    print(src1.shape)
    cv2.imshow('input image',src1) # 生成3张大小不同图
    cv2.waitKey(0)
down_image1 = cv2.pyrDown(src1)
down_image2 = cv2.pyrDown(down_image1)
up_image = cv2.pyrUp(down_image2)
laplacian = down_image1-up_image

cv2.imshow('input image',laplacian)
cv2.waitKey(0)

3.5 缩放


3.6 平移


3.7 旋转


3.8 仿射变换


3.9 透视变换


4.形态学
腐,膨。开,闭,开闭。白帽,黑帽

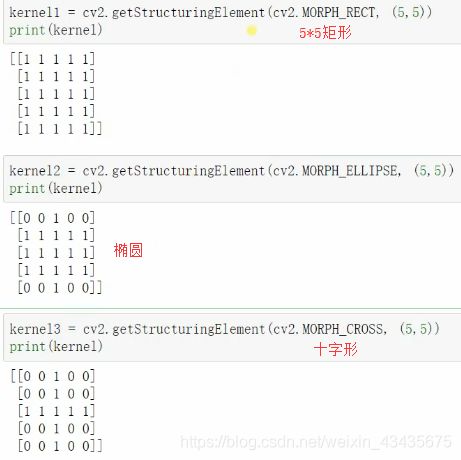
kernel1=cv2.getStructuringElement(cv2.MORPH_RECT,(5,5))
kernel2=cv2.getStructuringElement(cv2.MORPH_ELLIPSE,(5,5))
kernel3=cv2.getStructuringElement(cv2.MORPH_CROSS,(5,5))
erosion = cv2.erode(src1,kernel1) # 腐蚀

cv2.imshow('input image',erosion)
cv2.waitKey(0)

for i in range(3):
    erosion = cv2.erode(src1, kernel1,iterations=i+1)

    cv2.imshow('input image', erosion) #三次腐蚀颜色越来越深
    cv2.waitKey(0)
for i in range(3):
    dilation= cv2.dilate(src1, kernel1,iterations=i+1) #膨胀dilate,取得是局部最大值

    cv2.imshow('input image', dilation) #三次膨胀颜色越来越白
    cv2.waitKey(0)
kernel1=cv2.getStructuringElement(cv2.MORPH_RECT,(5,5))
opening = cv2.morphologyEx(src1,cv2.MORPH_OPEN,kernel1) # 开运算:先腐蚀后膨胀
closing = cv2.morphologyEx(src1,cv2.MORPH_CLOSE,kernel1) # 闭运算:先膨胀后腐蚀

cv2.imshow('input image', opening)
cv2.waitKey(0)
opening = cv2.morphologyEx(src1,cv2.MORPH_OPEN,kernel1) # 开闭运算
closing = cv2.morphologyEx(opening,cv2.MORPH_CLOSE,kernel1)
cv2.imshow('input image', closing)
cv2.waitKey(0)

gradient = cv2.morphologyEx(src1,cv2.MORPH_GRADIENT,kernel1)

cv2.imshow('input image', gradient)
cv2.waitKey(0)


blackhat = cv2.morphologyEx(src1,cv2.MORPH_BLACKHAT,kernel1)

cv2.imshow('input image', blackhat)
cv2.waitKey(0)

5.模糊(平滑)
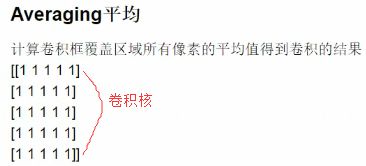
kernelsizes = [(3,3),(9,9),(15,15)] # 越大越模糊
plt.figure(figsize = (15,15))
src1 = cv2.cvtColor(src1, cv2.COLOR_BGR2RGB)
for i,kernel in enumerate (kernelsizes):
    plt.subplot(1,3,i+1)
    blur = cv2.blur(src1,kernel) # 平均平滑
    plt.axis('off')
    plt.title('Blurred'+str(kernel)) # 设置标题
    plt.imshow(blur)
plt.show()


kernelsizes = [(3,3),(9,9),(15,15)]
plt.figure(figsize = (15,15))
src1 = cv2.cvtColor(src1, cv2.COLOR_BGR2RGB)
for i,kernel in enumerate (kernelsizes):
    plt.subplot(1,3,i+1)
    blur = cv2.GaussianBlur(src1,kernel,0) # 0为标准差
    plt.axis('off')
    plt.title('Blurred'+str(kernel))
    plt.imshow(blur)
plt.show()


plt.figure(figsize = (15,15))
src1 = cv2.cvtColor(src1, cv2.COLOR_BGR2RGB)
for i,kernel in enumerate ((3,9,15)):
    plt.subplot(1,3,i+1)
    blur = cv2.medianBlur(src1,kernel)
    plt.axis('off')
    plt.title('Blurred'+str(kernel))
    plt.imshow(blur)
plt.show()


params = [(11,21,7),(11,41,21),(15,75,75)]
plt.figure(figsize = (15,15))
src1 = cv2.cvtColor(src1, cv2.COLOR_BGR2RGB)
for i,(diameter,sigmaColor,sigmaSpace) in enumerate (params): # 邻域直径,灰度值相似性高斯滤波函数标准差,空间高斯函数标准差
    plt.subplot(1,3,i+1)
    blur = cv2.bilateralFilter(src1,diameter,sigmaColor,sigmaSpace) #平均平滑
    plt.axis('off')
    plt.title('Blurred'+str((diameter,sigmaColor,sigmaSpace)))
    plt.imshow(blur)
plt.show()

6.色彩空间转换

(B,G,R) = cv2.split(src1)
zeros = np.zeros(src1.shape[:2],dtype='uint8') #src1.shape[:2]和src1宽高一样

cv2.imshow('input image', cv2.merge([zeros,G,zeros]))
cv2.waitKey(0)


hsv = cv2.cvtColor(src1,cv2.COLOR_BGR2HSV)
zeros = np.zeros(src1.shape[:2],dtype='uint8')
for(name,chan) in zip(('H','S','V'),cv2.split(hsv)):
    cv2.imshow(name,chan)

cv2.waitKey(0)
cv2.destroyAllWindows()


lab = cv2.cvtColor(src1,cv2.COLOR_BGR2LAB)
zeros = np.zeros(src1.shape[:2],dtype='uint8')
for (name,chan) in zip(('L','A','B'),cv2.split(lab)):
    cv2.imshow(name,chan) #缩进
cv2.waitKey(0)


gray = cv2.cvtColor(src1,cv2.COLOR_BGR2GRAY)

cv2.imshow('original',src1)
cv2.imshow('gray',gray)
cv2.waitKey(0)

7.二值化
![]()
gray =cv2.cvtColor(src1,cv2.COLOR_BGR2GRAY)
plt.imshow(gray,'gray') # plt显示要加‘gray’
plt.axis('off')
plt.show()

ret1,thresh1 = cv2.threshold(gray,127,255,cv2.THRESH_BINARY) #127阈值
ret2,thresh2 = cv2.threshold(gray,127,255,cv2.THRESH_BINARY_INV)
ret3,thresh3 = cv2.threshold(gray,127,255,cv2.THRESH_TRUNC)
ret4,thresh4 = cv2.threshold(gray,127,255,cv2.THRESH_TOZERO)
ret5,thresh5 = cv2.threshold(gray,127,125,cv2.THRESH_TOZERO_INV)
titles = ['original','BINARY','BINARY_INV','TRUNC','TOZERO','TOZERO_INV']
src1 = [gray,thresh1,thresh2,thresh3,thresh4,thresh5]
plt.figure(figsize=(15,5))
for i in range(6):
    plt.subplot(2,3,i+1)
    plt.imshow(src1[i],'gray')
    plt.title(titles[i])
    plt.axis('off')
plt.show()
#下面为遮挡,白色部分显示原图即提取。将阈值调小显示更好,但太小黑色背景会有白色噪声点
cv2.imshow('mask',cv2.bitwise_and(src1,src1,mask=thresh1))
cv2.waitKey(0)

ret1,thresh1 = cv2.threshold(gray,0,255,cv2.THRESH_BINARY | cv2.THRESH_OTSU) # 0阈值自动
ret2,thresh2 = cv2.threshold(gray,0,255,cv2.THRESH_BINARY_INV | cv2.THRESH_OTSU)
print('ret1',ret1)
print('ret2',ret2)

plt.imshow(thresh1,'gray')
plt.axis('off')
plt.show()
plt.imshow(thresh2,'gray')
plt.axis('off')
plt.show()


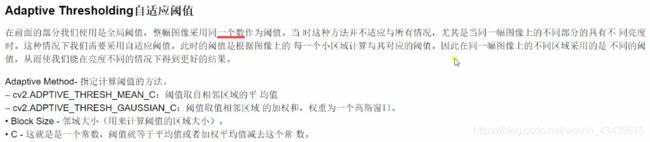
image = cv2.cvtColor(src1,cv2.COLOR_BGR2GRAY) # 变灰度图
image = cv2.medianBlur(image,5) # 中值滤波
ret,th1 = cv2.threshold(image,127,255,cv2.THRESH_BINARY) # 普通二值化
th2 = cv2.adaptiveThreshold(image,255,cv2.ADAPTIVE_THRESH_MEAN_C,cv2.THRESH_BINARY,11,3) # 平均值阈值
th3 = cv2.adaptiveThreshold(image,255,cv2.ADAPTIVE_THRESH_GAUSSIAN_C,cv2.THRESH_BINARY,11,3) # 高斯阈值

titles = ['original','Global','Thresholding','adaptive Mean Thresholding','Adaptive Gaussian Thresholding']
images = [image,th1,th2,th3]
plt.figure(figsize=(10,5))
for i in range(4):
    plt.subplot(2,2,i+1)
    plt.imshow(images[i],'gray')
    plt.axis('off')
    plt.title(titles[i])
plt.show()
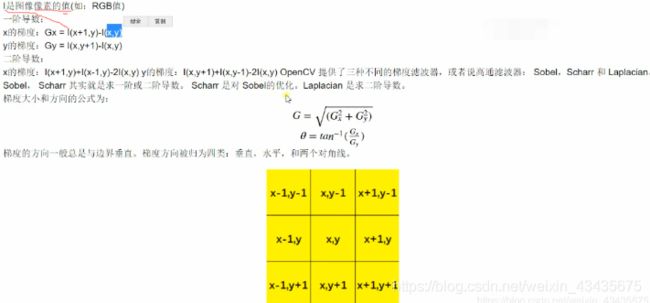
8.图像梯度

def gradient(image):
image = cv2.cvtColor(image,cv2.COLOR_RGB2GRAY)
laplacian = cv2.Laplacian(image,cv2.CV_64F) #cv2.CV_64F输出图像的深度(数据类型),64位float类型,因为梯度可能是正或负
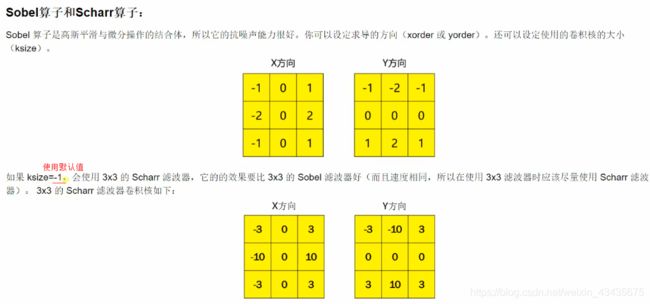
sobelx = cv2.Sobel(image,cv2.CV_64F,1,0,ksize=3) #1,0表示在X方向求一阶导数,最大可以求2阶导数
sobely = cv2.Sobel(image,cv2.CV_64F,0,1,ksize=3) #0,1表示在y方向求一阶导数,最大可以求2阶导数
titles = ['Original','Laplacian','SobelX','SobelY']
images = [image,laplacian,sobelx,sobely]
plt.figure(figsize=(10,5))
for i in range(4):
plt.subplot(2,2,i+1)
plt.imshow(images[i],'gray')
plt.title(titles[i])
plt.axis('off')
plt.show()
gradient(src1)
9.canny边缘检测


def edge_detection(image,minVal=100,maxVal=200):
image = cv2.cvtColor(image,cv2.COLOR_BGR2GRAY)
edges = cv2.Canny(image,minVal,maxVal)
plt.imshow(edges,'gray')
plt.axis('off')
plt.show()
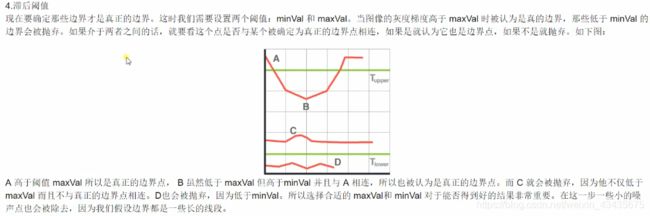
edge_detection(src1)

image = cv2.cvtColor(src1,cv2.COLOR_BGR2GRAY)
image = cv2.GaussianBlur(image,(3,3),0)
Value = [(10,150),(100,200),(180,230)]
plt.figure(figsize=(20,5))
for i,(minVal,maxVal) in enumerate(Value):
    plt.subplot(1,3,i+1)
    edges = cv2.Canny(image,minVal,maxVal)
    edges= cv2.GaussianBlur(edges,(3,3),0)
    plt.imshow(edges,'gray')
    plt.title(str((minVal,maxVal)))
    plt.axis('off')
plt.show()

def auto_canny(image,sigma=0.33):
    v=np.median(image)
    lower = int(max(0,(1.0-sigma)*v))
    upper = int(min(255,(1.0+sigma)*v))
    edged = cv2.Canny(image,lower,upper)
    print(lower,upper)
    return edged
edges = auto_canny(src1)
edges = cv2.GaussianBlur(edges,(3,3),0)
plt.imshow(edges,'gray')
plt.axis('off')
plt.show()

10.视频操作
10.1 读取摄像头视频
cap = cv2.VideoCapture(0)
while(True):
    ret,frame = cap.read()  #ret读取成功True或失败False,frame读取到的图像内容,读取一帧数据
    gray = cv2.cvtColor(frame,cv2.COLOR_BGR2GRAY)
    cv2.imshow('frame',gray) #或('frame',frame)
    if cv2.waitKey(1) & 0xff == ord('q'): #waitKey功能是不断刷新图像,单位ms,返回值是当前键盘按键值。ord返回对应的ASCII数值
        break
cap.release()
cv2.destroyAllWindows()
10.2 读取视频文件
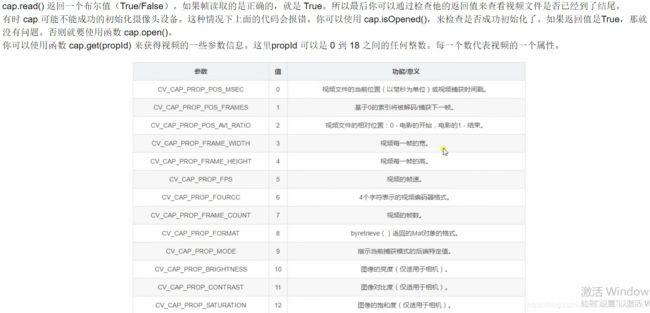

cap = cv2.VideoCapture('D:/KK_Movies/kk 2019-09-21 11-29-04.mp4')
fps = cap.get(cv2.CAP_PROP_FPS) # 视频每秒传输帧数
frame_width = int(cap.get(cv2.CAP_PROP_FRAME_WIDTH)) # 视频图像宽度
frame_height = int(cap.get(cv2.CAP_PROP_FRAME_HEIGHT))  # 视频图像长度
print(fps)
print(frame_width)
print(frame_height)

while(True):
    ret,frame = cap.read()
    if ret != True:
        break
    cv2.imshow('frame',frame)
    if cv2.waitKey(25)&0xff == ord('q'): # 25变大视频播放变慢
        break
cap.release()
cv2.destroyAllWindows()
10.3 视频写入

cap = cv2.VideoCapture('D:/KK_Movies/kk 2019-09-21 11-29-04.mp4')
fps = cap.get(cv2.CAP_PROP_FPS)
frame_width = int(cap.get(cv2.CAP_PROP_FRAME_WIDTH))
frame_height = int(cap.get(cv2.CAP_PROP_FRAME_HEIGHT))
print(fps)
print(frame_width)
print(frame_height)

fourcc = cv2.VideoWriter_fourcc(*'XVID')
out = cv2.VideoWriter('C:/Users/yuta/Desktop/333/1.avi',fourcc,fps,(frame_width,frame_height))
while(True):
    ret,frame = cap.read()
    if ret == True:
        #frame = cv2.flip(frame,1)
        out.write(frame)
        cv2.imshow('frame',frame)
        if cv2.waitKey(25)&0xff == ord('q'):
            break
    else:
        break
out.release()
cap.release()
cv2.destroyAllWindows()
10.4 视频提取指定颜色
# 色彩空间转为hsv和inrange函数从视频中提取指定颜色
# 并将其置为白,其余置为黑,实现跟踪某一颜色
import cv2 as cv
import numpy as np
def nextrace_object_demo():
    capture = cv.VideoCapture("E:/1.mp4")#导入视频
    while True:
        ret, frame = capture.read()
        if ret == False:
            break
        hsv = cv.cvtColor(frame, cv.COLOR_BGR2HSV)
        #上一行将frame视频一帧图转为hsv色彩空间
#如下设置绿色的范围,跟踪视频中的绿色,调节图像颜色信息(H)、饱和度(S)、亮度(V)区间
        lower_hsv = np.array([35, 43, 46])#设置过滤的绿色的低值,可查看下表
        upper_hsv = np.array([77, 255, 255])#设置过滤的绿色的高值
        mask = cv.inRange(hsv, lowerb=lower_hsv, upperb=upper_hsv)
        #用inRange函数提取指定颜色范围,这里对hsv来处理,得到二值图

        #dst = cv.bitwise_and(frame,frame,mask=mask)
        #cv.imshow("mask",dst)

        cv.imshow("video", frame)
        cv.imshow("mask", mask)
        if cv.waitKey(50) & 0xFF == ord('q'):
            break

nextrace_object_demo()
cv.waitKey(0)
cv.destroyAllWindows()

下图为#两行用bitwise_and输出

可以通过下表对应颜色的数值过滤其他颜色,HSV颜色对应RGB的分量范围:

import cv2 as cv
import numpy as np
src = cv.imread("E:/images/demo.JPG")
cv.namedWindow("input image", cv.WINDOW_NORMAL)
cv.imshow('input image',src)
# 通道分离,输出三个单通道图片
b, g, r = cv.split(src)  # 将彩色图像分割成3个通道
cv.imshow("blue", b)
cv.imshow("green", g)
cv.imshow("red", r)

# 通道合并
src = cv.merge([b, g, r])
cv.imshow("merge image", src)

# 修改某个通道的值,[:, :, 0]为第一个通道,[:, :, 1]为第二个通道
src[:, :, 2] = 100
cv.imshow("changed image", src)

cv.waitKey(0)
cv.destroyAllWindows()

11.直方图
# -*- coding: utf-8 -*-
import cv2 as cv
import matplotlib.pyplot as plt
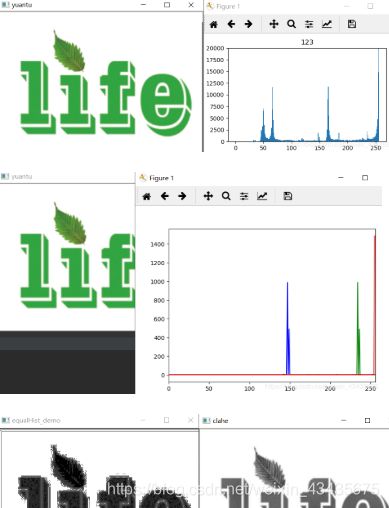
def plot_demo(image): #x轴为像素点取值,y轴为像素点个数
plt.figure(figsize = (5,3))
plt.hist(image.ravel(), 256, [0, 256])
#image.ravel()将图像展开,256为bins数量,[0, 256]为范围
plt.ylim([0, 20000])
plt.title('123')
plt.show()
def image_hist(image):
color = ('blue', 'green', 'red')
for i, color in enumerate(color):
# 计算出直方图,calcHist(images, channels, mask, histSize(有多少个bin), ranges)
hist = cv.calcHist(image, [i], None, [256], [0, 256])
print(hist.shape)
plt.plot(hist, color=color)
plt.xlim([0, 256])
plt.show()
#上面为绘制图片直方图,下面是直方图应用
def equalHist_demo(image):
gray = cv.cvtColor(image,cv.COLOR_BGR2GRAY)
#下行 `全局`直方图均衡化,提升对比度(默认提升),只能是灰度图像用于增强图像对比度,即黑的更黑,白的更白
dst = cv.equalizeHist(gray)
cv.imshow("equalHist_demo", dst)
#下行`局部`直方图均衡化,自定义,clipLimit是对比度的大小,tileGridSize是每次处理块的大小
clahe = cv.createCLAHE(clipLimit=2.0, tileGridSize=(8, 8))
clahe_dst = clahe.apply(gray)
cv.imshow("clahe", clahe_dst)
src = cv.imread("E:\images/demo.jpg")
cv.imshow("yuantu", src)
plot_demo(src)
image_hist(src)
equalHist_demo(src)
cv.waitKey(0)
cv.destroyAllWindows()
12.模板匹配
# -*- coding: utf-8 -*-
import cv2 as cv
import numpy as np
# 模板匹配,就是在整个图像区域发现与给定子图像匹配的小块区域,
# 需要模板图像T和待检测图像-源图像S
# 工作方法:在待检测的图像上,从左到右,从上倒下计算模板图像与重叠子图像匹配度,
# 匹配度越大,两者相同的可能性越大。
def template_demo():
    tpl = cv.imread("E:\images/4.jpg")
    target = cv.imread("E:\images/3.jpg")
    cv.imshow("template", tpl)
    cv.imshow("target", target)
    methods = [cv.TM_SQDIFF_NORMED, cv.TM_CCORR_NORMED, cv.TM_CCOEFF_NORMED]
    #上行参数三种模板匹配方法
    th, tw = tpl.shape[:2] #模板的高宽
    for md in methods:
        print(md)
        result = cv.matchTemplate(target, tpl, md)  # 得到匹配结果
        min_val, max_val, min_loc, max_loc = cv.minMaxLoc(result)
        if md == cv.TM_SQDIFF_NORMED:
        #cv.TM_SQDIFF_NORMED最小时最相似,其他最大时最相似
            tl = min_loc
        else:
            tl = max_loc
        br = (tl[0] + tw, tl[1] + th)  # br为右下角坐标=tl为左上角坐标+宽高
        cv.rectangle(target, tl, br, (0, 0, 255), 2) # (0, 0, 255)为红色,2为线宽,绘到target上。
        cv.imshow("match-"+np.str(md), target)

template_demo()

cv.waitKey(0)
cv.destroyAllWindows()

13.直线/圆/轮廓检测
霍夫变换:目的是通过投票程序在特定类型的形状内找到对象的不完美实例。这个投票程序是在一个参数空间中进行的,在这个参数空间中,候选对象被当作所谓的累加器空间中的局部最大值来获得。Hough变换主要优点是能容忍特征边界描述中的间隙,并且相对不受图像噪声的影响。
霍夫直线变换:1.Hough Line Transform用来做直线检测
2.前提条件:边缘检测已完成
3.平面空间到极坐标空间转换
# -*- coding: utf-8 -*-
import cv2 as cv
import numpy as np
def line_detection(image):
    gray = cv.cvtColor(image, cv.COLOR_BGR2GRAY)
    edges = cv.Canny(gray, 50, 150, apertureSize=3)
    #Canny做梯度窗口大小apertureSize=3
    #cv2.HoughLines()返回值就是(ρ,θ)。ρ 的单位是像素,θ 的单位是弧度。
    #这个函数的第一个参数是一个二值化图像,所以在进行霍夫变换之前要首先进行二值化,或者进行 Canny边缘检测。
    #第二和第三个值分别代表 ρ 和 θ 的精确度。第四个参数是阈值,只有累加其中的值高于阈值时才被认为是一条直线,
    #也可以把它看成能检测到的直线的最短长度(以像素点为单位)。
    lines = cv.HoughLines(edges, 1, np.pi/180, 80)
    #'NoneType' object is not iterable:没有检测到直线,lines为空,进入for循环发生错误:调整上面第四个参数。
    for line in lines:
        print(type(lines))
        rho, theta = line[0]
        a = np.cos(theta)
        b = np.sin(theta)
        x0 = a * rho
        y0 = b * rho
        x1 = int(x0 + 1000*(-b))
        y1 = int(y0 + 1000*(a))
        x2 = int(x0 - 1000*(-b))
        y2 = int(y0 - 1000*(a))
        cv.line(image, (x1, y1), (x2, y2), (0, 0, 255), 2) # 2为像素宽
    cv.imshow("line_detection", image)

def line_detection_possible_demo(image):
    gray = cv.cvtColor(image, cv.COLOR_BGR2GRAY)
    edges = cv.Canny(gray, 50, 150, apertureSize=3)
    lines = cv.HoughLinesP(edges, 1, np.pi / 180, 80, minLineLength=50, maxLineGap=10)
    for x1, y1, x2, y2 in lines[0]:
        cv.line(image, (x1, y1), (x2, y2), (255, 0, 0), 2)
    cv.imshow('line_detection_possible_demo', image)

def detection_circles_demo(image):
    dst = cv.pyrMeanShiftFiltering(image, 10, 100)#均值迁移,sp,sr为空间域核与像素范围域核半径
    gray = cv.cvtColor(dst, cv.COLOR_BGR2GRAY)
    circles = cv.HoughCircles(gray, cv.HOUGH_GRADIENT, 1, 20, param1=40, param2=30, minRadius=0, maxRadius=0)
    #上面1为dp步长,20为最小距离,圆心小于20为一个圆。
    circles = np.uint16(np.around(circles))
    print(circles.shape)
    for i in circles[0,:]:  # draw the outer circle
        cv.circle(image, (i[0], i[1]), i[2], (0, 255, 0), 2) # draw the center of the circle
        cv.circle(image, (i[0], i[1]), 2, (255, 0, 0), 3)  # 画圆心
    cv.imshow('detected circles', image)

def main():
    src = cv.imread("E:\images/dave.png")
    cv.imshow("demo",src)

    line_detection(src)
    line_detection_possible_demo(src)
    img = cv.imread("E:\images/circle.png")
    detection_circles_demo(img)

    cv.waitKey(0)
    cv.destroyAllWindows()

if __name__ == '__main__':
    main()

14.人脸检测
haar和lap数据:https://github.com/opencv/opencv/tree/master/data
win10下载子目录见文章:https://blog.csdn.net/weixin_43435675/article/details/88201615

import cv2 as cv

def face_detection(image):
    gray = cv.cvtColor(image, cv.COLOR_BGR2GRAY)
    face_detector = cv.CascadeClassifier(r"E:\images/1/haarcascade_frontalface_alt_tree.xml")
    # 在Python中\是转义符,\u表示其后是UNICODE编码,因此\User在这里会报错,在字符串前面加个r表示就可以了
    faces = face_detector.detectMultiScale(gray, 1.02, 2)
    # 多个尺度检测,向上或者向下是原来1.02倍,
    # 第二个参数是移动距离,第三个参数是识别度,越大识别读越高
    # faces就是几个候选矩形框
    for x, y, w, h in faces: # 取出这四个值
        cv.rectangle(image, (x, y), (x+w, y+h), (0, 0, 255), 2) # 绘制在图上
    cv.imshow("result", image)

def main():
    src = cv.imread("E:\images/lena.jpg")
    cv.imshow("input image", src)

    face_detection(src)

    # # 视频检测
    # capture = cv.VideoCapture(0)
    # while True:
    #     ret, frame = capture.read()
    #     frame = cv.flip(frame, 1)
    #     face_detection(frame)
    #     c = cv.waitKey(10)
    #     if c == 27:   #c == 27 时是用esc关闭的
    #         break

    cv.waitKey(0)
    cv.destroyAllWindows()  # 关闭所有窗口

if __name__ == '__main__':
    main()

15.数字验证码识别
pip install pytesseract
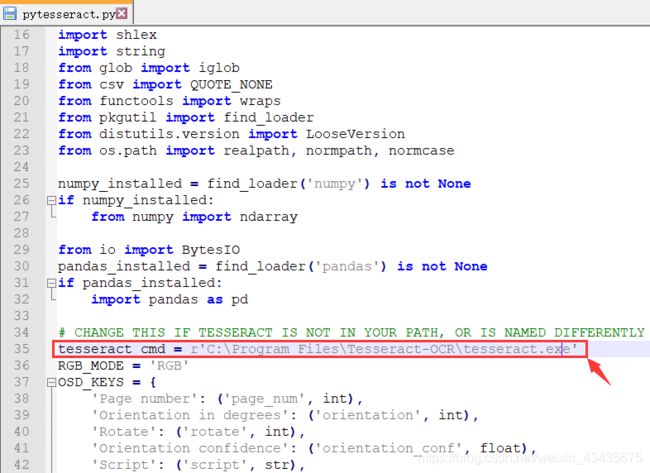
错误:pytesseract.pytesseract.TesseractNotFoundError: tesseract is not installed or it’s not in your path
解决:C:\Users\yuta\Anaconda3\Lib\site-packages\pytesseract中pytesseract.py改路径保存:下载tesseract.exe地址:https://github.com/tesseract-ocr/tesseract/wiki 选择系统对应版本下载安装,默认安装在C:\Program Files
import cv2 as cv
import numpy as np
from PIL import Image
import pytesseract as tess
"""
预处理-去除干扰线和点
不同的结构元素中选择
Image和numpy array相互转换
识别和输出
"""
def recognition_demo(image):
    gray = cv.cvtColor(image, cv.COLOR_BGR2GRAY)
    ret, binary = cv.threshold(gray, 0, 255, cv.THRESH_BINARY_INV | cv.THRESH_OTSU)
    cv.imshow("binary", binary)

    kernel = cv.getStructuringElement(cv.MORPH_RECT, (4, 4))
    bin1 = cv.morphologyEx(binary,cv.MORPH_OPEN, kernel=kernel)
    cv.imshow("bin1", bin1)

    textImage = Image.fromarray(bin1)
    text = tess.image_to_string(textImage)
    print("The result:", text)

def main():
    src = cv.imread("E:\images\yzm.jpg")
    cv.imshow("demo",src)

    recognition_demo(src)

    cv.waitKey(0)
    cv.destroyAllWindows()

if __name__ == '__main__':
    main()

16.图像拼接/保存器
# -*- coding: utf8 -*-
import cv2
img_head = cv2.imread('C:/Users/yuta/Desktop/6/20190924153611.jpg')  #读取头像和国旗图案
img_flag = cv2.imread('C:/Users/yuta/Desktop/6/timg (2).jpg')
w_head, h_head = img_head.shape[:2]  #获取头像和国旗图案宽度
w_flag, h_flag = img_flag.shape[:2]
print(w_head)
print(h_head)
print(w_flag)
print(h_flag)
scale = w_head / w_flag / 4  #计算图案缩放比例
print(scale)

img_flag = cv2.resize(img_flag, (0, 0), fx=scale, fy=scale) #缩放图案
w_flag, h_flag = img_flag.shape[:2] #获取缩放后新宽度

for c in range(0, 3): #按3个通道合并图片
    img_head[w_head - w_flag:, h_head - h_flag:, c] = img_flag[:, :, c]
cv2.imwrite('new_head.jpg', img_head)
import threading
from queue import Queue
import os
import numpy as np
from PIL import Image
import time
import logging


# 获取异常消息的字符串
import sys
import traceback
def get_exception_string():
    exc_type, exc_value, exc_traceback = sys.exc_info()
    exception_list = traceback.format_exception(exc_type, exc_value, exc_traceback)
    exception_string = ''.join(exception_list)
    return exception_string

class ImageSaver(threading.Thread):
    """ 多线程的图像文件保存器类"""

    def __new__(cls):
        """ 重写new方法,实现单实例的效果"""
        if not hasattr(cls, '_instance'):
            father_class = super(ImageSaver, cls)
            cls._instance = father_class.__new__(cls)
            self = cls._instance
            super(ImageSaver, self).__init__()
            self.queue = Queue()
            self.start()
        return cls._instance

    def save_image(self, argument_1, imageFilePath):
        """
        argument_1可以是Image库的图像对象,或者numpy库的ndarray(rgb通道顺序)
        imageFilePath必须是字符串
        """
        if isinstance(argument_1, np.ndarray):
            image = Image.fromarray(argument_1)
        else:
            image = argument_1
        put_tuple = (image, imageFilePath)
        self.queue.put(put_tuple)

    def run(self):
        """ 多线程的主要循环运行内容"""
        while True:
            try:
                if not self.queue.empty():
                    image, imageFilePath = self.queue.get()
                    dirPath, imageFileName = os.path.split(imageFilePath)
                    if not os.path.isdir(dirPath):
                        os.makedirs(dirPath)
                    image.save(imageFilePath)
            except Exception as e:
                exception_string = get_exception_string()
                logging.error(exception_string)
                logging.error('保存到此路径时出错: %s' %imageFilePath)
            time.sleep(0.0001)

