JAVA学习笔记24——SpringBoot
SpringBoot
微服务架构
把每个功能元素独立出来,把独立出来的功能元素动态组合,需要的功能元素才去拿来组合,需要多一些时可以聚合多个功能元素,所以微服务架构是对功能元素进行复制,而没有对整个应用进行复制
优点
节省了调用资源
每个功能元素的服务都是一个可替换的,可独立升级的软件代码
原理
pom.xml
spring-boot-dependencies:核心依赖在父工程中
我们在写或者引入一些springboot以来的时候,不需要指定版本,因为有版本仓库
启动器
springboot启动场景
springboot会将所有的功能场景,都变成一个个的启动器
主程序
// 标注这个类是一个springboot应用
@SpringBootApplication
public class Springboot01HelloworldApplication {


    public static void main(String[] args) {

        // 将springboot应用启动
        SpringApplication.run(Springboot01HelloworldApplication.class, args);
    }
}
注解
@SpringBootConfiguration
// springboot的配置
	// @Configuration:spring配置类
	// @Component:说明这也是一个spring组件
@EnableAutoConfiguration
//自动配置
	// AutoConfigurationPackage:自动配置包
	// @Import(AutoConfigurationPackage.Registrat.class):自动配置包注册
	// @Import(AutoConfigurationImportSelector.class):自动配置导入选择
	// List getCandidateConfigurations(AnnotationMetadata metadata, AnnotationAttributes attributes);获取所有配置
    protected List<String> getCandidateConfigurations(AnnotationMetadata metadata, AnnotationAttributes attributes) {

        List<String> configurations = SpringFactoriesLoader.loadFactoryNames(this.getSpringFactoriesLoaderFactoryClass(), this.getBeanClassLoader());
        Assert.notEmpty(configurations, "No auto configuration classes found in META-INF/spring.factories. If you are using a custom packaging, make sure that file is correct.");
        return configurations;
    }
结论
SpringBoot在启动的时候从类路径下的META-INF/spring.factories中获取EnableAutoConfiguration指定的值
将这些值作为自动配置类导入容器 , 自动配置类就生效 , 帮我们进行自动配置工作;
整个J2EE的整体解决方案和自动配置都在springboot-autoconfigure的jar包中;
它会给容器中导入非常多的自动配置类 (xxxAutoConfiguration), 就是给容器中导入这个场景需要的所有组件 , 并配置好这些组件 ;
有了自动配置类 , 免去了我们手动编写配置注入功能组件等的工作;
启动
SpringApplication
1、推断应用的类型是普通的项目还是Web项目
2、查找并加载所有可用初始化器 , 设置到initializers属性中
3、找出所有的应用程序监听器,设置到listeners属性中
4、推断并设置main方法的定义类,找到运行的主类
yaml
基础语法
配置文件
SpringBoot使用一个全局的配置文件 , 配置文件名称是固定的
application.properties
语法结构 :key=value
application.yml
语法结构 :key:空格 value
配置文件的作用 :修改SpringBoot自动配置的默认值,因为SpringBoot在底层都给我们自动配置好了;
# 普通的key-value
name: ray

# 对象
student:
  name: ray
  age: 24

# 行内写法
student: {
     name: ray,age: 24}

# 数组
person:
  - Kobe
  - Jordan

player: [Kobe,Jordan]
注入配置文件
person:
  name: ray
  age: 18
  sex: true
  birth: 1998/1/1
  map: {
     k1: v1,k2: v2}
  list:
    - run
    - swim
  dog:
    name: d
    age: 3
# Person{name='ray', age=18, sex=true, birth=Thu Jan 01 00:00:00 CST 1998, map={k1=v1, k2=v2}, list=[run, swim], dog=Dog{name='d', age=3}}
松散绑定
比如我的yml中写的last-name,这个和lastName是一样的, - 后面跟着的字母默认是大写的。这就是松散绑定。
就是在yaml文件中使用 - 的命名格式, 在java代码中使用驼峰命名格式, 这俩个之间是可以相互自行匹配的
JSR303校验数据
这个就是我们可以在字段是增加一层过滤器验证 , 可以保证数据的合法性
在实体类上使用注解 @Validated
然后在属性就可以例如@Email注解表示这个属性只能是邮件格式
其内部有很多注解, 总而言之就是为了校验数据的合法性
自动装配
1、SpringBoot启动会加载大量的自动配置类
2、我们看我们需要的功能有没有在SpringBoot默认写好的自动配置类当中;
3、我们再来看这个自动配置类中到底配置了哪些组件;(只要我们要用的组件存在在其中,我们就不需要再手动配置了)
4、给容器中自动配置类添加组件的时候,会从properties类中获取某些属性。我们只需要在配置文件中指定这些属性的值即可;
xxxxAutoConfigurartion:自动配置类;给容器中添加组件
xxxxProperties:封装配置文件中相关属性;
Web开发
静态资源
1.在springboot,我们可以使用以下方式处理静态资源
webjars localhost:8080/webjars/
public,static,/**,resources localhost:8080/
2.优先级 resources>static(默认)>public
Thymeleaf模板引擎
作用
模板引擎的作用就是我们来写一个页面模板,比如有些值呢,是动态的,我们写一些表达式。而这些值,从哪来呢,就是我们在后台封装一些数据。然后把这个模板和这个数据交给我们模板引擎,模板引擎按照我们这个数据帮你把这表达式解析、填充到我们指定的位置,然后把这个数据最终生成一个我们想要的内容给我们写出去,这就是我们这个模板引擎,不管是jsp还是其他模板引擎,都是这个思想。只不过呢,就是说不同模板引擎之间,他们可能这个语法有点不一样。
结论:只要需要使用thymeleaf,只需要导入对应的依赖就可以了。将html放在templates目录下
取值
<html lang="en"  xmlns:th="http://www.thymeleaf.org">
<head>
    <meta charset="UTF-8">
    <title>Titletitle>
head>
<body>

<div th:text="${msg}">div>
body>
html>
@Controller
public class IndexController {


    @RequestMapping("/test")
    public String test(Model model) {

        model.addAttribute("msg","hello,springboot");
        return "test";
    }
}
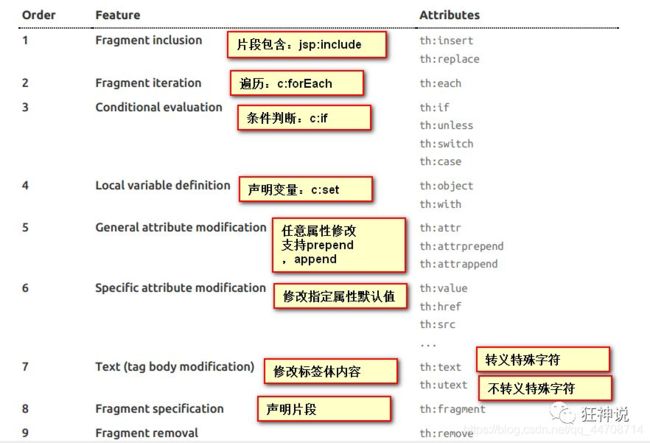
语法
<body>

<div th:text="${msg}">div>
<hr>
<h3 th:each="user:${users}" th:text="${user}">h3>
body>
Simple expressions:(表达式语法)
Variable Expressions: ${...}:获取变量值;OGNL;
    1)、获取对象的属性、调用方法
    2)、使用内置的基本对象:#18
         #ctx : the context object.
         #vars: the context variables.
         #locale : the context locale.
         #request : (only in Web Contexts) the HttpServletRequest object.
         #response : (only in Web Contexts) the HttpServletResponse object.
         #session : (only in Web Contexts) the HttpSession object.
         #servletContext : (only in Web Contexts) the ServletContext object.

    3)、内置的一些工具对象:
      #execInfo : information about the template being processed.
      #uris : methods for escaping parts of URLs/URIs
      #conversions : methods for executing the configured conversion service (if any).
      #dates : methods for java.util.Date objects: formatting, component extraction, etc.
      #calendars : analogous to #dates , but for java.util.Calendar objects.
      #numbers : methods for formatting numeric objects.
      #strings : methods for String objects: contains, startsWith, prepending/appending, etc.
      #objects : methods for objects in general.
      #bools : methods for boolean evaluation.
      #arrays : methods for arrays.
      #lists : methods for lists.
      #sets : methods for sets.
      #maps : methods for maps.
      #aggregates : methods for creating aggregates on arrays or collections.
==================================================================================

  Selection Variable Expressions: *{...}:选择表达式:和${}在功能上是一样;
  Message Expressions: #{...}:获取国际化内容
  Link URL Expressions: @{...}:定义URL;
  Fragment Expressions: ~{...}:片段引用表达式

Literals(字面量)
      Text literals: 'one text' , 'Another one!' ,…
      Number literals: 0 , 34 , 3.0 , 12.3 ,…
      Boolean literals: true , false
      Null literal: null
      Literal tokens: one , sometext , main ,…

Text operations:(文本操作)
    String concatenation: +
    Literal substitutions: |The name is ${name}|

Arithmetic operations:(数学运算)
    Binary operators: + , - , * , / , %
    Minus sign (unary operator): -

Boolean operations:(布尔运算)
    Binary operators: and , or
    Boolean negation (unary operator): ! , not

Comparisons and equality:(比较运算)
    Comparators: > , < , >= , <= ( gt , lt , ge , le )
    Equality operators: == , != ( eq , ne )

Conditional operators:条件运算(三元运算符)
    If-then: (if) ? (then)
    If-then-else: (if) ? (then) : (else)
    Default: (value) ?: (defaultvalue)

Special tokens:
    No-Operation: _
SpringSecurity
简介
SpringSecurity是针对Spring项目的安全框架,也是SpringBoot底层安全模块默认的技术选型,他可以实现强大的Web安全控制,对于安全控制,我们仅仅需要引入spring-boot-starter-security模块,进行少量的配置,即可实现强大的安全管理
相关类
- WebSecurityConfiguerAdapter:自定义Security策略
- AuthenticationManagerBuilder:自定义认证策略
- @EnableWebSecurity:开启WebSecurity模式
SpringSecurity的两个主要目标是认证和授权
Shiro
功能
Authentication: 身份认证、登录,验证用户是不是拥有相应的身份;
Authorization:授权,即权限验证,验证某个已认证的用户是否拥有某个权限,即判断用户能否进行什么操作,如:验证某个用户是否拥有某个角色,或者细粒度的验证某个用户对某个资源是否具有某个权限!
Session Manager: 会话管理,即用户登录后就是第-次会话,在没有退出之前,它的所有信息都在会话中;会话可以是普通的JavaSE环境,也可以是Web环境;
Cryptography: 加密,保护数据的安全性,如密码加密存储到数据库中,而不是明文存储;
Web Support: Web支持,可以非常容易的集成到Web环境;
Caching: 缓存,比如用户登录后,其用户信息,拥有的角色、权限不必每次去查,这样可以提高效率
Concurrency: Shiro支持多线程应用的并发验证,即,如在-个线程中开启另-一个线程,能把权限自动的传
播过去
Testing:提供测试支持;
RunAs:允许一个用户假装为另-一个用户(如果他们允许)的身份进行访问;
Remember Me:记住我,这个是非常常见的功能,即一-次登录后, 下次再来的话不用登录了
架构
外部
subject: 应用代码直接交互的对象是Subject, 也就是说Shiro的对外API核心就是Subject, Subject代表了当前的用户,这个用户不-定是一个具体的人,与当前应用交互的任何东西都是Subject,如网络爬虫,机器人等,与Subject的所有交互都会委托给SecurityManager; Subject其实是一一个门面, SecurityManageer 才是
实际的执行者
SecurityManager: 安全管理器,即所有与安全有关的操作都会与SercurityManager交互, 并且它管理着所有的Subject,可以看出它是Shiro的核心,它负责与Shiro的其他组件进行交互,它相当于SpringMVC的DispatcherServlet的角色
Realm: Shiro从Realm获取安全数据 (如用户,角色,权限),就是说SecurityManager要验证用户身份,那么它需要从Realm获取相应的用户进行比较,来确定用户的身份是否合法;也需要从Realm得到用户相应的角色、权限,进行验证用户的操作是否能够进行,可以把Realm看DataSource;
内部
Subject: 任何可以与应用交互的用户;
Security Manager:相当于SpringMVC中的DispatcherSerlet; 是Shiro的心脏, 所有具体的交互都通过Security Manager进行控制,它管理者所有的Subject, 且负责进行认证,授权,会话,及缓存的管理。
Authenticator:负责Subject认证, 是-一个扩展点,可以自定义实现;可以使用认证策略(Authentication Strategy),即什么情况下算用户认证通过了;
Authorizer:授权器,即访问控制器,用来决定主体是否有权限进行相应的操作;即控制着用户能访问应用中
的那些功能;
Realm: 可以有-一个或者多个的realm, 可以认为是安全实体数据源,即用于获取安全实体的,可以用JDBC实现,也可以是内存实现等等,由用户提供;所以- -般在应用中都需要实现自己的realm
SessionManager:管理Session生 命周期的组件,而Shiro并不仅仅可以用在Web环境,也可以用在普通的JavaSE环境中
CacheManager: 缓存控制器,来管理如用户,角色,权限等缓存的;因为这些数据基本上很少改变,放到缓存中后可以提高访问的性能;
Cryptography:密码模块,Shiro 提高了一些常见的加密组件用于密码加密, 解密等
入门
@Configuration
public class ShiroConfig {

    // ShiroFilterFactoryBean
    @Bean
    public ShiroFilterFactoryBean getShiroFilterFactoryBean(@Qualifier("securityManager") DefaultWebSecurityManager defaultWebSecurityManager) {

        ShiroFilterFactoryBean bean = new ShiroFilterFactoryBean();
        // 设置安全管理器
        bean.setSecurityManager(defaultWebSecurityManager);

        // 添加shiro的内置过滤器
        /*
            anno:无需认证就可以访问
            authc:必须认证才能访问
            user:必须拥有记住我才能用
            perms:拥有对某个资源的权限才能访问
            role:拥有某个角色权限才能访问
        */
        Map<String,String> filterMap = new LinkedHashMap<>();
        filterMap.put("/user/add","authc");
        filterMap.put("/user/update","authc");

        bean.setFilterChainDefinitionMap(filterMap);
        // 设置登录请求
        bean.setLoginUrl("/toLogin");

        return bean;
    }
    // DefaultWebSecurityManager
    @Bean(name = "securityManager")
    public DefaultWebSecurityManager getDefaultWebSecurityManage(@Qualifier("userRealm") UserRealm userRealm) {

        DefaultWebSecurityManager securityManager = new DefaultWebSecurityManager();
        // 关联UserRealm
        securityManager.setRealm(userRealm);
        return securityManager;
    }
    // 创建realm对象
    @Bean
    public UserRealm userRealm() {

        return new UserRealm();
    }
}
