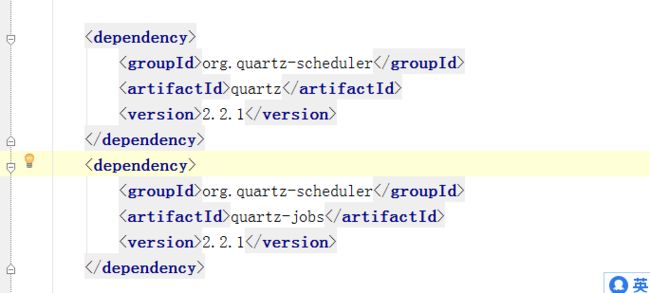
quartz的介绍就不说了,这里主要说的是使用spring boot+ 2.2.1搭建集群。
1.pom引入
2.在resources下新建quartz.properties文件,用于覆盖默认配置。
这里是集群配置文件
#quartz集群配置
# ===========================================================================
# Configure Main Scheduler Properties 调度器属性
# ===========================================================================
#调度标识名 集群中每一个实例都必须使用相同的名称
org.quartz.scheduler.instanceName=DefaultQuartzScheduler
#ID设置为自动获取 每一个必须不同
org.quartz.scheduler.instanceid=AUTO
#禁用quartz软件更新
org.quartz.scheduler.skipUpdateCheck=true
#============================================================================
# Configure ThreadPool
#============================================================================
#线程池的实现类(一般使用SimpleThreadPool即可满足几乎所有用户的需求)
org.quartz.threadPool.class=org.quartz.simpl.SimpleThreadPool
#指定线程数,至少为1(无默认值)(一般设置为1-100直接的整数合适)
org.quartz.threadPool.threadCount=25
#设置线程的优先级(最大为java.lang.Thread.MAX_PRIORITY 10,最小为Thread.MIN_PRIORITY 1,默认为5)
org.quartz.threadPool.threadPriority=5
#============================================================================
# Configure JobStore
#============================================================================
# 信息保存时间 默认值60秒
org.quartz.jobStore.misfireThreshold=60000
#数据保存方式为数据库持久化
org.quartz.jobStore.class=org.quartz.impl.jdbcjobstore.JobStoreTX
#数据库代理类,一般org.quartz.impl.jdbcjobstore.StdJDBCDelegate可以满足大部分数据库
org.quartz.jobStore.driverDelegateClass=org.quartz.impl.jdbcjobstore.StdJDBCDelegate
#JobDataMaps是否都为String类型
org.quartz.jobStore.useProperties=false
#数据库别名 随便取
org.quartz.jobStore.dataSource=myDS
#表的前缀,默认QRTZ_
org.quartz.jobStore.tablePrefix=QRTZ_
#是否加入集群
org.quartz.jobStore.isClustered=true
#调度实例失效的检查时间间隔
org.quartz.jobStore.clusterCheckinInterval=20000
#============================================================================
# Configure Datasources
#============================================================================
#数据库引擎
org.quartz.dataSource.myDS.driver=com.mysql.jdbc.Driver
#数据库连接
org.quartz.dataSource.myDS.URL=jdbc:mysql://127.0.0.1:3306/dbapp_dandan?useUnicode=true&characterEncoding=utf-8&useSSL=false&allowMultiQueries=true
#数据库用户
org.quartz.dataSource.myDS.user=root
#数据库密码
org.quartz.dataSource.myDS.password=
#允许最大连接
org.quartz.dataSource.myDS.maxConnections=5
#验证查询sql,可以不设置
org.quartz.dataSource.myDS.validationQuery=select 0 from dual
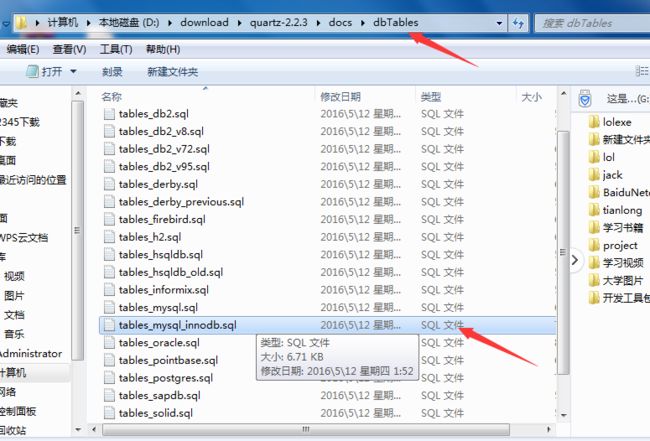
3.运行数据库脚本
解压官网下载下来的包,如果你的数据库是mysql,用这个tables_mysql_innodb.sql,里面有11个表
4下面是集群两种使用实现方式
第一种
1.添加任务注入的工厂类,否则任务注入会出错:
/**
* Created by Administrator on 2018\6\9 0009.
*/
public class DetailQuartzJobBeanextends QuartzJobBean {
protected final Loglogger = LogFactory.getLog(getClass());
private StringtargetObject;
private StringtargetMethod;
private ApplicationContextctx;
@Override
protected void executeInternal(JobExecutionContext context)throws JobExecutionException {
try {
Object otargetObject =ctx.getBean(targetObject);
Method m =null;
try {
m = otargetObject.getClass().getMethod(targetMethod,new Class[] { JobExecutionContext.class });
m.invoke(otargetObject,new Object[] { context });
}catch (SecurityException e) {
logger.error(e);
}catch (NoSuchMethodException e) {
logger.error(e);
}
}catch (Exception e) {
throw new JobExecutionException(e);
}
}
public void setApplicationContext(ApplicationContext applicationContext) {
this.ctx = applicationContext;
}
public void setTargetObject(String targetObject) {
this.targetObject = targetObject;
}
public void setTargetMethod(String targetMethod) {
this.targetMethod = targetMethod;
}
}
2.配置quartz
@Configuration
public class QuartzConfig {
// 配置文件路径
static final StringQUARTZ_CONFIG ="/quartz.properties";
/**
* Description: 定义调用对象和调用对象的方法
*
* @param
* @return
* @see
*/
@Bean(name ="initJobDetail")
public JobDetailFactoryBean enjoyQuartzJobTask()
{
//集群模式下必须使用JobDetailFactoryBean, MethodInvokingJobDetailFactoryBean 类中的 methodInvoking 方法,是不支持序列化的
JobDetailFactoryBean bean =new JobDetailFactoryBean();
bean.setName("enjoyQuartzJob");// 设置任务的名字
bean.setGroup("enjoyQuartzJobGroup");// 设置任务的分组,这些属性都可以存储在数据库中,在多任务的时候使用
bean.setDurability(true);
bean.setRequestsRecovery(true);
bean.setJobClass(DetailQuartzJobBean.class);
Map map =new HashMap<>();
map.put("targetObject","initBjLu28Session");//任务所在的类
map.put("targetMethod","task");//具体执行任务的方法
bean.setJobDataAsMap(map);
return bean;
}
// 配置触发器2
@Bean(name ="initJobTrigger")
public CronTriggerFactoryBean secondTrigger(JobDetail initJobDetail) {
CronTriggerFactoryBean trigger =new CronTriggerFactoryBean();
trigger.setJobDetail(initJobDetail);
// cron表达式
trigger.setCronExpression("0 0/1 * * * ?");
return trigger;
}
// 配置定时任务3
@Bean(name ="fetResultJobDetail")
public MethodInvokingJobDetailFactoryBean thirdJobDetail(FetchResult fetResultJob) {
MethodInvokingJobDetailFactoryBean jobDetail =new MethodInvokingJobDetailFactoryBean();
// 是否并发执行
jobDetail.setConcurrent(false);
// 为需要执行的实体类对应的对象
jobDetail.setTargetObject(fetResultJob);
// 需要执行的方法
jobDetail.setTargetMethod("task");
return jobDetail;
}
// 配置触发器2
@Bean(name ="fetResultJobTrigger")
public CronTriggerFactoryBean thirdTrigger(JobDetail fetResultJobDetail) {
CronTriggerFactoryBean trigger =new CronTriggerFactoryBean();
trigger.setJobDetail(fetResultJobDetail);
// cron表达式
trigger.setCronExpression("5 0/5 9-23 * * ?");
return trigger;
}
// 配置Scheduler
@Bean(name ="scheduler")
public SchedulerFactoryBean schedulerFactory(Trigger initJobTrigger) {
SchedulerFactoryBean bean =new SchedulerFactoryBean();
// public SchedulerFactoryBean schedulerFactory(Trigger initJobTrigger, Trigger fetResultJobTrigger) {
// SchedulerFactoryBean bean = new SchedulerFactoryBean();
// 延时启动,应用启动1秒后
bean.setStartupDelay(10);
//用于quartz集群,QuartzScheduler 启动时更新己存在的Job,这样就不用每次修改targetObject后删除qrtz_job_details表对应记录了
bean.setOverwriteExistingJobs(true);
//用于quartz集群,加载quartz数据源
// bean.setDataSource(dataSource);
//用于quartz集群,加载quartz数据源配置
// bean.setQuartzProperties(quartzProperties());
//直接使用配置文件
bean.setConfigLocation(new ClassPathResource(QUARTZ_CONFIG));
// bean.setConfigLocation(new FileSystemResource(this.getClass().getResource("/quartz.properties").getPath()));
bean.setApplicationContextSchedulerContextKey("applicationContext");
// 注册触发器
bean.setTriggers(initJobTrigger);
// bean.setTriggers(initJobTrigger,fetResultJobTrigger);
return bean;
}
}
3.JOB任务:
@Configuration
@Component("initBjSession")
@EnableScheduling
public class InitBSessionimplements Serializable {
@Autowired
private BjServiceImpl bjService;
// public void task() {
public void task(JobExecutionContext context) {
System.out.println("-----"+ DateTimeUtil.getDateTime());
}
}
第二种实现方式,更加简洁好用:
* 文件名:QuartzConfig.java 版权:Copyright by www.poly.com 描述: 修改人:gogym 修改时间:2017年11月9日 跟踪单号: 修改单号:
* 修改内容:
*/
package com.poly.pay.configuration;
import java.io.IOException;
import java.text.ParseException;
import java.util.ArrayList;
import java.util.HashMap;
import java.util.List;
import java.util.Map;
import java.util.Set;
import org.quartz.JobDetail;
import org.quartz.JobKey;
import org.quartz.Scheduler;
import org.quartz.SchedulerException;
import org.quartz.Trigger;
import org.quartz.TriggerKey;
import org.quartz.impl.matchers.GroupMatcher;
import org.quartz.impl.triggers.CronTriggerImpl;
import org.springframework.beans.factory.annotation.Qualifier;
import org.springframework.context.annotation.Bean;
import org.springframework.context.annotation.Configuration;
import org.springframework.core.io.ClassPathResource;
import org.springframework.scheduling.quartz.CronTriggerFactoryBean;
import org.springframework.scheduling.quartz.JobDetailFactoryBean;
import org.springframework.scheduling.quartz.SchedulerFactoryBean;
import com.poly.pay.schedule.JobRefundWeichartBean;
@Configuration
public class QuartzConfig
{
// 配置文件路径
static final String QUARTZ_CONFIG = "properties/quartz.properties";
// 定时任务组名称
public static final String Quartz_Group_Name = "enjoyQuartzJobGroup";
//定时任务方法后缀
public static final String Quartz_Job_Suffix = "_job";
//定时任务触发器后缀
public static final String Quartz_Trigger_Suffix = "_trigger";
@Bean(name = "triggers")
public CronTriggerImpl[] createTriggers()
throws ParseException
{
List l =new ArrayList();
l.add(createTrigger(JobRefundWeichartBean.class, "0/20 * * * * ?"));
//l.add(createTrigger(JobRefundWeichartBean.class, "0/20 * * * * ?"));
//按你的需要添加多个任务:任务所在类.class cron表达式
return l.toArray(new CronTriggerImpl[l.size()]);
}
private JobDetail create(Class c)
{
JobDetailFactoryBean d =new JobDetailFactoryBean();
d.setDurability(true);
d.setRequestsRecovery(true);
d.setJobClass(c);
d.setName(c.getSimpleName() + Quartz_Job_Suffix);
d.setGroup(Quartz_Group_Name);
d.afterPropertiesSet();
JobDetail jd= d.getObject();
//jd.getJobDataMap().put("key", 123);//如果想通过jobDataMap传递值,在这里添加
return jd;
}
private CronTriggerImpl createTrigger(Class t, String cronExpression) throws ParseException {
CronTriggerFactoryBean c =new CronTriggerFactoryBean();
c.setJobDetail(create(t));
c.setCronExpression(cronExpression);
c.setName(t.getSimpleName() + Quartz_Trigger_Suffix);
c.setGroup(Quartz_Group_Name); c.afterPropertiesSet();
return (CronTriggerImpl)c.getObject();
}
@Bean(name = "schedulerFactoryBean")
public SchedulerFactoryBean schedulerFactoryBean(@Qualifier("triggers") CronTriggerImpl[] triggers)
throws IOException, ParseException, SchedulerException
{
SchedulerFactoryBean factory =new SchedulerFactoryBean();
// 用于quartz集群,QuartzScheduler,启动时更新己存在的Job,这样就不用每次修改targetObject后删除qrtz_job_details表对应记录了
factory.setOverwriteExistingJobs(true);
// QuartzScheduler 延时启动,应用启动完10秒后 QuartzScheduler 再启动
factory.setStartupDelay(10);
// 直接使用配置文件,用于quartz集群,加载quartz数据源配置
factory.setConfigLocation(new ClassPathResource(QUARTZ_CONFIG));
factory.setAutoStartup(true);
// 集群需要通过QuartzJobBean注入,需要设置上下文
factory.setApplicationContextSchedulerContextKey("applicationContext");
// 注册触发器
// factory.getScheduler().pauseAll();
factory.setTriggers(createTriggers());// 直接使用配置文件
// factory.setConfigLocation(new
// FileSystemResource(this.getClass().getResource("/quartz.properties").getPath()));
return factory;
}
/**
* 添加该方法的目的在于一个使用场景。如果代码中删除了不需要的定时任务,但是数据库中不会删除掉,会导致之前
* 的定时任务一直在运行,如果把定时任务依赖的类删除了,就会导致报错,找不到目标。所以配置动态删除任务
*/
@Bean
public String fulsh(@Qualifier("schedulerFactoryBean") SchedulerFactoryBean schedulerFactoryBean,
@Qualifier("triggers") CronTriggerImpl[] triggers)
throws SchedulerException
{
try
{
Scheduler s = schedulerFactoryBean.getScheduler();
if (null == s)
{
return "Scheduler is null";
}
// 最新配置的任务
List newTriNames =new ArrayList();
if (null != triggers)
{
for (CronTriggerImpl cronTriggerImpl : triggers)
{
newTriNames.add(cronTriggerImpl.getName());
}
}
// 现有数据库中已有的任务
Set myGroupTriggers = s.getTriggerKeys(GroupMatcher.triggerGroupEquals(Quartz_Group_Name));
if (null == myGroupTriggers || myGroupTriggers.size() == 0)
{
return "myGroupTriggers is null";
}
if (newTriNames != null && newTriNames.size() > 0)
{
for (TriggerKey triggerKey : myGroupTriggers)
{
String dbTriggerName = triggerKey.getName();
if (!newTriNames.contains(dbTriggerName))
{
// 暂停 触发器
s.pauseTrigger(triggerKey);
Trigger g = s.getTrigger(triggerKey);
JobKey jk =null;
if (null != g)
{
jk = g.getJobKey();
}
// 停止触发器
s.pauseTrigger(triggerKey);
// 注销 触发器
s.unscheduleJob(triggerKey);
if (null != jk)
{
// 暂停任务
s.pauseJob(jk);
// 删除任务
s.deleteJob(jk);
}
}
}
}
// 重要,如果不恢复所有,会导致无法使用
s.resumeAll();
}
catch (Exception e)
{
e.printStackTrace();
return "Exception:" + e.getMessage();
}
return "success";
}
}
任务类:
[java] view plain copy
/*
* 文件名:JobRefundWeichartBean.java 版权:Copyright by www.poly.com 描述: 修改人:gogym 修改时间:2017年12月28日 跟踪单号:
* 修改单号: 修改内容:
*/
package com.poly.pay.schedule;
import org.quartz.DisallowConcurrentExecution;
import org.quartz.JobExecutionContext;
import org.quartz.JobExecutionException;
import org.quartz.PersistJobDataAfterExecution;
import org.springframework.scheduling.quartz.QuartzJobBean;
// 1.修改数据,防止并发,2不允许并发执行
@PersistJobDataAfterExecution
@DisallowConcurrentExecution
//@Component
public class JobRefundWeichartBean extends QuartzJobBean {
//需要注入的类,如redis代理
private IRedisProxy redisProxy;
@Override
protected void executeInternal(JobExecutionContext arg0)
throws JobExecutionException {
//System.out.println("打印通过jobDataMap传递的值:"+arg0.getJobDetail().getJobDataMap().get("qqq"));
//需要使用的时候,通过SpringContextUtil获取spring托管的实例注入即可
redisProxy = SpringContextUtil.getBean(IRedisProxy.class);
System.out.println("执行方法");
}
}
注意:在任务类里面注入,不能通过@Autowired注解直接注入。因为任务类本身并没有被spring托管,所以注入是null。可以这样解决
1、加入@Component类注解,让spring托管。但这种方法某些环境下不一定能使用,不推荐
2、通过自定义SpringContextUtil类来注入问题:
SpringContextUtil工具类:(注意,这个类要@Component注册到spring(前提是这个类要能被spring 扫描到)。也可以通过代码注册,在@Configuration类里面加入@Bean即可,这样可以手动注册。二者选其一就行)
[plain] view plain copy
import org.springframework.beans.BeansException;
import org.springframework.beans.factory.NoSuchBeanDefinitionException;
import org.springframework.context.ApplicationContext;
import org.springframework.context.ApplicationContextAware;
import org.springframework.stereotype.Component;
/**
* 这个类是为了解决在普通类调用service的问题
*
* @ClassName SpringContextUtil
* @Description
* @author gogym [email protected]
* @date 2016-6-12
* @content OfflineMessageService offlineMessageService = (OfflineMessageService) SpringContextUtil
* .getBean("offlineMessageService");
*/
@Component
public class SpringContextUtil implements ApplicationContextAware
{
private static ApplicationContext applicationContext; // Spring应用上下文
// 下面的这个方法上加了@Override注解,原因是继承ApplicationContextAware接口是必须实现的方法
@Override
public void setApplicationContext(ApplicationContext applicationContext)
throws BeansException
{
SpringContextUtil.applicationContext = applicationContext;
}
public static ApplicationContext getApplicationContext()
{
return applicationContext;
}
public static Object getBean(String name)
throws BeansException
{
return applicationContext.getBean(name);
}
public static Object getBean(String name, Class requiredType)
throws BeansException
{
return applicationContext.getBean(name, requiredType);
}
public static T getBean(Class clazz)
throws BeansException
{
return applicationContext.getBean(clazz);
}
public static boolean containsBean(String name)
{
return applicationContext.containsBean(name);
}
public static boolean isSingleton(String name)
throws NoSuchBeanDefinitionException
{
return applicationContext.isSingleton(name);
}
public static Class getType(String name)
throws NoSuchBeanDefinitionException
{
return applicationContext.getType(name);
}
public static String[] getAliases(String name)
throws NoSuchBeanDefinitionException
{
return applicationContext.getAliases(name);
}
}
启动即可看到数据库插入了任务相关的信息。集群完成。
需要注意的是:
当你运行水平集群时,时钟应当要同步,以免出现离奇且不可预知的行为。假如时钟没能够同步,Scheduler 实例将对其他节点的状态产生混乱。有几种简单的方法来保证时钟何持同步,而且也没有理由不这么做。最简单的同步计算机时钟的方式是使用某一个 Internet 时间服务器(Internet Time Server ITS)。
常用解决方案:
服务器中配置时间同步只要一台服务器同步互联网的时钟服务器,其它的服务以这台为时钟服务器!
Linux配置(局域网的客户端)
1、安装
yum install ntp (centos的安装方法)
2、先运行 # ntpdate 192.168.1.33 同步一次.
3、然后通过crontab计时器配置一个定时同步的任务,例如每月一号零点零分同步一次.代码如下:
# crontab -e //添下面一行,新建的定时任务文件保存在/var/spool/cron/下,以创建人的用户名命名
0 0 1 * * /etc/ntp/ntprsync.sh//每小时同步一次。
4、创建文件
# vi ntprsync.sh//内容如下#!/bin/sh/usr/sbin/ntpdate 192.168.1.33//时钟服务器的IP/sbin/hwclock –w
5、设置权限 chmod 777 ntprsync.sh
6、注意防火墙的设置.
7、成功。
8、服务启动。
/sbin/service crond start //启动服务/sbin/service crond stop //关闭服务/sbin/service crond restart //重启服务/sbin/service crond reload //重新载入配置
转载自https://blog.csdn.net/KokJuis/article/details/78526709


