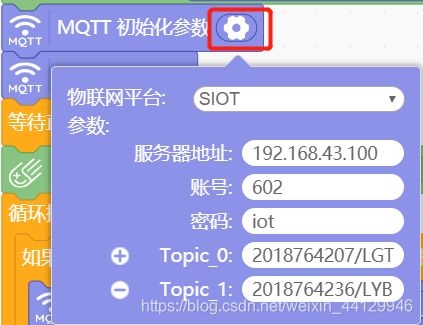
【实验一】实现sIoT配置并实现sIoT上mqtt消息的通讯。
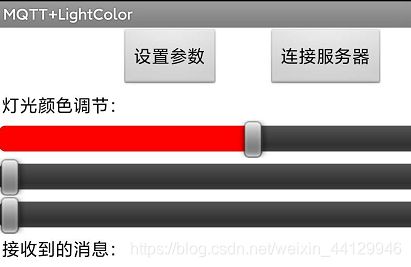
【实验二】通过AppInventor结合sIoT实现手机app控制掌控板的灯和显示内容。
sIoT可以在局域网上实现mqtt消息的通讯。借助sIoT可以通过手机app实现局域网内的设备操控。
硬件:掌控板
软件:Mind+
点击下载实验要用的资源
提取码:q82m
1、下载SIoT1.2。
2、打开config.json,记录账号602,密码iot。
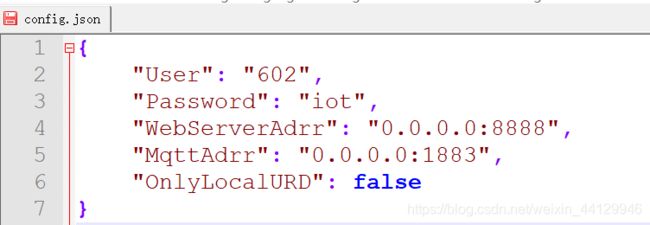
3、打开SIoT_windows_1_2.exe。
4、搜索cmd进入命令提示符窗口,输入ipconfig,记录无线局域网适配器WLAN的IPv4地址。
5、打开浏览器输入网址“IPv4地址:8888”,比如我的是192.168.43.100:8888。进入SIoT后输入账号602,密码iot登录。
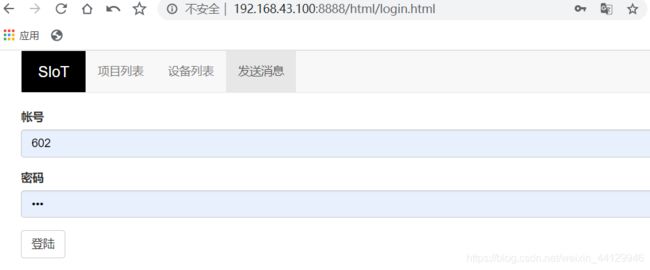
6、发送消息创建两个主题(项目ID/设备名)。
1、打开Mind+,连接掌控板,配置好图形模块代码,填写电脑连接的热点的名称以及密码。上传到设备,将代码上传到掌控板。另一块掌控板配置同理。
#include
#include
// 函数声明
void obloqMqttEventT1(String& message);
// 静态常量
const String topics[5] = {
"2018764207/LGT","2018764236/LYB","","",""};
const MsgHandleCb msgHandles[5] = {
NULL,obloqMqttEventT1,NULL,NULL,NULL};
// 创建对象
DFRobot_Iot myIot;
// 主程序开始
void setup() {
mPython.begin();
myIot.setMqttCallback(msgHandles);
myIot.wifiConnect("lyb", "lyb1234567890;");
while (!myIot.wifiStatus()) {
yield();}
display.setCursorLine(1);
display.printLine(myIot.getWiFiLocalIP());
myIot.init("192.168.43.100","602","","iot", topics, 1883);
myIot.connect();
while (!myIot.connected()) {
yield();}
display.setCursorLine(2);
display.printLine("Mqtt is OK!");
}
void loop() {
if ((buttonA.isPressed())) {
display.fillScreen(0);
myIot.publish(topic_0, "你好!");
display.setCursorLine(3);
display.printLine("发送成功");
}
}
// 事件回调函数
void obloqMqttEventT1(String& message) {
display.setCursorLine(4);
display.printLine(message);
rgb.write(0, 0x0000FF);
}
显示出IP地址以及“Mqtt is OK”表示WiFi以及SIoT连接成功。
掌控板1发送消息测试:按下A键,掌控板1会清屏并显示“发送成功”,掌控板2会显示“你好”。
掌控板1接收消息测试:掌控板2发送消息过来时,掌控板1会亮蓝灯并在第四行显示“开灯”。
详细步骤见【实验一】
1、打开Mind+,连接掌控板,配置好图形模块代码,填写电脑连接的热点的名称以及密码。将代码上传到掌控板。
C代码:
#include
#include
#include
// 动态变量
volatile float mind_n_DouHao1, mind_n_DouHao2, mind_n_R, mind_n_G, mind_n_B;
// 函数声明
void obloqMqttEventT0(String& message);
uint32_t rgbToColor(uint8_t r, uint8_t g, uint8_t b);
// 静态常量
const uint8_t imageMatrix[][350] = {
{
0x0,0x0,0x0,0x1f,0x80,0x0,0x0,0x0,0x0,0x0,0x30,0xc0,0x0,0x0,0x0,0x0,0x0,0x60,0x60,0x0,0x0,0x0,0x0,0x0,0x40,0x20,0x0,0x0,0x0,0x0,0x0,0x40,0x20,0x0,0x0,0x0,0x0,0x0,0x40,0x20,0x0,0x0,0x0,0x0,0x0,0x60,0x60,0x0,0x0,0x0,0x0,0x0,0x30,0xc0,0x0,0x0,0x0,0x0,0x0,0x33,0x80,0x0,0x0,0x0,0x1e,0x0,0x22,0x0,0x0,0x0,0x0,0x33,0x80,0x62,0x0,0x3c,0x0,0x0,0x60,0xc0,0x46,0x0,0xee,0x0,0x0,0x40,0xc0,0xc6,0x1,0x83,0x0,0x0,0xc0,0x40,0x86,0x1,0x1,0x80,0x0,0x40,0xc1,0x8c,0x1,0x1,0x80,0x0,0x7c,0x9f,0xff,0x1,0x1,0x80,0x0,0x37,0x98,0x3,0x81,0xa3,0x0,0x0,0x24,0x30,0x0,0x83,0x26,0x0,0x0,0x64,0x30,0x0,0xc6,0x7c,0x0,0x0,0xc7,0xff,0xff,0xf8,0x40,0x0,0x7f,0xff,0xff,0xff,0xff,0xfc,0x0,0xfe,0x0,0x0,0x0,0x1,0xff,0xc0,0xc0,0x0,0x0,0x0,0x0,0x1,0xc0,0xc0,0x0,0x0,0x0,0x0,0x0,0xc0,0xc0,0x0,0x0,0x0,0x0,0x0,0xc0,0xc0,0x0,0x0,0x0,0x0,0x0,0xc0,0xc0,0x0,0x0,0x0,0x0,0x0,0xc0,0xc0,0x3f,0xff,0xff,0xe0,0x1,0x80,0xdc,0x0,0x0,0x0,0x3,0xf9,0x80,0xcf,0xff,0xff,0xff,0xfc,0x5,0x80,0xcb,0xff,0xff,0xff,0xff,0xf5,0x80,0xcb,0xf8,0xff,0xff,0x9f,0xf9,0x80,0xcb,0xf8,0x7f,0xff,0xf,0xf9,0x80,0xcb,0xf8,0x7f,0xff,0xf,0xe9,0x80,0xcb,0xf8,0x7f,0xff,0xf,0xe9,0x80,0x4b,0xf8,0x7f,0xff,0xf,0xe9,0x80,0x68,0x7c,0xff,0xff,0x1f,0xf1,0x80,0x63,0x87,0xff,0xff,0xff,0x93,0x0,0x60,0x38,0x7f,0xff,0xf0,0x33,0x0,0x60,0x3,0x8f,0xfe,0xf,0x83,0x0,0x60,0x0,0x38,0x3,0xe0,0x3,0x0,0x60,0x0,0x7,0xf8,0x0,0x3,0x0,0x60,0x0,0x0,0x0,0x0,0x3,0x0,0x60,0x0,0x0,0x0,0x0,0x3,0x0,0x60,0x0,0x0,0x0,0x0,0x3,0x0,0x60,0x0,0x0,0x0,0x0,0x6,0x0,0x60,0x0,0x0,0x0,0x0,0x6,0x0,0x60,0x0,0x0,0x0,0x0,0x6,0x0,0x7f,0xff,0xff,0xff,0xff,0xfe,0x0,0x7f,0xff,0xff,0xff,0xff,0xfe,0x0}
};
const String topics[5] = {
"2018764236/LYB","","","",""};
const MsgHandleCb msgHandles[5] = {
obloqMqttEventT0,NULL,NULL,NULL,NULL};
// 创建对象
DFRobot_Iot myIot;
// 主程序开始
void setup() {
mPython.begin();
myIot.setMqttCallback(msgHandles);
display.fillScreen(0);
display.drawImage(39, 7, 50, 50, imageMatrix[0]);
myIot.wifiConnect("lyb", "lyb1234567890;");
while (!myIot.wifiStatus()) {
yield();}
display.fillScreen(0);
display.setCursor(0, 0);
display.print("WIFI已连接");
myIot.init("192.168.43.100","602","","iot", topics, 1883);
myIot.connect();
while (!myIot.connected()) {
yield();}
display.fillScreen(0);
display.setCursor(0, 0);
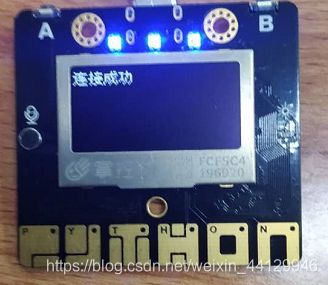
display.print("连接成功");
}
void loop() {
}
// 事件回调函数
void obloqMqttEventT0(String& message) {
mind_n_DouHao1 = (dfstring.indexOf(",",message));
mind_n_DouHao2 = (dfstring.lastIndexOf(",",message));
display.setCursor(0, 44);
display.print("");
mind_n_R = (String((dfstring.substring(message,0,1,0,mind_n_DouHao1))).toInt());
display.setCursor(40, 44);
display.print("");
mind_n_G = (String((dfstring.substring(message,0,(mind_n_DouHao1 + 1),0,mind_n_DouHao2))).toInt());
display.setCursor(80, 44);
display.print("");
mind_n_B = (String((dfstring.substring(message,0,(mind_n_DouHao2 + 1),0,(String(message).length())))).toInt());
rgb.write(-1, rgbToColor(round(mind_n_R), round(mind_n_G), round(mind_n_B)));
}
// 静态函数
uint32_t rgbToColor(uint8_t r, uint8_t g, uint8_t b)
{
return (uint32_t)((((uint32_t)r<<16) | ((uint32_t)g<<8)) | (uint32_t)b);
}
1、点击跳转到:MIT App Inventor2
2、使用QQ登录
3、导入lightColorCtr.aia
4、切换到逻辑设计模式
5、配置参数
6、打包APK安装到手机上。