创建 maven 项目
-
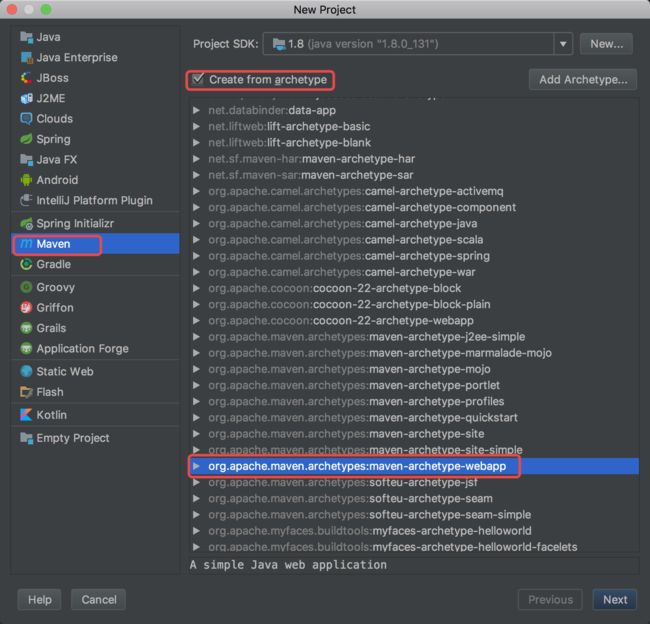
File->New->Module,进入创建项目窗口,如图选择
- 点击
Next,填写GroupId、ArtifactId和Version
注:
GroupID:
项目组织唯一的标识符,实际对应 Java 的包的结构,是 main 目录里 Java 的目录结构。一般是域名的反写,也作为项目中类的包名。
ArtifactID:
项目的唯一的标识符,实际对应项目的名称,就是项目根目录的名称。
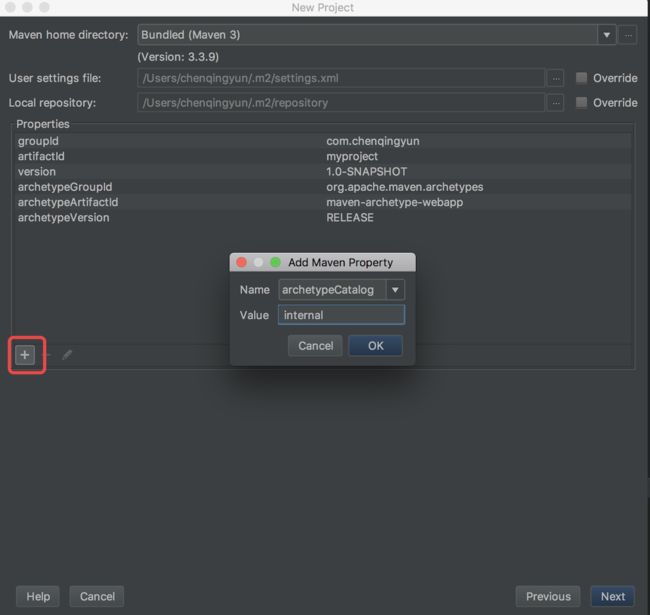
- 下一步,在
Properties中添加一个参数archetypeCatalog=internal
注: maven 的 jar 包需要去 maven 的中央仓库下载,访问国外的服务器,墙的存在速度很慢的,所以添加参数
archetypeCatalog=internal,表示仅使用内部元数据。
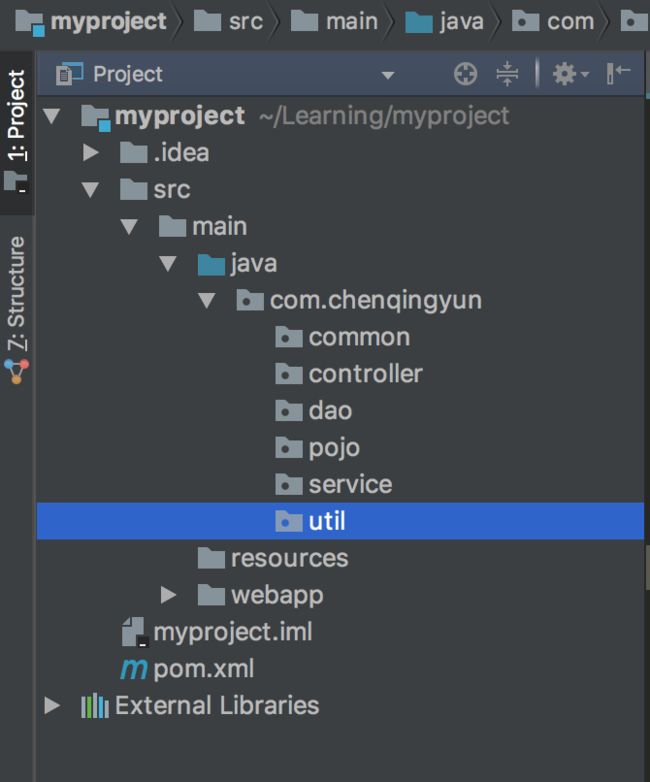
- Next,然后 finish,maven 项目就创建好了,如下就是整个项目的结构了
- 在
src/main下创建java文件夹,点击Project Structrue或者快捷键command + ;调出窗口。
对目录进行标注,将java目录标注为sources标签
对于这几个目录,网上的说明是这样的:
Sources: 一般用于标注类似 src 这种可编译目录。有时候我们不单单项目的 src 目录要可编译,还有其他一些特别的目录也许我们也要作为可编译的目录,就需要对该目录进行此标注。只有 Sources 这种可编译目录才可以新建 Java 类和包。
Tests: 一般用于标注可编译的单元测试目录。在规范的 maven 项目结构中,顶级目录是 src,maven 的 src 我们是不会设置为 Sources 的,而是在其子目录 main 目录下的 java 目录,我们会设置为 Sources。而单元测试的目录是 src - test - java,这里的 java 目录我们就会设置为 Tests,表示该目录是作为可编译的单元测试目录。一般这个和后面几个我们都是在 maven 项目下进行配置的,但是我这里还是会先说说。从这一点我们也可以看出 IntelliJ IDEA 对 maven 项目的支持是比较彻底的。
Resources: 一般用于标注资源文件目录。在 maven 项目下,资源目录是单独划分出来的,其目录为:src - main -resources,这里的 resources 目录我们就会设置为 Resources,表示该目录是作为资源目录。资源目录下的文件是会被编译到输出目录下的。
Test Resources: 一般用于标注单元测试的资源文件目录。在 maven 项目下,单元测试的资源目录是单独划分出来的,其目录为:src - test -resources,这里的 resources 目录我们就会设置为 Test Resources,表示该目录是作为单元测试的资源目录。资源目录下的文件是会被编译到输出目录下的。
Excluded: 一般用于标注排除目录。被排除的目录不会被 IntelliJ IDEA 创建索引,相当于被 IntelliJ IDEA 废弃,该目录下的代码文件是不具备代码检查和智能提示等常规代码功能。
通过上面的介绍,我们知道对于非 maven 项目我们只要会设置 src 即可。(引用自 http://wiki.jikexueyuan.com/project/intellij-idea-tutorial/eclipse-java-web-project-introduce.html)
- 在
java目录下新建包,新建controller层、dao层、pojo层、service层等层。
maven 项目的创建工作基本完成。
pom.xml 文件配置
  4.0.0
  com.chenqingyun
  myproject
  war
  1.0-SNAPSHOT
  myproject Maven Webapp
  http://maven.apache.org


        UTF-8
        UTF-8
        UTF-8


        4.0.0.RELEASE
        3.4.1
        1.3.0


            org.apache.tomcat
            tomcat-servlet-api
            7.0.64


            org.springframework
            spring-webmvc


            ${org.spring.version}


            org.springframework
            spring-oxm
            ${org.spring.version}


            org.springframework
            spring-jdbc
            ${org.spring.version}


            org.springframework
            spring-tx
            ${org.spring.version}


            org.springframework
            spring-test
            ${org.spring.version}


            org.aspectj
            aspectjweaver
            1.7.3


            org.aspectj
            aspectjrt
            1.6.11


            org.mybatis
            mybatis-spring
            ${org.mybatis.spring.version}


            org.mybatis
            mybatis
            ${org.mybatis.version}


            org.codehaus.jackson
            jackson-mapper-asl
            1.9.12


            commons-dbcp
            commons-dbcp
            1.4


            ch.qos.logback
            logback-classic
            1.1.2
            compile


            ch.qos.logback
            logback-core
            1.1.2
            compile


            mysql
            mysql-connector-java
            5.1.44


            com.google.guava
            guava
            20.0


            org.apache.commons
            commons-lang3
            3.5


            commons-collections
            commons-collections
            3.2.1


            junit
            junit
            4.12


            joda-time
            joda-time
            2.3


            org.hashids
            hashids
            1.0.1


            commons-net
            commons-net
            3.1


            commons-fileupload
            commons-fileupload
            1.2.2


            commons-io
            commons-io
            2.0.1


            com.github.pagehelper
            pagehelper
            4.1.0


            com.github.miemiedev
            mybatis-paginator
            1.2.17


            com.github.jsqlparser
            jsqlparser
            0.9.4


            commons-codec
            commons-codec
            1.10


            commons-configuration
            commons-configuration
            1.10


            commons-lang
            commons-lang
            2.6


            commons-logging
            commons-logging
            1.1.1


            com.google.zxing
            core
            2.1


            com.google.code.gson
            gson
            2.3.1


            org.hamcrest
            hamcrest-core
            1.3


            redis.clients
            jedis
            2.9.0


    myproject


              org.mybatis.generator
              mybatis-generator-maven-plugin
              1.3.2

                  true
                  true


              org.apache.maven.plugins
              maven-compiler-plugin


                  1.8
                  1.8
                  UTF-8


                      ${project.basedir}/src/main/webapp/WEB-INF/lib
根据实际需要添加依赖
Mybatis 配置
Mybatis Generator配置
代码生成器,自动生成 pojo,dao,Mapping 中的文件。
pom.xml 文件中配置插件
              org.mybatis.generator
              mybatis-generator-maven-plugin
              1.3.2

                  true
                  true
配置数据库连接配置文件 datasource.properties
在 resources 目录下新建 datasource.properties 文件
# 配置下载的驱动包的位置
db.driverLocation = ./library/mysql-connector-java-5.1.44-bin.jar

# db.driverClassName = oracle.jdbc.driver.OracleDriver
db.driverClassName = com.mysql.jdbc.Driver

# db.url=jdbc:mysql://数据库IP:数据库 Port/database?characterEncoding=utf-8
db.url = jdbc:mysql://localhost:3306/mydb?characterEncoding=utf-8&useSSL=true
db.username = mydb
db.password = 123456

db.initialSize = 20
db.maxActive = 50
db.maxIdle = 20
db.minIdle = 10
db.maxWait = 10
db.defaultAutoCommit = true
db.minEvictableIdleTimeMillis = 3600000
配置 generatorConfig.xmll 文件
这里就使用默认文件名,在 resources 目录下新建 generatorConfig.xml 文件。
生成代码
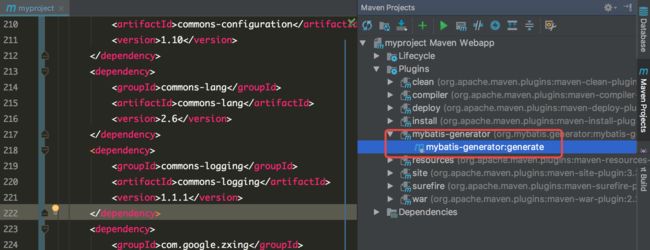
右侧菜单 Maven Project 中 Plugins 下双击 mybatis-generator 执行生成代码
查看执行结果
执行成功,在 pojo,dao,mappers 目录下就会有生成的文件了。
Mybatis-Plugin 安装
Mybatis-Plugin 插件的作用
提供 Service 与 Mapper 接口的导航,提供 Mapper 接口与配置文件中对应 SQL 的导航
自动检查 Mapper XML 文件中的 id 冲突
自动检查 Mapper XML 文件中错误的属性值
等
- 点击
preference->plugins->Browse Repository
搜索Mybatis-Plugin,左侧点击install安装插件
然后重启 IDEA。
Mybatis-PageHelper 分页插件
- 在
pom.xml文件中添加依赖
    com.github.pagehelper
    pagehelper
    4.1.0


    com.github.miemiedev
    mybatis-paginator
    1.2.17


    com.github.jsqlparser
    jsqlparser
    0.9.4
Spring、Spring MVC 配置
配置 Spring 容器
resources 目录下新建 applicationContext.xml 文件
- 配置 applicationContext-datasource.xml 文件
新建文件,配置如下:
                classpath:datasource.properties


                            dialect=mysql
配置 Spring MVC
使用默认文件名和路径,在./src/main/webapp/WEB-INF 目录下新建 dispatcher-servlet.xml 文件
                        text/plain;charset=UTF-8
                        text/html;charset=UTF-8


                        application/json;charset=UTF-8
配置 web.xml
./src/main/webapp/WEB-INF 目录下
    Archetype Created Web Application


        characterEncodingFilter
        org.springframework.web.filter.CharacterEncodingFilter

            encoding
            UTF-8


            forceEncoding
            true


        characterEncodingFilter
        /*


        org.springframework.web.context.request.RequestContextListener


        org.springframework.web.context.ContextLoaderListener


        contextConfigLocation

            classpath:applicationContext.xml


        dispatcher
        org.springframework.web.servlet.DispatcherServlet
        1


        dispatcher
        *.do
配置 logback.xml 文件
resources 目录下新建 logback.xml 文件
        UTF-8

            [%d{HH:mm:ss.SSS}][%p][%c{40}][%t] %m%n


            DEBUG


        ${CATALINA_HOME}/logs/myproject.log

            ${CATALINA_HOME}/logs/myproject.log.%d{yyyy-MM-dd}.gz
            true
            10


            [%d{HH:mm:ss.SSS}][%p][%c{40}][%t] %m%n


        ${CATALINA_HOME}/logs/error.log

            ${CATALINA_HOME}/logs/error.log.%d{yyyy-MM-dd}.gz
            true
            10


            [%d{HH:mm:ss.SSS}][%p][%c{40}][%t] %m%n


            ERROR
            ACCEPT
            DENY
Tomcat Server 配置
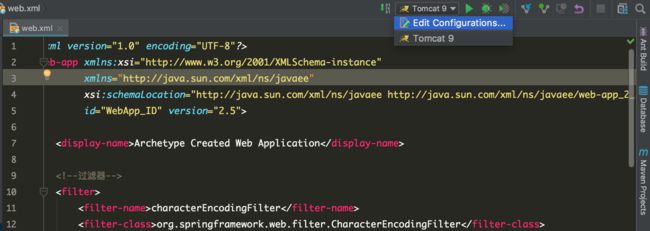
- 点击
Edit Configurations
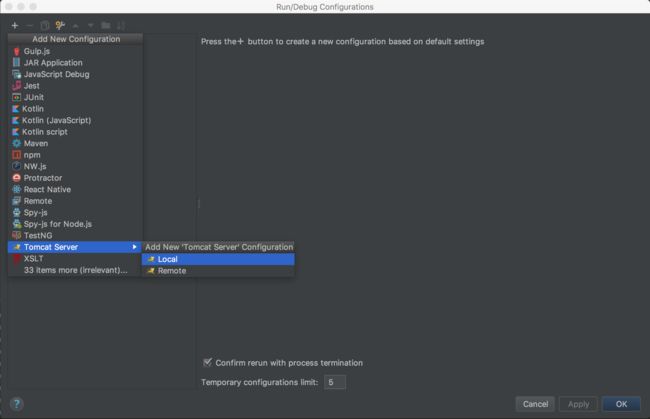
- 点击
+号,选择Tomcat Server->Local
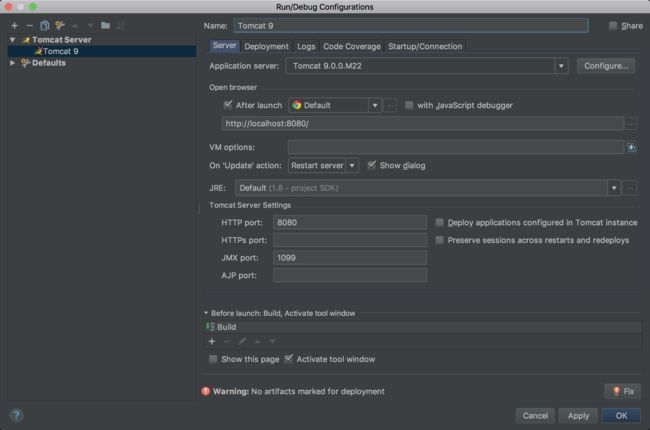
- 点击
Configure添加 Tomact,Tomcat Home选择根文件夹
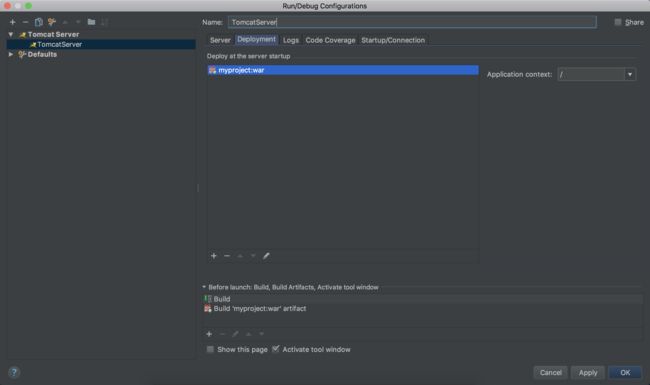
- 切换到
Deployment下,点击+号,选择Artifact,添加war包
点击 OK 就好了。
运行看看,Tomcat 启动成功那 Tomcat Server 就配置没问题了。
Git 初始化
在
Termianl中输入git init初始化 git 项目创建
.gitignore文件
在Termianl中输入touch .gitignore创建文件,添加配置
*.calss

#package file
*.war
*.ear

#kdiff3 ignore
*.orig

#maven ignore
target/

#idea
.idea/
/idea/
*.ipr
*.iml
*.iws

#temp file
*.log
*.cache
*.diff
*.patch
*.tmp

#system ignore
.DS_Store
Thumbs.db
- 提交项目
git add .添加文件,git commit -m "first commit"提交
[master (root-commit) 61cd96b] first commit
 4 files changed, 62 insertions(+)
 create mode 100644 .gitignore
 create mode 100644 pom.xml
 create mode 100644 src/main/webapp/WEB-INF/web.xml
 create mode 100644 src/main/webapp/index.jsp
提交成功
- 关联 GitHub 上的仓库
在GitHub上创建与项目同名的仓库,复制远程仓库地址。输入git remote add origin+ 远程仓库地址。
git brach查看分支,显示在master分支上
$ git remote add origin [email protected]:chenqingyun/myproject.git
$ git branch
* master
- 推送到远程仓库
git push -u origin master
$ git push -u origin master
To github.com:chenqingyun/myproject.git
 ! [rejected]        master -> master (fetch first)
error: failed to push some refs to '[email protected]:chenqingyun/myproject.git'
hint: Updates were rejected because the remote contains work that you do
hint: not have locally. This is usually caused by another repository pushing
hint: to the same ref. You may want to first integrate the remote changes
hint: (e.g., 'git pull ...') before pushing again.
hint: See the 'Note about fast-forwards' in 'git push --help' for details.
告诉我们要先执行git pull命令,将远程仓库上的先获取到本地。
执行 git pull
$ git pull
warning: no common commits
remote: Counting objects: 3, done.
remote: Total 3 (delta 0), reused 0 (delta 0), pack-reused 0
Unpacking objects: 100% (3/3), done.
From github.com:chenqingyun/myproject
 * [new branch]      master     -> origin/master
There is no tracking information for the current branch.
Please specify which branch you want to merge with.
See git-pull(1) for details.

    git pull

If you wish to set tracking information for this branch you can do so with:

    git branch --set-upstream-to=origin/ master
成功后再执行 git push -u origin master 命令。
To github.com:chenqingyun/myproject.git
 ! [rejected]        master -> master (non-fast-forward)
error: failed to push some refs to '[email protected]:chenqingyun/myproject.git'
hint: Updates were rejected because the tip of your current branch is behind
hint: its remote counterpart. Integrate the remote changes (e.g.
hint: 'git pull ...') before pushing again.
hint: See the 'Note about fast-forwards' in 'git push --help' for details.
还是失败,说当前分支是落后的,目前远程仓库上还什么都没有,我们可以强制 push ,覆盖掉远程仓库上的内容。
执行 git push -u -f origin master
Counting objects: 10, done.
Delta compression using up to 4 threads.
Compressing objects: 100% (7/7), done.
Writing objects: 100% (10/10), 1.15 KiB | 1.15 MiB/s, done.
Total 10 (delta 0), reused 0 (delta 0)
To github.com:chenqingyun/myproject.git
 + 6138854...61cd96b master -> master (forced update)
Branch master set up to track remote branch master from origin.
提示成功,可以去 GitHub 上刷新下仓库看看。
git 项目的初始化就完成了。
-
创建分支
-
git branch -r查看远程分支,在origin/master上,即主干分支 - 在
master基础上创建一个v1.0的分支,输入git checkout -b v1.0 origin/master
Branch v1.0 set up to track remote branch master from origin.
Switched to a new branch 'v1.0'
分支切换成功,执行
git branch查看本地分支,是v1.0- 推送分支,执行
git push origin HEAD -u
Total 0 (delta 0), reused 0 (delta 0)
To github.com:chenqingyun/myproject.git
* [new branch]      HEAD -> v1.0
Branch v1.0 set up to track remote branch v1.0 from origin.
远程仓库上就会有这个分支了
-
