RabbitMQ一条龙服务(安装教程,工程搭建,附源码)
前言
项目中需要集成消息队列实现部分业务需求,这次忙里偷闲,将逐步讲解RabbitMQ从搭建到应用的全流程,适合初学,不涉及业务需求,只说基础用于记录分享.
以下部分资料来源网络:
MQ全称为Message Queue,消息队列是应用程序和应用程序之间的通信方法。
-
为什么使用MQ?
在项目中,可将一些无需即时返回且耗时的操作提取出来,进行异步处理,而这种异步处理的方式大大的节省了服务器的请求响应时间,从而提高了系统的吞吐量。
-
开发中消息队列通常有如下应用场景:
1、任务异步处理
将不需要同步处理的并且耗时长的操作由消息队列通知消息接收方进行异步处理。提高了应用程序的响应时间。
2、应用程序解耦合
MQ相当于一个中介,生产方通过MQ与消费方交互,它将应用程序进行解耦合。
3、削峰填谷
如订单系统,在下单的时候就会往数据库写数据。但是数据库只能支撑每秒1000左右的并发写入,并发量再高就容易宕机。低峰期的时候并发也就100多个,但是在高峰期时候,并发量会突然激增到5000以上,这个时候数据库肯定卡死了。
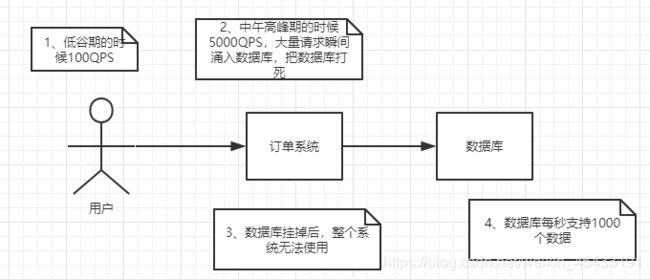
消息被MQ保存起来了,然后系统就可以按照自己的消费能力来消费,比如每秒1000个数据,这样慢慢写入数据库,这样就不会卡死数据库了。
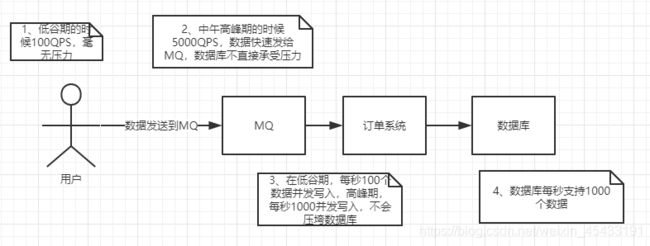
但是使用了MQ之后,限制消费消息的速度为1000,但是这样一来,高峰期产生的数据势必会被积压在MQ中,高峰就被“削”掉了。但是因为消息积压,在高峰期过后的一段时间内,消费消息的速度还是会维持在1000QPS,直到消费完积压的消息,这就叫做“填谷”

1.RabbitMQ:
RabbitMQ是由erlang语言开发,基于AMQP(Advanced Message Queue 高级消息队列协议)协议实现的消息队列,它是一种应用程序之间的通信方法,消息队列在分布式系统开发中应用非常广泛。
RabbitMQ官方地址:http://www.rabbitmq.com/
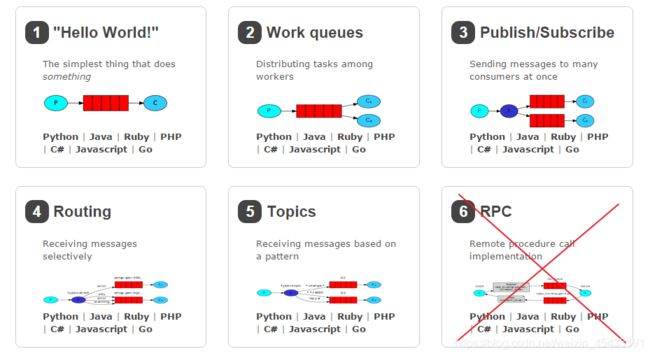
RabbitMQ提供了6种模式:1.简单模式,2.work模式,3.Publish/Subscribe发布与订阅模式,4.Routing路由模式,5.Topics主题模式,6.RPC远程调用模式(远程调用,不太算MQ;暂不作介绍);
官网对应模式介绍:https://www.rabbitmq.com/getstarted.html
1.2AMQP 和 JMS
MQ是消息通信的模型;实现MQ的大致有两种主流方式:AMQP、JMS。
1.3AMQP
AMQP是一种协议,更准确的说是一种binary wire-level protocol(链接协议)。这是其和JMS的本质差别,AMQP不从API层进行限定,而是直接定义网络交换的数据格式。
1.3 JMS
JMS即Java消息服务(JavaMessage Service)应用程序接口,是一个Java平台中关于面向消息中间件(MOM)的API,用于在两个应用程序之间,或分布式系统中发送消息,进行异步通信。
1.4 AMQP 与 JMS 区别
- JMS是定义了统一的接口,来对消息操作进行统一;AMQP是通过规定协议来统一数据交互的格式
- JMS限定了必须使用Java语言;AMQP只是协议,不规定实现方式,因此是跨语言的。
- JMS规定了两种消息模式;而AMQP的消息模式更加丰富
1.5 消息队列产品
市场上常见的消息队列有如下:
- ActiveMQ:基于JMS
- ZeroMQ:基于C语言开发
- RabbitMQ:基于AMQP协议,erlang语言开发,稳定性好
- RocketMQ:基于JMS,阿里巴巴产品
- Kafka:类似MQ的产品;分布式消息系统,高吞吐量
第一节:RabbitMQ的安装(本章示例Linux下的安装步骤)
如果你想安装在Windows上,可以百度一波,安装方法网上一抓一把
Linux需要安装在虚拟机上:http://www.51xiazai.cn/soft/2062.htm
Linux安装镜像文件(如果你按照我的来弄,下载CentOS6.1):https://blog.csdn.net/qq_41426326/article/details/93189855
最后打包下载以下全部文件:https://pan.baidu.com/s/1ScyO_3hzjp3mWpBx-_If2Q 提取码: wvu2
TS:因为项目限定要求3.8.8的RabbitMQ和22.3的erlang版本,版本的对应关系可以去官网了解
上传以下文件到Linux下:
esl-erlang_22.3-1_centos_6_amd64.rpm
socat-1.7.3.2-1.el6.lux.x86_64.rpm
rabbitmq-server-3.8.8-1.el6.noarch.rpm
走完以上流程我则默认你已经将linux安装完毕,并且已经将百度云盘下载的文件上传到了Linux,如果你没有上传或不知道上传,请参考Linux命令:https://pan.baidu.com/s/17PPhHqnXALfmDQDx4oF4eQ 提取码: 2wee
1.安装依赖环境
在线安装依赖环境:可能需要花费一些时间
yum install build-essential openssl openssl-devel unixODBC unixODBC-devel make gcc gcc-c++ kernel-devel m4 ncurses-devel tk tc xz
若安装提示:
warning: *:
Header V4 RSA/SHA256 Signature, key ID a14f4fca: NOKEY
解决的方法就是在rpm 语句后面加上 –force --nodeps
即原本为 rpm -ivh *.rpm 现在改成 rpm -ivh *.rpm --force --nodeps就可以了。nodeps的意思是忽视依赖关系。因为各个软件之间会有多多少少的联系。有了这两个设置选项就忽略了这些依赖关系,强制安装或者卸载.
2.安装Erlang
# 安装
rpm -ivh erlang-18.3-1.el7.centos.x86_64.rpm
3.安装RabbitMQ
# 安装
rpm -ivh socat-1.7.3.2-5.el7.lux.x86_64.rpm

# 安装
rpm -ivh rabbitmq-server-3.6.5-1.noarch.rpm
4.开启管理界面
# 开启管理界面
rabbitmq-plugins enable rabbitmq_management
5.注意了: 设置配置文件(有可能没有配置文件rabbitmq.config,我当时就是死活找不到这个文件),但是你下载rabbitmq的时候我提供了这个文件,将这个文件丢到这个目录下:
cd /etc/rabbitmq/
6.启动(注意关闭防火墙)
service rabbitmq-server start # 启动服务
service rabbitmq-server stop # 停止服务
service rabbitmq-server restart # 重启服务
第二节:配置虚拟主机及用户
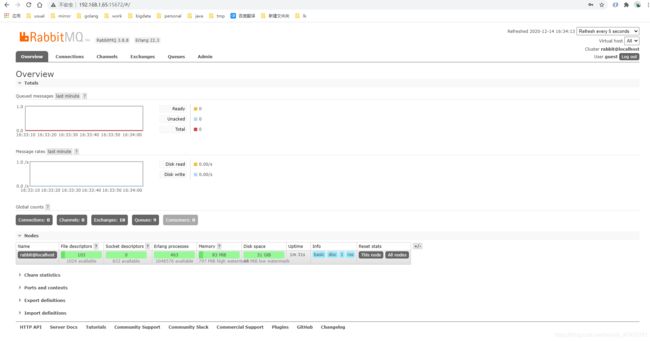
RabbitMQ在安装好后,可以访问http://ip地址:15672 (Linux下使用ifconfig命令查询)
其自带了guest/guest的用户名和密码
登录后效果如下:
用户角色设置详细操作请看传送门:https://www.cnblogs.com/zwwhnly/p/10918665.html
第三节:RabbitMQ入门
(注意了,以下代码可以copy过去用,但是有些参数配置必须写成你自己的,比如ip用户名密码之类的)
步骤:
        <dependency>
            <groupId>com.rabbitmqgroupId>
            <artifactId>amqp-clientartifactId>
            <version>5.6.0version>
        dependency>
使用IDEA创建maven工程,使用了jdk1.8,在工程中的pom.xml文件中添加了上述的依赖
1. 入门工程-生产者
目标:编写消息生产者代码,发送消息到队列
分析:
入门工程:生产者发送消息到RabbitMQ的队列(simple_queue);消费者可以从队列中获取消息。可以使用RabbitMQ的简单模式(simple)。
生产者实现发送消息的步骤:
- 创建连接工厂(设置RabbitMQ的连接参数)
- 创建连接
- 创建频道
- 声明队列
- 发送消息
- 关闭资源
代码:
package com.lk;

import com.rabbitmq.client.Channel;
import com.rabbitmq.client.Connection;
import com.rabbitmq.client.ConnectionFactory;


/**
 * 消息生产者
 */
public class Producer {

    public static void main(String[] args) throws Exception {

        // 创建连接工厂
        ConnectionFactory connectionFactory = new ConnectionFactory();
        // 设置连接参数
        // 1.设置ip
        connectionFactory.setHost("192.168.1.60");
        // 2.设置端口
        connectionFactory.setPort(5672);
        // 3.设置虚拟机
        connectionFactory.setVirtualHost("/lk");
        // 4.设置用户名
        connectionFactory.setUsername("lk");
        // 5.设置密码
        connectionFactory.setPassword("lk");
        // 创建连接
        Connection connection = connectionFactory.newConnection();
        // 创建Channel
        Channel channel = connection.createChannel();
        // 创建队列
        /**
         * 参数解释
         * queueDeclare(String queue, boolean durable, boolean exclusive, boolean autoDelete, Map arguments)
         * queue: 队列名称
         * durable: 是否持久化
         * exclusive: 是否独占
         * autoDelete: 没有消费者时是否自动删除
         * arguments: 参数
         */
        channel.queueDeclare("lktest",true,false,false,null);
        // 发送消息
        /**
         * 参数解释
         * basicPublish(String exchange, String routingKey, BasicProperties props, byte[] body)
         * exchange: 交换机名称
         * routingKey: 路由名称
         * props: 配置信息
         * body: 发送的数据
         */
        String body = "测试发送消息~~~~~~~~";
        for (int i = 0; i < 100; i++) {

//            Thread.sleep(2000);
            System.out.println(i);
            channel.basicPublish("","lktest",null,body.getBytes());
        }
        // 释放资源
        connection.close();
        channel.close();
    }
}
在设置连接工厂的时候,如果没有指定连接的参数则会有默认值,可以去设置虚拟主机
2.入门工程-消费者
目标:编写消息消费者代码,从队列中接收消息并消费
分析:
从RabbitMQ中队列(与生产者发送消息时的队列一致;simple_queue)接收消息
实现消费者步骤:
- 创建连接工厂
- 创建连接(抽取一个获取连接的工具类)
- 创建频道
- 声明队列
- 创建消费者(接收消息并处理消息)
- 监听队列
代码:
package com.lk;

import com.rabbitmq.client.*;

import java.io.IOException;
import java.text.SimpleDateFormat;

public class Consumer {

    public static void main(String[] args) throws Exception {

        // 创建连接工厂
        ConnectionFactory connectionFactory = new ConnectionFactory();
        // 设置连接参数
        // 1.设置ip
        connectionFactory.setHost("192.168.1.60");
        // 2.设置端口
        connectionFactory.setPort(5672);
        // 3.设置虚拟机
        connectionFactory.setVirtualHost("/lk");
        // 4.设置用户名
        connectionFactory.setUsername("lk");
        // 5.设置密码
        connectionFactory.setPassword("lk");
        // 创建连接
        Connection connection = connectionFactory.newConnection();
        // 创建Channel
        Channel channel = connection.createChannel();
        // 创建队列
        /**
         * 参数解释
         * queueDeclare(String queue, boolean durable, boolean exclusive, boolean autoDelete, Map arguments)
         * queue: 队列名称
         * durable: 是否持久化
         * exclusive: 是否独占
         * autoDelete: 没有消费者时是否自动删除
         * arguments: 参数
         */
        channel.queueDeclare("lktest",true,false,false,null);

        /*
        basicConsume(String queue, boolean autoAck, Consumer callback)
        参数:
            1. queue:队列名称
            2. autoAck:是否自动确认
            3. callback:回调对象

         */
        // 接收消息
        com.rabbitmq.client.Consumer consumer = new DefaultConsumer(channel) {

            /*
                回调方法,当收到消息后,会自动执行该方法

                1. consumerTag:标识
                2. envelope:获取一些信息,交换机,路由key...
                3. properties:配置信息
                4. body:数据

             */
            @Override
            public void handleDelivery(String consumerTag, Envelope envelope, AMQP.BasicProperties properties, byte[] body) throws IOException {

                System.out.println("consumerTag:"+consumerTag);
                System.out.println("Exchange:"+envelope.getExchange());
                System.out.println("RoutingKey:"+envelope.getRoutingKey());
                System.out.println("properties:"+properties);
                System.out.println("body:"+new String(body));
            }
        };
        channel.basicConsume("lktest",true,consumer);
            //关闭资源?不要,需要持续监听队列消息,所以不要关闭资源
    }
}
需要持续监听队列消息,所以不要关闭资源
3.入门工程测试
目标:启动消费者和生产者,到RabbitMQ中查询队列并在消费者端IDEA控制台查看接收到的消息
分析:
生产者:发送消息到RabbitMQ队列
消费者:接收RabbitMQ队列消息
TS:后续的几种模式的代码段我就不放出来了,交给你们自行去了解,因为我这里讲解可能并不是特别细致,网上有一大摞比我讲的更详细,我们都需要有自己的方法,学会创造才是魅力所在,接下来我会贴一段集成SpringBoot的代码段
第三节:SpringBoot集成RabbitMQ入门教程
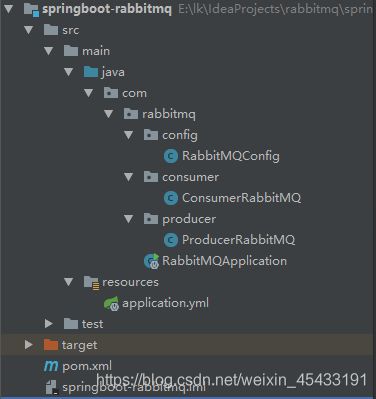
准备工作:
- 创建工程;
- 添加依赖(spring-boot-stater-amqp,spring-boot-starter-test);
- 创建启动引导类;
- 添加配置文件application.yml
pom.xml文件依赖:
<?xml version="1.0" encoding="UTF-8"?>
<project xmlns="http://maven.apache.org/POM/4.0.0"
         xmlns:xsi="http://www.w3.org/2001/XMLSchema-instance"
         xsi:schemaLocation="http://maven.apache.org/POM/4.0.0 http://maven.apache.org/xsd/maven-4.0.0.xsd">
    <modelVersion>4.0.0</modelVersion>

    <groupId>com.lk</groupId>
    <artifactId>springboot-rabbitmq</artifactId>
    <version>1.0-SNAPSHOT</version>

    <parent>
        <groupId>org.springframework.boot</groupId>
        <artifactId>spring-boot-starter-parent</artifactId>
        <version>2.1.4.RELEASE</version>
    </parent>

	<!-- 导入以下依赖 -->
    <dependencies>
        <dependency>
            <groupId>org.springframework.boot</groupId>
            <artifactId>spring-boot-starter-amqp</artifactId>
        </dependency>
        <dependency>
            <groupId>org.springframework.boot</groupId>
            <artifactId>spring-boot-starter-test</artifactId>
        </dependency>
        <dependency>
            <groupId>org.springframework.boot</groupId>
            <artifactId>spring-boot-starter-web</artifactId>
        </dependency>
    </dependencies>
</project>
application.yml文件下添加如下配置:
spring:
  rabbitmq:
    host: 你的ip
    port: 5672
    username: 你的用户名
    password: 你的密码
    virtual-host: /
package com.rabbitmq.config;

import org.springframework.amqp.core.*;
import org.springframework.beans.factory.annotation.Qualifier;
import org.springframework.context.annotation.Bean;
import org.springframework.context.annotation.Configuration;

@Configuration
public class RabbitMQConfig {

    // 交换机名称
    public static final String ITEM_TOPIC_EXCHANGE = "lk_boot_topic_exchange";
    // 队列名称
    public static final String ITEM_QUEUE = "lk_boot_queue";


    // 声明交换机
    @Bean("lkBootTopicExchange")
    public Exchange topicExchange(){

        return ExchangeBuilder.topicExchange(ITEM_TOPIC_EXCHANGE).durable(true).build();
    }

    // 声明队列
    @Bean("lkBootQueue")
    public Queue topicQueue(){

        return QueueBuilder.durable(ITEM_QUEUE).build();
    }

    // 绑定队列和交换机
    @Bean
    public Binding queueBindingExchange(@Qualifier("lkBootQueue") Queue queue, @Qualifier("lkBootTopicExchange") Exchange exchange){

        return BindingBuilder.bind(queue).to(exchange).with("item.#").noargs();
    }
}
提供者ProducerRabbitMQ:
package com.rabbitmq.producer;

import com.rabbitmq.config.RabbitMQConfig;
import org.springframework.amqp.rabbit.core.RabbitTemplate;
import org.springframework.beans.factory.annotation.Autowired;
import org.springframework.web.bind.annotation.RequestMapping;
import org.springframework.web.bind.annotation.RequestParam;
import org.springframework.web.bind.annotation.ResponseBody;
import org.springframework.web.bind.annotation.RestController;

@RestController
@RequestMapping("/lk")
@ResponseBody
public class ProducerRabbitMQ {

    @Autowired
    private RabbitTemplate rabbitTemplate;

    @RequestMapping("/rabbitmq")
    // 向交换机发送消息,队列会自动从交换机拉取消息
    public String rabbitMQ(@RequestParam("routingKey") String routingKey){

        if(null == routingKey || "".equals(routingKey)){

            return "201";
        }
        rabbitTemplate.convertAndSend(RabbitMQConfig.ITEM_TOPIC_EXCHANGE,routingKey,"商品新增,routing key 为" + routingKey);
        return "商品新增,routing key 为" + routingKey;
    }
}
消费者ConsumerRabbitMQ:
package com.rabbitmq.consumer;

import org.springframework.amqp.rabbit.annotation.RabbitListener;
import org.springframework.stereotype.Component;

@Component
public class ConsumerRabbitMQ {


    /**
     * 监听某个队列的消息
     * @param message 接收到的消息
     */
    @RabbitListener(queues = "lk_boot_queue")
    public void myListener1(String message){

        System.out.println("消费者接收到的消息为:" + message);
    }
}
安装问题列举:
公司连续断过几次电,我再打开虚拟机的时候死活启动不了,好像有文件损坏了,然后我重装了linux,最后在我使用yum安装环境的时候,报如下错误(后来据查是因为Centos6的支持给官方停掉了)
Loaded plugins: fastestmirror

Loading mirror speeds from cached hostfile

YumRepo Error: All mirror URLs are not using ftp, http[s] or file.

Eg. Invalid release/repo/arch combination/

removing mirrorlist with no valid mirrors: /var/cache/yum/x86_64/6/base/mirrorlist.txt

Error: Cannot find a valid baseurl for repo: base
或者是:
http://mirrors.linode.com/centos/6/os/x86_64/repodata/repomd.xml: [Errno 14]

PYCURL ERROR 22 - "The requested URL returned error: 404 Not Found"

Trying other mirror.

To address this issue please refer to the below knowledge base article

https://access.redhat.com/articles/1320623
解决方法,执行如下命令(可能你需要切换到root用户下,使用su命令):
sed -i "s|enabled=1|enabled=0|g" /etc/yum/pluginconf.d/fastestmirror.conf

mv /etc/yum.repos.d/CentOS-Base.repo /etc/yum.repos.d/CentOS-Base.repo.backup

curl -o /etc/yum.repos.d/CentOS-Base.repo https://www.xmpan.com/Centos-6-Vault-Aliyun.repo

yum clean all

yum makecache
源码地址:https://pan.baidu.com/s/1sG7bNYdlROdN-EUmjeRgYA 提取码:oapp
人若成就一道景致,则无关春夏秋冬
