第一节:LNMP架构概述
1.1 什么是LNMP
LNMP 是一套技术的组合, L=Linux、 N=Nginx、 M=MySQL、 P=PHP
1.2 LNMP架构是如何工作的
首先 Nginx 服务是不能处理动态请求,那么当用户发起动态请求时, Nginx 又是如何进行处理的。
当用户发起 http 请求,请求会被 Nginx 处理,如果是静态资源请求 Nginx 则直接返回,如果是动态请求 Nginx 则通过 fastcgi 协议转交给后端的 PHP 程序处理,具体如下图所示
1.3 Nginx与Fast-CGI工作流程

1.用户通过 http 协议发起请求,请求会先抵达 LNMP 架构中的 Nginx
2.Nginx 会根据用户的请求进行判断,这个判断是有 Location 进行完成
3.判断用户请求的是静态页面, Nginx 直接进行处理
4.判断用户请求的是动态页面, Nginx 会将该请求交给 fastcgi 协议下发
5.fastgi 会将请求交给 php-fpm 管理进程, php-fpm 管理进程接收到后会调用具体的工作进程 warrap
6.warrap 进程会调用 php 程序进行解析,如果只是解析代码 php 直接返回
7.如果有查询数据库操作,则由 php 连接数据库(用户 密码 IP)发起查询的操作
8.最终数据由 mysql->php->php-fpm->fastcgi->nginx->http->user
第二节:LNMP 部署
2.0 创建统一用户
[root@web01 ~]# groupadd www -g 666
[root@web01 ~]# useradd www -g 666 -u 666 -M -s /sbin/nologin
[root@web01 ~]# id www
uid=666(www) gid=666(www) 组=666(www)
2.1 安装nginx php
官方nginx源
[root@web01 ~]# cat /etc/yum.repos.d/nginx.repo
[nginx-stable]
name=nginx stable repo
baseurl=http://nginx.org/packages/centos/$releasever/$basearch/
gpgcheck=1
enabled=1
gpgkey=https://nginx.org/keys/nginx_signing.key

[nginx-mainline]
name=nginx mainline repo
baseurl=http://nginx.org/packages/mainline/centos/$releasever/$basearch/
gpgcheck=1
enabled=0
gpgkey=https://nginx.org/keys/nginx_signing.key
php 源
[root@web01 ~]# rpm -Uvh https://dl.fedoraproject.org/pub/epel/epel-release-latest-7.noarch.rpm
[root@web01 ~]# rpm -Uvh https://mirror.webtatic.com/yum/el7/webtatic-release.rpm
安装 php
[root@web01 ~]# yum remove php-mysql-5.4 php php-fpm php-common
#   先移除以上软件包,防止与后续新版本php冲突

[root@web01 ~]# yum -y install php71w php71w-cli php71w-common php71w-devel php71w-embedded php71w-gd php71w-mcrypt php71w-mbstring php71w-pdo php71w-xml php71w-fpm php71w-mysqlnd php71w-opcache php71w-pecl-memcached php71w-pecl-redis php71w-pecl-mongodb
安装 nginx
[root@web01 ~]# yum -y install nginx
安装 mariadb
[root@web01 ~]# yum -y install mariadb mariadb-server
2.2 配置 php-fpm nginx
# 统一用户

[root@web01 ~]# sed -i '/^user/c user = www' /etc/php-fpm.d/www.conf
[root@web01 ~]# sed -i '/^group/c group = www' /etc/php-fpm.d/www.conf

[root@web01 ~]# sed -i '/^user/c user  www;' /etc/nginx/nginx.conf
Sed 小贴士
| 命 令 | 说 明 |
|---|---|
| a\ | 在当前行后添加一行或多行 |
| c\ | 用新文本修改(替换)当前行中的文本 |
| d | 删除行 |
| i\ | 在当前行之前插入文本 |
| h | 把模式空间里的内容复制到暂存缓存区 |
| H | 把模式空间里的内容追加到暂存缓存区 |
| g | 取出暂存缓冲区里的内容,将其复制到模式空间,覆盖该处原有内容 |
| G | 取出暂存缓冲区里的内容,将其复制到模式空间,追加在原有内容后面 |
| l | 列出非打印字符 |
| p | 打印行 |
| n | 读入下一输入行,并从下一条命令而不是第一条命令开始处理 |
| q | 结束或退出 sed |
| r | 从文件中读取输入行 |
| ! | 对所选行意外的所有行应用命令 |
| s | 用一个字符串替换另一个 |
2.3 启动 php-fpm nginx
[root@web01 nginx]# systemctl start php-fpm.service
[root@web01 nginx]# systemctl enable php-fpm.service
Created symlink from /etc/systemd/system/multi-user.target.wants/php-fpm.service to /usr/lib/systemd/system/php-fpm.service.


[root@web01 nginx]# systemctl start nginx
[root@web01 nginx]# systemctl enable nginx
Created symlink from /etc/systemd/system/multi-user.target.wants/nginx.service to /usr/lib/systemd/system/nginx.service.


[root@web01 nginx]# systemctl start mariadb.service
[root@web01 nginx]# systemctl enable mariadb.service
Created symlink from /etc/systemd/system/multi-user.target.wants/mariadb.service to /usr/lib/systemd/system/mariadb.service.
2.4 配置Mariadb密码
# 修改密码方式1
[root@web01 nginx]# mysqladmin password 'test123'


# 修改密码方式2
[root@web01 nginx]# mysql_secure_installation
2.5 mysql 基础命令
登录mysql
[root@web01 nginx]# mysql -uroot -ptest123
指定ip登录
[root@web01 ~]# mysql -uroot -poldboy123 -h127.0.0.1
查看当前mysql用户
MariaDB [(none)]> select user,host from mysql.user;
+------+-----------+
| user | host      |
+------+-----------+
| root | 127.0.0.1 |
| root | ::1       |
|      | localhost |
| root | localhost |
|      | web01     |
| root | web01     |
+------+-----------+
6 rows in set (0.00 sec)
查看数据库列表
MariaDB [(none)]> show databases;
+--------------------+
| Database           |
+--------------------+
| information_schema |
| mysql              |
| performance_schema |
| test               |
+--------------------+
4 rows in set (0.00 sec)
查看库中的表
MariaDB [(none)]> show tables from mysql;
+---------------------------+
| Tables_in_mysql           |
+---------------------------+
| columns_priv              |
| db                        |
| event                     |
| func                      |
| general_log               |
| help_category             |
| help_keyword              |
| help_relation             |
| help_topic                |
| host                      |
| ndb_binlog_index          |
| plugin                    |
| proc                      |
| procs_priv                |
| proxies_priv              |
| servers                   |
| slow_log                  |
| tables_priv               |
| time_zone                 |
| time_zone_leap_second     |
| time_zone_name            |
| time_zone_transition      |
| time_zone_transition_type |
| user                      |
+---------------------------+
24 rows in set (0.00 sec)
选择数据库
MariaDB [(none)]> choose mysql;
ERROR 1064 (42000): You have an error in your SQL syntax; check the manual that corresponds to your MariaDB server version for the right syntax to use near 'choose mysql' at line 1
MariaDB [(none)]> use mysql;
Reading table information for completion of table and column names
You can turn off this feature to get a quicker startup with -A

Database changed
查看表中字段
MariaDB [mysql]> desc user;
+------------------------+-----------------------------------+------+-----+---------+-------+
| Field                  | Type                              | Null | Key | Default | Extra |
+------------------------+-----------------------------------+------+-----+---------+-------+
| Host                   | char(60)                          | NO   | PRI |         |       |
| User                   | char(16)                          | NO   | PRI |         |       |
| Password               | char(41)                          | NO   |     |         |       |
| Select_priv            | enum('N','Y')                     | NO   |     | N       |       |
| Insert_priv            | enum('N','Y')                     | NO   |     | N       |       |
| Update_priv            | enum('N','Y')                     | NO   |     | N       |       |
| Delete_priv            | enum('N','Y')                     | NO   |     | N       |       |
| Create_priv            | enum('N','Y')                     | NO   |     | N       |       |
| Drop_priv              | enum('N','Y')                     | NO   |     | N       |       |
| Reload_priv            | enum('N','Y')                     | NO   |     | N       |       |
| Shutdown_priv          | enum('N','Y')                     | NO   |     | N       |       |
| Process_priv           | enum('N','Y')                     | NO   |     | N       |       |
| File_priv              | enum('N','Y')                     | NO   |     | N       |       |
| Grant_priv             | enum('N','Y')                     | NO   |     | N       |       |
| References_priv        | enum('N','Y')                     | NO   |     | N       |       |
| Index_priv             | enum('N','Y')                     | NO   |     | N       |       |
| Alter_priv             | enum('N','Y')                     | NO   |     | N       |       |
| Show_db_priv           | enum('N','Y')                     | NO   |     | N       |       |
| Super_priv             | enum('N','Y')                     | NO   |     | N       |       |
| Create_tmp_table_priv  | enum('N','Y')                     | NO   |     | N       |       |
| Lock_tables_priv       | enum('N','Y')                     | NO   |     | N       |       |
| Execute_priv           | enum('N','Y')                     | NO   |     | N       |       |
| Repl_slave_priv        | enum('N','Y')                     | NO   |     | N       |       |
| Repl_client_priv       | enum('N','Y')                     | NO   |     | N       |       |
| Create_view_priv       | enum('N','Y')                     | NO   |     | N       |       |
| Show_view_priv         | enum('N','Y')                     | NO   |     | N       |       |
| Create_routine_priv    | enum('N','Y')                     | NO   |     | N       |       |
| Alter_routine_priv     | enum('N','Y')                     | NO   |     | N       |       |
| Create_user_priv       | enum('N','Y')                     | NO   |     | N       |       |
| Event_priv             | enum('N','Y')                     | NO   |     | N       |       |
| Trigger_priv           | enum('N','Y')                     | NO   |     | N       |       |
| Create_tablespace_priv | enum('N','Y')                     | NO   |     | N       |       |
| ssl_type               | enum('','ANY','X509','SPECIFIED') | NO   |     |         |       |
| ssl_cipher             | blob                              | NO   |     | NULL    |       |
| x509_issuer            | blob                              | NO   |     | NULL    |       |
| x509_subject           | blob                              | NO   |     | NULL    |       |
| max_questions          | int(11) unsigned                  | NO   |     | 0       |       |
| max_updates            | int(11) unsigned                  | NO   |     | 0       |       |
| max_connections        | int(11) unsigned                  | NO   |     | 0       |       |
| max_user_connections   | int(11)                           | NO   |     | 0       |       |
| plugin                 | char(64)                          | NO   |     |         |       |
| authentication_string  | text                              | NO   |     | NULL    |       |
+------------------------+-----------------------------------+------+-----+---------+-------+
42 rows in set (0.00 sec)
删除用户
MariaDB [(none)]> drop user web@'%';
Query OK, 0 rows affected (0.00 sec)
退出
MariaDB [mysql]> exit
Bye
第三节:LNMP 环境配置
3.0 认识 Fastcgi 语法
设置 fastcgi 服务器的地址,该地址可以指定为域名或 IP 地址,以及端口
Syntax: fastcgi_pass address;
Default: —
Context: location, if in location

#语法示例
fastcgi_pass localhost:9000;
fastcgi_pass unix:/tmp/fastcgi.socket;
设置 fastcgi 默认的首页文件,需要结合 fastcgi_param 一起设置
Syntax: fastcgi_index name;
Default: —
Context: http, server, location
通过 fastcgi_param 设置变量,并将设置的变量传递到后端的 fastcgi 服务器
Syntax: fastcgi_param parameter value [if_not_empty];
Default: —
Context: http, server, location

#语法示例
fastcgi_index index.php;
fastcgi_param SCRIPT_FILENAME /code$fastcgi_script_name;
3.1 nginx 配置
[root@web01 conf.d]# vim www.cxw.com.conf

server {
    server_name www.cxw.com;
    listen 80;
    root /code;
    index index.php index.html;

    location ~ \.php$ {
        root /code;
        fastcgi_pass 127.0.0.1:9000;
        fastcgi_index index.php;
        fastcgi_param SCRIPT_FILENAME $document_root$fastcgi_script_name;
        include fastcgi_params;
    }
}
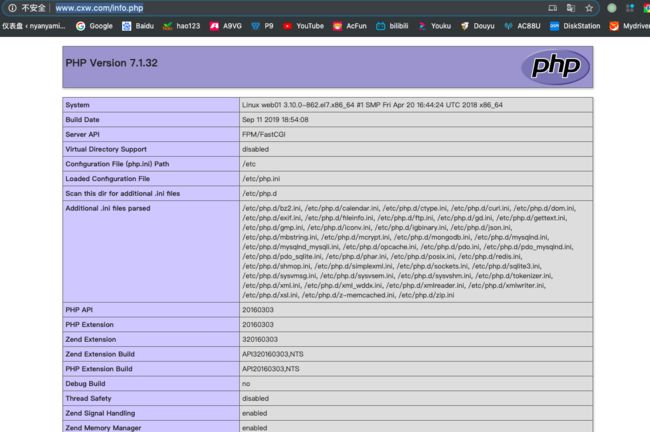
3.2 测试php
[root@web01 conf.d]# mkdir /code
[root@web01 conf.d]# chown -R www.www /code
[root@web01 conf.d]# vim /code/info.php
3.3 检查nginx语法并重启
[root@web01 conf.d]# nginx -t
nginx: the configuration file /etc/nginx/nginx.conf syntax is ok
nginx: configuration file /etc/nginx/nginx.conf test is successful
[root@web01 conf.d]# systemctl restart nginx
3.4 绑定hosts并打开网页
http://www.cxw.com/info.php
3.5 检查php与数据库的连接
[root@web01 conf.d]# vim /code/mysql.php

第四节:部署 Wordpress
[root@web01 conf.d]# vim blog.cxw.com.conf

server {
    server_name blog.cxw.com;
    listen 80;
    root /code/wordpress;
    index index.php index.html;

    location ~ \.php$ {
        root /code/wordpress;
        fastcgi_pass 127.0.0.1:9000;
        fastcgi_index index.php;
        fastcgi_param SCRIPT_FILENAME $document_root$fastcgi_script_name;
        include fastcgi_params;
    }
}
[root@web01 conf.d]# nginx -t
nginx: the configuration file /etc/nginx/nginx.conf syntax is ok
nginx: configuration file /etc/nginx/nginx.conf test is successful
[root@web01 conf.d]# systemctl restart nginx
# 上传文件

caixiaoweideMacBook-Air:~ chevy$ scp /Users/chevy/Downloads/wordpress-4.9.4-zh_CN.tar.gz [email protected]:/code
[email protected]'s password:
wordpress-4.9.4-zh_CN.tar.gz                  100% 8870KB   5.7MB/s   00:01
[root@web01 code]# ll
总用量 8872
-rw-r--r-- 1 root root 9082696 9月  25 20:16 wordpress-4.9.4-zh_CN.tar.gz
[root@web01 code]# tar xf wordpress-4.9.4-zh_CN.tar.gz
[root@web01 code]# chown -R www.www /code
[root@web01 code]# mysql -uroot -ptest123

MariaDB [(none)]> create database wordpress;
Query OK, 1 row affected (0.00 sec)

MariaDB [(none)]> show databases;
+--------------------+
| Database           |
+--------------------+
| information_schema |
| mysql              |
| performance_schema |
| test               |
| wordpress          |
+--------------------+
5 rows in set (0.00 sec)

## 命令行直接创建数据库
mysql -uroot -ptest123 -e 'create database wordpress'
# 修改hosts

caixiaoweideMacBook-Air:~ chevy$ sudo vim /private/etc/hosts
Password:

##
# Host Database
#
# localhost is used to configure the loopback interface
# when the system is booting.  Do not change this entry.
##
127.0.0.1       localhost
255.255.255.255 broadcasthost
::1             localhost
10.0.0.7        www.cxw.com blog.cxw.com zhihu.cxw.com
访问 blog.cxw.com

第五节:部署WeCenter
参考wordpress
注意点: 1.配置文件的域名和目录
            2.目录文件的权限

            3.重启nginx

            4.创建数据库

            5.网页配置时候数据表类型选择InnoDB
配置文件:
[root@web01 code]# vim /etc/nginx/conf.d/zhihu.cxw.com.conf

server {
    server_name zhihu.cxw.com;
    listen 80;
    root /code/zhihu;
    index index.php index.html;

    location ~ \.php$ {
        root /code/zhihu;
        fastcgi_pass 127.0.0.1:9000;
        fastcgi_index index.php;
        fastcgi_param SCRIPT_FILENAME $document_root$fastcgi_script_name;
        include fastcgi_params;
    }
}
第六节:拆分数据库
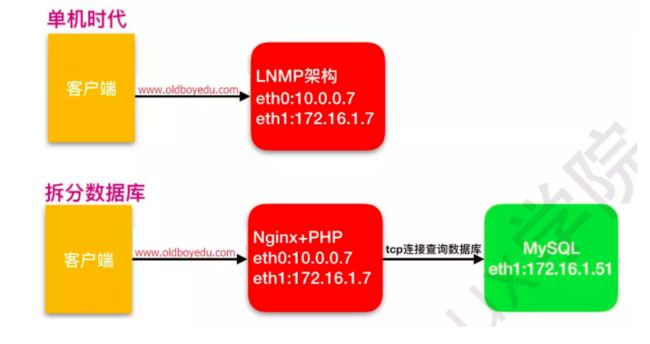
6.1 为什么要进行数据库的拆分
由于单台服务器运行 LNMP 架构会导致网站访问缓慢,当内存被吃满时,很容易导致系统出现 oom,从而 kill 掉MySQL 数据库,所以需要将 web 和数据库进行独立部署
6.2 数据库拆分后解决了什么问题
1.缓解 web 网站的压力
2.增强数据库读写性能
3.提高用户访问的速度
6.3 数据库拆分架构演变过程
6.4 环境搭建
6.4.1 备份数据库
[root@web01 code]# mysqldump -uroot -ptest123 -A >/root/mysql.sql
6.4.2 传输到db01
[root@web01 code]# scp /root/mysql.sql 10.0.0.51:/root
6.4.3 db01数据库从备份恢复
[root@db01 ~]# yum install mariadb mariadb-server -y
[root@db01 ~]# systemctl start mariadb
[root@db01 ~]# systemctl enable mariadb
[root@db01 ~]# mysqladmin password 'test123'
[root@db01 ~]# mysql -uroot -p'oldboy123' < /root/mysql.sql
[root@db01 ~]# mysql -uroot -p'oldboy123' -e "show databases;"
+--------------------+
| Database           |
+--------------------+
| information_schema |
| mysql              |
| performance_schema |
| test               |
| wordpress          |
| zhihu              |
+--------------------+
6 rows in set (0.00 sec)
6.4.4 创建web用户授权172.16.1.0网段登录
MariaDB [(none)]> grant all privileges on *.* to 'web'@'172.16.1.%' identified by 'test123';
Query OK, 0 rows affected (0.00 sec)

# web01客户端测试登录
[root@web01 code]# mysql -h172.16.1.51 -uweb -ptest123
Welcome to the MariaDB monitor.  Commands end with ; or \g.
Your MariaDB connection id is 5
Server version: 5.5.64-MariaDB MariaDB Server

Copyright (c) 2000, 2018, Oracle, MariaDB Corporation Ab and others.

Type 'help;' or '\h' for help. Type '\c' to clear the current input statement.

MariaDB [(none)]>
6.4.5 web01连接远程数据库
修改 wordpress
[root@web01 ~]# vim /code/wordpress/wp-config.php

 * * MySQL设置
 * * 密钥
 * * 数据库表名前缀
 * * ABSPATH
 *
 * @link https://codex.wordpress.org/zh-cn:%E7%BC%96%E8%BE%91_wp-config.php
 *
 * @package WordPress
 */

// ** MySQL 设置 - 具体信息来自您正在使用的主机 ** //
/** WordPress数据库的名称 */
define('DB_NAME', 'wordpress');

/** MySQL数据库用户名 */
define('DB_USER', 'web');

/** MySQL数据库密码 */
define('DB_PASSWORD', 'test123');

/** MySQL主机 */
define('DB_HOST', '172.16.1.51');
修改WeCenter
[root@web01 ~]# vim /code/zhihu/system/config/database.php

 'utf8mb4',
  'host' => '172.16.1.51',
  'username' => 'web',
  'password' => 'test123',
  'dbname' => 'zhihu',
);^M
$config['slave'] = false;^M
~
关闭web01数据库
[root@web01 ~]# systemctl stop mariadb
[root@web01 ~]# systemctl disable mariadb
Removed symlink /etc/systemd/system/multi-user.target.wants/mariadb.service.
测试
打开相应网站操作确认
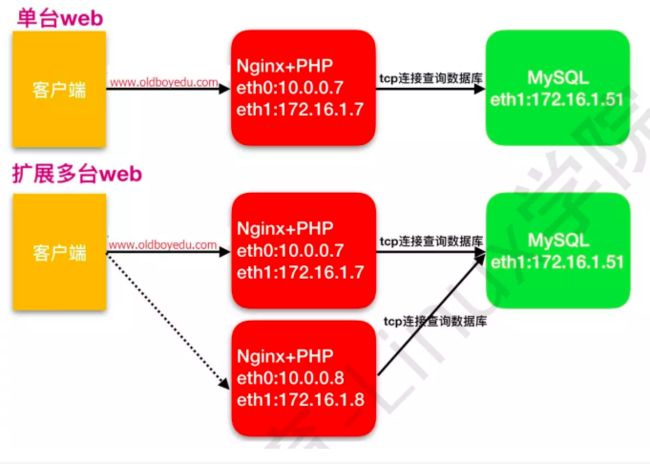
第七节:扩展web节点
7.1 为什么要拓展多台web节点
单台 web 服务器能抗住的访问量是有限的,配置多台 web 服务器能提升更高的访问速度
7.2 拓展多台web解决了什么问题
1.单台 web 节点如果故障,会导致业务 down 机
2.多台 web 节点能保证业务的持续稳定,扩展性高
3.多台 web 节点能有效的提升用户访问网站的速度
7.3 多台web服务器架构组成
7.4 多台web服务器思路
1.可以使用ansible批量部署多台web服务器
2.配置内网私有yum仓库
3 按照web01的步骤安装好nginx和php,然后远程拷贝代码到新机器
7.5 搭建
[root@web02 ~]# groupadd www -g 666
[root@web02 ~]# useradd www -g 666 -u 666 -M -s /sbin/nologin
[root@web02 ~]# scp -rp [email protected]:/etc/yum.repos.d/* /etc/yum.repos.d/
[root@web02 ~]# scp -rp [email protected]:/etc/pki/rpm-gpg/* /etc/pki/rpm-gpg/
[root@web02 ~]# yum install nginx -y
[root@web02 ~]# yum -y install php71w php71w-cli php71w-common php71w-devel php71w-embedded php71w-gd php71w-mcrypt php71w-mbstring php71w-pdo php71w-xml php71w-fpm php71w-mysqlnd php71w-opcache php71w-pecl-memcached php71w-pecl-redis php71w-pecl-mongodb
# 拷贝nginx配置文件
[root@web02 ~]# scp -rp [email protected]:/etc/nginx /etc/
# 拷贝php配置文件
[root@web02 ~]# scp -rp [email protected]:/etc/php-fpm.d /etc/
# 打包
[root@web01 /]# tar zcvf code.tar.gz /code
# 发送到web02
[root@web01 /]# scp code.tar.gz 10.0.0.8:/
# 解压
[root@web02 ~]# tar xf /code.tar.gz -C /
# 开机自启
[root@web02 ~]# systemctl start nginx php-fpm
[root@web02 ~]# systemctl enable nginx php-fpm
Created symlink from /etc/systemd/system/multi-user.target.wants/nginx.service to /usr/lib/systemd/system/nginx.service.
Created symlink from /etc/systemd/system/multi-user.target.wants/php-fpm.service to /usr/lib/systemd/system/php-fpm.service.
修改hosts 测试访问
第八节:挂载 nfs
要点
1.创建www用户
2.安装nfs-utils
3.服务端配置exports
   /code/blog 172.16.1.0/24(rw,sync,all_squash,anonuid=666,anongid=666)
   /code/zhihu 172.16.1.0/24(rw,sync,all_squash,anonuid=666,anongid=666)
4.nfs 加入自启
5.客户端安装nfs-utils
6.客户端挂载
7.挂载目录
   /code/wordpress/wp-content/uploads
   /code/zhihu/uploads