MSDN教你美化控件之DataGridView
开始做WinForm开发的时候,我想大家和我一样,都有一个相同的疑问。
Windows可以做的如此漂亮,为什么它提供的开发控件确如此“平淡无奇”。甚至可以用普通来形容。
时间长了以后才发现,原来可以通过OnPaint事件对控件的外观进行重绘。过了不久,随之的第二个问题就来了。OnPaint事件对于Button、Panel等单一控件还是比较有用的,但是对于DataGridView、ToolBar、TabControl等复合控件来说,该如何处理呢?
这个问题确实也困扰了“小白”我很长时间,甚至怀疑微软的“能力”(小白大都如此)。
还好,我有一个比较好的习惯,就是没事的时候i,去翻翻“天书”,因为它总能给我意外的惊喜。
言归正传,下面我就来教大家如何美化DataGridView(其实是MSDN在教我们)。
说明:由于本人年纪大了,没有追赶新技术的能力,所以VS和MSDN一直使用VS2005版。
所有讲解的内容均来自MSDN2005,如果和你的环境有差距,请大家谅解。
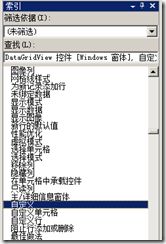
首先请大家打开MSDN,在索引页面的条件框内输入DataGridView。这时你会看到很多和DataGridView相关的介绍。而我们要关注的是自定义。
MSDN地址:ms-help://MS.MSDNQTR.v80.chs/MS.MSDN.v80/MS.VisualStudio.v80.chs/dv_fxmclictl/html/01ea5d4c-a736-4596-b0e9-a67a1b86e15f.htm(MSDN2005,建议大家直接看MSDN文档,也许你会发现我们都不知道的“秘密”)
图大家都看到了,用荧光标注的地方,就是我们要关注及使用的。微软其实早就准好了方案,就是等着那些需要的人来使用而已。
DataGridView要重绘的区域大致分为3部分:Column、RowHeader、SelectRow。
我们首先来绘制Column、RowHeader
CellPainting事件 就是我们要使用的事件。
MSDN说明:
注意:此事件在 .NET Framework 2.0 版中是新增的。
在单元格需要绘制时发生。
命名空间:System.Windows.Forms
程序集:System.Windows.Forms(在 system.windows.forms.dll 中)
描述是很少,但是加上例子足够了
在使用事件之前,我们先来看一下事件参数,了解它以后,一切对我们来说更加简单了。
CellPainting(object sender, System.Windows.Forms.DataGridViewCellPaintingEventArgs e)
object暂且不论(应该都知道吧),让我们来看看DataGridViewCellPaintingEventArgs
DataGridViewCellPaintingEventArgs提供了很多有用的方法和属性,我在这里只介绍我们重绘所需要的属性及方法。
获取当前 DataGridViewCell 的边界(注释:我们要绘制区域的大小(Column 或Row))。
获取当前 DataGridViewCell 的列索引(注释:Column的索引值)。
获取当前 DataGridViewCell 的行索引(注释:Row的索引值)。
获取用于绘制当前 DataGridViewCell 的 Graphics(注释:我们的画板)。
Handled
获取或设置一个值,该值指示事件处理程序是否已完整处理事件,或者系统是否应该继续本身的处理。(注释:是否需要系统继续绘制)
PaintContent
绘制指定边界中相应区域的单元格内容。(注释:哥只想说Column和Row上面的字不能忘了呀)
熟悉了这些属性后,我们开始正式绘制。
首先继承系统的DataGridView,重载CellPainting事件
/// <summary>
/// 自定义DataGridView控件
/// </summary>
public class testDataGirdView:System.Windows.Forms.DataGridView
{
/// <summary>
/// 重绘Column、Row
/// </summary>
/// <param name="e"></param>
protected override void OnCellPainting(DataGridViewCellPaintingEventArgs e)
{
//如果是Column
if(e.RowIndex == -1) {
drawColumnAndRow(e);
e.Handled = true;
//如果是Rowheader
} else if(e.ColumnIndex < 0 && e.RowIndex >= 0) {
drawColumnAndRow(e);
e.Handled = true;
}
}
}
通过e.RowIndex == -1可以判断当前重绘区域是否Column。
通过e.ColumnIndex < 0 && e.RowIndex >= 0可以判断当前重绘区域是否RowHeader。
e.Handled = true是告诉系统,哥已经自己重绘过了,你任务到此结束。
绘制前的准备完成,下面开始正式绘制
/// <summary>
/// Column和RowHeader绘制
/// </summary>
/// <param name="e"></param>
void drawColumnAndRow(DataGridViewCellPaintingEventArgs e)
{
// 绘制背景色
using (LinearGradientBrush backbrush =
new LinearGradientBrush(e.CellBounds,
ProfessionalColors.MenuItemPressedGradientBegin,
ProfessionalColors.MenuItemPressedGradientMiddle
, LinearGradientMode.Vertical)){
Rectangle border = e.CellBounds;
border.Width -= 1;
//填充绘制效果
e.Graphics.FillRectangle(backbrush, border);
//绘制Column、Row的Text信息
e.PaintContent(e.CellBounds);
//绘制边框
ControlPaint.DrawBorder3D(e.Graphics, e.CellBounds, Border3DStyle.Etched);
}
}
LinearGradientBrush backbrush 创建渐变画刷
e.Graphics.FillRectangle(backbrush, border) 当前区域内绘制画刷效果
e.PaintContent(e.CellBounds) 不要忘了Column或Row上面的文字信息
ControlPaint.DrawBorder3D 加了个边框,纯属个人爱好,哈哈
最兴奋的时刻到来了,让我们看看效果吧。
重绘之前:
重绘之后:
Column、RowHeader绘制完成,下面让我来绘制SelectRow
绘制SelectRow需要RowPrePaint 和 RowPostPaint 事件。
MSDN说明:
RowPrePaint
注意:此事件在 .NET Framework 2.0 版中是新增的。
在绘制 DataGridViewRow 之前发生。
命名空间:System.Windows.Forms
程序集:System.Windows.Forms(在 system.windows.forms.dll 中)
RowPostPaint
注意:此事件在 .NET Framework 2.0 版中是新增的。
在绘制 DataGridViewRow 后发生。
命名空间:System.Windows.Forms
程序集:System.Windows.Forms(在 system.windows.forms.dll 中)
还是一样的描述很少,
它事件参数我就不一一介绍了,“小白”们可以自己去MSDN查看。
直接进入主题开始重绘
/// <summary>
/// Row重绘前处理
/// </summary>
/// <param name="e"></param>
protected override void OnRowPrePaint(DataGridViewRowPrePaintEventArgs e)
{
base.OnRowPrePaint(e);
//是否是选中状态
if ((e.State & DataGridViewElementStates.Selected) ==
DataGridViewElementStates.Selected)
{
// 计算选中区域Size
int width = this.Columns.GetColumnsWidth(DataGridViewElementStates.Visible)+_RowHeadWidth;
Rectangle rowBounds = new Rectangle(
0 , e.RowBounds.Top, width,
e.RowBounds.Height);
// 绘制选中背景色
using (LinearGradientBrush backbrush =
new LinearGradientBrush(rowBounds,
Color.GreenYellow,
e.InheritedRowStyle.ForeColor, 90.0f))
{
e.Graphics.FillRectangle(backbrush, rowBounds);
e.PaintCellsContent(rowBounds);
e.Handled = true;
}
}
}
e.State & DataGridViewElementStates.Selected获取当前Row是否为选择状态
this.Columns.GetColumnsWidth(DataGridViewElementStates.Visible)获取当前可视化Column的宽度,也就是选择区域的宽度
/// <summary>
/// Row重绘后处理
/// </summary>
/// <param name="e"></param>
protected override void OnRowPostPaint(DataGridViewRowPostPaintEventArgs e)
{
base.OnRowPostPaint(e);
int width = this.Columns.GetColumnsWidth(DataGridViewElementStates.Visible) + _RowHeadWidth;
Rectangle rowBounds = new Rectangle(
0, e.RowBounds.Top, width, e.RowBounds.Height);
if (this.CurrentCellAddress.Y == e.RowIndex){
//设置选中边框
e.DrawFocus(rowBounds, true);
}
}
e.DrawFocus(rowBounds, true) 绘制边框
绘制完成,上效果图
好了,大功告成。自定义的DataGridView绘制完成。
下面回答几个“小白”可能提出的问题。
1、画的比较丑:哥不是美工,也不是画家,我只是告诉你如何去重绘,在哪里重绘,至于如 何画的更漂亮、颜色搭配的更好,那是美工的事情。
2、LinearGradientBrush、ProfessionalColors、ControlPaint都是什么东东:一句话“天书”上有,自己查。
3、好处:很难说好处是什么,就当自己多学点东西而已。如果实在要找一个理由的话,那就是不管你的Windows风格如何变,DataGridView始终如一。
源代码下载:微软全系统兼容


