SpringBoot+Mybatis实现用户账号CRUD系统+前后端交互(含源码)
文章目录
-
- 一、实现基于mybatis实现CRUD功能
- 二、验证码与前端的基础实现
- 三、前后端的交互
-
-
- 1、前后交互之创建账号
- 2、前后交互之数据库数据传入前端显示
- 3、前后交互之修改密码
- 4、前后交互之删除
- 5、前后交互之权限区别登录
-
- 四、小总结与源码获取
Mybatis-Spring地址
SpringBoot整合持久层框架有很多:例如SpringJDBC、Hibernate、Mybatis(这里SpringBoot整合Mybatis时,sql语句写在XML中,这种方式对于后期的维护、优化等方面可读性好,所以这里就不采用注解形式,把sql语句写在实体类中了)。
写这个小demo的动机:
在学习SpringBoot的开发常用技术时,学习完SpringBoot整合MyBatis时,突然想自己写一个,谁知道写完后端的CRUD后又想把前端还有前后端的交互也写了,不过前端了解的知识有限所以前端做的比较简陋,写的过程中只注重于功能,至于一些编程规范、还有逻辑上可能要考虑的不完全,希望大家有兴趣看完的文章后,能把需要注意的问题和我说一下,源码在最后呦,Thanks♪(・ω・)ノ
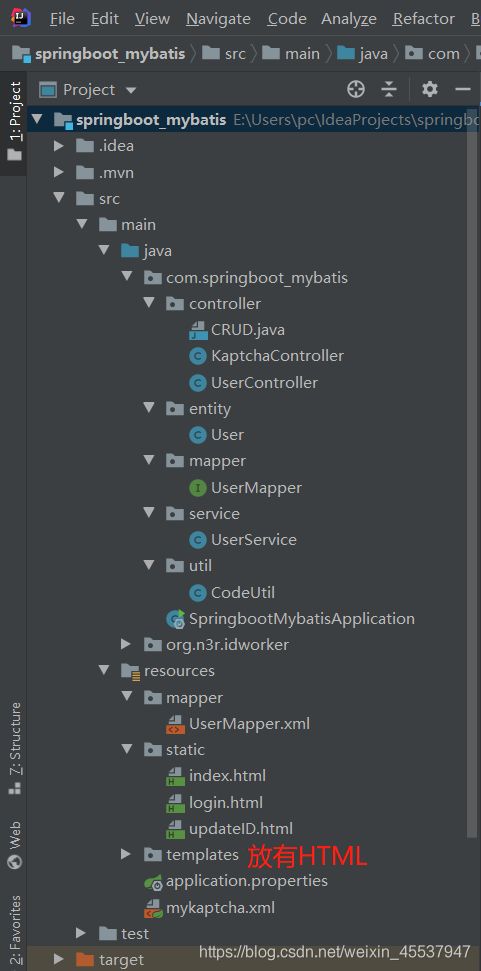
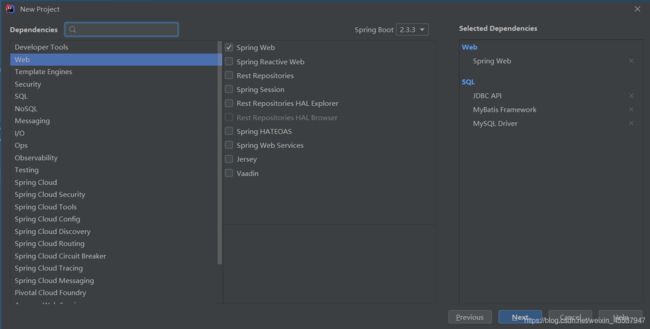
首先用idea新建一个spring Initializr,进行下列操作
可以选定这些进行操作:
下面便开始吧─━ _ ─━✧
先看看,最终效果图:


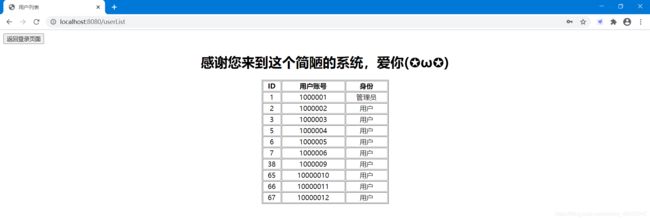

最终的效果就是这样子,若有兴趣功能模块可自行添加如:分页等这些功能,下面便开始我的写作历程<(▰˘◡˘▰)
一、实现基于mybatis实现CRUD功能
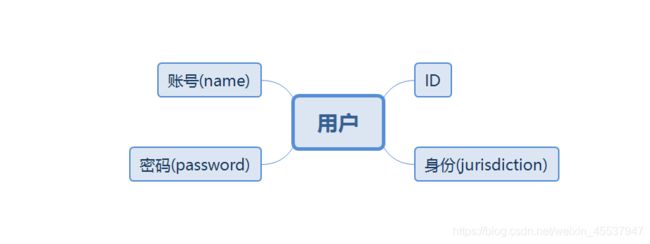
entity层实体类:User.java:实体类(get、set)
public class User {
    private int id;
    private String name;
    private String password;
    private int jurisdiction;
    }
mapper层接口:添加CRUD功能
@Mapper
public interface UserMapper {
    List findUserByName(String name);	//通过账号查询数据库
    public List ListUser();				//遍历数据库数据
    public int insertUser(User user);		//添加数据
    public int delete(int id);					//通过ID删除数据
    public int Update(User user);			//改数据
}
service层实现类:实现mapper层接口功能方法
@Service
public class UserService {

    @Autowired
    private UserMapper userMapper;

    public List findByName(String name) {
        return userMapper.findUserByName(name);
    }
    public User insertUser(User user) {
        userMapper.insertUser(user);
        return user;
    }
    public List ListUser(){
        return  userMapper.ListUser();
    }
    public int Update(User user){
        return userMapper.Update(user);
    }
    public int delete(int id){
        return userMapper.delete(id);
    }
}
先简单的介绍一下标签:
@RestController注解是@Controller和@ResponseBody的合集,表示这是个控制器bean,并且是将函数的返回值直 接填入HTTP响应体中,是REST风格的控制器。
@RequestMapping:提供路由信息,负责URL到Controller中的具体函数的映射。
@ResponseBody:表示该方法的返回结果直接写入HTTP response body中,一般在异步获取数据时使用,用于构建RESTful的api。在使用@RequestMapping后,返回值通常解析为跳转路径,加上@responsebody后返回结果不会被解析为跳转路径,而是直接写入HTTP response body中。比如异步获取json数据,加上@responsebody后,会直接返回json数据。该注解一般会配合@RequestMapping一起使用。
@Autowired自动导入
controller层访问类:UserController.java:控制类
@RestController
@RequestMapping(value = "/CRUD", method = { RequestMethod.GET, RequestMethod.POST })
public class CRUD {
	@Autowired
    private UserService userservice;

    @RequestMapping("/ListUser")
    @ResponseBody
    public List ListUser(){
        return userservice.ListUser();
    }
    //通过用户账号,对数据库进行查找操作
    @RequestMapping("/ListUserByname")
    @ResponseBody
    public List ListUserByname(String name){
        return userservice.findByName(name);
    }

    //通过ID,对数据库进行的删除操作
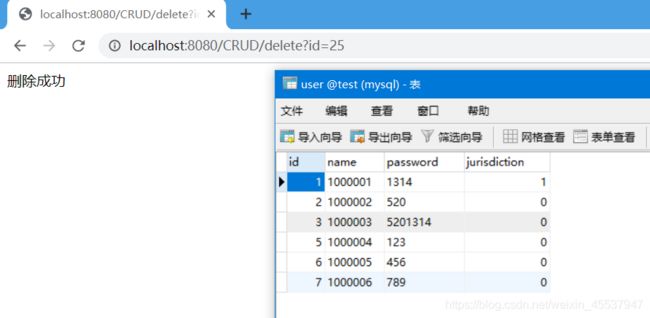
    @RequestMapping(value = "/delete", method = RequestMethod.GET)
    public String delete(int id) {
        int result = userservice.delete(id);
        if (result >= 1) {
            return "删除成功";
        } else {
            return "删除失败";
        }
    }
    //对数据进行修改的操作
    @RequestMapping(value = "/update", method = RequestMethod.POST)
    public String update(User user) {
        int result = userservice.Update(user);
        if (result >= 1) {
            return "修改成功";
        } else {
            return "修改失败";
        }
    }
    //对数据库进行增加字段操作
    @RequestMapping(value = "/insert", method = RequestMethod.POST)
    public User insert(User user)
    {
        return userservice.insertUser(user);
    }
}
编写映射文件UserMapper.xml,数据库操作(后面由于功能要求,后面会更改),通过UserMapper类里的方法,来调用对应的数据库操作
INSERT INTO user(id,name,password,jurisdiction)
VALUES (#{id},#{name, jdbcType=VARCHAR},#{password, jdbcType=VARCHAR},#{jurisdiction} )
delete from user where id=#{id}
update user set user.name=#{name},user.password=#{password},user.jurisdiction=#{jurisdiction} where user.id=#{id}
编写配置文件application.properties,Spring项目启动自动加载
spring.datasource.url=jdbc:mysql://localhost:3306/test?useUnicode=true&characterEncoding=UTF-8&useJDBCCompliantTimezoneShift=true&useLegacyDatetimeCode=false&serverTimezone=UTC
spring.datasource.username = root
spring.datasource.password = 1214
spring.datasource.driverClassName = com.mysql.cj.jdbc.Driver
spring.datasource.max-active=20 //指定连接池中最大的活跃连接数
spring.datasource.max-idle=8 //指定连接池中连接的最大的空闲连接数量
spring.datasource.min-idle=8 //指定必须保持连接的最小值
spring.datasource.initial-size=10 //指定启动连接池时,初始建立的连接数量
mybatis.mapper-locations= classpath:mapper/*.xml
“查”的功能:
查询全部数据:

通过用户名查询:

以上便是关于后端开发SpringBoot的CRUD的一些简单操作,就这个我这个小菜鸟写了一个下午o(╥﹏╥)o,我的下午是3点到6点,所以说我用了3小时,我太难了。
然后想了想"就这"!??因为我用springboot整合mybatis的初衷是想做个小demo,一个用户账号注册登录的系统,那后端的CRUD已经写好,那说干就干,然后我又用一个下午写了两个前端页面(登录和注册),前端太花费时间了,下次就应该找个小伙伴一起干,下面我直接上代码:
二、验证码与前端的基础实现
因为我的登录页面是用到了验证码登录,具体详情可看我的想关文章:
SpringBoot整合kaptcha验证码,复制粘贴即可用
引入依赖pom.xml:
            com.github.penggle
            kaptcha
            2.3.2
mykaptcha.xml:
                        120

                        50

                        0123456789AKWUEHPMRX

                        4

                        no

                        105,179,90

                        1

                        red

                        35

                        楷体

                        black

                        8

                        com.google.code.kaptcha.impl.ShadowGimpy
springboot启动类加上这个:@ImportResource(locations = {“classpath:mykaptcha.xml”})
@SpringBootApplication:包含了@ComponentScan、@Configuration和@EnableAutoConfiguration注解。其中@ComponentScan让Spring Boot扫描到Configuration类并把它加入到程序上下文。
@SpringBootApplication
@ImportResource(locations = {"classpath:mykaptcha.xml"})
public class SpringbootMybatisApplication {
    public static void main(String[] args) {
        SpringApplication.run(SpringbootMybatisApplication.class, args);
    }
}
@Controller:用于定义控制器类,在spring 项目中由控制器负责将用户发来的URL请求转发到对应的服务接口(service层),一般这个注解在类中,通常方法需要配合注解@RequestMapping。
KaptchaController.java:
@Controller
public class KaptchaController {
    //第二种方法
    //@Qualifier("getDefaultKaptcha")
    @Autowired
    private Producer captchaProducer = null;
    @RequestMapping("/mykaptcha")
    public void getKaptchaImage(HttpServletRequest request, HttpServletResponse response) throws Exception {
        HttpSession session = request.getSession();
        response.setDateHeader("Expires", 0);
        response.setHeader("Cache-Control", "no-store, no-cache, must-revalidate");
        response.addHeader("Cache-Control", "post-check=0, pre-check=0");
        response.setHeader("Pragma", "no-cache");
        response.setContentType("image/jpeg");
        //生成验证码
        String capText = captchaProducer.createText();
        session.setAttribute(Constants.KAPTCHA_SESSION_KEY, capText);
        //向客户端写出
        BufferedImage bi = captchaProducer.createImage(capText);
        ServletOutputStream out = response.getOutputStream();
        ImageIO.write(bi, "jpg", out);
        try {
            out.flush();
        } finally {
            out.close();
        }
    }
}
HelloKaptcha.java:
@RestController
public class HelloKaptcha {
    @RequestMapping("/hello")
    public String hello(HttpServletRequest request) {
        if (!CodeUtil.checkVerifyCode(request)) {
            return "验证码有误!!!";
        } else {
            return "欢迎使用!!!";
        }
    }
}
编写工具类util:
CodeUtil.java:
public class CodeUtil {
/**
 * 将获取到的前端参数转为string类型
 */
public static String getString(HttpServletRequest request, String key) {
    try {
        String result = request.getParameter(key);
        if(result != null) {
            result = result.trim();
        }
        if("".equals(result)) {
            result = null;
        }
        return result;
    }catch(Exception e) {
        return null;
    }
}
/**
 * 验证码校验
 */
public static boolean checkVerifyCode(HttpServletRequest request) {
    //获取生成的验证码
    String verifyCodeExpected = (String) request.getSession().getAttribute(com.google.code.kaptcha.Constants.KAPTCHA_SESSION_KEY);
    //获取用户输入的验证码
    String verifyCodeActual = CodeUtil.getString(request, "verifyCodeActual");
    if(verifyCodeActual == null ||!verifyCodeActual.equals(verifyCodeExpected)) {
        return false;
    }
    return true;
    }
}
登录页面:
index.html:
登录系统
登录系统
注册页面:
login.html:
注册系统
账号注册系统
页面效果:


页面可能不是很美观,不要介意啦|ू・ω・` ),当然已经在HTML中顺便写入了JS的代码主要用于对于一些细节的处理如:登录界面账号、密码必须填写,而账号注册界面的密码要相同,注册的用户账号有位数要求;以上便是我的前端实现的操作。
三、前后端的交互
到这里问题就来了,前后端我要如何交互???这个就难到我了,据了解和目前做过项目,trymeleaf、vue等等可以进行交互,关于springboot整合trymeleaf倒是有所了解,但具体的使用不详,对于在账号注册的添加账号、密码不知道怎么存储到数据库里。然后不断的了解和回想做过的项目所用到的技术,因为只是一个简单的表单传送嘛,最后终于想到了HttpServletRequest的getParameter方法,具体代码实现如下:
1、前后交互之创建账号
首先要在login.html的action填入action="/CRUD/insert"来进行添加到数据库的操作。
修改一下上面实现CRUD的代码:
CRUD.java:
//对数据库进行增加字段操作
    @RequestMapping(value = "/insert", method = RequestMethod.POST)
    public User insert(User user,HttpServletRequest request)
    {
        user.setName(request.getParameter("username"));     //获取注册的用户账号,存放到数据库

        user.setPassword(request.getParameter("password2"));  //获取注册的用户密码,存放到数据库

        return userservice.insertUser(user);
    }
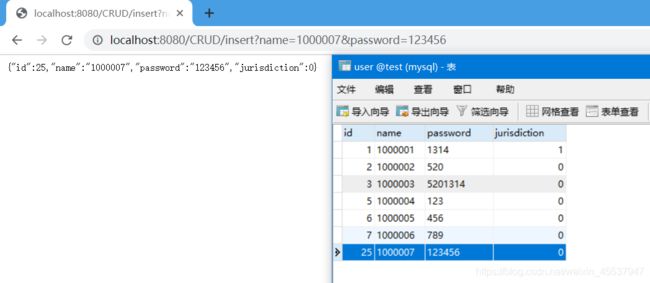
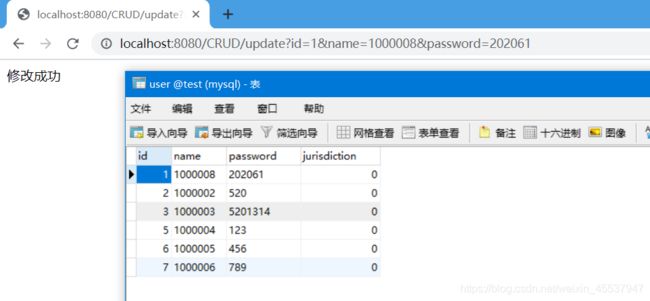
在看看效果:


是的,这个操作有用了我一下午o(╥﹏╥)o,不过,嗯~~~添加的操作感觉还行,哈哈哈哈哈,起码成功了,那这个下午就没有白费,然后现在又有难题了,注册账号嘛,当然要去数据库里先查找一下这个账号是否已经存在啦,所以用账号查询的方法来查询数据库数据是否存在,用户账号查询的sql语句在什么是已经实现了,所以只需要接收判断是否存在即可,由此便有了如下代码:
userMapper.findUserByName(request.getParameter("username")).size() == 0
这样便可判断数据是否已存在,那既然都判断到这个份上了,那登录判断账号密码是否相互对应和账号是否存在,也写了吧:
添加个mysql的语法,UserMapper.xml:
Java判断:
userMapper.findUserByPassword(request.getParameter("username"),request.getParameter("password")).size() != 0
2、前后交互之数据库数据传入前端显示
登录成功后,把数据库的数据全部传入前端页面,这里就要用到trymeleaf了,刚好在学习springboot开发常用技术里了解过,那便用一下吧。
SpringBoot开发常用技术这些你知道吗???
首先引入依赖pom.xml:
            org.springframework.boot
            spring-boot-starter-thymeleaf
application.properties:
###################################################################
#thymeleaf 静态资源配置
###################################################################
spring.thymeleaf.prefix=classpath:/templates/
spring.thymeleaf.suffix=.html
spring.thymeleaf.mode=HTML5
spring.thymeleaf.encoding=UTF-8
spring.thymeleaf.servlet.content-type=text/html
#关闭缓存,即时刷新,上线生产环境需求改为true
spring.thymeleaf.cache=false
提醒一下在前端和后端交互后,所用的CRUD都将在UserController里操作。
UserController.java:
@Controller
public class UserController {
    @Autowired
    private UserService userservice;

	@Autowired
    private UserMapper userMapper;

    @RequestMapping("/userList")
    public String ListUser(Model model, HttpServletRequest request){
        if (!CodeUtil.checkVerifyCode(request)) {
            return "examine";
        } else {
            List userList = userservice.ListUser();
            model.addAttribute("userList", userList);
            return "list";
        }
    }
}
前端接收:
list.html:
用户列表
ID
用户账号
用户密码
身份
3、前后交互之修改密码
到这里登录、注册、还有登录成功后的列表都完成了,那修改密码应该如何实现呢?思路:可以通过账号与密码来选定数据位置,然后接收前端的数据来进行更改,下面便完成修改密码的操作流程:
修改密码的页面updateID.html:
注册系统
密码修改系统
后端接收UserController.java:
//修改密码
    @RequestMapping(value = "/update")
    public String update(HttpServletRequest request) {
        String name = request.getParameter("username");
        String password = request.getParameter("password");
        if (userMapper.findUserByPassword(name,password).size() != 0) {  //查询数据库该条数据是否存在
            String password1 = request.getParameter("password2");
            userMapper.Update(password1, name);
            return "index";
        } else {
            return "update";
        }
    }
4、前后交互之删除
修改密码的操作就完成了,下面便是删除的操作,我通过ID的查找进行删除:
关于SQL的语法在一开始就已经实现,前端代码:
后端代码UserController:
//删除用户
    @RequestMapping(value = "/delete")
    public String delete(int id) {
        int result = userservice.delete(id);
        if (result >= 1) {
            return "Refresh";			//成功的页面跳转
        } else {
            return "Refresh_the_list";		//失败的页面跳转
        }
    }
到最后就是用户登录时,如何判断登录的用户是普通用户还是管理员,操作如下:
5、前后交互之权限区别登录
前端index.html(部分代码):
身份:
所以后端接收判断其身份即可,为了能使账号和身份查询是否对应,便有了如下操作:
UserMapper.xml:
最后整个登录的后台操作便写成了这样UserController:
//登录成功后,查询所有数据
    @RequestMapping("/userList")
    public String ListUser(Model model, HttpServletRequest request){
        String name = request.getParameter("username");
        String password = request.getParameter("password");
        String jurisdiction = request.getParameter("jurisdiction");
        if (userMapper.findUserByPassword(name,password).size() != 0) {  //查询数据库该条数据是否存在
            if (!CodeUtil.checkVerifyCode(request)) {       //判断验证码是否正确
                return "examine";
            } else {
                //通过name和jurisdiction判断账号身份
                if (jurisdiction.equals("管理员")) {
                    if (userMapper.findNameByJurisdiction(name, jurisdiction).size() != 0) {
                        List userList = userservice.ListUser();
                        model.addAttribute("userList", userList);
                        return "listAdministrator";
                    } else {
                        return "jurisdictionerror";
                    }
                } else {
                    if (userMapper.findNameByJurisdiction(name, jurisdiction).size() != 0) {
                        List userList = userservice.ListUser();
                        model.addAttribute("userList", userList);
                        return "listUser";
                    } else {
                        return "jurisdictionerror";
                    }
                }
            }
        } else {
            return "ringup";
        }
    }
以上便是我整个小demo的实现历程(づ。◕ᴗᴗ◕。)づ
四、小总结与源码获取
小总结:
要总结的东西,额…其实也没啥好总结,毕竟这个小demo无论是表现层、业务层、数据层里面所用的逻辑和知识点都是很简单的,其中不足的是对于前后端的交互交互的也不多,对js、ajax等一些技术不熟悉进行的传值效果不好,像JSP因为我只简单的了解了一下,就没有用了,不过经历这次可以发现,身为以Java后端为方向的小白,前后端都自己开发,发现反倒是前端花费的时间比后端功能实现要多得多,收获的话,就是对MyBatis、Servlet比较熟系了运用也比较有经验了一点点,对于一个项目的开发流程比较理得清,日后还得多加油,一个Java后端的小白仍在打怪升级的路上<(▰˘◡˘▰)>
web后端和前端是怎么连接的?
网站数据处理主要分为三层。
第一层,表示层,这部分可以用HTML代码,CSS/Javascript代码来实现等。通过前端代码可以实现网页的布局和设计。这层又可以称为显示层。也就是你用浏览器打开能看到的网页。
第二层,是业务层,这层是负责处理数据的。常用的代码语言有PHP,JSP,Java等。通过这些后台处理语言的算法来处理前台传回的数据。必要的时候进行操作数据库,然后把结果返回给前端网页。
第三层,是数据层,这个就是数据库,用来存储数据的。通过业务层的操作可以实现增删改数据库的操作。
举个例子就是这样,比方说你在网页上填一个表格然后提交会有以下几种数据传输经过:
①你接触到的是这个网页是属于表示层,这个网页一般由HTML标签结合CSS/JAVASCRIPT来实现的。 这时候你要先填入数据。
②然后你按提交触发后台处理机制,这时候数据会传到后台的代码进行处理。这部分代码根据不同网站可以使PHP,JSP,JAVA等。 代码根据程序员预设的算法将收到的数据进行处理之后会相应的对数据库进行操作,存储数据等。
③成功操作完数据库之后,业务层的代码会再向表示层也就是显示器端传回一个指令通知你表格填写成功
源码:点我,你就可以得到我(づ ̄3 ̄)づ╭❤~
居然都看到这里了, 点个赞呗,创作不易 ⁞⁞⁞⁞꒰ ´╥ д ╥` ू ꒱⁞⁞⁞⁞

