spring-mvc mybatis 整合其中包括整合步骤,整合区别,以及通过一个通过id查询的实例说明问题 dao层 service层,整合需要注意哪些点
第十七章 环境整合
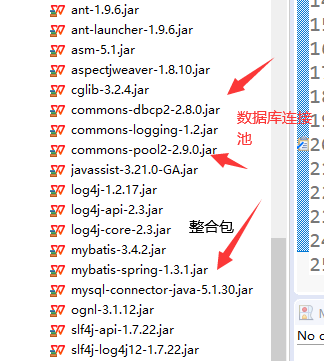
导包
编写配置文件 applicationContext.xml
引入文件
数据库连接的配置

事务管理
mapper扫描器,跟数据库相关
dao:数据库读写
servers:具体的业务,调用dao层代码,先写接口,再写实现类
controller:需要配置在springmvc
配置mabatis-config
配置别名
springmvc-config
视图解析器

自动包扫描和注解驱动

web.xml
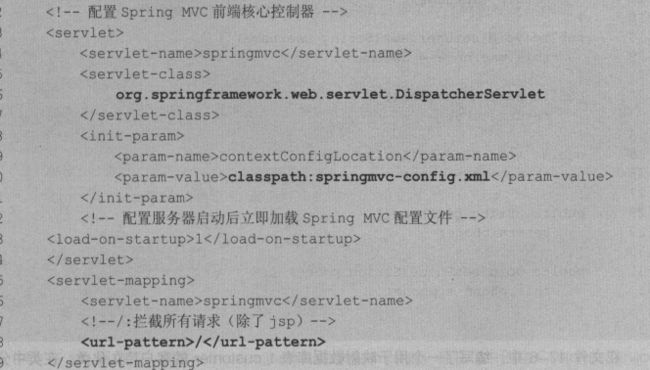
配置前端控制器
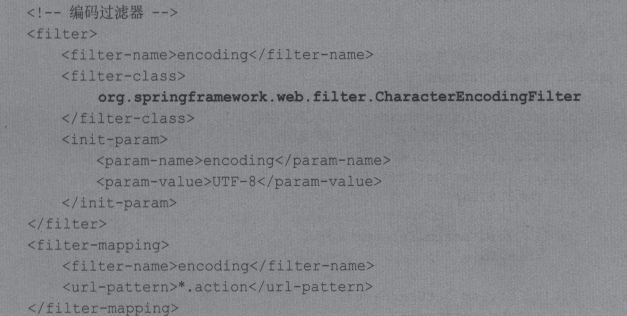
配置中文解析
读取:applicationContaxt…xml
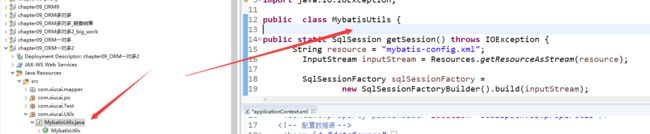
之前在测试类中
写配置文件::applicationContaxt-xxx,可以分为多个.在web中写applicationContaxt-*可以都加载了

整合测试:
建立数据库

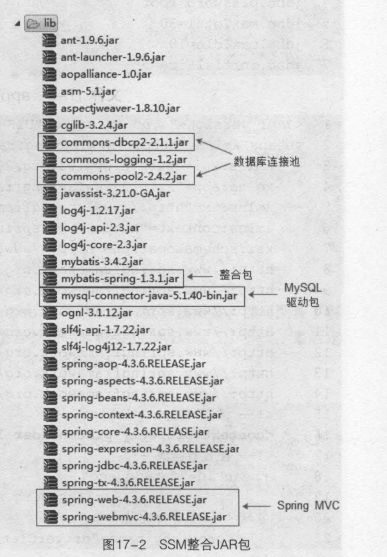
第一步:导包
- 四个核心包:
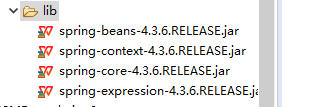
- aop跟aspects切面包

- springmvc包:

- jdbc和tx包 tx包:spring提供对事务的支持,事务的相关处理以及实现类就在这个Jar包中
![]()
到这里包是springmvc的
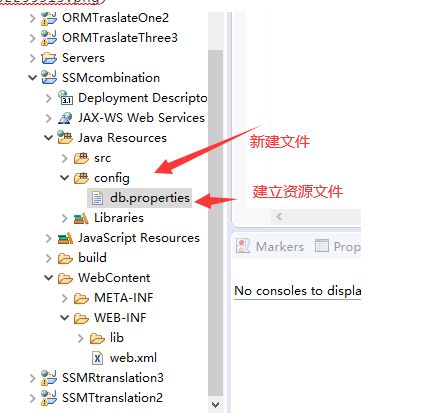
第二步:编写db.properties文件
jdbc.driver=com.mysql.jdbc.Driver
jdbc.url=jdbc:mysql://localhost:3306/mybatis
jdbc.username=root
jdbc.password=
jdbc.maxTotal=30
jdbc.maxIdle=10
jdbc.initialSize=5
这里没有区别
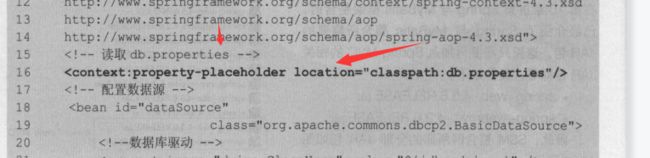
第三步:编写applicationContexte.xml
读取数据库配置文件,配置数据库
之前
在mbatis-config中

之前的代码
<configuration>
<properties resource="db.properties">properties>
<typeAliases>
<package name="com.xiucai.po"/>
typeAliases>

    <environments default="mysql">

        <environment id="mysql">

            <transactionManager type="JDBC" />

            <dataSource type="POOLED">
			  <property name="driver" value="${jdbc.driver}" />
			  <property name="url"  value="${jdbc.url}" />
			  <property name="username" value="${jdbc.username}" />
			  <property name="password" value="${jdbc.password}" />
            dataSource>
        environment>
    environments>

    <mappers>

		<mapper resource="com/xiucai/mapper/PersonMapper.xml" />

    mappers>
configuration>
之前设置工厂都在工具类建一个工厂生成
现在
在applicationContext.xml中
头部内容
<beans xmlns="http://www.springframework.org/schema/beans"
    xmlns:xsi="http://www.w3.org/2001/XMLSchema-instance"
    xmlns:aop="http://www.springframework.org/schema/aop"
    xmlns:tx="http://www.springframework.org/schema/tx"
    xmlns:context="http://www.springframework.org/schema/context"
    xsi:schemaLocation="http://www.springframework.org/schema/beans
    http://www.springframework.org/schema/beans/spring-beans-4.3.xsd
    http://www.springframework.org/schema/tx
    http://www.springframework.org/schema/tx/spring-tx-4.3.xsd
    http://www.springframework.org/schema/context
    http://www.springframework.org/schema/context/spring-context-4.3.xsd
    http://www.springframework.org/schema/aop
    http://www.springframework.org/schema/aop/spring-aop-4.3.xsd">
beans>
配置数据源
	<bean id="dataSource"
            class="org.apache.commons.dbcp2.BasicDataSource">

        <property name="driverClassName" value="${jdbc.driver}" />

        <property name="url" value="${jdbc.url}" />

        <property name="username" value="${jdbc.username}" />

        <property name="password" value="${jdbc.password}" />

        <property name="maxTotal" value="${jdbc.maxTotal}" />

        <property name="maxIdle" value="${jdbc.maxIdle}" />

        <property name="initialSize" value="${jdbc.initialSize}" />
	bean>
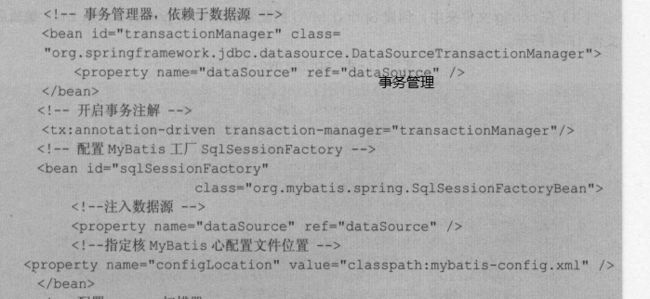
配置事务管理器
之前这一块也在applicationContext
		<property name="dataSource" ref="dataSource" />
	bean>

	<tx:annotation-driven transaction-manager="transactionManager"/>
现在在xml设置了 session工厂
    <bean id="sqlSessionFactory"
            class="org.mybatis.spring.SqlSessionFactoryBean">

         <property name="dataSource" ref="dataSource" />

   		<property name="configLocation" value="classpath:mybatis-config.xml"/>
   bean>
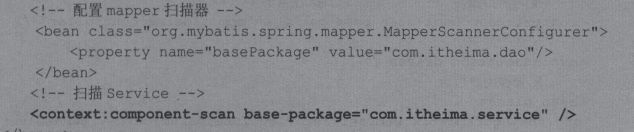
配置mapper扫描器
之前在mybatis-config.xml中这个在上文也提到过
<bean class="org.mybatis.spring.mapper.MapperScannerConfigurer">
<property name="basePackage" value="com.xiucai.dao">property>
bean>

<context:component-scan base-package="com.xiucai.service">context:component-scan>
总的
<beans xmlns="http://www.springframework.org/schema/beans"
    xmlns:xsi="http://www.w3.org/2001/XMLSchema-instance"
    xmlns:aop="http://www.springframework.org/schema/aop"
    xmlns:tx="http://www.springframework.org/schema/tx"
    xmlns:context="http://www.springframework.org/schema/context"
    xsi:schemaLocation="http://www.springframework.org/schema/beans
    http://www.springframework.org/schema/beans/spring-beans-4.3.xsd
    http://www.springframework.org/schema/tx
    http://www.springframework.org/schema/tx/spring-tx-4.3.xsd
    http://www.springframework.org/schema/context
    http://www.springframework.org/schema/context/spring-context-4.3.xsd
    http://www.springframework.org/schema/aop
    http://www.springframework.org/schema/aop/spring-aop-4.3.xsd">

    <context:property-placeholder location="classpath:db.properties"/>

	<bean id="dataSource"
            class="org.apache.commons.dbcp2.BasicDataSource">

        <property name="driverClassName" value="${jdbc.driver}" />

        <property name="url" value="${jdbc.url}" />

        <property name="username" value="${jdbc.username}" />

        <property name="password" value="${jdbc.password}" />

        <property name="maxTotal" value="${jdbc.maxTotal}" />

        <property name="maxIdle" value="${jdbc.maxIdle}" />

        <property name="initialSize" value="${jdbc.initialSize}" />
	bean>


		<property name="dataSource" ref="dataSource" />
	bean>

	<tx:annotation-driven transaction-manager="transactionManager"/>


    <bean id="sqlSessionFactory"
            class="org.mybatis.spring.SqlSessionFactoryBean">

         <property name="dataSource" ref="dataSource" />

   		<property name="configLocation" value="classpath:mybatis-config.xml"/>
   bean>

<bean class="org.mybatis.spring.mapper.MapperScannerConfigurer">
<property name="basePackage" value="com.xiucai.dao">property>
bean>

<context:component-scan base-package="com.xiucai.service">context:component-scan>
beans>
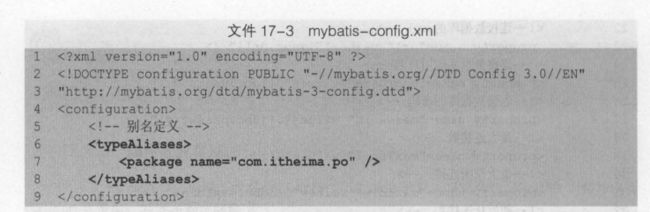
第三步编写mybatis-config.xml
之前包含配置数据库文件,跟扫描包mapper,现在改掉了
把之前
<configuration>
<properties resource="dba.properties">properties>
<typeAliases>
<package name="com.xiucai.po"/>
typeAliases>

    <environments default="mysql">

        <environment id="mysql">

            <transactionManager type="JDBC" />

            <dataSource type="POOLED">
			  <property name="driver" value="${jdbc.driver}" />
			  <property name="url"  value="${jdbc.url}" />
			  <property name="username" value="${jdbc.username}" />
			  <property name="password" value="${jdbc.password}" />
            dataSource>
        environment>
    environments>

    <mappers>

		<mapper resource="com/xiucai/mapper/PersonMapper.xml" />

    mappers>
configuration>
改成了
只保留了配置别名的功能
<configuration>

<typeAliases>
<package name="com.xiucai.po"/>
typeAliases>

configuration>
第四步 springmvc-config.xml
<beans xmlns="http://www.springframework.org/schema/beans"
  xmlns:mvc="http://www.springframework.org/schema/mvc"
  xmlns:xsi="http://www.w3.org/2001/XMLSchema-instance"
  xmlns:context="http://www.springframework.org/schema/context"
  xsi:schemaLocation="http://www.springframework.org/schema/beans
  http://www.springframework.org/schema/beans/spring-beans-4.3.xsd
  http://www.springframework.org/schema/mvc
  http://www.springframework.org/schema/mvc/spring-mvc-4.3.xsd
  http://www.springframework.org/schema/context
  http://www.springframework.org/schema/context/spring-context-4.3.xsd">

	<context:component-scan base-package="com.xiucai.controller" />

	<mvc:annotation-driven>mvc:annotation-driven>


	     <property name="prefix" value="/WEB-INF/jsp/" />

	     <property name="suffix" value=".jsp" />
	bean>

beans>
第五步编写 web.xml
重要的一步,之前这个步骤在test里边
<context-param>
<param-name>contextConfigLocationparam-name>
<param-value>classpath:applicationContext.xmlparam-value>
context-param>
<listener>
<listener-class>org.springframework.web.context.ContextLoaderListenerlistener-class>
listener>
相当于
![]()
<web-app xmlns:xsi="http://www.w3.org/2001/XMLSchema-instance"
	      xmlns="http://xmlns.jcp.org/xml/ns/javaee"
	      xsi:schemaLocation="http://xmlns.jcp.org/xml/ns/javaee
	      http://xmlns.jcp.org/xml/ns/javaee/web-app_3_1.xsd"
	      id="WebApp_ID" version="3.1">


<context-param>
<param-name>contextConfigLocationparam-name>
<param-value>classpath:applicationContext.xmlparam-value>
context-param>
<listener>
<listener-class>org.springframework.web.context.ContextLoaderListenerlistener-class>
listener>


  <filter>
  <filter-name>CharacterEncodingFilterfilter-name>
  <filter-class>org.springframework.web.filter.CharacterEncodingFilterfilter-class>
  <init-param>
  <param-name>encodingparam-name>
  <param-value>UTF-8param-value>
  init-param>
  filter>


  <servlet>
       <servlet-name>springmvcservlet-name>
       <servlet-class>
           org.springframework.web.servlet.DispatcherServlet
       servlet-class>

       <init-param>
          <param-name>contextConfigLocationparam-name>
          <param-value>classpath:springmvc-config.xmlparam-value>
       init-param>

       <load-on-startup>1load-on-startup>
   servlet>


   <servlet-mapping>
       <servlet-name>springmvcservlet-name>
       <url-pattern>/url-pattern>
   servlet-mapping>


web-app>
第六步 建立 实例化持久化po

package com.xiucai.po;

public class Customer {

private Integer id;
private String username;
private String jobs;
private String phone;
public Integer getId() {

	return id;
}
public String getUsername() {

	return username;
}
public String getJobs() {

	return jobs;
}
public String getPhone() {

	return phone;
}
public void setId(Integer id) {

	this.id = id;
}
public void setUsername(String username) {

	this.username = username;
}
public void setJobs(String jobs) {

	this.jobs = jobs;
}
public void setPhone(String phone) {

	this.phone = phone;
}
@Override
public String toString() {

	return "Customer [id=" + id + ", username=" + username + ", jobs=" + jobs + ", phone=" + phone + "]";
}
}
第七步 建立dao层 其中包括抽象接口以及映射文件
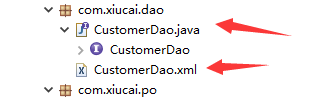
当xml里边的方法名字跟dao层接口里边的方法名字不一致时,会导致报错.
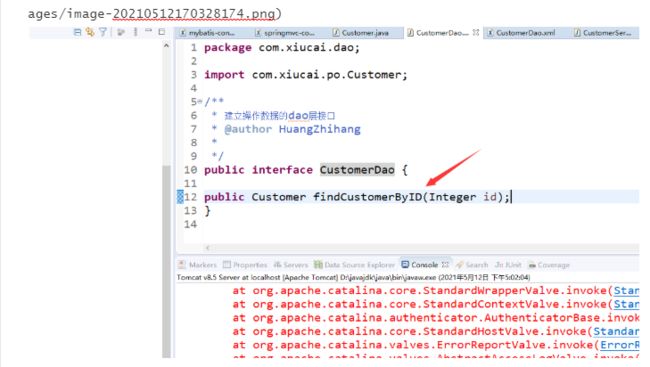

更改过来以后正常执行映射
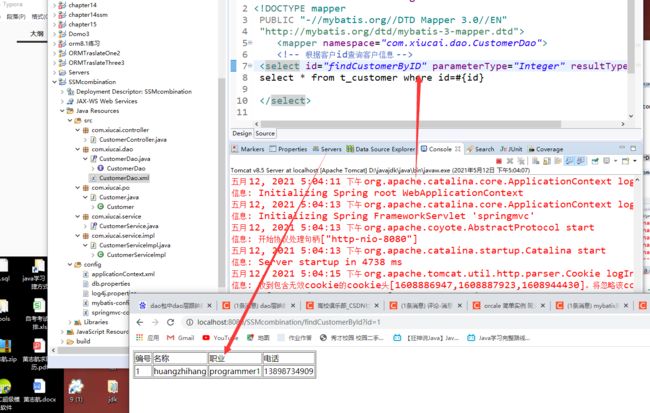
    <mapper namespace="com.xiucai.dao.CustomerDao">

 <select id="findCustomerById" parameterType="Integer" resultType="Customer">
 select * from t_customer where id=#{id}

 select>


    mapper>
package com.xiucai.dao;
/**
 * 建立操作数据的dao层接口
 * @author HuangZhihang
 *
 */
public interface CustomerDao {


public void findCustomerById(Integer id);
}
第八步建立service层
CustomerService接口
package com.xiucai.service;

import com.xiucai.po.Customer;

public interface CustomerService {

	public Customer findCustomerById(Integer id);
}
package com.xiucai.service.impl;
import org.springframework.beans.factory.annotation.Autowired;
import org.springframework.stereotype.Service;
import org.springframework.transaction.annotation.Transactional;
import com.xiucai.dao.CustomerDao;
import com.xiucai.po.Customer;
import com.xiucai.service.CustomerService;
@Service
@Transactional
public class CustomerServicelmpl implements CustomerService {
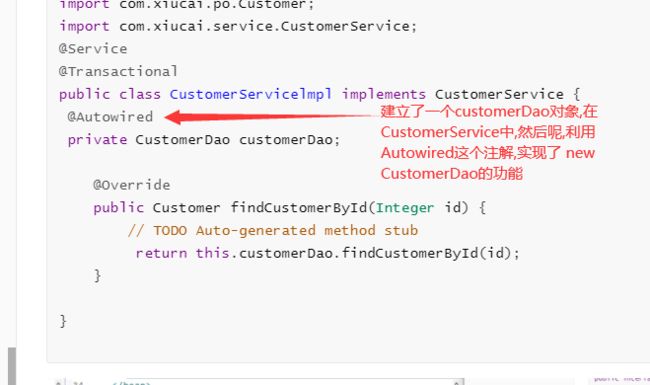
@Autowired
private CustomerDao customerDao;
@Override
public Customer findCustomerById(Integer id) {
// TODO Auto-generated method stub
return this.customerDao.findCustomerById(id);
}
}

在里边可以使用注解的方法
service注解作用
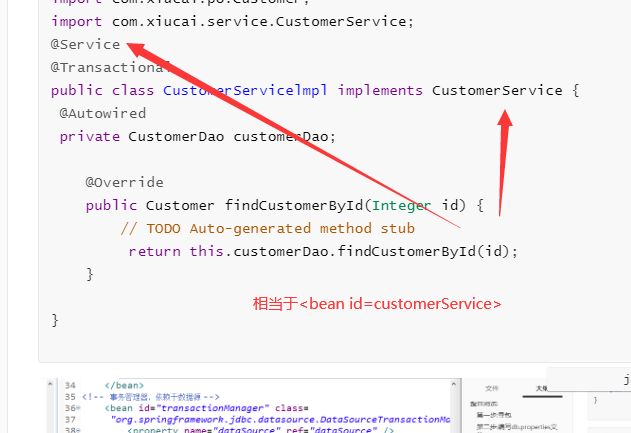

这里只管扫描 ,到底是不是还是得看上边有没有@Service


第九步 建立controller
package com.xiucai.controller;

import org.springframework.beans.factory.annotation.Autowired;
import org.springframework.stereotype.Controller;
import org.springframework.ui.Model;
import org.springframework.web.bind.annotation.RequestMapping;

import com.xiucai.po.Customer;
import com.xiucai.service.CustomerService;

@Controller
public class CustomerController {

@Autowired
private CustomerService customerService;
@RequestMapping("/findCustomerById")
public String findCustomerById(Integer id,Model model) {


	Customer customer=customerService.findCustomerById(id);
	model.addAttribute("customer",customer);

	return "customer";
}
}
第十步 建立jsp
<%@ page language="java" contentType="text/html; charset=UTF-8"
	pageEncoding="UTF-8"%>


Insert title here


			编号
			名称

			职业
			电话


			${customer.id}
			${customer.username}

			${customer.jobs}
			${customer.phone}