react-native-code-push在Android上的更新流程
热更新
CodePush 是微软提供的一套用于热更新 React Native 和 Cordova 应用的服务。
CodePush 是提供给 React Native 和 Cordova 开发者直接部署移动应用更新给用户设备的云服务。CodePush 作为一个中央仓库,开发者可以推送更新 (JS, HTML, CSS and images),应用可以从客户端 SDK 里面查询更新。CodePush 可以让应用有更多的可确定性,也可以让你直接接触用户群。在修复一些小问题和添加新特性的时候,不需要经过二进制打包,可以直接推送代码进行实时更新。
CodePush 可以进行实时的推送代码更新:
- 直接对用户部署代码更新
- 管理 Alpha,Beta 和生产环境应用
- 支持 React Native 和 Cordova
- 支持JavaScript 文件与图片资源的更新
CodePush开源了react-native版本,react-native-code-push托管在GitHub上。
具体关于CodePush的部署及安装,本文不阐释,可自行搜索网络资源,本文是基于自己部署的Code Push服务器进行Android及iOS应用的热更新,已稳定运行超过2年。
Android code-push配置流程
(1)react native 的package.json的 react-native-code-push: "^5.7.0" ;
(2)Android代码中需要把对应的key配置好,我这直接在build.gradle上把配置,这样的好处在于debug与release上自动切换,避免犯错;
    buildTypes {
        release {
            minifyEnabled true
            proguardFiles getDefaultProguardFile('proguard-android.txt'), 'proguard-rules.pro'
            buildConfigField "boolean", "SIGN_CHECK", "true"
            buildConfigField "String", "CODE_PUSH_KEY", '"配置你的key"'
            buildConfigField "boolean", "IS_CODE_PUSH", "true"
            signingConfig signingConfigs.release
        }
        debug {
            minifyEnabled false
            proguardFiles getDefaultProguardFile('proguard-android.txt'), 'proguard-rules.pro'
            buildConfigField "boolean", "SIGN_CHECK", "false"
            buildConfigField "String", "CODE_PUSH_KEY", '"配置你的key"'
            buildConfigField "boolean", "IS_CODE_PUSH", "true"
            signingConfig signingConfigs.release
        }
}(3)将react-native-code-push link进来,建议手动配置,直接运行命令的话不保证正常,而且容易出小毛病,setting.gradle配置如下:
rootProject.name='Test'
include ':react-native-code-push'
project(':react-native-code-push').projectDir = new File(rootProject.projectDir, '../node_modules/react-native-code-push/android/app')
include ':app'
(4)新建一个React native的容器,我这直接在TestActivity.java上操作,具体如下:
public class TestActivity extends AppCompatActivity implements DefaultHardwareBackBtnHandler {
 private ReactRootView mReactRootView;
 private ReactInstanceManager mReactInstanceManager;

 @Override
    protected void onCreate(Bundle savedInstanceState) {
        super.onCreate(savedInstanceState);

        mReactRootView = new ReactRootView(this);
        ReactInstanceManagerBuilder mReactInstanceManagerBuilder = ReactInstanceManager.builder()
                .setApplication(getApplication())
                .setCurrentActivity(this)
                .setBundleAssetName("index.android.bundle")
                .setJSMainModulePath("index")
                .addPackage(new CodePush(
                        BuildConfig.CODE_PUSH_KEY,
                        getApplicationContext(),
                        BuildConfig.DEBUG,
                        "填上你的热更新服务器地址"))
                .setUseDeveloperSupport(BuildConfig.DEBUG)
                .setInitialLifecycleState(LifecycleState.RESUMED);
        //根据实际build.gradle配置是否在测试与生产环境下开启热更新,开启了则将JS文件采用CodePush的
        if (BuildConfig.IS_CODE_PUSH) {
            mReactInstanceManagerBuilder.setJSBundleFile(CodePush.getJSBundleFile());
        }
        mReactInstanceManager = mReactInstanceManagerBuilder.build();
        // 注意这里的MyReactNativeApp必须对应“index.js”中的
        // “AppRegistry.registerComponent()”的第一个参数
        mReactRootView.startReactApplication(mReactInstanceManager, "Test", null);
        setContentView(mReactRootView);

    }

    @Override
    protected void onPause() {
        super.onPause();

        if (mReactInstanceManager != null) {
            mReactInstanceManager.onHostPause(this);
        }
    }

    @Override
    protected void onResume() {
        super.onResume();
        if (mReactInstanceManager != null) {
            mReactInstanceManager.onHostResume(this, this);
        }
    }

    @Override
    protected void onDestroy() {
        super.onDestroy();
        if (mReactInstanceManager != null) {
            mReactInstanceManager.onHostDestroy(this);
            mReactInstanceManager.destroy();
            mReactInstanceManager = null;
        }
        if (mReactRootView != null) {
            mReactRootView.unmountReactApplication();
        }
    }

   @Override
    public void onBackPressed() {
        if (mReactInstanceManager != null) {
            mReactInstanceManager.onBackPressed();
        } else {
            super.onBackPressed();
        }
    }

    @Override
    public void invokeDefaultOnBackPressed() {
        super.onBackPressed();
    }

}
以上基本是Android的大致code-push配置流程,剩下的需要在js代码中添加code-push的调用了
(5)回到react native代码上,我们需要在打开APP时或者从后台重新返回到前台时进行检测热更新,具体的策略可自行调整,启动页如下Test.android.js:
import React, {Component} from 'react';
import {View,Text} from 'react-native';
import CodePush from "react-native-code-push";

let codePushOptions = {checkFrequency: CodePush.CheckFrequency.ON_APP_RESUME};
type Props = {};

class Test extends Component {

    componentDidMount(): void {
        this.syncImmediate();
    }

    //如果有更新的提示
    syncImmediate = () => {
        let syncOption = {
            deploymentKey: '对应原生上的key,注意debug与release',
            updateDialog: false,
            mandatoryInstallMode: CodePush.InstallMode.IMMEDIATE,
            InstallMode: CodePush.InstallMode.IMMEDIATE,
            rollbackRetryOptions: {
                delayInHours: 1,//回滚后重试,1小时/次
                maxRetryAttempts: 24//回滚后重试,最大尝试24次
            }
        };
        CodePush.sync(syncOption, (status) => {
            console.log("CodePush = change " + JSON.stringify(status))
            switch (status) {
                case CodePush.SyncStatus.DOWNLOADING_PACKAGE:
                    console.log("CodePushLabel DOWNLOADING_PACKAGE");
                    break;
                case CodePush.SyncStatus.INSTALLING_UPDATE:
                    console.log("CodePushLabel INSTALLING_UPDATE");
                    break;
                case CodePush.SyncStatus.UP_TO_DATE:
                case CodePush.SyncStatus.UPDATE_INSTALLED:
                    console.log("CodePushLabel " + CodePush.SyncStatus.UP_TO_DATE);
                    //存储当前热更新版本号
                    CodePush.getUpdateMetadata().then((localPackage) => {

                        if (JSON.stringify(localPackage) !== '{}' && localPackage.hasOwnProperty('label')) {
                            console.log("CodePushLabel = " + localPackage.label + " failedInstall = " + localPackage.failedInstall);
                            //TODO存储操作
                        }
                    }).catch(e => {
                        console.log("CodePushLabel Err = " + e);
                    });
                    break;
                case CodePush.SyncStatus.SYNC_IN_PROGRESS:
                    console.log("CodePushLabel SYNC_IN_PROGRESS");
                    break;
                case CodePush.SyncStatus.CHECKING_FOR_UPDATE:
                    console.log("CodePushLabel SYNC_IN_PROGRESS");
                    break;
            }
        }, (progress) => {
            console.log("CodePush = progress " + JSON.stringify(progress))
        }, (update) => {
            console.log("CodePush = update " + JSON.stringify(update))
        });
    };

    render() {
        return (

                测试

        );
    }

}

export default TestPage= CodePush(codePushOptions)(Test);
(6)运行热更新命令
//Staging为测试,Production为生产,Test-android中的Test为配置的项目名
code-push release-react Test-android android -d Staging-m true --des '1. 测试热更新' --t 1.0.0
Android热更新下载流程
在配置完后,我们可以进行手动debug查看具体code-push到底是怎么实现热更新下载
(1)在React native 挂载中,我们通过CodePush调用sync方法来实现检测更新,CodePush.js
// This function allows only one syncInternal operation to proceed at any given time.
// Parallel calls to sync() while one is ongoing yields CodePush.SyncStatus.SYNC_IN_PROGRESS.
const sync = (() => {
  let syncInProgress = false;
  const setSyncCompleted = () => { syncInProgress = false; };

  return (options = {}, syncStatusChangeCallback, downloadProgressCallback, handleBinaryVersionMismatchCallback) => {
    let syncStatusCallbackWithTryCatch, downloadProgressCallbackWithTryCatch;
    if (typeof syncStatusChangeCallback === "function") {
      syncStatusCallbackWithTryCatch = (...args) => {
        try {
          syncStatusChangeCallback(...args);
        } catch (error) {
          log(`An error has occurred : ${error.stack}`);
        }
      }
    }

    if (typeof downloadProgressCallback === "function") {
      downloadProgressCallbackWithTryCatch = (...args) => {
        try {
          downloadProgressCallback(...args);
        } catch (error) {
          log(`An error has occurred: ${error.stack}`);
        }
      }
    }

    if (syncInProgress) {
      typeof syncStatusCallbackWithTryCatch === "function"
        ? syncStatusCallbackWithTryCatch(CodePush.SyncStatus.SYNC_IN_PROGRESS)
        : log("Sync already in progress.");
      return Promise.resolve(CodePush.SyncStatus.SYNC_IN_PROGRESS);
    }

    syncInProgress = true;
    const syncPromise = syncInternal(options, syncStatusCallbackWithTryCatch, downloadProgressCallbackWithTryCatch, handleBinaryVersionMismatchCallback);
    syncPromise
      .then(setSyncCompleted)
      .catch(setSyncCompleted);

    return syncPromise;
  };
})();
从源码我们继续进入到syncInternal方法内,在CodePush.js文件410行,先将正在等待的更新全部移除
await CodePush.notifyApplicationReady();Android源码可以对应找到CodePushNativeModule.java内的notifyApplicationReady方法,因为js上await,所以需要等待Android这边处理完后才往下进行
    @ReactMethod
    public void notifyApplicationReady(Promise promise) {
        try {
            mSettingsManager.removePendingUpdate();
            promise.resolve("");
        } catch(CodePushUnknownException e) {
            CodePushUtils.log(e);
            promise.reject(e);
        }
    }
(2)清除完后,js通过code-push包下script的acquisition-sdk.js进行与服务器的版本对比,当本地热更新版本小于服务器的热更新版本时,返回需要下载的信息
   AcquisitionManager.prototype.queryUpdateWithCurrentPackage = function (currentPackage, callback) {
            ...
            try {
                var responseObject = JSON.parse(response.body);
                var updateInfo = responseObject.update_info;
            }
            catch (error) {
                callback(error, /*remotePackage=*/ null);
                return;
            }
            ...
        });
};(3)下载热更新包,我们可以打开Android中的code-push源码,找到CodePushUpdateManager.java的downloadPackage方法,
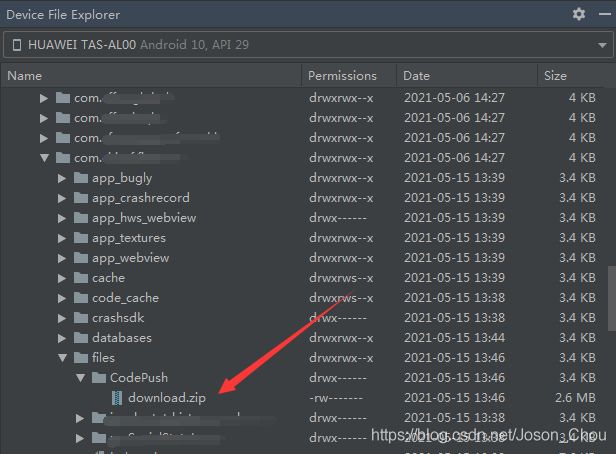
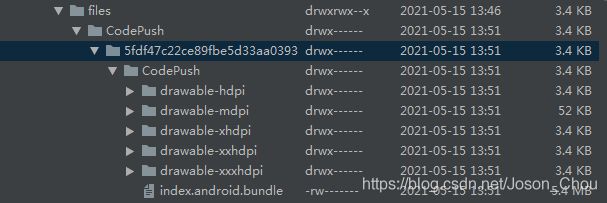
其中热更新下载到本地的路径为/data/user/0包名/files/CodePush/热更新包哈希值/,通过Android studio的Device File Explorer可以看到,下载下来的是一个压缩包
代码往下走,可以找到CodePushUpdateManager.java的downloadPackage方法里,将下载到的压缩包进行解压,得到一个unzipped的文件夹,然后通过刚才的热更新包哈希进行新建一个文件夹,将unzipped的内容复制到该文件夹下,然后删除unzipped文件夹,为下一次热更新做准备,下载整体流程基本如上,理解来不难,可以看到热更新包解压后的内容包括图片资源、bundle文件,也就是js代码,
Android热更新安装流程
前面说明热更新的下载,既然热更新的文件我们都下载下来了,剩下的就是将bundle与资源文件重新指向到新下载的热更新文件下。接下来,我们继续来分析源码,查看安装更新的流程。
(1)继续回到CodePushUpdateManager.java的downloadPackage方法里,这里有一个比较有意思的地方,可以看到在248行代码里,有这么一段,是不是说明咱们热更新也可以支持增量更新,而不用全量更新呢?有待实验~
     if (isDiffUpdate) {
        CodePushUtils.log("Applying diff update.");
     } else {
        CodePushUtils.log("Applying full update.");
}在方法最后一段,CodePushUtils.writeJsonToFile(updatePackage, newUpdateMetadataPath),目的是将热更新包的内容更新本地,作为下一次的热更新版本对比。
(2)回到CodePush.js的syncInternal方法内,接下来进行安装流程,
   await localPackage.install(resolvedInstallMode, syncOptions.minimumBackgroundDuration, () => {
        syncStatusChangeCallback(CodePush.SyncStatus.UPDATE_INSTALLED);
});在安装前会检测是否文件下载失败,如果失败了,将会在SettingsManager.java 的 saveFailedUpdate 方法以SharedPreferences记录下来具体哪些资源下载失败。
回到CodePushNativeModule.java中的installUpdate方法,我们在起初时设置的更新安装模式为CodePushInstallMode.ON_NEXT_RESUME,将在下次onResume时进行安装,源码中可以看到通过Runnable接口中调用loadBundle方法。
(3)在loadBundle方法里,可以看到将更新下来的bundle与资源文件路径重新加载,从而达到热更新的目的。
    // Use reflection to find and set the appropriate fields on ReactInstanceManager. See #556 for a proposal for a less brittle way
    // to approach this.
    private void setJSBundle(ReactInstanceManager instanceManager, String latestJSBundleFile) throws IllegalAccessException {
        try {
            JSBundleLoader latestJSBundleLoader;
            if (latestJSBundleFile.toLowerCase().startsWith("assets://")) {
                latestJSBundleLoader = JSBundleLoader.createAssetLoader(getReactApplicationContext(), latestJSBundleFile, false);
            } else {
                latestJSBundleLoader = JSBundleLoader.createFileLoader(latestJSBundleFile);
            }

            Field bundleLoaderField = instanceManager.getClass().getDeclaredField("mBundleLoader");
            bundleLoaderField.setAccessible(true);
            bundleLoaderField.set(instanceManager, latestJSBundleLoader);
        } catch (Exception e) {
            CodePushUtils.log("Unable to set JSBundle - CodePush may not support this version of React Native");
            throw new IllegalAccessException("Could not setJSBundle");
        }
}(4)在loadBundle方法里,调用ReactInstanceManager的recreateReactContextInBackground重新创建React native的上下文,如果在重新加载过程中还没完成,则判断是否需要进行回滚操作,CodePush.java中initializeUpdateAfterRestart方法
 void initializeUpdateAfterRestart() {
        // Reset the state which indicates that
        // the app was just freshly updated.
        mDidUpdate = false;

        JSONObject pendingUpdate = mSettingsManager.getPendingUpdate();
        if (pendingUpdate != null) {
            JSONObject packageMetadata = this.mUpdateManager.getCurrentPackage();
            if (packageMetadata == null || !isPackageBundleLatest(packageMetadata) && hasBinaryVersionChanged(packageMetadata)) {
                CodePushUtils.log("Skipping initializeUpdateAfterRestart(), binary version is newer");
                return;
            }

            try {
                boolean updateIsLoading = pendingUpdate.getBoolean(CodePushConstants.PENDING_UPDATE_IS_LOADING_KEY);
                if (updateIsLoading) {
                    // Pending update was initialized, but notifyApplicationReady was not called.
                    // Therefore, deduce that it is a broken update and rollback.
                    CodePushUtils.log("Update did not finish loading the last time, rolling back to a previous version.");
                    sNeedToReportRollback = true;
                    rollbackPackage();
                } else {
                    // There is in fact a new update running for the first
                    // time, so update the local state to ensure the client knows.
                    mDidUpdate = true;

                    // Mark that we tried to initialize the new update, so that if it crashes,
                    // we will know that we need to rollback when the app next starts.
                    mSettingsManager.savePendingUpdate(pendingUpdate.getString(CodePushConstants.PENDING_UPDATE_HASH_KEY),
                            /* isLoading */true);
                }
            } catch (JSONException e) {
                // Should not happen.
                throw new CodePushUnknownException("Unable to read pending update metadata stored in SharedPreferences", e);
            }
        }
    }
更新完成后,返回CodePush.SyncStatus.UPDATE_INSTALLED标识
至此,code-push在Android上的热更新流程如上!
结语
简单的介绍了code-push在Android上热更新的应用。欢迎大家拍砖点赞分析收藏,谢谢大家。


