一、vue学习笔记:vue-cli3创建vue项目,并配置路由
文章目录
-
- 1、安装nodejs
- 2、查看版本号:
-
- 2.1配置npm在安装全局模块时的路径和缓存cache的路径(可选操作)
- 2.2、npm常用命令
-
- 2.2.1、安装
- 2.2.2、npm更新、卸载
- 2.2.3、npm查看命令
- 2.2.3、其他
- 3、安装@vue/cli
-
- 遇到的问题:
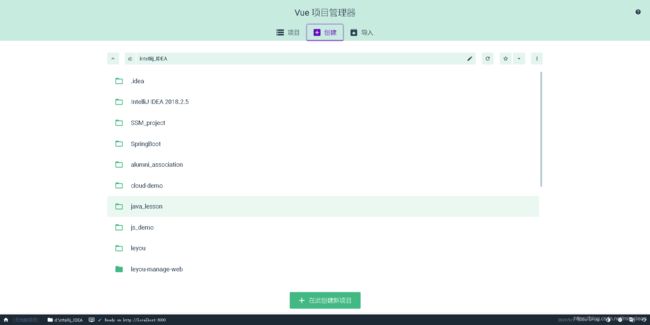
- 3.1 使用```vue ui```来创建项目
- 3.2初始界面
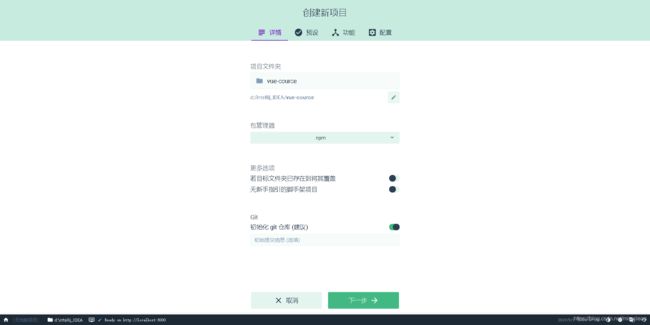
- 3.3创建新的项目
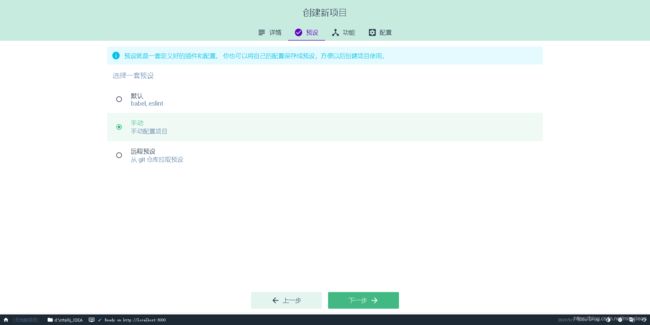
- 3.4 手动选着需要那些插件支持
-
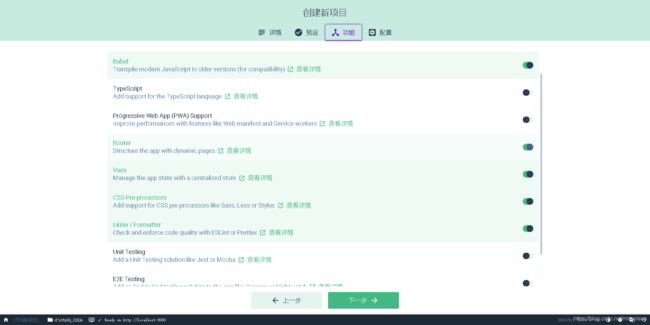
- 3.4.1 各个插件的功能
- 3.4.2 界面
- 3.5 配置
-
- 3.5.1 创建项目
- 3.5.2
- 4、新项目窗口
-
- 4.1 项目各文件介绍
- 4.2 各个修改添加文件详细:
- 4.3、运行项目
- 5、路由
-
- 5.1 动态路由
- 5.2 嵌套路由
- 5.3 命名路由
- 参考网址:
1、安装nodejs
2、查看版本号:
- 进入cmd命令行执行 node -v 和 npm -v 分别查看node和npm的版本号:
node -v
npm -v
-
2.1配置npm在安装全局模块时的路径和缓存cache的路径(可选操作)
//D:\nodejs为nodejs安装目录
npm config set prefix "D:\Program Files\nodejs\node_global"
npm config set cache "D:\Program Files\nodejs\node_cache"
//修改完成后输入npm config ls查看修改信息
-
2.2、npm常用命令
-
2.2.1、安装
# 全局安装
npm install 模块名 -g
# 本地安装
npm install 模块名
# 一次性安装多个
npm install 模块名 模块名
# 安装开发时依赖包
npm install 模块名 --save-dev
# 安装运行时依赖包
npm install 模块名 --save
-
2.2.2、npm更新、卸载
- 查看帮助命令
npm help
- 检查包是否已经过时
npm outdated
- 更新node模块
npm update 模块名
npm update 模块名 @版本号 更新到指定版本
npm update 模块名 @latest
- 卸载node模块
npm uninstall 模块名
-
2.2.3、npm查看命令
- 清除缓存
npm cache clean --force  //清除缓存
- 查看某个包对于各种包的依赖关系
npm view 模块名 dependencies
- 查看包的源文件地址
npm view 模块名 repository.url
- 查看当前模块依赖的node最低版本号
npm view 模块名 engines
- 查看模块的当前版本号
npm view 模块名 version
- 查看模块的历史版本和当前版本
npm view 模块名 versions
- 查看一个模块的所有信息
npm view 模块名
- 查看当前已经安装的模块
npm list
npm list --depth=0  //限制输入的模块层级
npm list 模块名
- 查看全局的包的安装路径
npm root -g
-
2.2.3、其他
- 更改包内容后进行重建
npm rebuild 模块名
- 访问package.json的字段文档
npm help json
- 查看某个模块的bugs列表界面
npm bugs 模块名
- 打开某个模块的仓库界面
npm repo 模块名
- 打开某个模块的文档
npm docs 模块名
- 打开某个模块的主页
npm home 模块名
- 清除未被使用到的模块
npm prune
3、安装@vue/cli
关于旧版本
Vue CLI 的包名称由 vue-cli 改成了 @vue/cli。 如果你已经全局
安装了旧版本的 vue-cli (1.x 或 2.x),你需要先通过 npm uninstall
vue-cli -g 或 yarn global remove vue-cli 卸载它。
npm install -g @vue/cli
# OR
yarn global add @vue/cli  //前提安装了yarn
-
遇到的问题:
- 在使用命令
npm install -g @vue/cli安装vue-cli时一直报错,运行以下命令以后再运行安装命令,问题解决。
npm config set registry http://registry.npm.taobao.org/
- 在使用命令
- 你还可以用这个命令来检查其版本是否正确 (3.x):
vue --version
-
3.1 使用
vue ui来创建项目
PS C:\WINDOWS\system32> vue ui
?  Starting GUI...
?  Ready on http://localhost:8000
-
3.2初始界面
-
3.3创建新的项目
-
3.4 手动选着需要那些插件支持
-
3.4.1 各个插件的功能
babel:会将es6789的es代码转换成es3、5等低一级的浏览器能够支持的形式  				--->需要
pwa:渐进式移动应用															--->不需要
router:路由  																--->需要
vuex:官方的状态管理工具  													--->需要
css pre-processors:css预处理器,如果习惯使用css预处理器则勾选					--->需要
linter / formatter :会在编译器为我们做一些代码的检测,如编写风格和一些低级的错误	--->需要
unit testing:单元测试														--->不需要
use config files :使用配置文件												--->需要
-
3.4.2 界面
-
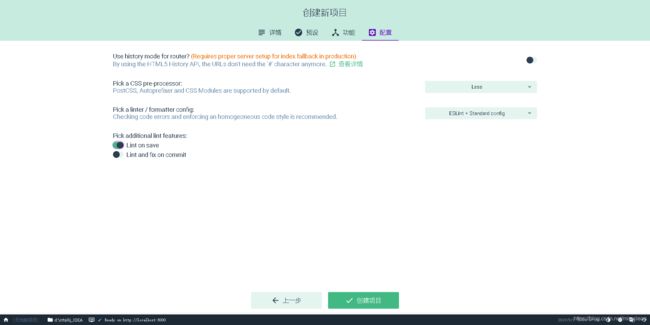
3.5 配置
选择要用的css预处理器 								---> LESS
选择eslint风格 										---> eslint + standard config
保存检测代码											---> 需要
提交检测代码											---> 不需要
-
3.5.1 创建项目
-
3.5.2
PS C:\WINDOWS\system32> vue --version
3.11.0
PS C:\WINDOWS\system32> vue ui
?  Starting GUI...
?  Ready on http://localhost:8000
✨  Creating project in d:\intellij_IDEA\vue-cource.
?  Initializing git repository...
⚓  Running completion hooks...
?  Generating README.md...
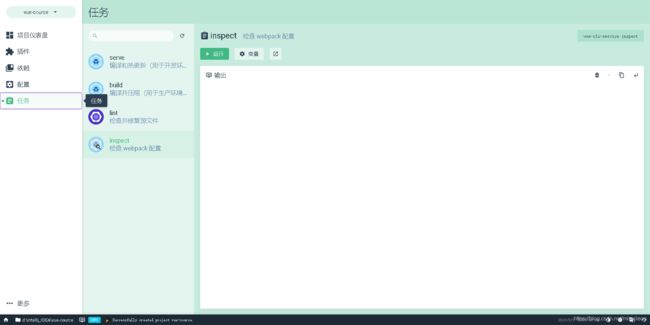
4、新项目窗口
1、插件栏
2、配置栏
3、项目任务:
	1)server:开发运行的环境
	2)build:打包编译项目
	3)lint:检查并修复文件
	4)inspect:用于检查webpack配置
-
4.1 项目各文件介绍
vue.config.js : lintOnSave : 取消每次保存时的检测

package.json : 定义了项目的一些描述,如项目的版本(version)、名称(name)、项目运行的一些脚本(scripts)、
项目中的一些依赖:打包阶段需要的依赖(dependencies)、开发阶段需要用到的依赖(devDependencies)

babel.config : babel的配置文件

.postcssrc : css自动补充一些兼容性代码的配置文件

.gitignore : git提交的忽略文件

.eslintrc.js : 用来配置eslint规则的配置文件、在rules中去修改添加

public : 里面放的是公共文件
	index.html : 里面是模板文件、webpack在运行打包我们的项目时会使用这个个文件作为模板去生成项目
最后的index.html。
	favicon.ico : 在标签栏中看见的小图标

src : 项目的主文件 :
	assets : 用来放置静态资源、如图片、图标、字体文件
	components : 组建文件夹、从代码中抽离出一些可以复用的逻辑、便于复用
	views : 页面所在
	App.vue : 基础组件
	main.js : 项目入口文件、项目在开发、编译、运行时都会以这个目录作为起始点进入,在里面引入以及编译
	router.js : 路由文件
	store.js : 状态管理文件


补充的文件 :
.editconfig : 配置一些编写的使用习惯
root = true   // 首先让它生效
[*]  // 对所有文件都有效
charset = utf-8  // 编码设置为utf-8
indent_style = tabs  // 使用tabs缩进
indent_size = 2 // 缩进的尺寸

src :
	api :
	assets :
		img :
		font :
	config :
		index.js : 在其他处引用方法(书写./config会自动去找其中的index.js):import config from './config'
			export default{
       }
	directive :
		index.js : 用来存放vue自定义指令
	lib :
		util.js : 与业务结合的工具方法放在此处
		tool.js : 与业务无关的工具方法
	router : 只有一个router.js、在编写路由拦截等其他路由设置时会很复杂,需要一个文件夹将其分开编写
		router.js : 将其挪入路由文件夹中
		index.js : 路由列表的索引文件,使用es6的模块化系统,将其他路由模块化,导入该文件
	store :
		index.js : 将store.js更名为index.js。将其他js引入该文件
		state.js :
		mutations.js :
		action.js :
		module : 里面放板块
			user.js : 与用户相关的用户名、用户信息
	main.js : 对main.js进行修改,修改router和store的起始文件为index.js
	mock : 请求模拟,返回一些模拟数据
		index.js : 使用npm install mockjs -D安装mockjs,会在package.json里面devDependencies
		中增加一行"mockjs": "^1.0.1-beta3"
	views :
		argu.vue :
import Vue from 'vue'
import Vuex from 'vuex'
import state from './state'
import mutations from './mutations'
import actions from './actions'
import user from './modele/user'

Vue.use(Vuex)

export default new Vuex.Store({

  state: state,
  mutations: mutations,
  actions: actions,
  modules: {

    user
  }
})
- user.js
const state = {

  //
}

const mutations = {

  //
}

const actions = {

  //
}

export default {

  state,
  mutations,
  actions
}
- mock.index.js:
import Mock from 'mockjs'
//
export default Mock
- vue.config.js
// 先引入path的node模块
const path = require('path')
const resolve = dir => {

  return path.join(__dirname, dir)
}

// 如果当前是要打包编译了还是只是开发环境。'/'代表指定到根目录下。
const BASE_URL = process.env.NODE_ENV === 'procution' ? '/iview-admin/' : '/'

module.exports = {

  lintOnSave: false,
  baseUrl: BASE_URL,
  // 颗粒化去配置webpack
  chainWebpack: config => {

    // 链式调用
    config.resolve.alias
      .set('@', resolve('src')) // 设置简写,用@代替src的过程,如引入api直接写@api
      .set('_c', resolve('src/components'))
  },
  // 在打包时不生成.map文件
  productionSourceMap: false,
  // 会告诉开发服务器将所有没有匹配到静态文件的请求都代理到以下url
  devServer: {

    proxy: 'http://localhost:4000'
  }
}
-
4.3、运行项目
npm run serve
run npm run build    // To create a production build
5、路由
- router/router.js :
import Home from '@/views/Home'

export default [
  {

    path: '/',
    // 定义别名
    alias: '/home_page',
    name: 'home',
    component: Home
  },
  {

    path: '/about',
    name: 'about',
    // route level code-splitting
    // this generates a separate chunk (about.[hash].js) for this route
    // which is lazy-loaded when the route is visited.
    // 懒加载
    component: () => import(/* webpackChunkName: "about" */ '@/views/About.vue')
  },
  {

    // 动态路由参数,不管参数是什么,匹配到的都是这个路由对象
    path: '/argu/:name',
    name: 'argu',
    // 参数
    params: {

      name: 'lison'
    },
    component: () => import('@/views/argu.vue'),
    // true表示里面的参数,它会使用router的params作为组建的属性,此时params中
    // 有一个name('/argu/:name'),它就会把name传入argu的属性里
    props: true
  },
  // 嵌套路由
  {

    path: '/parent',
    name: 'parent',
    component: () => import('@/views/parent.vue'),
    // children代表着嵌套在parent里面的子集页面,路径不用写斜线,作为子集会自动补全
    children: [
      {

        path: 'child',
        component: () => import('@/views/child.vue')
      }
    ]
  },
  {

    path: '/named_view',
    // 注意有个s
    components: {

      // 没有命名则加载default
      default: () => import('@/views/child.vue'),
      email: () => import('@/views/email.vue'),
      tel: () => import('@/views/tel.vue')
    }
  },
  // 重定向路由
  {

    path: '/main',
    // redirect: '/'
    // redirect: to => {

    //   console.log(to)
    // }
    // redirect: 'home'
    // redirect: to => {

    //   return {

    //     name: 'home'
    //   }
    // }
    redirect: to => {

      return '/'
    }
  }
]
- App.vue
<!--一个示例,即运行vue时的页面-->
<template>
  <div id="app">
    <div id="nav">
      <!--封装了一个a标签,里面有一个重要属性:to,它指定的值是一个路径-->
      <router-link v-bind:to="{name: 'home'}">Home</router-link> |
      <!--命名路由,可以通过指定name来跳转到相应界面-->
      <router-link v-bind:to="{name: 'about'}">About</router-link>
    </div>
    <!--是一个视图渲染组件-->
    <router-view/>
    <!--命名视图-->
    <router-view name="email"/>
    <router-view name="tel"/>
  </div>
</template>

<style lang="less">
#app {

  font-family: 'Avenir', Helvetica, Arial, sans-serif;
  -webkit-font-smoothing: antialiased;
  -moz-osx-font-smoothing: grayscale;
  text-align: center;
  color: #2c3e50;
}
#nav {

  padding: 30px;
  a {

    font-weight: bold;
    color: #2c3e50;
    &.router-link-exact-active {

      color: #42b983;
    }
  }
}
</style>
-
5.1 动态路由
- views/argu.vue :
<template>
  <div>
    <!--$route代表当前加载的路由对象,包含params参数,它是一个对象,里面包含一个叫做name的值-->
    {
     {
      $route.params.name }}
  </div>
</template>

<script>
  export default {

    //

  }
</script>
访问页面 :http://localhost:8080/#/argu/sun

-
5.2 嵌套路由
- views/child.vue :
<template>
    <div>
      i am child
    </div>
</template>

<script></script>

<style scoped></style>
- views/parent.vue :
i am parent
访问页面 :http://localhost:8080/#/parent/child

-
5.3 命名路由
- 将home和about通过命名路由来指定跳转
- App.vue :
<!--一个示例,即运行vue时的页面-->
<template>
  <div id="app">
    <div id="nav">
      <!--封装了一个a标签,里面有一个重要属性:to,它指定的值是一个路径-->
      <router-link v-bind:to="{name: 'home'}">Home</router-link> |
      <!--命名路由,可以通过指定name来跳转到相应界面-->
      <router-link v-bind:to="{name: 'about'}">About</router-link>
    </div>
    <!--是一个视图渲染组件-->
    <router-view/>
  </div>
</template>
访问网页 : http://localhost:8080/#/
参考网址:
https://www.jianshu.com/p/d6de1662a2c2
